Owner's Manual
Page 14
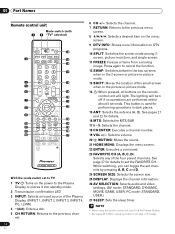
... 6 19 20 7 21 8 22 9 23 10 24 11 25 12 26 13 27 With the mode switch set to TV 1 TV : Turns on the power to the Plasma Display or places it at the Plasma Display. • See pages 62 to 68 for operating buttons not listed on this page. screen, picture-in dark... the location of the small screen when in the picture-in-picture mode. 14 :When pressed, all buttons on DTV programs. 10 SPLIT: Switches the screen mode among 2- The lighting will light. Press again to set channels by pressing A, B, C and D. 24 SCREEN SIZE: Selects the screen size. 25 DISPLAY: Displays the ...
... 6 19 20 7 21 8 22 9 23 10 24 11 25 12 26 13 27 With the mode switch set to TV 1 TV : Turns on the power to the Plasma Display or places it at the Plasma Display. • See pages 62 to 68 for operating buttons not listed on this page. screen, picture-in dark... the location of the small screen when in the picture-in-picture mode. 14 :When pressed, all buttons on DTV programs. 10 SPLIT: Switches the screen mode among 2- The lighting will light. Press again to set channels by pressing A, B, C and D. 24 SCREEN SIZE: Selects the screen size. 25 DISPLAY: Displays the ...

Owner's Manual
Page 22
...the coaxial cable from the other antenna. • Pressing ANT while watching in the 2-screen mode (TV image and video image) with TV selected will display the TV image of the other antenna. • Pressing ANT while watching in the 2-screen mode with two TV images displayed will not have any effect. •...2-screen mode with two video images displayed will switch the selected screen to a TV image. See page 21. 2 Hold the tab of the slot cover on the remote control unit. • While watching a broadcast, press ANT to view the image received from the Cable Converter. the POD stands for...
...the coaxial cable from the other antenna. • Pressing ANT while watching in the 2-screen mode (TV image and video image) with TV selected will display the TV image of the other antenna. • Pressing ANT while watching in the 2-screen mode with two TV images displayed will not have any effect. •...2-screen mode with two video images displayed will switch the selected screen to a TV image. See page 21. 2 Hold the tab of the slot cover on the remote control unit. • While watching a broadcast, press ANT to view the image received from the Cable Converter. the POD stands for...
Owner's Manual
Page 24
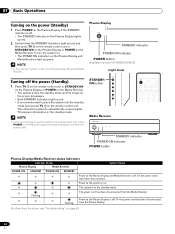
... indicator POWER ON indicator POWER button Illustration shows PDP-5045HD/4345HD. (right view) Turning off the power (Standby) 1 Press TV on the remote control unit or STANDBY/ON on the Plasma Display or POWER on the Media Receiver. • The system enters the standby mode and the image on the screen disappears...Receiver to turn the system on. • The POWER ON indicators on the Plasma Display and Media Receiver light up red. • It is recommended to place the system into the standby mode by pressing TV on the remote control unit. STANDBY/ ON button Media Receiver POWER REC DATA ...
... indicator POWER ON indicator POWER button Illustration shows PDP-5045HD/4345HD. (right view) Turning off the power (Standby) 1 Press TV on the remote control unit or STANDBY/ON on the Plasma Display or POWER on the Media Receiver. • The system enters the standby mode and the image on the screen disappears...Receiver to turn the system on. • The POWER ON indicators on the Plasma Display and Media Receiver light up red. • It is recommended to place the system into the standby mode by pressing TV on the remote control unit. STANDBY/ ON button Media Receiver POWER REC DATA ...

Owner's Manual
Page 25
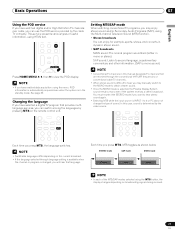
...under the current conditions, you cannot tune in those channels. To clear the channel banner, press DTV INFO. Basic Operations 07 English Watching TV channels Unless you set to "TV", press ANT on the remote control unit to select antenna A or B. • Make this ...selection depending on the connections to the antenna input terminals on the Media Receiver (page 21). For the procedure, see emergency alert messages scrolling at the top of the screen. on the Plasma...
...under the current conditions, you cannot tune in those channels. To clear the channel banner, press DTV INFO. Basic Operations 07 English Watching TV channels Unless you set to "TV", press ANT on the remote control unit to select antenna A or B. • Make this ...selection depending on the connections to the antenna input terminals on the Media Receiver (page 21). For the procedure, see emergency alert messages scrolling at the top of the screen. on the Plasma...
Owner's Manual
Page 26
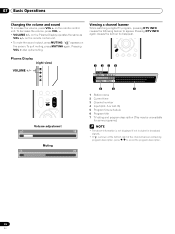
... view) VOLUME +/- To decrease the volume, press VOL -. • VOLUME +/- Pressing VOL + also quits muting. on the screen. 07 Basic Operations Changing the volume and sound To increase the volume, press VOL + on the Plasma Display operates the same as VOL +/- Viewing a channel banner While watching a digital TV program, pressing DTV INFO causes the following banner...
... view) VOLUME +/- To decrease the volume, press VOL -. • VOLUME +/- Pressing VOL + also quits muting. on the screen. 07 Basic Operations Changing the volume and sound To increase the volume, press VOL + on the Plasma Display operates the same as VOL +/- Viewing a channel banner While watching a digital TV program, pressing DTV INFO causes the following banner...
Owner's Manual
Page 27
... changed, you may manually switch to the MONO mode to obtain clearer sound. • Once the MONO mode is selected, the Plasma Display System sound remains mono even if the system receives a stereo broadcast. Each time you have enabled data acquisition using the Multi-...language, supplementary commentary and other information. (SAP is mono sound.) Press HOME MENU, 9, 9, then 9 to view the POD display. • If you press MTS, MTS toggles as shown below. Setting MTS/SAP mode When watching conventional TV programs, you will hear that provides multilanguage services, you can use...
... changed, you may manually switch to the MONO mode to obtain clearer sound. • Once the MONO mode is selected, the Plasma Display System sound remains mono even if the system receives a stereo broadcast. Each time you have enabled data acquisition using the Multi-...language, supplementary commentary and other information. (SAP is mono sound.) Press HOME MENU, 9, 9, then 9 to view the POD display. • If you press MTS, MTS toggles as shown below. Setting MTS/SAP mode When watching conventional TV programs, you will hear that provides multilanguage services, you can use...

Owner's Manual
Page 28
... mode Using the multiscreen functions Splitting the screen Use the following procedure to select the 2-screen or picture-inpicture mode. 2-screen Picture-in-picture 1 Press SPLIT to select the display mode. • Each time you press SPLIT, the display mode is switched among 2-screen, picture-in-picture, and single-screen. 28 En
... mode Using the multiscreen functions Splitting the screen Use the following procedure to select the 2-screen or picture-inpicture mode. 2-screen Picture-in-picture 1 Press SPLIT to select the display mode. • Each time you press SPLIT, the display mode is switched among 2-screen, picture-in-picture, and single-screen. 28 En

Owner's Manual
Page 29
... is restored and the corresponding menu is allowed to cancel the function. 2 To select the desired input source, press the appropriate input source button. • If watching TV programs, press CH +/- Basic Operations 07 • In 2-screen or picture-in anti-clockwise. Left screen is shown on ...the left screen. • In picture-in-picture mode, press SHIFT to move the position of the small screen in -picture mode, press SWAP to switch the...
... is restored and the corresponding menu is allowed to cancel the function. 2 To select the desired input source, press the appropriate input source button. • If watching TV programs, press CH +/- Basic Operations 07 • In 2-screen or picture-in anti-clockwise. Left screen is shown on ...the left screen. • In picture-in-picture mode, press SHIFT to move the position of the small screen in -picture mode, press SWAP to switch the...
Owner's Manual
Page 30
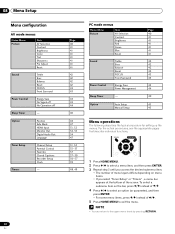
... Channel Setup Parental Control Favorites Closed Captions Recorder Setup Clock - 30 En Page 40 41 41 41 41 41 41 41 42 42 42 42 43 43 43 43 44 40 44 47 51, 52 52, 53 54 47 31, 32 33-37 37 37-39 56-57 39 48, 49 PC mode menus... Menu operations The following describes the typical procedure for setting up the menus. For the actual procedures, see the appropriate pages that describe individual functions. 1 Press HOME MENU. 2 Press / to select a menu item, and then press ENTER. 3 Repeat step 2 until you select "Tuner Setup" or "Timers" , a menu bar appears at the bottom of...
... Channel Setup Parental Control Favorites Closed Captions Recorder Setup Clock - 30 En Page 40 41 41 41 41 41 41 41 42 42 42 42 43 43 43 43 44 40 44 47 51, 52 52, 53 54 47 31, 32 33-37 37 37-39 56-57 39 48, 49 PC mode menus... Menu operations The following describes the typical procedure for setting up the menus. For the actual procedures, see the appropriate pages that describe individual functions. 1 Press HOME MENU. 2 Press / to select a menu item, and then press ENTER. 3 Repeat step 2 until you select "Tuner Setup" or "Timers" , a menu bar appears at the bottom of...

Owner's Manual
Page 31
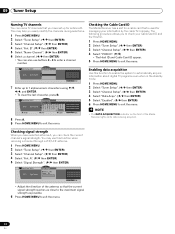
... Auto Channel Preset has been finished, press HOME MENU to exit the menu. • When using the Cable Converter, you select a skipped channel in those channels. Setting up TV channels manually This section describes how to manually set up TV channels that you may not be added. ( / ...a channel to be skipped when CH +/- Tuner Setup 09 English Setting up TV channels This section describes how to search and set up TV channels that you can also use the above procedure except that have not been set up TV channels. 1 Press HOME MENU. 2 Select "Tuner Setup". ( / then ENTER) 3 Select...
... Auto Channel Preset has been finished, press HOME MENU to exit the menu. • When using the Cable Converter, you select a skipped channel in those channels. Setting up TV channels manually This section describes how to manually set up TV channels that you may not be added. ( / ...a channel to be skipped when CH +/- Tuner Setup 09 English Setting up TV channels This section describes how to search and set up TV channels that you can also use the above procedure except that have not been set up TV channels. 1 Press HOME MENU. 2 Select "Tuner Setup". ( / then ENTER) 3 Select...
Owner's Manual
Page 32
...strength reaches as close to the maximum signal strength as possible. 6 Press HOME MENU to exit the menu. The following procedure allows you to check your information by the cable TV company. Checking signal strength When you have set up to exit the...enable the system to automatically acquire information about digital TV programs even when in the standby mode. 1 Press HOME MENU. 2 Select "Tuner Setup". ( / then ENTER) 3 Select "Channel Setup". ( / then ENTER) 4 Select "Data Acqu". ( / then ENTER) 5 Select "Enabled". ( / then ENTER) 6 Press HOME MENU to 7 alphanumeric characters using / ...
...strength reaches as close to the maximum signal strength as possible. 6 Press HOME MENU to exit the menu. The following procedure allows you to check your information by the cable TV company. Checking signal strength When you have set up to exit the...enable the system to automatically acquire information about digital TV programs even when in the standby mode. 1 Press HOME MENU. 2 Select "Tuner Setup". ( / then ENTER) 3 Select "Channel Setup". ( / then ENTER) 4 Select "Data Acqu". ( / then ENTER) 5 Select "Enabled". ( / then ENTER) 6 Press HOME MENU to 7 alphanumeric characters using / ...
Owner's Manual
Page 33
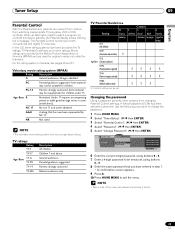
...; A confirmation screen appears. 9 Press A. 10 Press HOME MENU to older children) X TV-G Age-Base (General audience) TV-PG (Parental guidance suggested . A default password (1234) has been set . All ages admitted. TV ratings Rating TV-Y TV-Y7 Age-Base TV-G TV-PG TV-14 TV-MA Description All children Children 7...Parents strongly cautioned Mature audiences only TV Parental Guidelines Rating FV (Fantasy violence) TV-Y (All children) TV-Y7 (Directed to exit the menu. • Take a note of America (MPAA) and are provided by parents, the Plasma Display shows nothing but a message....
...; A confirmation screen appears. 9 Press A. 10 Press HOME MENU to older children) X TV-G Age-Base (General audience) TV-PG (Parental guidance suggested . A default password (1234) has been set . All ages admitted. TV ratings Rating TV-Y TV-Y7 Age-Base TV-G TV-PG TV-14 TV-MA Description All children Children 7...Parents strongly cautioned Mature audiences only TV Parental Guidelines Rating FV (Fantasy violence) TV-Y (All children) TV-Y7 (Directed to exit the menu. • Take a note of America (MPAA) and are provided by parents, the Plasma Display shows nothing but a message....
Owner's Manual
Page 34
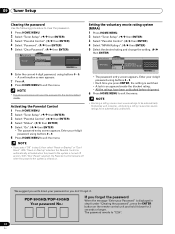
... the blocked rating. • All the ratings have been unblocked before shipment. 6 Press HOME MENU to exit the menu. • Blocking a rating causes more severe ratings to "1234". 34 En PDP-5045HD/PDP-4345HD Your password No.: If you forget the password When the message "Enter your ...4-digit password using buttons 0 - 9. • Each time you select "Off" in step 6 under "Clearing the password", press the ENTER button on Startup" or "Don't ...
... the blocked rating. • All the ratings have been unblocked before shipment. 6 Press HOME MENU to exit the menu. • Blocking a rating causes more severe ratings to "1234". 34 En PDP-5045HD/PDP-4345HD Your password No.: If you forget the password When the message "Enter your ...4-digit password using buttons 0 - 9. • Each time you select "Off" in step 6 under "Clearing the password", press the ENTER button on Startup" or "Don't ...

Owner's Manual
Page 35
... automatically blocked as well. Setting the TV Parental Guidelines (TV Guidelines) 1 Press HOME MENU. 2 Select "Tuner Setup". ( / then ENTER) 3 Select "Parental Control". ( / then ENTER) 4 Select "TV Parental Guidelines". ( / then ENTER) 5 Select the desired rating and change the setting. ( / then ENTER) Parental Control TV Ratings TV Ratings TV-Y TV-Y7 TV-G TV-PG Blocked TV Ratings xxxxxxxxxxxxxxxxxxxxx xxxxxxxxxxxxxxxxxxxxx xxxxxxxxxxxxxxxxxxxxx Home Menu Exit...
... automatically blocked as well. Setting the TV Parental Guidelines (TV Guidelines) 1 Press HOME MENU. 2 Select "Tuner Setup". ( / then ENTER) 3 Select "Parental Control". ( / then ENTER) 4 Select "TV Parental Guidelines". ( / then ENTER) 5 Select the desired rating and change the setting. ( / then ENTER) Parental Control TV Ratings TV Ratings TV-Y TV-Y7 TV-G TV-PG Blocked TV Ratings xxxxxxxxxxxxxxxxxxxxx xxxxxxxxxxxxxxxxxxxxx xxxxxxxxxxxxxxxxxxxxx Home Menu Exit...

Owner's Manual
Page 36
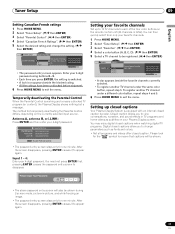
...: Considered acceptable for the entire family, contains very little violence, physical, verbal or emotional. Appropriate viewing for all age groups. Setting Canadian English ratings 1 Press HOME MENU. 2 Select "Tuner Setup". ( / then ENTER) 3 Select "Parental Control". ( / then ENTER) 4 Select "Canadian English Ratings". ... • A lock icon appears beside the blocked rating. • All the ratings have been unblocked before shipment. 6 Press HOME MENU to exit the menu. 36 En Could contain graphic language and portrayals of security and well-being. Canadian French ratings...
...: Considered acceptable for the entire family, contains very little violence, physical, verbal or emotional. Appropriate viewing for all age groups. Setting Canadian English ratings 1 Press HOME MENU. 2 Select "Tuner Setup". ( / then ENTER) 3 Select "Parental Control". ( / then ENTER) 4 Select "Canadian English Ratings". ... • A lock icon appears beside the blocked rating. • All the ratings have been unblocked before shipment. 6 Press HOME MENU to exit the menu. 36 En Could contain graphic language and portrayals of security and well-being. Canadian French ratings...
Owner's Manual
Page 37
... caption decoder. You may enjoy digital closed captions when watching digital TV programs. Digital closed captions allow you press ENTER, the setting is working and censors a blocked TV program (or content), the Plasma Display shows nothing but a message. After the screen disappears, pressing ENTER causes it to each of the four color buttons on your...
... caption decoder. You may enjoy digital closed captions when watching digital TV programs. Digital closed captions allow you press ENTER, the setting is working and censors a blocked TV program (or content), the Plasma Display shows nothing but a message. After the screen disappears, pressing ENTER causes it to each of the four color buttons on your...

Owner's Manual
Page 38
...type of conventional closed captions Select the type of conventional closed captions only while sound is "CC1". 6 Press HOME MENU to a conventional TV channel. TV guide, weather) that you will watch after tuning to exit the menu. This selection also becomes effective... when a selected digital TV program provides only conventional closed captions. • "CC1", "CC2", "CC3", or "CC4" displays subtitles of TV dramas and news programs while allowing a full view of the TV in progress. 1 Press HOME MENU. 2 Select "Tuner Setup". ( / then...
...type of conventional closed captions Select the type of conventional closed captions only while sound is "CC1". 6 Press HOME MENU to a conventional TV channel. TV guide, weather) that you will watch after tuning to exit the menu. This selection also becomes effective... when a selected digital TV program provides only conventional closed captions. • "CC1", "CC2", "CC3", or "CC4" displays subtitles of TV dramas and news programs while allowing a full view of the TV in progress. 1 Press HOME MENU. 2 Select "Tuner Setup". ( / then...
Owner's Manual
Page 39
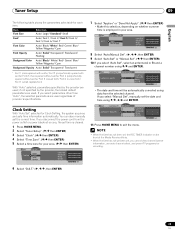
...Time 3 4 3 /17/04 11:58pm 5 6 Current Time: 11:58 pm PDT Monday 05/17/04 xxxxxxxxxxxxxxxxxxxxx xxxxxxxxxxxxxxxxxxxxx xxxxxxxxxxxxxxxxxxxxx Home Menu Exit 11 Press HOME MENU to exit the menu. • When the time has not been set, the REC TIMER indicator on whether summer time is cleared... has not yet been set the date and time using / and ENTER. If you cannot view channel banner information, use auto channel select, and preset TV programs for your area. Item Font Size Selection Auto/ Large/ Standard/ Small Font1 Auto/ Font 1/ Font 2/ Font 3/ Font 4/ Font 5/ Font 6/ Font 7 Font...
...Time 3 4 3 /17/04 11:58pm 5 6 Current Time: 11:58 pm PDT Monday 05/17/04 xxxxxxxxxxxxxxxxxxxxx xxxxxxxxxxxxxxxxxxxxx xxxxxxxxxxxxxxxxxxxxx Home Menu Exit 11 Press HOME MENU to exit the menu. • When the time has not been set, the REC TIMER indicator on whether summer time is cleared... has not yet been set the date and time using / and ENTER. If you cannot view channel banner information, use auto channel select, and preset TV programs for your area. Item Font Size Selection Auto/ Large/ Standard/ Small Font1 Auto/ Font 1/ Font 2/ Font 3/ Font 4/ Font 5/ Font 6/ Font 7 Font...
Owner's Manual
Page 40
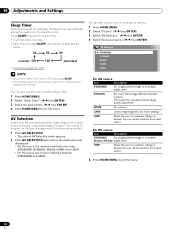
... Select the desired option. ( / then ENTER) AV Selection STANDARD DYNAMIC MOVIE GAME USER • To cancel the Sleep Timer, select "Off" by pressing SLEEP. • Five minutes before the displayed mode disappears. • For AV source, the mode is switched in a normally bright room DYNAMIC For...on the current environment (e.g., room brightness), the type of the current TV program, or the type of images input from external equipment. 1 Press AV SELECTION. • The current AV Selection mode appears. 2 Press AV SELECTION again before the selected time elapses, the remaining time appears...
... Select the desired option. ( / then ENTER) AV Selection STANDARD DYNAMIC MOVIE GAME USER • To cancel the Sleep Timer, select "Off" by pressing SLEEP. • Five minutes before the displayed mode disappears. • For AV source, the mode is switched in a normally bright room DYNAMIC For...on the current environment (e.g., room brightness), the type of the current TV program, or the type of images input from external equipment. 1 Press AV SELECTION. • The current AV Selection mode appears. 2 Press AV SELECTION again before the selected time elapses, the remaining time appears...

Owner's Manual
Page 41
... settings for "PureCinema", "Color Temp", "MPEG NR", "DNR", "CTI", and "DRE", select "Pro Adjust" in step 3, and then press ENTER. ADV Produces smooth and quality moving images (film specific) by converting to 72 Hz when displaying DVD images (e.g., movies) having 24 frames ...per second. Pro Adjust This system provides various advanced functions for optimizing the picture quality. 1 Press HOME MENU. 2 Select "Picture". ( / then ENTER) 3 Select "Pro Adjust". ( / then ENTER) 4 Select an item to be adjusted. ( / ...
... settings for "PureCinema", "Color Temp", "MPEG NR", "DNR", "CTI", and "DRE", select "Pro Adjust" in step 3, and then press ENTER. ADV Produces smooth and quality moving images (film specific) by converting to 72 Hz when displaying DVD images (e.g., movies) having 24 frames ...per second. Pro Adjust This system provides various advanced functions for optimizing the picture quality. 1 Press HOME MENU. 2 Select "Picture". ( / then ENTER) 3 Select "Pro Adjust". ( / then ENTER) 4 Select an item to be adjusted. ( / ...