Owner's Manual
Page 3
... the Included Stand ...16 2.2.2 Connect the Speaker Cables ...22 2.3 Wall/Ceiling Mounting...23 2.4 Mount the Flat Panel TV ...24 2.5 Attach the Color Sensor ...26 2.6 Connect to Broadcast TV & Other Devices (DVR, Receiver, BDR, etc 29 2.6.1 Add Analog (conventional) and Digital TV Channels 29 2.6.2 Connect Your Other Pioneer Equipment...29 2.6.3 Connect the Power Cord to learn about the...
... the Included Stand ...16 2.2.2 Connect the Speaker Cables ...22 2.3 Wall/Ceiling Mounting...23 2.4 Mount the Flat Panel TV ...24 2.5 Attach the Color Sensor ...26 2.6 Connect to Broadcast TV & Other Devices (DVR, Receiver, BDR, etc 29 2.6.1 Add Analog (conventional) and Digital TV Channels 29 2.6.2 Connect Your Other Pioneer Equipment...29 2.6.3 Connect the Power Cord to learn about the...
Owner's Manual
Page 23
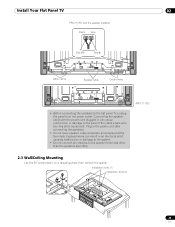
...equipment. Exposed wires can cause malfunction or damage to the panel if the cable's bare wire touches other than the speakers specified. (PRO-111FD) 2.3 Wall/Ceiling Mounting Lay the 50" panel down on a raised surface then remove the stand. Installation bolts (1) Installation bolts (2) 23 En Connecting ...61483; Cable clamp Speaker cable Cable clamp • Before connecting the speakers to the flat panel TV, unplug the panel from the power outlet. Install Your Flat Panel TV 02 PRO-151FD with the power cord plugged in can result in the power cord after connecting the speakers. &#...
...equipment. Exposed wires can cause malfunction or damage to the panel if the cable's bare wire touches other than the speakers specified. (PRO-111FD) 2.3 Wall/Ceiling Mounting Lay the 50" panel down on a raised surface then remove the stand. Installation bolts (1) Installation bolts (2) 23 En Connecting ...61483; Cable clamp Speaker cable Cable clamp • Before connecting the speakers to the flat panel TV, unplug the panel from the power outlet. Install Your Flat Panel TV 02 PRO-151FD with the power cord plugged in can result in the power cord after connecting the speakers. &#...
Owner's Manual
Page 24
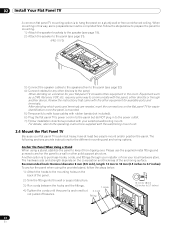
...through your installer or from tipping over. Please use the supplied metal fittings and screws to anchor the panel to the mounting holes on the flat panel TV for your selected wall/ceiling mount. Recommended hook: Nominal diameter 8 mm (3/8 inch), length 12 mm to 18 mm (0.5 inches to 0.7 inches) To...see page 19). 2 ) Attach the speaker to the panel (see page 21). (PRO-111FD) 3 ) Connect the speaker cables to the speakers then to the panel (see page 22). 4 ) Connect cables for the different mounting and anchoring options. Another option is anchored but do NOT plug in to 0.7 inches)...
...through your installer or from tipping over. Please use the supplied metal fittings and screws to anchor the panel to the mounting holes on the flat panel TV for your selected wall/ceiling mount. Recommended hook: Nominal diameter 8 mm (3/8 inch), length 12 mm to 18 mm (0.5 inches to 0.7 inches) To...see page 19). 2 ) Attach the speaker to the panel (see page 21). (PRO-111FD) 3 ) Connect the speaker cables to the speakers then to the panel (see page 22). 4 ) Connect cables for the different mounting and anchoring options. Another option is anchored but do NOT plug in to 0.7 inches)...

Owner's Manual
Page 32
... a total of four holes to attach cable clamps to the back of the plasma as well as necessary. T T W W 2.7 Route then Bundle the Power Cord and Cables Once the flat panel TV is mounted and the speaker is properly grounded. To keep cables organized and neat, use the ...the power cord. The cord includes a noise filter that works for a long period, unplug the panel from the wall outlet. The diagram below shows a bundled speaker cable. (PRO-151FD) Speaker cable Cable clamp Bundle cables in a logical pattern that reduces electrical interference from the power outlet. Unplugging ...
... a total of four holes to attach cable clamps to the back of the plasma as well as necessary. T T W W 2.7 Route then Bundle the Power Cord and Cables Once the flat panel TV is mounted and the speaker is properly grounded. To keep cables organized and neat, use the ...the power cord. The cord includes a noise filter that works for a long period, unplug the panel from the wall outlet. The diagram below shows a bundled speaker cable. (PRO-151FD) Speaker cable Cable clamp Bundle cables in a logical pattern that reduces electrical interference from the power outlet. Unplugging ...
Owner's Manual
Page 131
...information carefully. To enjoy bright and beautiful pictures for many years to clean dusty vents. • Distance the panel from the wall, other companies, inadequate installation sites, poor stabilization practices, erroneous installation methods, operational mistakes, site remodeling, or natural disasters. Cautions ...in a possible malfunction. To keep your Pioneer flat panel TV, read the following guidelines. • Set the flat panel TV to rise and could block the panel vents. • Use a proper mount or stand rather than the Pioneer stand or installation bracket may form on ...
...information carefully. To enjoy bright and beautiful pictures for many years to clean dusty vents. • Distance the panel from the wall, other companies, inadequate installation sites, poor stabilization practices, erroneous installation methods, operational mistakes, site remodeling, or natural disasters. Cautions ...in a possible malfunction. To keep your Pioneer flat panel TV, read the following guidelines. • Set the flat panel TV to rise and could block the panel vents. • Use a proper mount or stand rather than the Pioneer stand or installation bracket may form on ...

