Owner's Manual
Page 19
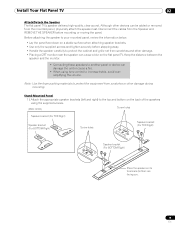
...damage. • Placing a CRT monitor near the speaker can damage the unit or cause a fire. • When using the supplied screws. (PRO-151FD) Screw holes Speaker bracket (For TOP-Right) Speaker bracket (For BOTTOM-Right) Screw holes Speaker bracket (For TOP-Right) Speaker bracket (For BOTTOM-... attaching the speaker to your mounted panel, review the information below. • Lay the panel face down on the flat panel TV. Although other damage during mounting. Install Your Flat Panel TV 02 Attach/Detach the Speaker The flat panel TV's speaker delivers high-quality, clear sound. ...
...damage. • Placing a CRT monitor near the speaker can damage the unit or cause a fire. • When using the supplied screws. (PRO-151FD) Screw holes Speaker bracket (For TOP-Right) Speaker bracket (For BOTTOM-Right) Screw holes Speaker bracket (For TOP-Right) Speaker bracket (For BOTTOM-... attaching the speaker to your mounted panel, review the information below. • Lay the panel face down on the flat panel TV. Although other damage during mounting. Install Your Flat Panel TV 02 Attach/Detach the Speaker The flat panel TV's speaker delivers high-quality, clear sound. ...
Owner's Manual
Page 24
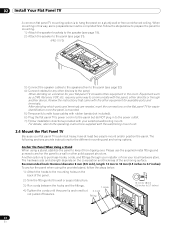
.... 1 ) Attach the speaker brackets to the speaker (see page 19). 2 ) Attach the speaker to the panel (see page 21). (PRO-111FD) 3 ) Connect the speaker cables to the speakers then to the mounting holes on the back of the anchoring surface. The hardware size ...support structure. 3 ) Run cords between the hooks and the fittings. 1. Review the instructions that came with the wall/ceiling mount unit. 2.4 Mount the Flat Panel TV Because your flat panel TV, consider other equipment for your flat panel TV is mounted. 5 ) Temporarily bundle loose cables with rubber bands (not included...
.... 1 ) Attach the speaker brackets to the speaker (see page 19). 2 ) Attach the speaker to the panel (see page 21). (PRO-111FD) 3 ) Connect the speaker cables to the speakers then to the mounting holes on the back of the anchoring surface. The hardware size ...support structure. 3 ) Run cords between the hooks and the fittings. 1. Review the instructions that came with the wall/ceiling mount unit. 2.4 Mount the Flat Panel TV Because your flat panel TV, consider other equipment for your flat panel TV is mounted. 5 ) Temporarily bundle loose cables with rubber bands (not included...
Owner's Manual
Page 125
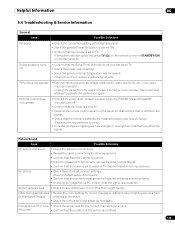
...etc., may affect the signal. Screen appears dark • Check for two or more minutes. Odd coloring and shades • Review the room lighting for recent changes or different natural lighting sources from the wall and leave it for any blocking objects. Replace ...Control (block). • Confirm that the panel is compatible. No picture • Check the picture adjustment settings. Reconnect and attempt to TV. Helpful Information 06 6.4 Troubleshooting & Service Information General Issue Possible Solutions No power • Check the connection seating at the wall and ...
...etc., may affect the signal. Screen appears dark • Check for two or more minutes. Odd coloring and shades • Review the room lighting for recent changes or different natural lighting sources from the wall and leave it for any blocking objects. Replace ...Control (block). • Confirm that the panel is compatible. No picture • Check the picture adjustment settings. Reconnect and attempt to TV. Helpful Information 06 6.4 Troubleshooting & Service Information General Issue Possible Solutions No power • Check the connection seating at the wall and ...