Owner's Manual
Page 3
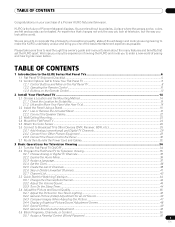
... 2.2.1 Use or Remove the Included Stand ...16 2.2.2 Connect the Speaker Cables ...22 2.3 Wall/Ceiling Mounting...23 2.4 Mount the Flat Panel TV ...24 2.5 Attach the Color Sensor ...26 2.6 Connect to Broadcast TV & Other Devices (DVR, Receiver, BDR, etc 29 2.6.1 Add Analog (conventional) and Digital TV Channels 29 2.6.2 Connect Your Other Pioneer Equipment...29 2.6.3 Connect the Power...
... 2.2.1 Use or Remove the Included Stand ...16 2.2.2 Connect the Speaker Cables ...22 2.3 Wall/Ceiling Mounting...23 2.4 Mount the Flat Panel TV ...24 2.5 Attach the Color Sensor ...26 2.6 Connect to Broadcast TV & Other Devices (DVR, Receiver, BDR, etc 29 2.6.1 Add Analog (conventional) and Digital TV Channels 29 2.6.2 Connect Your Other Pioneer Equipment...29 2.6.3 Connect the Power...
Owner's Manual
Page 6
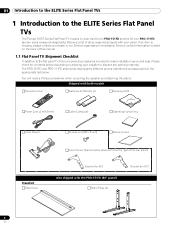
...Sensor Screws (x 2) (M5 x 8 mm) Warranty Card Stand kit Base Cover Color Sensor Bracket (when attached to the ELITE Series Flat Panel TVs The Pioneer ELITE Series Flat Panel TV models include the 60-inch PRO-151FD and the 50-inch PRO-111FD (screen sizes measured diagonally). 01 Introduction to the ELITE ...Series Flat Panel TVs 1 Introduction to the top right of the rear...
...Sensor Screws (x 2) (M5 x 8 mm) Warranty Card Stand kit Base Cover Color Sensor Bracket (when attached to the ELITE Series Flat Panel TVs The Pioneer ELITE Series Flat Panel TV models include the 60-inch PRO-151FD and the 50-inch PRO-111FD (screen sizes measured diagonally). 01 Introduction to the ELITE ...Series Flat Panel TVs 1 Introduction to the top right of the rear...
Owner's Manual
Page 7
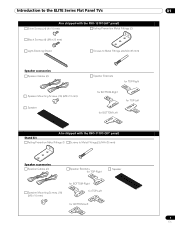
Introduction to the ELITE Series Flat Panel TVs 01 Also shipped with the PRO-151FD (60" panel) Silver Screws (4) (4×10 mm) Falling Prevention Metal Fittings (2) Black Screws (4) (M6×20 mm) Light-Blocking Shield Screws to Metal Fittings (4) (M4×... (16) (M5×10 mm) Speaker Speaker Brackets for TOP-Right for BOTTOM-Right for TOP-Left for BOTTOM-Left Also shipped with the PRO-111FD (50" panel) Stand kit Falling Prevention Metal Fittings (2) Screws to Metal Fittings(2) (M4×35 mm) Speaker accessories Speaker Cables (2) Speaker Brackets for TOP-Right Speaker...
Introduction to the ELITE Series Flat Panel TVs 01 Also shipped with the PRO-151FD (60" panel) Silver Screws (4) (4×10 mm) Falling Prevention Metal Fittings (2) Black Screws (4) (M6×20 mm) Light-Blocking Shield Screws to Metal Fittings (4) (M4×... (16) (M5×10 mm) Speaker Speaker Brackets for TOP-Right for BOTTOM-Right for TOP-Left for BOTTOM-Left Also shipped with the PRO-111FD (50" panel) Stand kit Falling Prevention Metal Fittings (2) Screws to Metal Fittings(2) (M4×35 mm) Speaker accessories Speaker Cables (2) Speaker Brackets for TOP-Right Speaker...
Owner's Manual
Page 14
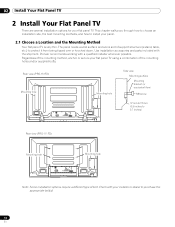
...and parts included with a qualified installer whenever possible. Pioneer recommends working with the shipment. Regardless of the mounting method, anchor or secure your installer or dealer to install your flat panel TV. Rear view (PRO-151FD) Mounting hole Mounting hole Side view Mounting surface ... structure (a stand, table, etc.) to 0.7 inches) Rear view (PRO-111FD) W Mounting hole W T W W Mounting hole W T W Note: Some installation options require a different type of the mounting holes and/or supplied bolts. 02 Install Your Flat Panel TV 2 Install Your Flat Panel TV There are...
...and parts included with a qualified installer whenever possible. Pioneer recommends working with the shipment. Regardless of the mounting method, anchor or secure your installer or dealer to install your flat panel TV. Rear view (PRO-151FD) Mounting hole Mounting hole Side view Mounting surface ... structure (a stand, table, etc.) to 0.7 inches) Rear view (PRO-111FD) W Mounting hole W T W W Mounting hole W T W Note: Some installation options require a different type of the mounting holes and/or supplied bolts. 02 Install Your Flat Panel TV 2 Install Your Flat Panel TV There are...
Owner's Manual
Page 15
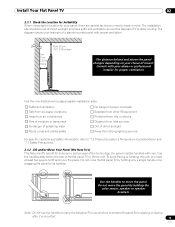
... with your dealer or professional installer for your choice of the technology, the panel must be out of a stand-mounted panel with care. Over 10 cm (3 15/16 inches) Over 50 cm (19 11/16 inches...the panel by its handles. Note: Do not use the handles to hang the flat panel TV or as anchors to prevent the panel from strong lighting sources For specific cautions and safety information...other IR equipment Protected from hits or shocks Distance from heat sources Out of the flat panel TV to the rear of direct sunlight Away from slipping or tipping after it is built for endurance ...
... with your dealer or professional installer for your choice of the technology, the panel must be out of a stand-mounted panel with care. Over 10 cm (3 15/16 inches) Over 50 cm (19 11/16 inches...the panel by its handles. Note: Do not use the handles to hang the flat panel TV or as anchors to prevent the panel from strong lighting sources For specific cautions and safety information...other IR equipment Protected from hits or shocks Distance from heat sources Out of the flat panel TV to the rear of direct sunlight Away from slipping or tipping after it is built for endurance ...
Owner's Manual
Page 16
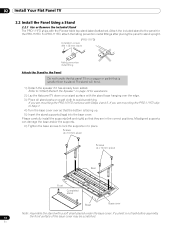
...Install Your Flat Panel TV 2.2 Install the Panel Using a Stand 2.2.1 Use or Remove the Included Stand The PRO-111FD ships with a soft sheet placed under the base cover. For PRO-111FD, attach the falling prevention metal fittings after placing the panel to stand upright. (PRO-111FD) Installation screws ... on page 19 for the PRO-151FD. En Screws (4 x 10 mm: silver) Screws (4 x 10 mm: silver) Rear Front Completed stand Sheet Base cover Note: Assemble the stand with the Pioneer table top stand (stand) attached. If a sheet is facing up. 5 ) Insert the stand supports (legs) into the ...
...Install Your Flat Panel TV 2.2 Install the Panel Using a Stand 2.2.1 Use or Remove the Included Stand The PRO-111FD ships with a soft sheet placed under the base cover. For PRO-111FD, attach the falling prevention metal fittings after placing the panel to stand upright. (PRO-111FD) Installation screws ... on page 19 for the PRO-151FD. En Screws (4 x 10 mm: silver) Screws (4 x 10 mm: silver) Rear Front Completed stand Sheet Base cover Note: Assemble the stand with the Pioneer table top stand (stand) attached. If a sheet is facing up. 5 ) Insert the stand supports (legs) into the ...
Owner's Manual
Page 17
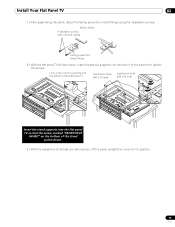
... bolts (M6 x 20 mm) Insert the stand supports into the bottom of the panel then tighten the screws. Install Your Flat Panel TV 02 7 ) After assembling the stand, attach the falling prevention metal fittings using the installation screws. (PRO-151FD) Installation screws (M4 x 35 mm: black...) Falling prevention metal fitting 8 ) With the flat panel TV still face down, insert the stand's supports into the flat panel TV...
... bolts (M6 x 20 mm) Insert the stand supports into the bottom of the panel then tighten the screws. Install Your Flat Panel TV 02 7 ) After assembling the stand, attach the falling prevention metal fittings using the installation screws. (PRO-151FD) Installation screws (M4 x 35 mm: black...) Falling prevention metal fitting 8 ) With the flat panel TV still face down, insert the stand's supports into the flat panel TV...
Owner's Manual
Page 18
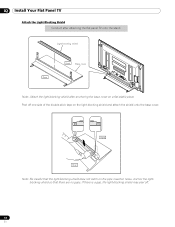
...-stick tape on the pipe insertion holes. Light-blocking shield Front Base cover Rear Note: Attach the light-blocking shield after attaching the flat panel TV onto the stand. 02 Install Your Flat Panel TV Attach the Light-Blocking Shield Conduct after anchoring the base cover on a flat stable place.
...-stick tape on the pipe insertion holes. Light-blocking shield Front Base cover Rear Note: Attach the light-blocking shield after attaching the flat panel TV onto the stand. 02 Install Your Flat Panel TV Attach the Light-Blocking Shield Conduct after anchoring the base cover on a flat stable place.
Owner's Manual
Page 19
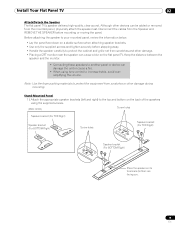
... from scratches and other damage during mounting. Stand-Mounted Panel 1 ) Attach the appropriate speaker brackets (left and right) to increase treble, avoid overamplifying the volume. Install Your Flat Panel TV 02 Attach/Detach the Speaker The flat panel TV's speaker delivers high-quality, clear sound. ...cause a fire. • When using tone control to the top and bottom on the back of the speakers using the supplied screws. (PRO-151FD) Screw holes Speaker bracket (For TOP-Right) Speaker bracket (For BOTTOM-Right) Screw holes Speaker bracket (For TOP-Right) Speaker bracket (For...
... from scratches and other damage during mounting. Stand-Mounted Panel 1 ) Attach the appropriate speaker brackets (left and right) to increase treble, avoid overamplifying the volume. Install Your Flat Panel TV 02 Attach/Detach the Speaker The flat panel TV's speaker delivers high-quality, clear sound. ...cause a fire. • When using tone control to the top and bottom on the back of the speakers using the supplied screws. (PRO-151FD) Screw holes Speaker bracket (For TOP-Right) Speaker bracket (For BOTTOM-Right) Screw holes Speaker bracket (For TOP-Right) Speaker bracket (For...
Owner's Manual
Page 23
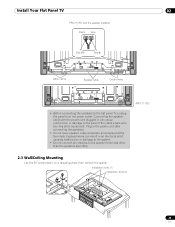
... Cable clamp Speaker cable Cable clamp • Before connecting the speakers to the flat panel TV, unplug the panel from the power outlet. Installation bolts (1) Installation bolts (2) 23 En Install Your Flat Panel TV 02 PRO-151FD with the power cord plugged in the power cord after connecting the speakers. • Do not... or damage to the system. • Do not connect any devices to the panel if the cable's bare wire touches other than the speakers specified. (PRO-111FD) 2.3 Wall/Ceiling Mounting Lay the 50" panel down on a raised surface then remove the...
... Cable clamp Speaker cable Cable clamp • Before connecting the speakers to the flat panel TV, unplug the panel from the power outlet. Installation bolts (1) Installation bolts (2) 23 En Install Your Flat Panel TV 02 PRO-151FD with the power cord plugged in the power cord after connecting the speakers. • Do not... or damage to the system. • Do not connect any devices to the panel if the cable's bare wire touches other than the speakers specified. (PRO-111FD) 2.3 Wall/Ceiling Mounting Lay the 50" panel down on a raised surface then remove the...
Owner's Manual
Page 24
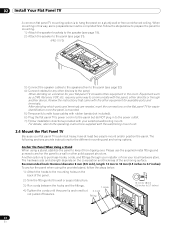
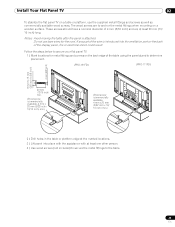
... using the provided stand, follow the steps below to prepare the panel for mounting. 1 ) Attach the speaker brackets to the speaker (see page 19). 2 ) Attach the speaker to the panel (see page 21). (PRO-111FD) 3 ) Connect the speaker cables to the speakers then to the panel (see page 22). 4 ... mm (0.5 inches to 0.7 inches) To anchor the panel when using a stand, stabilize the panel to a wall or other devices to purchase hooks, cords, and fittings through another device. 02 Install Your Flat Panel TV A common flat panel TV mounting option is to 0.7 inches) 24 En Fitting 12 mm to 18...
... using the provided stand, follow the steps below to prepare the panel for mounting. 1 ) Attach the speaker brackets to the speaker (see page 19). 2 ) Attach the speaker to the panel (see page 21). (PRO-111FD) 3 ) Connect the speaker cables to the speakers then to the panel (see page 22). 4 ... mm (0.5 inches to 0.7 inches) To anchor the panel when using a stand, stabilize the panel to a wall or other devices to purchase hooks, cords, and fittings through another device. 02 Install Your Flat Panel TV A common flat panel TV mounting option is to 0.7 inches) 24 En Fitting 12 mm to 18...
Owner's Manual
Page 25
... locations for the cord. Install Your Flat Panel TV 02 To stabilize the flat panel TV on a table or platform, use bare wires for metal fittings and screws on the back edge of the table using the panel stand to determine placement. (PRO-151FD) (PRO-111FD) 8 mm to 15 mm (3/8 inch to anchor the metal fittings...
... locations for the cord. Install Your Flat Panel TV 02 To stabilize the flat panel TV on a table or platform, use bare wires for metal fittings and screws on the back edge of the table using the panel stand to determine placement. (PRO-151FD) (PRO-111FD) 8 mm to 15 mm (3/8 inch to anchor the metal fittings...
Owner's Manual
Page 131
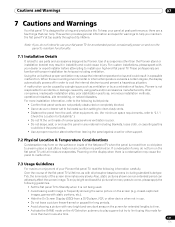
... are a few things that panel vents are familiar with your dealer or expert installer before attempting to install your high-end flat panel TV. This section provides general information and specific warnings to a warm place or just after a heater or air conditioner is switched on. ...a certain degree, the display automatically powers off in instability and could block the panel vents. • Use a proper mount or stand rather than the Pioneer stand or installation bracket may cause the internal temperature to Standby when it is not being used. • Avoid leaving a still image ...
... are a few things that panel vents are familiar with your dealer or expert installer before attempting to install your high-end flat panel TV. This section provides general information and specific warnings to a warm place or just after a heater or air conditioner is switched on. ...a certain degree, the display automatically powers off in instability and could block the panel vents. • Use a proper mount or stand rather than the Pioneer stand or installation bracket may cause the internal temperature to Standby when it is not being used. • Avoid leaving a still image ...
Owner's Manual
Page 145
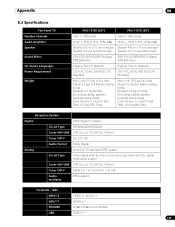
Appendix 08 8.3 Specifications Flat Panel TV Number of pixels Audio Amplifier Speaker Sound Effect On-Screen Languages Power Requirement Weight PRO-151FD (60") PRO-111FD (50") 1920 × 1080 pixels 1920 × 1080 pixels 18 W + 18 W (1 kHz, 10 %, 6 Ω) 18 W + 18 W (1 kHz, .../SRS/SRS TruBass/ SRS Definition SRS Definition English, French, Spanish English, French, Spanish 120 V AC, 60 Hz, 524 W (0.3 W Standby) 120 V AC, 60 Hz, 436 W (0.2 W Standby) Main unit: 51.0 kg (112.4 lbs) Stand: 6.1 kg (13.4 lbs) (including bolts) Speaker: 4.1 kg (9.0 lbs) (including cables, speaker ...
Appendix 08 8.3 Specifications Flat Panel TV Number of pixels Audio Amplifier Speaker Sound Effect On-Screen Languages Power Requirement Weight PRO-151FD (60") PRO-111FD (50") 1920 × 1080 pixels 1920 × 1080 pixels 18 W + 18 W (1 kHz, 10 %, 6 Ω) 18 W + 18 W (1 kHz, .../SRS/SRS TruBass/ SRS Definition SRS Definition English, French, Spanish English, French, Spanish 120 V AC, 60 Hz, 524 W (0.3 W Standby) 120 V AC, 60 Hz, 436 W (0.2 W Standby) Main unit: 51.0 kg (112.4 lbs) Stand: 6.1 kg (13.4 lbs) (including bolts) Speaker: 4.1 kg (9.0 lbs) (including cables, speaker ...
Owner's Manual
Page 162
...it easy for consumer electronics/home appliances. Effective scanning lines are expressed as set down in 1/60 of a second for a complete frame of a second, then the remaining lines with a...of interoperability based on a single cable for local area networks (LANs). The flat panel TV supports 162 100BASE-TX. HDMI also allows digitally transmitted audio and control signals on open ... new standard for home network PCs and other digital devices, as "480i" and "1080i" ("i" stands for converting analog audio signals to a station within the Internet. A default gateway (such as a...
...it easy for consumer electronics/home appliances. Effective scanning lines are expressed as set down in 1/60 of a second for a complete frame of a second, then the remaining lines with a...of interoperability based on a single cable for local area networks (LANs). The flat panel TV supports 162 100BASE-TX. HDMI also allows digitally transmitted audio and control signals on open ... new standard for home network PCs and other digital devices, as "480i" and "1080i" ("i" stands for converting analog audio signals to a station within the Internet. A default gateway (such as a...


