
Owner's Manual
Page 2
... Before You Start Information to User 3 For Canadian model 3 About this manual before using the product for the first time, to the radio 7 - Installing the battery 5 - Adjusting initial settings 12 - DIN Rear-mount 16 Fastening the front panel 16 Additional Information Error messages... 17 Handling guideline of discs and player 17 Dual Discs 18 Compressed audio files 18 - Using the remote control 5 Operating this PIONEER product. Display indication 7 Basic Operations 7 - Compressed audio compatibility 18 Specifications 20 Contents Thank you for purchasing this unit What...
... Before You Start Information to User 3 For Canadian model 3 About this manual before using the product for the first time, to the radio 7 - Installing the battery 5 - Adjusting initial settings 12 - DIN Rear-mount 16 Fastening the front panel 16 Additional Information Error messages... 17 Handling guideline of discs and player 17 Dual Discs 18 Compressed audio files 18 - Using the remote control 5 Operating this PIONEER product. Display indication 7 Basic Operations 7 - Compressed audio compatibility 18 Specifications 20 Contents Thank you for purchasing this unit What...

Owner's Manual
Page 5
...until it clicks. Replace only with metallic tools. ! If the battery leaks, wipe the remote control completely clean and install a new battery. ! "Perchlorate Material - Do not store the remote control in direct sunlight. ! Before You Start Section 01 English Attaching the front panel 1...the front panel has been jointed to operate. Do not store the battery with the plus (+) and minus (-) poles aligned properly. The remote control may be swallowed, consult a doctor immediately. Use one CR2025 (3 V) lithium battery. ! special handling may become jammed under the brake...
...until it clicks. Replace only with metallic tools. ! If the battery leaks, wipe the remote control completely clean and install a new battery. ! "Perchlorate Material - Do not store the remote control in direct sunlight. ! Before You Start Section 01 English Attaching the front panel 1...the front panel has been jointed to operate. Do not store the battery with the plus (+) and minus (-) poles aligned properly. The remote control may be swallowed, consult a doctor immediately. Use one CR2025 (3 V) lithium battery. ! special handling may become jammed under the brake...
Owner's Manual
Page 6
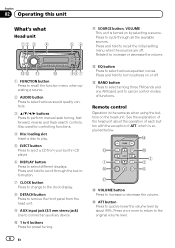
... through the text information. 7 CLOCK button Press to change to the clock display. 8 DETACH button Press to remove the front panel from your built-in CD player. 6 DISPLAY button Press to connect an auxiliary device. e d f 3 1 2 g 6 h e VOLUME button Press to select various equalizer curves. a 1 ...a source. 2 AUDIO button Press to select various sound quality controls. 3 a/b/c/d buttons Press to turn loudness on or off . Remote control Operation is turned on by about the operation of each button with the exception of functions. d BAND button Press to select among...
... through the text information. 7 CLOCK button Press to change to the clock display. 8 DETACH button Press to remove the front panel from your built-in CD player. 6 DISPLAY button Press to connect an auxiliary device. e d f 3 1 2 g 6 h e VOLUME button Press to select various equalizer curves. a 1 ...a source. 2 AUDIO button Press to select various sound quality controls. 3 a/b/c/d buttons Press to turn loudness on or off . Remote control Operation is turned on by about the operation of each button with the exception of functions. d BAND button Press to select among...
Owner's Manual
Page 13
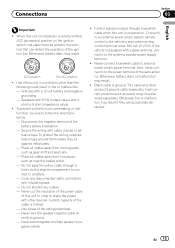
...) position on . Never wire the speaker negative cable directly to external power amp's power terminal. Also, never connect it to an external power amp's system remote control or the vehicle's auto-antenna relay control terminal (max. 300 mA 12 V DC). Black cable is limited. - When this unit is powered on the...
...) position on . Never wire the speaker negative cable directly to external power amp's power terminal. Also, never connect it to an external power amp's system remote control or the vehicle's auto-antenna relay control terminal (max. 300 mA 12 V DC). Black cable is limited. - When this unit is powered on the...
Owner's Manual
Page 14
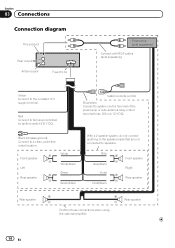
... Green Green/black With a 2 speaker system, do not connect anything to the speaker leads that are not connected to a clean, paint-free metal location. System remote control Blue/white Connect to the constant 12 V supply terminal. Section 03 Connections Connection diagram This product Rear output Antenna jack Fuse (10 A) Power amp...
... Green Green/black With a 2 speaker system, do not connect anything to the speaker leads that are not connected to a clean, paint-free metal location. System remote control Blue/white Connect to the constant 12 V supply terminal. Section 03 Connections Connection diagram This product Rear output Antenna jack Fuse (10 A) Power amp...


