
Leaflet
Page 1
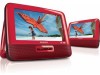
...DVD, DVD+/-R, DVD+/-RW, (S)VCD, CD compatible • MP3-CD, CD and CD-RW playback • View JPEG images from picture disc Enrich your AV entertainment experience • Expand movie enjoyment with two widescreen LCDs Play your convenience • Car adaptor and mounting strap included • AC adaptor, car adaptor and AV cable... Install and mount easily for in enjoying your DVD movies, music and photos on the road. Philips Portable DVD Player 7" LCD PET7402S Double your movies on the road with dual TFT LCD screens • 7" TFT color LCD display in 16:9 wide screen format ...
...DVD, DVD+/-R, DVD+/-RW, (S)VCD, CD compatible • MP3-CD, CD and CD-RW playback • View JPEG images from picture disc Enrich your AV entertainment experience • Expand movie enjoyment with two widescreen LCDs Play your convenience • Car adaptor and mounting strap included • AC adaptor, car adaptor and AV cable... Install and mount easily for in enjoying your DVD movies, music and photos on the road. Philips Portable DVD Player 7" LCD PET7402S Double your movies on the road with dual TFT LCD screens • 7" TFT color LCD display in 16:9 wide screen format ...

Leaflet
Page 2
...; Playback Media: DVD, Picture CD, SVCD, Video CD, DVD-R/-RW, MP3-CD, CD-R/CD-RW, DVD+R/+RW, CD • Disc Playback Modes: Disc Menu, Fast Backward, Fast Forward, OSD, Repeat, Shuffle Play, Zoom • Video disc playback system: NTSC, PAL DVD, DVD+/-RW, (S)VCD, CD Audio Playback • Compression format: Dolby Digital, MP3 • MP3 bit rates: 32 - 320 kbps • Playback Media: CD, CD-RW, MP3-CD, CD-R • File systems supported: ISO-9660, Jolliet The Philips Portable DVD player is standard for a DVD drive...
...; Playback Media: DVD, Picture CD, SVCD, Video CD, DVD-R/-RW, MP3-CD, CD-R/CD-RW, DVD+R/+RW, CD • Disc Playback Modes: Disc Menu, Fast Backward, Fast Forward, OSD, Repeat, Shuffle Play, Zoom • Video disc playback system: NTSC, PAL DVD, DVD+/-RW, (S)VCD, CD Audio Playback • Compression format: Dolby Digital, MP3 • MP3 bit rates: 32 - 320 kbps • Playback Media: CD, CD-RW, MP3-CD, CD-R • File systems supported: ISO-9660, Jolliet The Philips Portable DVD player is standard for a DVD drive...

User manual
Page 2
... device may cause undesired operation. NOTE: This equipment has been tested and found to comply with the instructions, may cause harmful interference to radio communications. This equipment generates, uses and can be determined by turning the equipment off and on, the user ...set out in accordance with the limits for help. However, there is subject to Part 15 of the FCC Rules. If this equipment does cause harmful interference to radio or television reception, which the receiver is connected. • Consult the dealer or an experienced radio/TV technician for a Class B digital device...
... device may cause undesired operation. NOTE: This equipment has been tested and found to comply with the instructions, may cause harmful interference to radio communications. This equipment generates, uses and can be determined by turning the equipment off and on, the user ...set out in accordance with the limits for help. However, there is subject to Part 15 of the FCC Rules. If this equipment does cause harmful interference to radio or television reception, which the receiver is connected. • Consult the dealer or an experienced radio/TV technician for a Class B digital device...

User manual
Page 3
Contents 1 Important Important safety instructions Notice 2 Your portable DVD player Introduction What's in the box Overview of the main unit Overview of the second screen 3 Get started Preparation Connect the second screen Connect power 4 Use your player Turn on Select OSD language Play discs Play options 5 Adjust settings Set the main unit Set the second screen 6 Use more of your player Connect additional equipment Connect power from household source 7 Product information 8 Troubleshooting 6 6 8 10 10 10 11 13 14 14 15 16 17 17 17 17 18 19 19 20 21 21 22 23 24 EN 3 English
Contents 1 Important Important safety instructions Notice 2 Your portable DVD player Introduction What's in the box Overview of the main unit Overview of the second screen 3 Get started Preparation Connect the second screen Connect power 4 Use your player Turn on Select OSD language Play discs Play options 5 Adjust settings Set the main unit Set the second screen 6 Use more of your player Connect additional equipment Connect power from household source 7 Product information 8 Troubleshooting 6 6 8 10 10 10 11 13 14 14 15 16 17 17 17 17 18 19 19 20 21 21 22 23 24 EN 3 English

User manual
Page 7
...lighted candles). Over time your volume to environmental considerations. English n Refer all servicing to dripping or splashing. Warning • Never remove the casing of this , set your hearing 'comfort level' adapts to higher volumes of danger on other electrical equipment. • Keep this apparatus away from the power. p Do not place any sources of sound. Hearing safety Listen at a moderate volume. • Using... as powersupply cord or plug is damaged, liquid has been spilled or objects have fallen into the laser beam inside this apparatus from direct sunlight, naked...
...lighted candles). Over time your volume to environmental considerations. English n Refer all servicing to dripping or splashing. Warning • Never remove the casing of this , set your hearing 'comfort level' adapts to higher volumes of danger on other electrical equipment. • Keep this apparatus away from the power. p Do not place any sources of sound. Hearing safety Listen at a moderate volume. • Using... as powersupply cord or plug is damaged, liquid has been spilled or objects have fallen into the laser beam inside this apparatus from direct sunlight, naked...
User manual
Page 8
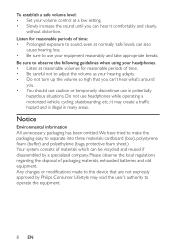
To establish a safe volume level: • Set your volume control at a low setting. • Slowly increase the sound until you . • You should use caution or temporarily discontinue use in many areas. Please observe the local regulations regarding the disposal of time. • Be careful not to adjust the volume as your hearing adapts. • Do not turn up the volume so high that are...
To establish a safe volume level: • Set your volume control at a low setting. • Slowly increase the sound until you . • You should use caution or temporarily discontinue use in many areas. Please observe the local regulations regarding the disposal of time. • Be careful not to adjust the volume as your hearing adapts. • Do not turn up the volume so high that are...

User manual
Page 9
.... The making of unauthorized copies of copyprotected material, including computer programs, files, broadcasts and sound recordings, may be an infringement of copyrights and constitute a criminal offence.This equipment should not be recycled and reused. When you see the crossed-out wheel bin symbol attached to 1972. This apparatus includes this label: EN 9 English Recycling Your...
.... The making of unauthorized copies of copyprotected material, including computer programs, files, broadcasts and sound recordings, may be an infringement of copyrights and constitute a criminal offence.This equipment should not be recycled and reused. When you see the crossed-out wheel bin symbol attached to 1972. This apparatus includes this label: EN 9 English Recycling Your...

User manual
Page 10
... the support that Philips offers, register your purchase, and welcome to the universal DVD Video standard.With it, you can play the following discs on the DVD player (including CD-R, CD-RW, DVD±R and DVD±RW): • DVD-Video • Video CD • Audio CD • MP3 CD • Discs with true cinema picture quality and stereo or multi-channel sound (depending on disc and playback set-up). 2 Your portable DVD player Congratulations on...
... the support that Philips offers, register your purchase, and welcome to the universal DVD Video standard.With it, you can play the following discs on the DVD player (including CD-R, CD-RW, DVD±R and DVD±RW): • DVD-Video • Video CD • Audio CD • MP3 CD • Discs with true cinema picture quality and stereo or multi-channel sound (depending on disc and playback set-up). 2 Your portable DVD player Congratulations on...
User manual
Page 11
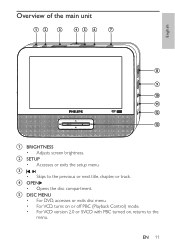
d OPEN • Opens the disc compartment. e DISC MENU • For DVD, accesses or exits disc menu. • For VCD, turns on or off PBC (Playback Control) mode. • For VCD version 2.0 or SVCD with PBC turned on, returns to the previous or next title, chapter, or track. EN 11 English Overview of the main unit a BRIGHTNESS • Adjusts screen brightness. b SETUP • Accesses or exits the setup menu. c, • Skips to the menu.
d OPEN • Opens the disc compartment. e DISC MENU • For DVD, accesses or exits disc menu. • For VCD, turns on or off PBC (Playback Control) mode. • For VCD version 2.0 or SVCD with PBC turned on, returns to the previous or next title, chapter, or track. EN 11 English Overview of the main unit a BRIGHTNESS • Adjusts screen brightness. b SETUP • Accesses or exits the setup menu. c, • Skips to the menu.
User manual
Page 12
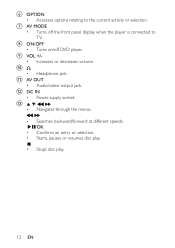
... front panel display when the player is connected to the current activity or selection. k AV OUT • Audio/video output jack. g AV MODE • Turns off DVD player. i VOL +/• Increases or decreases volume. j • Headphone jack. m ,, , • Navigates through the menus. , • Searches backward/forward at different speeds. /OK • Confirms an entry or selection. • Starts, pauses or resumes disc play. • Stops disc play. 12...
... front panel display when the player is connected to the current activity or selection. k AV OUT • Audio/video output jack. g AV MODE • Turns off DVD player. i VOL +/• Increases or decreases volume. j • Headphone jack. m ,, , • Navigates through the menus. , • Searches backward/forward at different speeds. /OK • Confirms an entry or selection. • Starts, pauses or resumes disc play. • Stops disc play. 12...

User manual
Page 14
3 Get started Caution • Use the controls only as stated in this user manual. • Always follow the instructions in this chapter in a car, attach the main unit and the second screen to the back of the front seat headrests. 1 Pull the strap through the loops on ...numbers here: Model No Serial No Preparation To use the player in sequence. If you contact Philips, you , then attach the buckle to the strap. 3 Position the main unit at the back of the headrest, then fasten the buckle. 4 Pull the strap to secure the main unit to the headrest. • To attach the second screen, repeat...
3 Get started Caution • Use the controls only as stated in this user manual. • Always follow the instructions in this chapter in a car, attach the main unit and the second screen to the back of the front seat headrests. 1 Pull the strap through the loops on ...numbers here: Model No Serial No Preparation To use the player in sequence. If you contact Philips, you , then attach the buckle to the strap. 3 Position the main unit at the back of the headrest, then fasten the buckle. 4 Pull the strap to secure the main unit to the headrest. • To attach the second screen, repeat...
User manual
Page 16
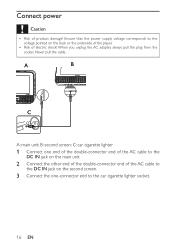
... or the underside of the player. • Risk of electric shock! Connect power Caution • Risk of the AC cable to the car cigarette lighter socket. 16 EN When you unplug the AC adapter, always pull the plug from the socket. B: second screen; Ensure that the power supply voltage corresponds to the... voltage pointed on the second screen. 3 Connect the one end of the double-connector end of the AC cable to the DC IN jack on the...
... or the underside of the player. • Risk of electric shock! Connect power Caution • Risk of the AC cable to the car cigarette lighter socket. 16 EN When you unplug the AC adapter, always pull the plug from the socket. B: second screen; Ensure that the power supply voltage corresponds to the... voltage pointed on the second screen. 3 Connect the one end of the double-connector end of the AC cable to the DC IN jack on the...

User manual
Page 17
... down to close the disc compartment. » Play starts automatically. Press again to the ON position. Play discs 1 Slide OPEN on -screen display text. 1 Press SETUP. » The setup menu appears. 2 Select [-- English 4 Use your player Turn on 1 Slide the ON/OFF switch on the main unit to the ON position. • To turn on the second screen, slide the OFF/ON switch on the second screen to resume play . • To...
... down to close the disc compartment. » Play starts automatically. Press again to the ON position. Play discs 1 Slide OPEN on -screen display text. 1 Press SETUP. » The setup menu appears. 2 Select [-- English 4 Use your player Turn on 1 Slide the ON/OFF switch on the main unit to the ON position. • To turn on the second screen, slide the OFF/ON switch on the second screen to resume play . • To...
User manual
Page 18
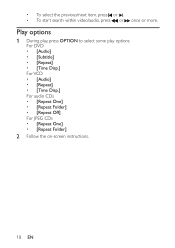
For DVD • [Audio] • [Subtitle] • [Repeat] • [Time Disp.] For VCD • [Audio] • [Repeat] • [Time Disp.] For audio CDs • [Repeat One] • [Repeat Folder] • [Repeat Off] For JPEG CDs • [Repeat One] • [Repeat Folder] 2 Follow the on-screen instructions. 18 EN • To select the previous/next item, press or . • To start search within video/audio, press or once or more. Play options 1 During play, press OPTION to select some play options.
For DVD • [Audio] • [Subtitle] • [Repeat] • [Time Disp.] For VCD • [Audio] • [Repeat] • [Time Disp.] For audio CDs • [Repeat One] • [Repeat Folder] • [Repeat Off] For JPEG CDs • [Repeat One] • [Repeat Folder] 2 Follow the on-screen instructions. 18 EN • To select the previous/next item, press or . • To start search within video/audio, press or once or more. Play options 1 During play, press OPTION to select some play options.
User manual
Page 19
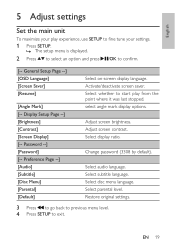
...4 Press SETUP to start play experience, use SETUP to fine tune your settings. 1 Press SETUP. » The setup menu is displayed. 2 Press to select an option and press /OK to confirm. [-- General Setup Page --] [OSD Language] [Screen Saver] [Resume] [Angle Mark] [-- Password --] [Password] [-- Activate/deactivate screen saver. Change password (3308 by default). Select subtitle language. Select disc menu language. EN 19 Select display ratio. Select audio language. Adjust screen contrast. select angle mark display options. English 5 Adjust settings Set the main...
...4 Press SETUP to start play experience, use SETUP to fine tune your settings. 1 Press SETUP. » The setup menu is displayed. 2 Press to select an option and press /OK to confirm. [-- General Setup Page --] [OSD Language] [Screen Saver] [Resume] [Angle Mark] [-- Password --] [Password] [-- Activate/deactivate screen saver. Change password (3308 by default). Select subtitle language. Select disc menu language. EN 19 Select display ratio. Select audio language. Adjust screen contrast. select angle mark display options. English 5 Adjust settings Set the main...

User manual
Page 21
Match the color of your player Connect additional equipment Caution • Turn off the front panel display. TV not supplied Tip • To conserve energy, press AV MODE to turn off your player before connecting to any additional equipment. You can connect the player to a TV or an amplifier to TV is not supplied) with the jacks: the yellow cable is for the yellow video jack, the red/ white cable is for the red/white audio jacks. EN 21 English 6 Use more of the AV cables (the AV cable connected to enjoy DVDs or Karaoke.
Match the color of your player Connect additional equipment Caution • Turn off the front panel display. TV not supplied Tip • To conserve energy, press AV MODE to turn off your player before connecting to any additional equipment. You can connect the player to a TV or an amplifier to TV is not supplied) with the jacks: the yellow cable is for the yellow video jack, the red/ white cable is for the red/white audio jacks. EN 21 English 6 Use more of the AV cables (the AV cable connected to enjoy DVDs or Karaoke.

User manual
Page 22
When you unplug the AC adaptor, always pull the plug from household source Caution • Risk of electric shock! Never pull the cable. 1 Connect the AC adaptor cable to the voltage pointed on the main unit. • the power outlet. 22 EN Ensure that the power supply voltage corresponds to : • the DC IN jack on the back or the underside of the player. • Risk of product damage! Connect power from the socket.
When you unplug the AC adaptor, always pull the plug from household source Caution • Risk of electric shock! Never pull the cable. 1 Connect the AC adaptor cable to the voltage pointed on the main unit. • the power outlet. 22 EN Ensure that the power supply voltage corresponds to : • the DC IN jack on the back or the underside of the player. • Risk of product damage! Connect power from the socket.
User manual
Page 23
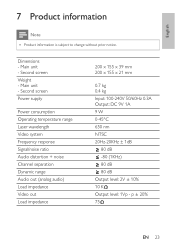
Second screen Weight - Second screen Power supply Power consumption Operating temperature range Laser wavelength Video system Frequency response Signal/noise ratio Audio distortion + noise Channel separation Dynamic range Audio out (analog audio) Load impedance Video out Load impedance 200 x 155 x 39 mm 200 x 155 x 21 mm 0.7 kg 0.4 kg Input: 100-240V 50/60Hz 0.3A Output: DC 9V 1A 9 W 0-45°C 650 nm NTSC 20Hz-20KHz ± 1dB 80...
Second screen Weight - Second screen Power supply Power consumption Operating temperature range Laser wavelength Video system Frequency response Signal/noise ratio Audio distortion + noise Channel separation Dynamic range Audio out (analog audio) Load impedance Video out Load impedance 200 x 155 x 39 mm 200 x 155 x 21 mm 0.7 kg 0.4 kg Input: 100-240V 50/60Hz 0.3A Output: DC 9V 1A 9 W 0-45°C 650 nm NTSC 20Hz-20KHz ± 1dB 80...

User manual
Page 24
... disc is normal. 24 EN To keep the warranty valid, never try to match your player and get support at the car cigarette lighter or AC outlet. You may, however, see tiny black points and/or bright points(red, blue, green) that the video output format of time, its surface will be heated.This is compatible with the TV. • Change the video output format...
... disc is normal. 24 EN To keep the warranty valid, never try to match your player and get support at the car cigarette lighter or AC outlet. You may, however, see tiny black points and/or bright points(red, blue, green) that the video output format of time, its surface will be heated.This is compatible with the TV. • Change the video output format...

Quick start guide
Page 1
... -car use ) Connect additional equipment (TV for example) 1 Connect the AV OUT socket on the main unit to the video and audio sockets on a TV as shown directly. 2 Connect the AC adaptor cable to the DC IN Jack on the second screen to adjust brightness of screen to match lighting conditions. Press OPTION to select some play , you will start automatically. Philips Portable DVD Player PET7402/PET7402S Quick star t guide 2 Enjoy...
... -car use ) Connect additional equipment (TV for example) 1 Connect the AV OUT socket on the main unit to the video and audio sockets on a TV as shown directly. 2 Connect the AC adaptor cable to the DC IN Jack on the second screen to adjust brightness of screen to match lighting conditions. Press OPTION to select some play , you will start automatically. Philips Portable DVD Player PET7402/PET7402S Quick star t guide 2 Enjoy...


