
Leaflet
Page 1
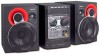
Micro Hi-Fi System with 5 CD Tray Changer MC M570 USB PC Link for MP3 Streaming Remote Control your MP3 music on your PC • USB PC Link • Song titles from PC on audio system display Unlimited Listening Pleasure • Playback 50 hours of MP3-CD music with 5CDs Power and Performance • 200W Total Power0 • Class D Digital Amplifier • MAX Sound for instant Power Boost Personalized sound settings • Digital Sound Control (rock, pop, jazz, optimal) • Virtual Environment Control (cinema, hall, concert, cyber)
Micro Hi-Fi System with 5 CD Tray Changer MC M570 USB PC Link for MP3 Streaming Remote Control your MP3 music on your PC • USB PC Link • Song titles from PC on audio system display Unlimited Listening Pleasure • Playback 50 hours of MP3-CD music with 5CDs Power and Performance • 200W Total Power0 • Class D Digital Amplifier • MAX Sound for instant Power Boost Personalized sound settings • Digital Sound Control (rock, pop, jazz, optimal) • Virtual Environment Control (cinema, hall, concert, cyber)

Leaflet
Page 2
Micro Hi-Fi System with 5 CD Tray Changer standard product information MC M570 USB PC link • Bundled MusicMatch Jukebox software • Track info display • Navigate via set remote control for Play, Pause, Stop, Next and Previous track disc player • 5 CD Tray Changer • Plays CD, CD-R, CD-RW and MP3-CD... : 3.5mm stereo jack • Antenna : FM coaxial, AM loop general • FTD display • Dim mode • Clock, Sleep timer, Alarm timer • 32-key Remote Control • Eco power standby mode (
Micro Hi-Fi System with 5 CD Tray Changer standard product information MC M570 USB PC link • Bundled MusicMatch Jukebox software • Track info display • Navigate via set remote control for Play, Pause, Stop, Next and Previous track disc player • 5 CD Tray Changer • Plays CD, CD-R, CD-RW and MP3-CD... : 3.5mm stereo jack • Antenna : FM coaxial, AM loop general • FTD display • Dim mode • Clock, Sleep timer, Alarm timer • 32-key Remote Control • Eco power standby mode (

User manual
Page 8
English Contents General Information Supplied accessories 9 Environmental information 9 Care and safety information 9 Functional Overview Main unit and remote control 10-11 Control buttons available on the remote only 11 Connections Step 1: Connecting FM/AM antennas 12 Step 2: Connecting the speakers 13 Step 3: Connecting ...to PC 13 Step 4: Connecting the AC power cord ........ 13 Step 5: Inserting batteries into the remote control 13 Using the remote control to operate the system 13 USB PC Link Quick Setup Guide 14 PC system requirement 14 Install MusicMatch software...
English Contents General Information Supplied accessories 9 Environmental information 9 Care and safety information 9 Functional Overview Main unit and remote control 10-11 Control buttons available on the remote only 11 Connections Step 1: Connecting FM/AM antennas 12 Step 2: Connecting the speakers 13 Step 3: Connecting ...to PC 13 Step 4: Connecting the AC power cord ........ 13 Step 5: Inserting batteries into the remote control 13 Using the remote control to operate the system 13 USB PC Link Quick Setup Guide 14 PC system requirement 14 Install MusicMatch software...

User manual
Page 9
Remote control and two AA batteries. - P2) Avoid high temperatures, moisture, water and dust - The lens may cloud over when the system is designed to use a ...
Remote control and two AA batteries. - P2) Avoid high temperatures, moisture, water and dust - The lens may cloud over when the system is designed to use a ...

User manual
Page 10
... •DEMO STOP MICRO SYSTEM AUX USB PC LINK STANDBY ON ECO POWER # $¡ %# ^& 5/0 & 4 * 6/9 (≤ )7 ¡ ∞ § ≥ 8 ™^ £ ‹ 3 Main unit and remote control 1 ECO POWER indicator - TUNER: selects a preset radio station. - USB PC LINK: starts/pauses playback. (only on /off the demonstration mode. 5 PREV í / NEXT ë...
... •DEMO STOP MICRO SYSTEM AUX USB PC LINK STANDBY ON ECO POWER # $¡ %# ^& 5/0 & 4 * 6/9 (≤ )7 ¡ ∞ § ≥ 8 ™^ £ ‹ 3 Main unit and remote control 1 ECO POWER indicator - TUNER: selects a preset radio station. - USB PC LINK: starts/pauses playback. (only on /off the demonstration mode. 5 PREV í / NEXT ë...

User manual
Page 11
English Functional Overview 0 TITLE +- (í ë) - Point the remote control towards this sensor. ^ MAX SOUND (MAX ON/OFF) - Selects different type of environment-based equalizer settings (HALL, CINEMA, CONCERT or CYBER). ( DSC - CD: toggles ... - *Enters clock setting mode. - Switches to Eco Power standby mode. - *Switches to clock display mode. ¡ CD / TUNER / AUX / USB PC LINK - Turns on the remote only ≤ REPEAT - Mutes or restores the volume. ª TIMER - *Enters timer setting mode. - Adjusts the volume level. * VEC -
English Functional Overview 0 TITLE +- (í ë) - Point the remote control towards this sensor. ^ MAX SOUND (MAX ON/OFF) - Selects different type of environment-based equalizer settings (HALL, CINEMA, CONCERT or CYBER). ( DSC - CD: toggles ... - *Enters clock setting mode. - Switches to Eco Power standby mode. - *Switches to clock display mode. ¡ CD / TUNER / AUX / USB PC LINK - Turns on the remote only ≤ REPEAT - Mutes or restores the volume. ª TIMER - *Enters timer setting mode. - Adjusts the volume level. * VEC -

User manual
Page 13
...used for a long time. - Step 3: Connecting to store all available radio stations (page 3 - Using the remote control to operate the system 1 Aim the remote control directly at the remote sensor (iR) on the main unit. 2 Select the source you wish to "USB PC Link"). P5) Use... be disposed of properly. 13 3139 115 22181 Improper connections may appear on the display panel when the AC power cord is plugged into the remote control 3 1 2 Notes: - You are correctly connected. Step 5: Inserting batteries into the power outlet for example CAUTION! - speaker terminals. 1 Open...
...used for a long time. - Step 3: Connecting to store all available radio stations (page 3 - Using the remote control to operate the system 1 Aim the remote control directly at the remote sensor (iR) on the main unit. 2 Select the source you wish to "USB PC Link"). P5) Use... be disposed of properly. 13 3139 115 22181 Improper connections may appear on the display panel when the AC power cord is plugged into the remote control 3 1 2 Notes: - You are correctly connected. Step 5: Inserting batteries into the power outlet for example CAUTION! - speaker terminals. 1 Open...

User manual
Page 16
... Eco Power standby mode q Press B. ➜ ECO POWER button lights up. ➜ The display screen will go blank. OR Press and hold CLOCK on the remote until the time flashing on the main unit until "SELECT CLOCK OR TIMER" is displayed. Notes: - Switching to Eco Power standby or standby mode, make...
... Eco Power standby mode q Press B. ➜ ECO POWER button lights up. ➜ The display screen will go blank. OR Press and hold CLOCK on the remote until the time flashing on the main unit until "SELECT CLOCK OR TIMER" is displayed. Notes: - Switching to Eco Power standby or standby mode, make...

User manual
Page 17
... to increase or decrease the sound level. ➜ "VOL MUTE" is the minimum volume level and "0 dB" is shown, except for DIM OFF mode. on remote) to select : HALL, CINEMA, CONCERT or CYBER. 17 3139 115 22181 q Press DSC repeatedly to show the information related to select one of preset sound... sound features (DSC,VEC for the display panel. Volume control q Adjust MASTER VOLUME (or press VOL +/- q Press CLOCK• TIMER (or CLOCK on off on remote). ➜ In any active mode, pressing the button again will resume normal display. q Press MAX SOUND (or MAX ON/OFF on the...
... to increase or decrease the sound level. ➜ "VOL MUTE" is the minimum volume level and "0 dB" is shown, except for DIM OFF mode. on remote) to select : HALL, CINEMA, CONCERT or CYBER. 17 3139 115 22181 q Press DSC repeatedly to show the information related to select one of preset sound... sound features (DSC,VEC for the display panel. Volume control q Adjust MASTER VOLUME (or press VOL +/- q Press CLOCK• TIMER (or CLOCK on off on remote). ➜ In any active mode, pressing the button again will resume normal display. q Press MAX SOUND (or MAX ON/OFF on the...

User manual
Page 18
... disc(s) before the second tray opens. For MP3 disc, the volume will play the selected disc only q Press one tray can replace the discs on remote). ➜ The selected disc will not affect the current playback. To play once, then stop mode for loading discs onto the disc trays 2~5. All pre...
... disc(s) before the second tray opens. For MP3 disc, the volume will play the selected disc only q Press one tray can replace the discs on remote). ➜ The selected disc will not affect the current playback. To play once, then stop mode for loading discs onto the disc trays 2~5. All pre...

User manual
Page 19
.... D - Pressing the OPEN/CLOSE button will be cancelled. ➜ The random play modes before or during playback. Random play q Press SHUFFLE on the remote to turn on the remote repeatedly to the next available disc tray. ➜ If program mode is active, only the programmed tracks will cancel all available discs (not...
.... D - Pressing the OPEN/CLOSE button will be cancelled. ➜ The random play modes before or during playback. Random play q Press SHUFFLE on the remote to turn on the remote repeatedly to the next available disc tray. ➜ If program mode is active, only the programmed tracks will cancel all available discs (not...

User manual
Page 22
... stays in standby mode. ➜ If deactivated, "OFF" is too low, the set correctly. - Checking the timer setting q Press TIMER on the remote. ➜ The timer information will display for a few seconds, then the system resumes to the last active source or stays in standby mode. 22 3139...- If the last tuned volume level is displayed. Before setting the timer, ensure that the clock is displayed. OR Press and hold TIMER on the remote until "SELECT CLOCK OR TIMER" is set will then increase to wake you up. playing the last tuned radio station. ➜ USB PC LINK...
... stays in standby mode. ➜ If deactivated, "OFF" is too low, the set correctly. - Checking the timer setting q Press TIMER on the remote. ➜ The timer information will display for a few seconds, then the system resumes to the last active source or stays in standby mode. 22 3139...- If the last tuned volume level is displayed. Before setting the timer, ensure that the clock is displayed. OR Press and hold TIMER on the remote until "SELECT CLOCK OR TIMER" is set will then increase to wake you up. playing the last tuned radio station. ➜ USB PC LINK...

User manual
Page 23
... are only able to activate the Snooze function within 30 minutes after the timer wake Teumppfroormarstialyndbeyamctoivdae.tingthewakeuptimer 1 After timer wake up, press SNOOZE on the remote. ➜ The system will switch to the AUX/CDR IN left terminal.
... are only able to activate the Snooze function within 30 minutes after the timer wake Teumppfroormarstialyndbeyamctoivdae.tingthewakeuptimer 1 After timer wake up, press SNOOZE on the remote. ➜ The system will switch to the AUX/CDR IN left terminal.

User manual
Page 25
... cannot be played. ✔ Insert a disc. ✔ Load in USB PC LINK mode,"NO CONNECTION" is turned on the system again. The remote control does not function properly. ✔ Select the source (CD or TUNER, for latest update on the supplied CD-ROM or visit our website "...www.audio.philips.com" for example) before taking the system for better reception. ✔ Increase the distance between the remote control and the system. ✔ Replace the battery. ✔ Point the remote control directly toward the IR sensor. The timer is of...
... cannot be played. ✔ Insert a disc. ✔ Load in USB PC LINK mode,"NO CONNECTION" is turned on the system again. The remote control does not function properly. ✔ Select the source (CD or TUNER, for latest update on the supplied CD-ROM or visit our website "...www.audio.philips.com" for example) before taking the system for better reception. ✔ Increase the distance between the remote control and the system. ✔ Replace the battery. ✔ Point the remote control directly toward the IR sensor. The timer is of...


