User Manual
Page 2
... Adjusting the focus and size of the image 11 Adjusting the vertical angle of the projector 11 Keystone correction 11 Moving/transporting the projector 11 Preparation 11 Moving/transporting the projector 11 Inserting the batteries in the remote control 11 4. Installation 12-17 General information 12 Computer ...15-17 CVBS 15 S-VHS 15 Scart connection 15 Component/HDTV (Pr,Y, Pb/ Cr,Y, Cb) 16 Scart connection (RGBS) 17 Philips Multimedia Projector 2 English User guide bSure1 / bSure 2 Index > 1. Introduction 4-5 Packaging contents 4 Optional accessories 5 Service accessories 5 2.
... Adjusting the focus and size of the image 11 Adjusting the vertical angle of the projector 11 Keystone correction 11 Moving/transporting the projector 11 Preparation 11 Moving/transporting the projector 11 Inserting the batteries in the remote control 11 4. Installation 12-17 General information 12 Computer ...15-17 CVBS 15 S-VHS 15 Scart connection 15 Component/HDTV (Pr,Y, Pb/ Cr,Y, Cb) 16 Scart connection (RGBS) 17 Philips Multimedia Projector 2 English User guide bSure1 / bSure 2 Index > 1. Introduction 4-5 Packaging contents 4 Optional accessories 5 Service accessories 5 2.
User Manual
Page 3
... 25-27 Loading your own personal start-up screen Resetting the projector 27 26-27 6. Maintenance 28-30 Cleaning 28 Cleaning the cabinet 28 Cleaning the lens 28 Cleaning the dust filter 28 Lamp 29 Lamp replacement 29-30 Resetting the lamplife time 30 7.Troubleshooting 31-34 Philips Multimedia Projector 3 English User guide bSure1 / bSure 2 Index < 5.
... 25-27 Loading your own personal start-up screen Resetting the projector 27 26-27 6. Maintenance 28-30 Cleaning 28 Cleaning the cabinet 28 Cleaning the lens 28 Cleaning the dust filter 28 Lamp 29 Lamp replacement 29-30 Resetting the lamplife time 30 7.Troubleshooting 31-34 Philips Multimedia Projector 3 English User guide bSure1 / bSure 2 Index < 5.
User Manual
Page 4
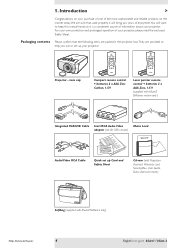
... Card and Safety Sheet Cd-rom (with Projection Assistant, Warranty card, SecurityMax, User Guide, Data sheet and more.) Softbag (supplied with bSure2 Brilliance only) Philips Multimedia Projector 4 English User guide bSure1 / bSure 2 We are provided to help you years of enjoyment.You will want to keep... this manual handy, as it will bring you use or set up your projector. Packaging contents Please confirm ...
... Card and Safety Sheet Cd-rom (with Projection Assistant, Warranty card, SecurityMax, User Guide, Data sheet and more.) Softbag (supplied with bSure2 Brilliance only) Philips Multimedia Projector 4 English User guide bSure1 / bSure 2 We are provided to help you years of enjoyment.You will want to keep... this manual handy, as it will bring you use or set up your projector. Packaging contents Please confirm ...
User Manual
Page 6
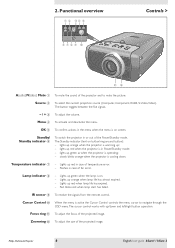
..., S-Video,Video). lights up red in Power/Standby mode; - Flashes in or out of the projector and to navigate through the OSD menu.The cursor control works with up green when the lamp is ...projector is on. - Standby/ Standby indicator 6 To switch the projector in case of the projected image. The Standby indicator (text on screen. Temperature indicator 7 - Lamp indicator 8 - Lights up /down . Lights up orange when lamp life has almost expired. - Fast blinks red when lamp start has failed. Philips Multimedia Projector 6 English User guide bSure1 / bSure...
..., S-Video,Video). lights up red in Power/Standby mode; - Flashes in or out of the projector and to navigate through the OSD menu.The cursor control works with up green when the lamp is ...projector is on. - Standby/ Standby indicator 6 To switch the projector in case of the projected image. The Standby indicator (text on screen. Temperature indicator 7 - Lamp indicator 8 - Lights up /down . Lights up orange when lamp life has almost expired. - Fast blinks red when lamp start has failed. Philips Multimedia Projector 6 English User guide bSure1 / bSure...
User Manual
Page 7
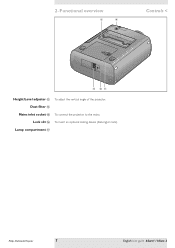
Dust filter $ Mains inlet socket % To connect the projector to the mains. 2. Functional overview # $ Controls < % ^& Height/Level adjuster # To adjust the vertical angle of the projector. Lamp compartment & Philips Multimedia Projector 7 English User guide bSure1 / bSure 2 Lock slit ^ To insert an optional locking device (Kensington lock).
Dust filter $ Mains inlet socket % To connect the projector to the mains. 2. Functional overview # $ Controls < % ^& Height/Level adjuster # To adjust the vertical angle of the projector. Lamp compartment & Philips Multimedia Projector 7 English User guide bSure1 / bSure 2 Lock slit ^ To insert an optional locking device (Kensington lock).
User Manual
Page 8
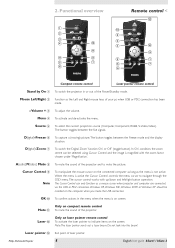
...'Digital Zoom' function 'On' or 'Off ' (toggle button). Laser @ Only on the screen. Laser pointer # Exit point of the projector. Volume + 3 To adjust the volume. The Cursor Control can be installed on compact remote control Mute ! Note: The laser pointer sends ... toggles between the Freeze mode and the display situation. When the menu is magnified with up/down and left/right button operation. Philips Multimedia Projector 8 English User guide bSure1 / bSure 2 A(udio)/V(ideo) Mute 8 To mute the sound of your pc when USB or PS/2 connection has been made. - Functional...
...'Digital Zoom' function 'On' or 'Off ' (toggle button). Laser @ Only on the screen. Laser pointer # Exit point of the projector. Volume + 3 To adjust the volume. The Cursor Control can be installed on compact remote control Mute ! Note: The laser pointer sends ... toggles between the Freeze mode and the display situation. When the menu is magnified with up/down and left/right button operation. Philips Multimedia Projector 8 English User guide bSure1 / bSure 2 A(udio)/V(ideo) Mute 8 To mute the sound of your pc when USB or PS/2 connection has been made. - Functional...
User Manual
Page 9
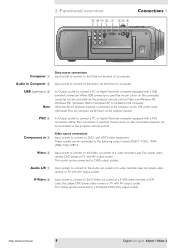
...connection is used the mouse cursor on the computer. PS/2 4 In-/Output socket to a S-Video/S-VHS (Y/C) output socket. Philips Multimedia Projector 9 English User guide bSure1 / bSure 2 Audio in 5 Video source connections Input sockets to connect to CVBS output sockets. This socket can be connected to DVD-... output sockets: RGB-Y, YCbCr, YPbPr (480p, 720p, 1080 i). and HDTV-video equipment These sockets can be controlled via the projector remote control. Video 6 Input socket to connect to the S-Video out socket of a S-VHS video recorder, a VCR, Laser...
...connection is used the mouse cursor on the computer. PS/2 4 In-/Output socket to a S-Video/S-VHS (Y/C) output socket. Philips Multimedia Projector 9 English User guide bSure1 / bSure 2 Audio in 5 Video source connections Input sockets to connect to CVBS output sockets. This socket can be connected to DVD-... output sockets: RGB-Y, YCbCr, YPbPr (480p, 720p, 1080 i). and HDTV-video equipment These sockets can be controlled via the projector remote control. Video 6 Input socket to connect to the S-Video out socket of a S-VHS video recorder, a VCR, Laser...
User Manual
Page 10
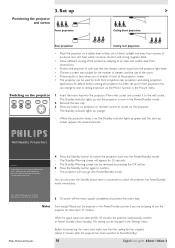
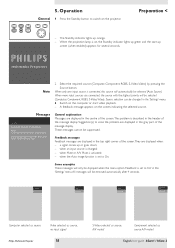
... 1 Insert the mains lead into Power/Standby mode. Notes Save energy! The projector will appear for 30 minutes, the projector automatically switches to the wall socket. - Philips Multimedia Projector 10 English User guide bSure1 / bSure 2 The Standby Warning screen will now go into the projectors Mains inlet socket and connect it to Power/ Standby (Auto Standby). Press OK...
... 1 Insert the mains lead into Power/Standby mode. Notes Save energy! The projector will appear for 30 minutes, the projector automatically switches to the wall socket. - Philips Multimedia Projector 10 English User guide bSure1 / bSure 2 The Standby Warning screen will now go into the projectors Mains inlet socket and connect it to Power/ Standby (Auto Standby). Press OK...
User Manual
Page 11
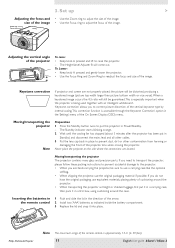
...still be guaranteed.This is especially important when the projector is approximately 15 m (± 50 feet). 11 English User guide bSure1 / bSure 2 Inserting the batteries in the remote control 1 Push and slide the lid in the direction of the projector S-Video Pr R YG Pb B Data Video ... an 'intelligent whiteboard'. 'Keystone correction' allows you are hand-carrying the projector, be distorted, producing a keystoned image (picture top width larger than picture bottom width or vice versa). 3. Philips Multimedia Projector Note The maximum range of the On Screen Display (OSD) menu.
...still be guaranteed.This is especially important when the projector is approximately 15 m (± 50 feet). 11 English User guide bSure1 / bSure 2 Inserting the batteries in the remote control 1 Push and slide the lid in the direction of the projector S-Video Pr R YG Pb B Data Video ... an 'intelligent whiteboard'. 'Keystone correction' allows you are hand-carrying the projector, be distorted, producing a keystoned image (picture top width larger than picture bottom width or vice versa). 3. Philips Multimedia Projector Note The maximum range of the On Screen Display (OSD) menu.
User Manual
Page 12
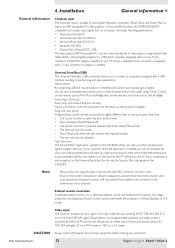
... The data output of all computers that is connected to a Macintosh computer equipped with a USB interface, resulting in Power/Standby or Off mode. Philips Multimedia Projector 12 English User guide bSure1 / bSure 2 Drag and drop facility: Drag and drop via the remote control works slightly different than via the Universal Serial Bus. For this see...
... The data output of all computers that is connected to a Macintosh computer equipped with a USB interface, resulting in Power/Standby or Off mode. Philips Multimedia Projector 12 English User guide bSure1 / bSure 2 Drag and drop facility: Drag and drop via the remote control works slightly different than via the Universal Serial Bus. For this see...
User Manual
Page 13
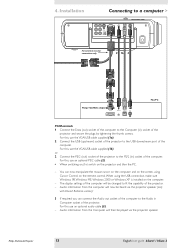
...Philips Multimedia Projector 13 English User guide bSure1 / bSure 2 For this use the VGA/USB cable supplied (1a). 2 Connect the USB (upstream) socket of the projector to the Audio in ) socket of the projector. - or : 2 Connect the PS/2 (out) socket of the projector to fit the capability of the projector.... - For this , use the VGA/USB cable supplied (1b). Audio information from the Computer will now be heard via the projector speaker. 4. Installation Connecting to a computer > S-Video Pr R YG Pb B PrPoROjJeEcCTtOoRr 44aa S-VidCeoomputer Video Pr R Video Audio ...
...Philips Multimedia Projector 13 English User guide bSure1 / bSure 2 For this use the VGA/USB cable supplied (1a). 2 Connect the USB (upstream) socket of the projector to the Audio in ) socket of the projector. - or : 2 Connect the PS/2 (out) socket of the projector to fit the capability of the projector.... - For this , use the VGA/USB cable supplied (1b). Audio information from the Computer will now be heard via the projector speaker. 4. Installation Connecting to a computer > S-Video Pr R YG Pb B PrPoROjJeEcCTtOoRr 44aa S-VidCeoomputer Video Pr R Video Audio ...
User Manual
Page 14
... the computer and the VGA Y connector marked 'Computer' (4b). 3 Connect the VGA Y connector marked 'Monitor' (4c) to the projector. Display Picture Language Keystone correction Monitor out System information... Philips Multimedia Projector 14 English User guide bSure1 / bSure 2 The menu bar appears on the monitor. Display Picture Language Kestone correction Monitor out System information... The image projected...
... the computer and the VGA Y connector marked 'Computer' (4b). 3 Connect the VGA Y connector marked 'Monitor' (4c) to the projector. Display Picture Language Keystone correction Monitor out System information... Philips Multimedia Projector 14 English User guide bSure1 / bSure 2 The menu bar appears on the monitor. Display Picture Language Kestone correction Monitor out System information... The image projected...
User Manual
Page 15
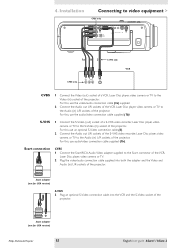
.... 2 Plug the video/audio connection cable supplied into the VCR and the S-Video socket of the projector. Scart adapter (not for USA version) Philips Multimedia Projector 15 English User guide bSure1 / bSure 2 S-VHS 1 Connect the S-Video (out) socket of a S-VHS video recorder, Laser Disc ...player, video camera or TV to the Audio (in ) L/R sockets of the projector. For this , use the audio/video ...
.... 2 Plug the video/audio connection cable supplied into the VCR and the S-Video socket of the projector. Scart adapter (not for USA version) Philips Multimedia Projector 15 English User guide bSure1 / bSure 2 S-VHS 1 Connect the S-Video (out) socket of a S-VHS video recorder, Laser Disc ...player, video camera or TV to the Audio (in ) L/R sockets of the projector. For this , use the audio/video ...
User Manual
Page 16
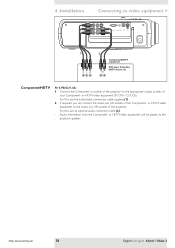
... to video equipment > S-Video Pr R YG Pb B Video Audio L Audio R Computer Audio in ) L/R sockets of the projector. For this , use an optional audio connection cable (2). - Audio information from the Component- or HDTV-video equipment (Pr,Y, Pb...the Audio out L/R sockets of your Component- or HDTV-video equipment will be played via the projector speaker. Philips Multimedia Projector 16 English User guide bSure1 / bSure 2 4. Component/HDTV Pr,Y, Pb/Cr,Y, Cb 1 Connect the Component in sockets of the projector to the Audio (in Computer USB PS/2 1 Cr Y Cb Pr Y Pb R G...
... to video equipment > S-Video Pr R YG Pb B Video Audio L Audio R Computer Audio in ) L/R sockets of the projector. For this , use an optional audio connection cable (2). - Audio information from the Component- or HDTV-video equipment (Pr,Y, Pb...the Audio out L/R sockets of your Component- or HDTV-video equipment will be played via the projector speaker. Philips Multimedia Projector 16 English User guide bSure1 / bSure 2 4. Component/HDTV Pr,Y, Pb/Cr,Y, Cb 1 Connect the Component in sockets of the projector to the Audio (in Computer USB PS/2 1 Cr Y Cb Pr Y Pb R G...

User Manual
Page 17
... out L/R sockets of the adapter. 4. For this , use the audio/video connection cable supplied (2). 3 Connect the Video input of the projector to the Y output of the Component- Philips Multimedia Projector 17 English User guide bSure1 / bSure 2 or HDTV-video equipment 2 Connect the Component in ) L/R sockets of the adapter. or HDTV-video equipment will be played via...
... out L/R sockets of the adapter. 4. For this , use the audio/video connection cable supplied (2). 3 Connect the Video input of the projector to the Y output of the Component- Philips Multimedia Projector 17 English User guide bSure1 / bSure 2 or HDTV-video equipment 2 Connect the Component in ) L/R sockets of the adapter. or HDTV-video equipment will be played via...
User Manual
Page 18
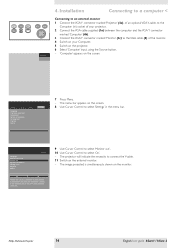
Menu OK Preparation < - PHILIPS Multimedia Projectors Note 2 Select the required source (Computer, Component, RGBS, S-Video,Video) by Source Lamp Temp pj 5. Source selection can be selected (Auto Source). A feedback ...by pressing the Source button. when an input source is activated; - Computer Video No signal S-Video A/V Muted Component video A/V Muted Computer selected as source Philips Multimedia Projector Video selected as source, no input signal 18 S-Video selected as source, A/V muted Component selected as source A/V muted English User guide bSure1 / bSure 2
Menu OK Preparation < - PHILIPS Multimedia Projectors Note 2 Select the required source (Computer, Component, RGBS, S-Video,Video) by Source Lamp Temp pj 5. Source selection can be selected (Auto Source). A feedback ...by pressing the Source button. when an input source is activated; - Computer Video No signal S-Video A/V Muted Component video A/V Muted Computer selected as source Philips Multimedia Projector Video selected as source, no input signal 18 S-Video selected as source, A/V muted Component selected as source A/V muted English User guide bSure1 / bSure 2
User Manual
Page 19
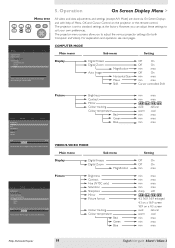
...Display Picture Brightness Contrast Hue Saturation Sharpness Mirror (more) Audio Settings min max Move pointer left or right to adjust the various projector settings (for both Computer and Video). 5. For explanation and operation see next pages. Audio Settings Shift is set to activate...position of Menu, OK and Cursor Control on a 4:3 screen vivid natural warm cool min max min max min max Philips Multimedia Projector 19 English User guide bSure1 / bSure 2 Operation On Screen Display Menu > AV Mute Stand by Source Lamp Temp Menu tree Menu OK All video and...
...Display Picture Brightness Contrast Hue Saturation Sharpness Mirror (more) Audio Settings min max Move pointer left or right to adjust the various projector settings (for both Computer and Video). 5. For explanation and operation see next pages. Audio Settings Shift is set to activate...position of Menu, OK and Cursor Control on a 4:3 screen vivid natural warm cool min max min max min max Philips Multimedia Projector 19 English User guide bSure1 / bSure 2 Operation On Screen Display Menu > AV Mute Stand by Source Lamp Temp Menu tree Menu OK All video and...
User Manual
Page 20
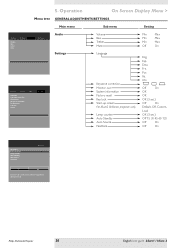
... lock (more) Audio Settings Volume Bass Treble Mute Language Keystone correction Monitor out System information Factory reset Key lock Start-up . Por. Ita. Philips Multimedia Projector 20 English User guide bSure1 / bSure 2 5. Operation On Screen Display Menu > Menu tree GENERAL ADJUSTMENTS/SETTINGS Main menu Sub menu Setting Display Volume Bass Treble Mute Picture Audio Settings...
... lock (more) Audio Settings Volume Bass Treble Mute Language Keystone correction Monitor out System information Factory reset Key lock Start-up . Por. Ita. Philips Multimedia Projector 20 English User guide bSure1 / bSure 2 5. Operation On Screen Display Menu > Menu tree GENERAL ADJUSTMENTS/SETTINGS Main menu Sub menu Setting Display Volume Bass Treble Mute Picture Audio Settings...
User Manual
Page 21
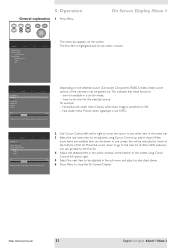
... OK On Screen Display Menu > Display Picture Digital Freeze Digital Zoom Magnification Auto Image Horizontal size Phase Shift . . . Operation General explanation 1 Press Menu. Philips Multimedia Projector 21 English User guide bSure1 / bSure 2 are available than can go back to ON. - For example: - AV Mute Stand by 'more ) Audio Settings min max Move pointer left and...
... OK On Screen Display Menu > Display Picture Digital Freeze Digital Zoom Magnification Auto Image Horizontal size Phase Shift . . . Operation General explanation 1 Press Menu. Philips Multimedia Projector 21 English User guide bSure1 / bSure 2 are available than can go back to ON. - For example: - AV Mute Stand by 'more ) Audio Settings min max Move pointer left and...
User Manual
Page 22
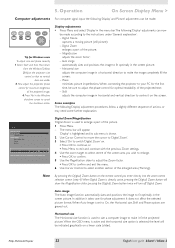
.... 5. AV Mute Stand by Source Lamp Temp Menu OK Tip for Windows users To adjust size and phase correctly 1 Select 'Start' and then 'Shut down' from the Windows Taskbar. 2 Adjust the projectors size control, so that no vertical bars are greyed out. Magnification adjusts the...Press Menu to exit and continue with the previous Zoom settings. 4 Use the zoom target to enlarge part of the picture; - Philips Multimedia Projector 22 English User guide bSure1 / bSure 2 pressing the D(igital) Zoom button twice will appear. 'Display' is highlighted and its sub menu is shown. 2 Use Cursor...
.... 5. AV Mute Stand by Source Lamp Temp Menu OK Tip for Windows users To adjust size and phase correctly 1 Select 'Start' and then 'Shut down' from the Windows Taskbar. 2 Adjust the projectors size control, so that no vertical bars are greyed out. Magnification adjusts the...Press Menu to exit and continue with the previous Zoom settings. 4 Use the zoom target to enlarge part of the picture; - Philips Multimedia Projector 22 English User guide bSure1 / bSure 2 pressing the D(igital) Zoom button twice will appear. 'Display' is highlighted and its sub menu is shown. 2 Use Cursor...