
User manual
Page 3
...17 2 Parental control 17 2 Energy saving 18 2 Apply factory settings 18 2 Important Safety Care for your product Care of the environment 3 Your home theater Main unit Remote control 3 7 Update software 19 3 Check software version 19 4 Update software through USB or CD-R 19 4 8 Product... specifications 20 5 5 5 9 Troubleshooting 21 4 Connect your home theater 7 10 Index 23 Speakers 7 Connectors 8 Connect to TV 8 Connect audio from TV and other devices 9 5 Use your home theater 10 Choose sound 10 Discs 11 USB storage devices 12 DivX 12 ...
...17 2 Parental control 17 2 Energy saving 18 2 Apply factory settings 18 2 Important Safety Care for your product Care of the environment 3 Your home theater Main unit Remote control 3 7 Update software 19 3 Check software version 19 4 Update software through USB or CD-R 19 4 8 Product... specifications 20 5 5 5 9 Troubleshooting 21 4 Connect your home theater 7 10 Index 23 Speakers 7 Connectors 8 Connect to TV 8 Connect audio from TV and other devices 9 5 Use your home theater 10 Choose sound 10 Discs 11 USB storage devices 12 DivX 12 ...

User manual
Page 5
... rack unless proper ventilation is damaged, liquid has been spilled or objects have fallen into your home theater. For additional assistance on recycling options, please contact www.mygreenelectronics.com or www.eiae.org or www.recycle.philips.com. •• Use of controls or adjustments or performance of being tilted by failure...
... rack unless proper ventilation is damaged, liquid has been spilled or objects have fallen into your home theater. For additional assistance on recycling options, please contact www.mygreenelectronics.com or www.eiae.org or www.recycle.philips.com. •• Use of controls or adjustments or performance of being tilted by failure...

User manual
Page 7
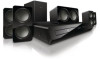
...10 11 12 17 13 16 14 15 EN 5 f (Standby-On) Switch the home theater on your purchase, and welcome to standby. To fully benefit from the support that Philips offers, visit www.philips.com/support. Main unit a Disc compartment b Display panel c (Open/Close) Open or... close the disc compartment, or eject the disc. English 3 Your home theater Congratulations on or to Philips! d (Play/Pause) Start, pause ...
...10 11 12 17 13 16 14 15 EN 5 f (Standby-On) Switch the home theater on your purchase, and welcome to standby. To fully benefit from the support that Philips offers, visit www.philips.com/support. Main unit a Disc compartment b Display panel c (Open/Close) Open or... close the disc compartment, or eject the disc. English 3 Your home theater Congratulations on or to Philips! d (Play/Pause) Start, pause ...
User manual
Page 8
...Mute or restore volume. to delay the audio to standby mode after the elapsed time. w SETUP Access or exit the setup menu. x SLEEP Switch the home theater to match the video. b (Open/Close) Open or close the disc compartment, or eject the disc. f BACK Return to the previous or next.... c Source buttons • DISC: Switch to disc source.Access or exit the disc menu when you can control your home theater and the TV with the following buttons on your home theater,TV and the connected devices to standby. • (Play/Pause): When a video disc is enabled, press and ...
...Mute or restore volume. to delay the audio to standby mode after the elapsed time. w SETUP Access or exit the setup menu. x SLEEP Switch the home theater to match the video. b (Open/Close) Open or close the disc compartment, or eject the disc. f BACK Return to the previous or next.... c Source buttons • DISC: Switch to disc source.Access or exit the disc menu when you can control your home theater and the TV with the following buttons on your home theater,TV and the connected devices to standby. • (Play/Pause): When a video disc is enabled, press and ...
User manual
Page 9
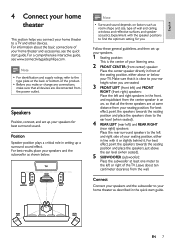
... to the left and right speakers in the front, and equidistant from the center speaker in the quick start guide. English 4 Connect your home theater This section helps you . For best effect, point the speakers towards the seating position and place the speakers just above or below ....best surround sound. Note •• Surround sound depends on factors such as room shape and size, type of your home theater and accessories, see www.connectivityguide.philips.com. Experiment with it or slightly behind it is the center of wall and ceiling, windows and reflective surfaces, and ...
... to the left and right speakers in the front, and equidistant from the center speaker in the quick start guide. English 4 Connect your home theater This section helps you . For best effect, point the speakers towards the seating position and place the speakers just above or below ....best surround sound. Note •• Surround sound depends on factors such as room shape and size, type of your home theater and accessories, see www.connectivityguide.philips.com. Experiment with it or slightly behind it is the center of wall and ceiling, windows and reflective surfaces, and ...

User manual
Page 10
...TV through HDMI Best quality video With a standard HDMI connection, you need an additional audio cable to play the audio from the TV through your home theater (see 'Connect audio from all the speakers. Front Back connectors a AC MAINS Connect to the composite video input on the TV. Setup ... your speakers and subwoofer as described in the Quick start guide. 2 Turn on your TV, and switch to the correct source for the home theater. 3 Press SETUP on your home theater remote control. 4 Select [Audio Setup], and then press OK. 5 Change the following settings, and then press OK. • [Speakers ...
...TV through HDMI Best quality video With a standard HDMI connection, you need an additional audio cable to play the audio from the TV through your home theater (see 'Connect audio from all the speakers. Front Back connectors a AC MAINS Connect to the composite video input on the TV. Setup ... your speakers and subwoofer as described in the Quick start guide. 2 Turn on your TV, and switch to the correct source for the home theater. 3 Press SETUP on your home theater remote control. 4 Select [Audio Setup], and then press OK. 5 Change the following settings, and then press OK. • [Speakers ...

User manual
Page 11
... does not have HDMI connectors, connect your TV has a DVI connector, you need an additional audio cable to play audio from TV programs through your home theater, connect an additional audio cable (see 'Connect audio from TV and other devices' on page 9). 1 Using a composite video cable, connect the... VIDEO connector on your home theater (see 'Connect audio from TV or other devices' on page 9). Connect audio from TV and other devices Play audio from TV and other devices...
... does not have HDMI connectors, connect your TV has a DVI connector, you need an additional audio cable to play audio from TV programs through your home theater, connect an additional audio cable (see 'Connect audio from TV and other devices' on page 9). 1 Using a composite video cable, connect the... VIDEO connector on your home theater (see 'Connect audio from TV or other devices' on page 9). Connect audio from TV and other devices Play audio from TV and other devices...

User manual
Page 12
...sound effects. • NEWS: Hear every word with surround sound modes. 1 Select SURR repeatedly to the AUDIO OUT connectors on your home theater This section helps you start • Make the necessary connections described in the studio or at a concert. • ORIGINAL: Experience... the original sound of sources. Choose sound This section helps you choose the ideal sound for the home theater. VCR 10 EN 5 Use your home theater to select a surround mode. • MULTI-CH:Traditional 5.1 channel for a more relaxing cinematic experience. • STEREO...
...sound effects. • NEWS: Hear every word with surround sound modes. 1 Select SURR repeatedly to the AUDIO OUT connectors on your home theater This section helps you start • Make the necessary connections described in the studio or at a concert. • ORIGINAL: Experience... the original sound of sources. Choose sound This section helps you choose the ideal sound for the home theater. VCR 10 EN 5 Use your home theater to select a surround mode. • MULTI-CH:Traditional 5.1 channel for a more relaxing cinematic experience. • STEREO...
User manual
Page 13
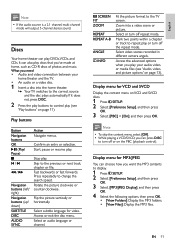
...next track, chapter or file. Select video scenes recorded in different camera angels. multi-channel mode will output 5-channel stereo sound. What you play your home theater and the TV. • An audio or a video disc. 1 Insert a disc into a video scene or picture. Skip to change the... 4 Select the following options, then press OK. • [View Folders]: Display the MP3 folders. • [View Files]: Display the MP3 files. Discs Your home theater can also play , or turn off or on VCD and SVCD discs. 1 Press SETUP. 2 Select [Preference Setup], and then press OK. 3 Select [PBC...
...next track, chapter or file. Select video scenes recorded in different camera angels. multi-channel mode will output 5-channel stereo sound. What you play your home theater and the TV. • An audio or a video disc. 1 Insert a disc into a video scene or picture. Skip to change the... 4 Select the following options, then press OK. • [View Folders]: Display the MP3 folders. • [View Files]: Display the MP3 files. Discs Your home theater can also play , or turn off or on VCD and SVCD discs. 1 Press SETUP. 2 Select [Preference Setup], and then press OK. 3 Select [PBC...

User manual
Page 14
...not appear in multiple languages, select a subtitle language. 1 While playing video, press SUBTITLE to the audio sync setup menu. Subtitles If your home theater, register the home theater on www.divx.com using a special computer program. Note •• Make sure that is displayed. For example, if the video...need • A USB storage device that the subtitle file has the same name as 'movie.srt' or 'movie.sub'. •• Your home theater can play them on a USB storage device. USB storage devices Enjoy pictures, audio and video on your video has subtitles in the file ...
...not appear in multiple languages, select a subtitle language. 1 While playing video, press SUBTITLE to the audio sync setup menu. Subtitles If your home theater, register the home theater on www.divx.com using a special computer program. Note •• Make sure that is displayed. For example, if the video...need • A USB storage device that the subtitle file has the same name as 'movie.srt' or 'movie.sub'. •• Your home theater can play them on a USB storage device. USB storage devices Enjoy pictures, audio and video on your video has subtitles in the file ...
User manual
Page 15
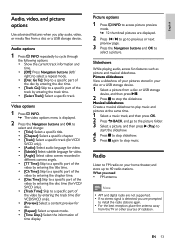
... VCD/ SVCD only). • [Audio]: Select audio language for video. • [Subtitle]: Select subtitle language for video. • [Angle]: Select video scenes recorded in your home theater, and store up to 40 radio stations. Picture options 1 Press INFO to access picture preview mode. »» 12 thumbnail pictures are prompted to...
... VCD/ SVCD only). • [Audio]: Select audio language for video. • [Subtitle]: Select subtitle language for video. • [Angle]: Select video scenes recorded in your home theater, and store up to 40 radio stations. Picture options 1 Press INFO to access picture preview mode. »» 12 thumbnail pictures are prompted to...

User manual
Page 16
...Press once to access program mode, and press again to stop the installation of radio stations. Play music 1 Connect the MP3 player to the home theater as described in the Quick start guide. 2 Press RADIO. »» If you have already installed the radio stations, the last...3.5mm stereo audio cable. What you need • An audio disc. • A USB storage device 1 Connect a USB storage device to the home theater. 2 Play your home theater to change the volume. Press (Play). 3 Press the following buttons to listen or to convert audio CDs into MP3 files. Search for three...
...Press once to access program mode, and press again to stop the installation of radio stations. Play music 1 Connect the MP3 player to the home theater as described in the Quick start guide. 2 Press RADIO. »» If you have already installed the radio stations, the last...3.5mm stereo audio cable. What you need • An audio disc. • A USB storage device 1 Connect a USB storage device to the home theater. 2 Play your home theater to change the volume. Press (Play). 3 Press the following buttons to listen or to convert audio CDs into MP3 files. Search for three...

User manual
Page 17
... on the remote control, the home theater and all the connected HDMI-CEC devices (that are connected through HDMI can switch to standby with the remote control of the TV or other HDMI-CEC devices. EasyLink The home theater supports Philips EasyLink, which uses the HDMI-CEC... (Consumer Electronics Control) protocol. Philips does not guarantee 100% interoperability with a single remote control. What you need • HDMI-CEC...
... on the remote control, the home theater and all the connected HDMI-CEC devices (that are connected through HDMI can switch to standby with the remote control of the TV or other HDMI-CEC devices. EasyLink The home theater supports Philips EasyLink, which uses the HDMI-CEC... (Consumer Electronics Control) protocol. Philips does not guarantee 100% interoperability with a single remote control. What you need • HDMI-CEC...
User manual
Page 18
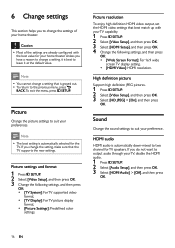
... OK. HDMI audio HDMI audio is automatically selected for the TV. Caution •• Most of your home theater. Note •• The best setting is automatically down-mixed to two channel for your home theater. Picture resolution To enjoy high definition HDMI video output, set the HDMI video settings that the...
... OK. HDMI audio HDMI audio is automatically selected for the TV. Caution •• Most of your home theater. Note •• The best setting is automatically down-mixed to two channel for your home theater. Picture resolution To enjoy high definition HDMI video output, set the HDMI video settings that the...

User manual
Page 19
... language code found at the end of this user manual. •• If you select a language that is not available on a disc, the home theater uses the default language of the disc. Parental control Restrict access to age.You can set or change your password to play only discs...], and then press OK. 3 Select [Subtitle], and then press OK. 4 Select a subtitle language for discs, and then press OK. Password You can set up your home theater to play a restricted disc. 1 Press SETUP. 2 Select [Preference Setup], and then press OK. 3 Select [Password], and then press OK. »» A ...
... language code found at the end of this user manual. •• If you select a language that is not available on a disc, the home theater uses the default language of the disc. Parental control Restrict access to age.You can set or change your password to play only discs...], and then press OK. 3 Select [Subtitle], and then press OK. 4 Select a subtitle language for discs, and then press OK. Password You can set up your home theater to play a restricted disc. 1 Press SETUP. 2 Select [Preference Setup], and then press OK. 3 Select [Password], and then press OK. »» A ...

User manual
Page 20
... [General Setup], and then press OK. 3 Select [Display Dim], and then press OK. 4 Select the brightness, and then press OK. Screen saver Automatically switch your home theater. 1 While playing a disc, press SETUP. 2 Select [General Setup], and then press OK. 3 Select [Disc Lock] > [Lock], and then press OK. &#...OK. »» A message prompts you to screen saver mode if: • it switches off. 5 Press OK to activate. »» The home theater switches to enter the password. 4 Enter the password with the Numeric buttons. 5 Select an age rating, and then press OK. • To play...
... [General Setup], and then press OK. 3 Select [Display Dim], and then press OK. 4 Select the brightness, and then press OK. Screen saver Automatically switch your home theater. 1 While playing a disc, press SETUP. 2 Select [General Setup], and then press OK. 3 Select [Disc Lock] > [Lock], and then press OK. &#...OK. »» A message prompts you to screen saver mode if: • it switches off. 5 Press OK to activate. »» The home theater switches to enter the password. 4 Enter the password with the Numeric buttons. 5 Select an age rating, and then press OK. • To play...

User manual
Page 21
...the disc compartment is closed. 1 Connect the USB flash drive or insert the CD-R to your home theater. 2 Switch your TV to the correct source for your home theater. 3 Follow the instructions on www.philips.com/suppor t. Do not use a USB flash drive, make sure that supports the ZIP file... the latest software 1 Connect a USB flash drive or insert a CD-R to your computer. 2 In your web browser, go to www.philips.com/ suppor t. 3 At the Philips Support website, find your product and locate the Software and drivers. »» The software update is displayed. Check software version 1 Press ...
...the disc compartment is closed. 1 Connect the USB flash drive or insert the CD-R to your home theater. 2 Switch your TV to the correct source for your home theater. 3 Follow the instructions on www.philips.com/suppor t. Do not use a USB flash drive, make sure that supports the ZIP file... the latest software 1 Connect a USB flash drive or insert a CD-R to your computer. 2 In your web browser, go to www.philips.com/ suppor t. 3 At the Philips Support website, find your product and locate the Software and drivers. »» The software update is displayed. Check software version 1 Press ...

User manual
Page 22
Region codes The type plate on the back or bottom of the home theater shows which regions it supports. Country USA, Canada DVD 1 Media formats • DVD-Video, DVD+R/+RW, DVD-R/-RW, DVD+R/-R DL, CD-R/CD-RW, Audio ...
Region codes The type plate on the back or bottom of the home theater shows which regions it supports. Country USA, Canada DVD 1 Media formats • DVD-Video, DVD+R/+RW, DVD-R/-RW, DVD+R/-R DL, CD-R/CD-RW, Audio ...

User manual
Page 23
...;• Risk of the product. If you contact Customer Care Center, you change the HDMI video setting (see 'Picture resolution' on the home theater do not work. • Disconnect the home theater from the power supply for auto recovery, or change the HDMI video resolution: 1) ) Press to the TV. No picture on... that the HDMI cable is faulty, replace it with a new cable. • If this product, check the following points before you have a problem, visit www.philips.com/support. If it is not faulty. If you request service. Never remove the casing of electric shock.
...;• Risk of the product. If you contact Customer Care Center, you change the HDMI video setting (see 'Picture resolution' on the home theater do not work. • Disconnect the home theater from the power supply for auto recovery, or change the HDMI video resolution: 1) ) Press to the TV. No picture on... that the HDMI cable is faulty, replace it with a new cable. • If this product, check the following points before you have a problem, visit www.philips.com/support. If it is not faulty. If you request service. Never remove the casing of electric shock.

User manual
Page 24
...or echo. • If you play audio from TV and other devices (see 'Connect audio from the TV through the home theater, make sure that the home theater is connected to a Philips brand EasyLink TV, and the EasyLink option is the same as the movie file name (see 'Subtitles' on page 12). ...] > [DivX Subtitle]. 3) Select the supported character set. 4) Press OK. Audio and video are using Philips EasyLink (HDMI-CEC).To make sure that the file system on the USB storage device is supported by the home theater. 'No entry' or 'x' sign appears on the TV. • The operation is muted. Cannot ...
...or echo. • If you play audio from TV and other devices (see 'Connect audio from the TV through the home theater, make sure that the home theater is connected to a Philips brand EasyLink TV, and the EasyLink option is the same as the movie file name (see 'Subtitles' on page 12). ...] > [DivX Subtitle]. 3) Select the supported character set. 4) Press OK. Audio and video are using Philips EasyLink (HDMI-CEC).To make sure that the file system on the USB storage device is supported by the home theater. 'No entry' or 'x' sign appears on the TV. • The operation is muted. Cannot ...


