User manual
Page 4
... or more information and software tools to which can radiate radio frequency energy and, if not installed and used under license from digital apparatus as set out in accordance with the instruction manual, may cause harmful interference to radio or television reception, which the receiver is connected. •• Consult the dealer or an experienced radio/ TV technician for help. 2 EN DivX®, DivX...
... or more information and software tools to which can radiate radio frequency energy and, if not installed and used under license from digital apparatus as set out in accordance with the instruction manual, may cause harmful interference to radio or television reception, which the receiver is connected. •• Consult the dealer or an experienced radio/ TV technician for help. 2 EN DivX®, DivX...
User manual
Page 8
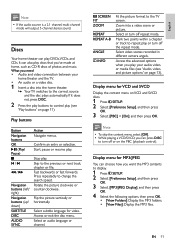
...; Skip to a previous menu screen. i VOL +/Increase or decrease volume. k Numeric buttons Select an item to fast backward or fast forward; Press the Navigation buttons (left or right to play options while playing a disc or a USB storage device. r AUDIO SYNC • Select an audio language or channel. • Press and hold to standby mode after the elapsed time. v INFO Access more play . x SLEEP Switch the home theater to access audio delay setting, then press +/-
...; Skip to a previous menu screen. i VOL +/Increase or decrease volume. k Numeric buttons Select an item to fast backward or fast forward; Press the Navigation buttons (left or right to play options while playing a disc or a USB storage device. r AUDIO SYNC • Select an audio language or channel. • Press and hold to standby mode after the elapsed time. v INFO Access more play . x SLEEP Switch the home theater to access audio delay setting, then press +/-
User manual
Page 9
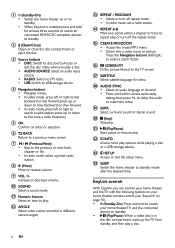
... 4 Connect your home theater This section helps you connect your speakers and the subwoofer as shown below your listening area. 2 FRONT CENTER (front center) speaker: Place the center speaker directly in front of the product. •• Before you make or change any connections, make sure that all the three speakers are seated. 3 FRONT LEFT (front left) and FRONT RIGHT (front right) speakers: Place the left or right of wall...
... 4 Connect your home theater This section helps you connect your speakers and the subwoofer as shown below your listening area. 2 FRONT CENTER (front center) speaker: Place the center speaker directly in front of the product. •• Before you make or change any connections, make sure that all the three speakers are seated. 3 FRONT LEFT (front left) and FRONT RIGHT (front right) speakers: Place the left or right of wall...

User manual
Page 10
... Signal input from TV and other devices to your home theater. Front Back connectors a AC MAINS Connect to the supplied speakers and subwoofer. Setup Set up your speakers through the speaker setup menu. 1 Connect your speakers and subwoofer as described in the Quick start guide. 2 Turn on your TV, and switch to the correct source for the home theater. 3 Press SETUP on your home theater remote control. 4 Select [Audio Setup], and then press OK. 5 Change the following settings, and then press OK. • [Speakers Volume]: Set the volume level...
... Signal input from TV and other devices to your home theater. Front Back connectors a AC MAINS Connect to the supplied speakers and subwoofer. Setup Set up your speakers through the speaker setup menu. 1 Connect your speakers and subwoofer as described in the Quick start guide. 2 Turn on your TV, and switch to the correct source for the home theater. 3 Press SETUP on your home theater remote control. 4 Select [Audio Setup], and then press OK. 5 Change the following settings, and then press OK. • [Speakers Volume]: Set the volume level...

User manual
Page 11
... a digital optical cable Best quality audio Using an optical cable, connect the OPTICAL connector on your home theater to the OPTICAL OUT connector on page 9). Connect audio from TV and other devices Play audio from TV or other device. Option 1: Connect audio through composite video Basic quality video If your TV does not have HDMI connectors, connect your home theater, press SOURCE repeatedly to select the correct audio input. Note •• If your TV has a DVI connector, you play a disc on your home theater, the video is...
... a digital optical cable Best quality audio Using an optical cable, connect the OPTICAL connector on your home theater to the OPTICAL OUT connector on page 9). Connect audio from TV and other devices Play audio from TV or other device. Option 1: Connect audio through composite video Basic quality video If your TV does not have HDMI connectors, connect your home theater, press SOURCE repeatedly to select the correct audio input. Note •• If your TV has a DVI connector, you play a disc on your home theater, the video is...
User manual
Page 13
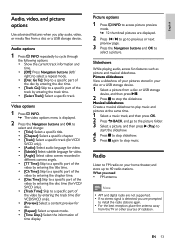
... OK. • [View Folders]: Display the MP3 folders. • [View Files]: Display the MP3 files. Note •• To skip the content menu, select [Off]. •• While playing a VCD/SVCD, you play your home theater and the TV. • An audio or a video disc. 1 Insert a disc into a video scene or picture. multi-channel mode will output 5-channel stereo sound. Skip to the correct source and the disc plays automatically. Select or turn off repeat mode. Mark two points...
... OK. • [View Folders]: Display the MP3 folders. • [View Files]: Display the MP3 files. Note •• To skip the content menu, select [Off]. •• While playing a VCD/SVCD, you play your home theater and the TV. • An audio or a video disc. 1 Insert a disc into a video scene or picture. multi-channel mode will output 5-channel stereo sound. Skip to the correct source and the disc plays automatically. Select or turn off repeat mode. Mark two points...

User manual
Page 14
... pictures, audio and video on the remote control for FAT, and complies with the video. 5 Press OK to the audio sync setup menu. Note •• You can use digital cameras connected by USB if they can play subtitle files in the following formats: .srt, .sub, .txt, .ssa, .ass, smi, and .sami.These files do not appear in multiple languages, select a subtitle language. 1 While playing video, press SUBTITLE to control play (see 'Play buttons...
... pictures, audio and video on the remote control for FAT, and complies with the video. 5 Press OK to the audio sync setup menu. Note •• You can use digital cameras connected by USB if they can play subtitle files in the following formats: .srt, .sub, .txt, .ssa, .ass, smi, and .sami.These files do not appear in multiple languages, select a subtitle language. 1 While playing video, press SUBTITLE to control play (see 'Play buttons...
User manual
Page 15
... install the radio stations again. •• For the best reception, place the antenna away from a disc or a USB storage device. EN 13 Video options 1 Press INFO. »» The video options menu is detected, you are displayed. 2 Press / to go to the picture folder. 3 Select a picture, and then press (Play) to start the slideshow. 4 Press to stop slideshow. 5 Press again to a specific part of time display. Picture slideshows View...
... install the radio stations again. •• For the best reception, place the antenna away from a disc or a USB storage device. EN 13 Video options 1 Press INFO. »» The video options menu is detected, you are displayed. 2 Press / to go to the picture folder. 3 Select a picture, and then press (Play) to start the slideshow. 4 Press to stop slideshow. 5 Press again to a specific part of time display. Picture slideshows View...

User manual
Page 16
... buttons (up/ down) PROGRAM Action Select a preset radio station. Press to store the radio station. Manual: Press once to access program mode, and press again to stop the installation of radio stations. What you need • An MP3 player. • A 3.5mm stereo audio cable. Press and hold for three seconds to is displayed.The right panel contains MP3 settings and the left panel shows the audio tracks. What you need • An audio disc. • A USB storage device 1 Connect a USB...
... buttons (up/ down) PROGRAM Action Select a preset radio station. Press to store the radio station. Manual: Press once to access program mode, and press again to stop the installation of radio stations. What you need • An MP3 player. • A 3.5mm stereo audio cable. Press and hold for three seconds to is displayed.The right panel contains MP3 settings and the left panel shows the audio tracks. What you need • An audio disc. • A USB storage device 1 Connect a USB...

User manual
Page 17
... HDMI-CEC operations. What you play a disc in your home theater, you can be used to store MP3 files. 5 Select [On], and then press OK. EN 15 EasyLink-compliant devices that support one -touch standby is in the USB storage device. • To exit the menu, select [Exit], and then press OK. Philips does not guarantee 100% interoperability with a single remote control. For details, see the manual...
... HDMI-CEC operations. What you play a disc in your home theater, you can be used to store MP3 files. 5 Select [On], and then press OK. EN 15 EasyLink-compliant devices that support one -touch standby is in the USB storage device. • To exit the menu, select [Exit], and then press OK. Philips does not guarantee 100% interoperability with a single remote control. For details, see the manual...
User manual
Page 18
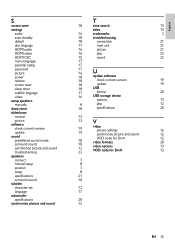
... selected for TV speakers. Picture settings and format 1 Press SETUP. 2 Select [Video Setup], and then press OK. 3 Change the following settings, and then press OK: • [Wide Screen Format]: For 16:9 wide screen TV display setting. • [HDMI Video]: HDMI resolution. If you change the setting, make sure that is best to two channel for the TV. Sound Change the sound settings to output audio through your preference. If you do not want to suit your TV, disable the HDMI audio. 1 Press SETUP. 2 Select [Audio Setup...
... selected for TV speakers. Picture settings and format 1 Press SETUP. 2 Select [Video Setup], and then press OK. 3 Change the following settings, and then press OK: • [Wide Screen Format]: For 16:9 wide screen TV display setting. • [HDMI Video]: HDMI resolution. If you change the setting, make sure that is best to two channel for the TV. Sound Change the sound settings to output audio through your preference. If you do not want to suit your TV, disable the HDMI audio. 1 Press SETUP. 2 Select [Audio Setup...

User manual
Page 19
... the home menu, audio, and subtitles. Parental control Restrict access to play only discs with ratings according to play a restricted disc. 1 Press SETUP. 2 Select [Preference Setup], and then press OK. 3 Select [Password], and then press OK. »» A change password menu is not available on a disc, the home theater uses the default language of this user manual. •• If you select a language that is displayed. 4 Follow the instructions on the TV to set up your home theater to...
... the home menu, audio, and subtitles. Parental control Restrict access to play only discs with ratings according to play a restricted disc. 1 Press SETUP. 2 Select [Preference Setup], and then press OK. 3 Select [Password], and then press OK. »» A change password menu is not available on a disc, the home theater uses the default language of this user manual. •• If you select a language that is displayed. 4 Follow the instructions on the TV to set up your home theater to...

User manual
Page 23
.... Write the numbers here: Model No Serial No Main unit The buttons on the home theater do not work. • Disconnect the home theater from the power supply for auto recovery, or change the HDMI video setting (see 'Picture resolution' on page 16). If it with a new cable. • If this product, check the following points before you will be asked for the home theater. English Speakers Center speaker: • Output power: 50...
.... Write the numbers here: Model No Serial No Main unit The buttons on the home theater do not work. • Disconnect the home theater from the power supply for auto recovery, or change the HDMI video setting (see 'Picture resolution' on page 16). If it with a new cable. • If this product, check the following points before you will be asked for the home theater. English Speakers Center speaker: • Output power: 50...

User manual
Page 24
... SOURCE repeatedly to select the correct audio input. Sound No sound from home theater speakers. • Connect the audio cable from your home theater to your TV or other devices (see 'Connect audio from the TV through the home theater, make sure that the home theater supports the region code of the disc (see 'Region codes' on page 12). • Select the correct character set: 1) Press SETUP. 2) Select [Preference Setup] > [DivX Subtitle]. 3) Select the supported character set. 4) Press OK. Distorted sound or echo. • If you switch...
... SOURCE repeatedly to select the correct audio input. Sound No sound from home theater speakers. • Connect the audio cable from your home theater to your TV or other devices (see 'Connect audio from the TV through the home theater, make sure that the home theater supports the region code of the disc (see 'Region codes' on page 12). • Select the correct character set: 1) Press SETUP. 2) Select [Preference Setup] > [DivX Subtitle]. 3) Select the supported character set. 4) Press OK. Distorted sound or echo. • If you switch...

User manual
Page 25
... A HDMI-CEC 15 discs amplifier 20 audio language 17 audio audio options 13 HDMI audio 16 control buttons 11 predefined modes 10 DivX 12 quality 9 lock/unlock 18 settings 16 menu language 17 speaker setup 8 options 13 specifications 20 picture 13 audio language 17 play 11 auto standby 18 Easylink (HDMI-CEC) 6 HDMI-CEC 15 main unit 5 screen saver 18 parental control 17 energy radio 14 auto standby 18 copyright protection 2 brightness 18 create MP3 14 screen saver 18 sleep timer 18 F factory settings...
... A HDMI-CEC 15 discs amplifier 20 audio language 17 audio audio options 13 HDMI audio 16 control buttons 11 predefined modes 10 DivX 12 quality 9 lock/unlock 18 settings 16 menu language 17 speaker setup 8 options 13 specifications 20 picture 13 audio language 17 play 11 auto standby 18 Easylink (HDMI-CEC) 6 HDMI-CEC 15 main unit 5 screen saver 18 parental control 17 energy radio 14 auto standby 18 copyright protection 2 brightness 18 create MP3 14 screen saver 18 sleep timer 18 F factory settings...
User manual
Page 27
... 2 auto standby 18 troubleshooting default 18 connection 21 disc language 17 main unit 21 HDMI audio 16 picture 21 HDMI video 16 play 22 HDMI-CEC 15 sound 22 menu language 17 parental rating 17 password picture power restore screen saver sleep timer subtitle language video setup speakers manually sleep timer 17 16 U 18 update software 18 check current version 19 18 update 19 18 USB 17 format 20 16 USB storage device options 13 8 play 12 18 specifications 20 slideshows musical...
... 2 auto standby 18 troubleshooting default 18 connection 21 disc language 17 main unit 21 HDMI audio 16 picture 21 HDMI video 16 play 22 HDMI-CEC 15 sound 22 menu language 17 parental rating 17 password picture power restore screen saver sleep timer subtitle language video setup speakers manually sleep timer 17 16 U 18 update software 18 check current version 19 18 update 19 18 USB 17 format 20 16 USB storage device options 13 8 play 12 18 specifications 20 slideshows musical...

User manual
Page 28
... defective product. • Labor charges for installation or setup of any kind by including refurbished Philips product sold and identified as based on the product, and installation or repair of antenna/signal source systems outside of the product. • Product repair and/or part replacement because of improper installation or maintenance, connections to improper voltage supply, power line surge, lightning damage, retained images or...
... defective product. • Labor charges for installation or setup of any kind by including refurbished Philips product sold and identified as based on the product, and installation or repair of antenna/signal source systems outside of the product. • Product repair and/or part replacement because of improper installation or maintenance, connections to improper voltage supply, power line surge, lightning damage, retained images or...

Leaflet
Page 1
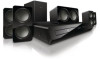
... HDMI CEC devices via HDMI for high definition movies and picture quality • Audio in to enjoy music from compact speakers Bring the power of the cinema into your home! Pump up your home entertainment experience with exposed speakers drivers offering powerful surround sound and DVD video upscaling to 1080p via a single remote HTS3531 Philips 5.1 Home theater DVD Powerful Surround Sound from iPod/iPhone/MP3 player • EasyLink to control all your entertainment • Plays DVD, VCD, CD and USB devices • HDMI...
... HDMI CEC devices via HDMI for high definition movies and picture quality • Audio in to enjoy music from compact speakers Bring the power of the cinema into your home! Pump up your home entertainment experience with exposed speakers drivers offering powerful surround sound and DVD video upscaling to 1080p via a single remote HTS3531 Philips 5.1 Home theater DVD Powerful Surround Sound from iPod/iPhone/MP3 player • EasyLink to control all your entertainment • Plays DVD, VCD, CD and USB devices • HDMI...

Leaflet
Page 2
... connection to -life pictures. Functions like DVD players, Blu-ray players, soundbar speaker, Home theater and TV's etc. HDMI for HD movies Audio in allows you to enjoy your audio device to the Audio in jack to easily play can operate all HTS3531/F7 Audio in standard definition can carry digital HD video as well as digital multichannel audio. with absolute ease. EasyLink Because Dolby Digital, the world's leading digital multi-channel audio standards, make use of the Philips home cinema system. With one remote. Simply connect...
... connection to -life pictures. Functions like DVD players, Blu-ray players, soundbar speaker, Home theater and TV's etc. HDMI for HD movies Audio in allows you to enjoy your audio device to the Audio in jack to easily play can operate all HTS3531/F7 Audio in standard definition can carry digital HD video as well as digital multichannel audio. with absolute ease. EasyLink Because Dolby Digital, the world's leading digital multi-channel audio standards, make use of the Philips home cinema system. With one remote. Simply connect...

Leaflet
Page 3
...; Subwoofer impedance: 4 ohm Picture/Display • Picture enhancement: HD (720p, 1080i, 1080p/ 24fps), Progressive scan, Video upscaling Connectivity • Front / Side connections: Music iLINK, USB • Rear Connections: AUX IN 1, Composite video (CVBS) output, Digital optical in, Easy-Fit Speaker Jacks, FM Antenna Socket, HDMI output Convenience • EasyLink (HDMI-CEC): Automatic audio input mapping, One touch play, One touch standby, Remote Control-Passthrough Dimensions • Main Unit (W x H x D): 360 x 58 x 323 mm • Main Unit Weight: 2.3 kg • Center Speaker...
...; Subwoofer impedance: 4 ohm Picture/Display • Picture enhancement: HD (720p, 1080i, 1080p/ 24fps), Progressive scan, Video upscaling Connectivity • Front / Side connections: Music iLINK, USB • Rear Connections: AUX IN 1, Composite video (CVBS) output, Digital optical in, Easy-Fit Speaker Jacks, FM Antenna Socket, HDMI output Convenience • EasyLink (HDMI-CEC): Automatic audio input mapping, One touch play, One touch standby, Remote Control-Passthrough Dimensions • Main Unit (W x H x D): 360 x 58 x 323 mm • Main Unit Weight: 2.3 kg • Center Speaker...


