Leaflet
Page 2
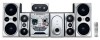
... field with no line structure. The DivX media format is created instantaneously, using the maximum resolution. DVD Mini Hi-Fi System FWD798/37 Specifications Product highlights Sound • Total Sound Power (RMS): 750 W • Sound System: Dolby Prologic II, DTS... control, Quick start guide, AM antenna, FM antenna, Product Registration Card • Quick start guide: Eng,Spa,Fre • Remote control: 45-key • User Manual: English/ French/ Spanish Dimensions • Set dimensions (W x H x D): 265 x 310 x 367 mm • Main speaker dimensions (W x H x D): 235 x 457 x 247 mm ...
... field with no line structure. The DivX media format is created instantaneously, using the maximum resolution. DVD Mini Hi-Fi System FWD798/37 Specifications Product highlights Sound • Total Sound Power (RMS): 750 W • Sound System: Dolby Prologic II, DTS... control, Quick start guide, AM antenna, FM antenna, Product Registration Card • Quick start guide: Eng,Spa,Fre • Remote control: 45-key • User Manual: English/ French/ Spanish Dimensions • Set dimensions (W x H x D): 265 x 310 x 367 mm • Main speaker dimensions (W x H x D): 235 x 457 x 247 mm ...
User manual
Page 9
English Tuner Operations Tuning to radio stations 38 Presetting radio stations 38~39 Automatic preset programming Manual preset programming Selecting a preset radio station 39 Deleting a preset radio station Tape Operation/Recording Tape playback 40 General information on recording 40 Preparation for recording ...
English Tuner Operations Tuning to radio stations 38 Presetting radio stations 38~39 Automatic preset programming Manual preset programming Selecting a preset radio station 39 Deleting a preset radio station Tape Operation/Recording Tape playback 40 General information on recording 40 Preparation for recording ...
User manual
Page 12
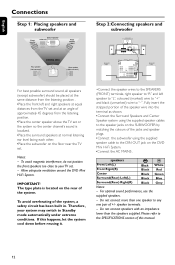
... of the jacks and speaker plugs. •Connect the subwoofer using the supplied speaker cables to Standby mode automatically under extreme conditions. IMPORTANT! If this manual. 12 speakers Front Left(L) Front Rignt(R) - Notes: - To avoid magnetic interference, do not position the front speakers too close to your system may switch to...
... of the jacks and speaker plugs. •Connect the subwoofer using the supplied speaker cables to Standby mode automatically under extreme conditions. IMPORTANT! If this manual. 12 speakers Front Left(L) Front Rignt(R) - Notes: - To avoid magnetic interference, do not position the front speakers too close to your system may switch to...

User manual
Page 34
... mode, press and hold OPEN/CLOSE on the front panel to open the disc tray. 2 Press numeric key "1". ➜ The blue Philips DVD background appears on the TV screen. A progressive scan TV set to ON, the screen saver will be activated when you have connected ...a blank screen. 1 In stop or pause mode for auto recovery. - OFF Select this system, through PrPbY output connection. To deactivate Progressive Scan manually If the progressive function is required. - ON To enjoy the full quality potential offered by progressive scan feature. Setting the screen saver Helpful Hints: ...
... mode, press and hold OPEN/CLOSE on the front panel to open the disc tray. 2 Press numeric key "1". ➜ The blue Philips DVD background appears on the TV screen. A progressive scan TV set to ON, the screen saver will be activated when you have connected ...a blank screen. 1 In stop or pause mode for auto recovery. - OFF Select this system, through PrPbY output connection. To deactivate Progressive Scan manually If the progressive function is required. - ON To enjoy the full quality potential offered by progressive scan feature. Setting the screen saver Helpful Hints: ...

User manual
Page 39
... an address number, press PROGRAM again to store the radio station. ● Repeat steps 3-5 to erase other preset radio stations. Tuner Operations 39 English Manual preset programming 1 Press TUNER (BAND) repeatedly to select the desired tuner band: FM or AM. 2 Press and hold 1 / ¡ on the.... Deleting a preset radio station 1 Press O or P to select the preset radio station to be displayed. Note: - To stop storing the manual preset ● Press 7 on the display. ➜ The preset numbers of all other preset radio stations in the band with higher numbers are displayed.
... an address number, press PROGRAM again to store the radio station. ● Repeat steps 3-5 to erase other preset radio stations. Tuner Operations 39 English Manual preset programming 1 Press TUNER (BAND) repeatedly to select the desired tuner band: FM or AM. 2 Press and hold 1 / ¡ on the.... Deleting a preset radio station 1 Press O or P to select the preset radio station to be displayed. Note: - To stop storing the manual preset ● Press 7 on the display. ➜ The preset numbers of all other preset radio stations in the band with higher numbers are displayed.
Quick start guide
Page 1
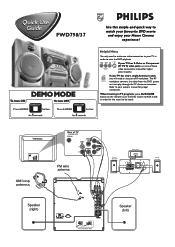
Helpful Hints You only need an accessory RF modulator. Refer to your Home Cinema experience! FWD798/37 Use this simple and quick way to watch your favourite DVD movie and enjoy your owner's manual for proper connection. If your TV has S-Video or Component (Pr Pb Y) video jacks, use one video connection to...
Helpful Hints You only need an accessory RF modulator. Refer to your Home Cinema experience! FWD798/37 Use this simple and quick way to watch your favourite DVD movie and enjoy your owner's manual for proper connection. If your TV has S-Video or Component (Pr Pb Y) video jacks, use one video connection to...
Quick start guide
Page 2
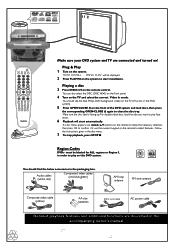
"AUTO INSTALL - You should see the blue Philips DVD background screen on the TV (If no disc in the DVD system). 5 Press OPEN0CLOSE 0 on this DVD system. 1 ALL You should find the below ... TV are described in the disc menu. 7 To stop playback, press STOP 9. Playing a disc 3 Press DISC1/2/3 on ! Follow the instructions given in the accompanying owner's manual Make sure the disc label is facing up.
"AUTO INSTALL - You should see the blue Philips DVD background screen on the TV (If no disc in the DVD system). 5 Press OPEN0CLOSE 0 on this DVD system. 1 ALL You should find the below ... TV are described in the disc menu. 7 To stop playback, press STOP 9. Playing a disc 3 Press DISC1/2/3 on ! Follow the instructions given in the accompanying owner's manual Make sure the disc label is facing up.


