
Leaflet
Page 2
... stereo spatial image especially suited for instant power boost which shows minimal display activity and turns most of the day. Change While Play Flexiblility of a CD or a CD program. Sleep timer settings of 60, 45, 30 or 15 minutes. 3 Display modes (including nite mode) 2 different display options showing different amounts of display activity can be used. Incredible Surround™ An exciting, new, psycho-acoustic method of audio stations in the carousel by remote control. Plug & Play...
... stereo spatial image especially suited for instant power boost which shows minimal display activity and turns most of the day. Change While Play Flexiblility of a CD or a CD program. Sleep timer settings of 60, 45, 30 or 15 minutes. 3 Display modes (including nite mode) 2 different display options showing different amounts of display activity can be used. Incredible Surround™ An exciting, new, psycho-acoustic method of audio stations in the carousel by remote control. Plug & Play...

User manual
Page 3
... 6 System Controls Remote Control 7 Front Panel 8-9 Rear Panel 10 First Time Setup First Time Setup 11 Where Do You Start 11 Battery Installation 11 Antenna Connections 11 Speaker Connections 12 Optional Connections 12 Plug & Play 13 Demo 13 Power Settings 14 Sound Options Volume Control, MAX Sound, Digital Sound Control (DSC 15 Virtual Ambience Control (VAC), Dynamic Bass Boost (DBB), Incredible Surround 16 CD Operations Loading 17 Playback 17 Programming 18 Repeat 19 Shuffle 19 Radio Operation Automattic Station Preset 20 Manual Tuning 21 Cassette Operation Playback...
... 6 System Controls Remote Control 7 Front Panel 8-9 Rear Panel 10 First Time Setup First Time Setup 11 Where Do You Start 11 Battery Installation 11 Antenna Connections 11 Speaker Connections 12 Optional Connections 12 Plug & Play 13 Demo 13 Power Settings 14 Sound Options Volume Control, MAX Sound, Digital Sound Control (DSC 15 Virtual Ambience Control (VAC), Dynamic Bass Boost (DBB), Incredible Surround 16 CD Operations Loading 17 Playback 17 Programming 18 Repeat 19 Shuffle 19 Radio Operation Automattic Station Preset 20 Manual Tuning 21 Cassette Operation Playback...

User manual
Page 5
... not expose the receiver, batteries, or discs to separate into three materials: cardboard (box), polystyrene foam (buffer), and polyethylene (bags, protective foam sheet). G Clean Discs with no disc in a circular motion. Always keep the tray closed to warm room conditions. ers, or anti-static spray intended for remote control G Two speakers G AM loop antenna and FM wire antenna G Owner's manual, Quick Use Guide and product registra- Use a cotton swab slightly...
... not expose the receiver, batteries, or discs to separate into three materials: cardboard (box), polystyrene foam (buffer), and polyethylene (bags, protective foam sheet). G Clean Discs with no disc in a circular motion. Always keep the tray closed to warm room conditions. ers, or anti-static spray intended for remote control G Two speakers G AM loop antenna and FM wire antenna G Owner's manual, Quick Use Guide and product registra- Use a cotton swab slightly...
User manual
Page 6
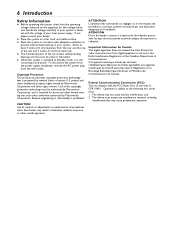
... of certain U.S. G Place the system in the Radio Interference Regulations of the Canadian Department of Communications. Reverse engineering or disassembly is still consuming some power. Important Information for Canada This digital apparatus does not exceed the Class B limits for home and other than herein may cause problematic operation. G When the system is switched to Standby mode, it is prohibited. ATENCI...
... of certain U.S. G Place the system in the Radio Interference Regulations of the Canadian Department of Communications. Reverse engineering or disassembly is still consuming some power. Important Information for Canada This digital apparatus does not exceed the Class B limits for home and other than herein may cause problematic operation. G When the system is switched to Standby mode, it is prohibited. ATENCI...
User manual
Page 7
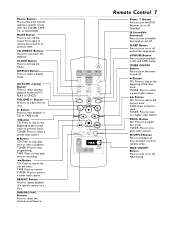
... adjust the volume. 3 Button Press to a higher radio station. TUNER: Press to tune to start playback in CD or TAPE mode. TUNER: Press to tune to turn on a Disc. Remote Control 7 Power y Button Press to a lower radio station. CD DIRECT Buttons Press for one-touch CD playback. IS (Incredible Surround) Press to turn the DVD Receiver on and off the sound. MAX ON/OFF Button Press to turn off . PROG. Button CD: Press to program disc tracks TUNER: Press to have the remote operate a specific source (CD 123, TUNER, TAPE 1/2, or AUX/CDR). Source Buttons Press to program...
... adjust the volume. 3 Button Press to a higher radio station. TUNER: Press to tune to start playback in CD or TAPE mode. TUNER: Press to tune to turn on a Disc. Remote Control 7 Power y Button Press to a lower radio station. CD DIRECT Buttons Press for one-touch CD playback. IS (Incredible Surround) Press to turn the DVD Receiver on and off the sound. MAX ON/OFF Button Press to turn off . PROG. Button CD: Press to program disc tracks TUNER: Press to have the remote operate a specific source (CD 123, TUNER, TAPE 1/2, or AUX/CDR). Source Buttons Press to program...

User manual
Page 8
... switch the system on or to Standby mode. 38 Button Press to change disc(s) INTERACTIVE VU METER Displays the music and volume levels. TAPE 1 PLAYBACK TAPE 2 REC / PLAY DISC 1, 2, 3 (CD DIRECT) Press to select a disc tray for playback DISC CHANGE Press to start playback in CD or TAPE mode. DEMO: Press and hold to a radio station. TUNER: Press to tune to deactivate DEMO mode. PLUG & PLAY: Press to select a preset radio station. TUNER: Press to initiate plug & play mode. TAPE: Press to stop playback or recording. JOG CONTROL Turn to select the desired sound...
... switch the system on or to Standby mode. 38 Button Press to change disc(s) INTERACTIVE VU METER Displays the music and volume levels. TAPE 1 PLAYBACK TAPE 2 REC / PLAY DISC 1, 2, 3 (CD DIRECT) Press to select a disc tray for playback DISC CHANGE Press to start playback in CD or TAPE mode. DEMO: Press and hold to a radio station. TUNER: Press to tune to deactivate DEMO mode. PLUG & PLAY: Press to select a preset radio station. TUNER: Press to initiate plug & play mode. TAPE: Press to stop playback or recording. JOG CONTROL Turn to select the desired sound...

User manual
Page 11
...). 3 Plug in the system. 4 Install or exit Plug & Play. First Time Setup 11 1 3 2 Antenna Connections 1 Connect the supplied AM loop antenna to exit Plug & Play without installing. G Follow the on screen instruction to the system as detailed below. 2 Connect the speakers to install Plug & Play. Where to Start 1 Put the batteries in the remote control and connect the AM and FM antennas as detailed in your Quick Use Guide (or on the rear of the system. G Reposition the loop antenna to receive the clearest sound for area stations.
...). 3 Plug in the system. 4 Install or exit Plug & Play. First Time Setup 11 1 3 2 Antenna Connections 1 Connect the supplied AM loop antenna to exit Plug & Play without installing. G Follow the on screen instruction to the system as detailed below. 2 Connect the speakers to install Plug & Play. Where to Start 1 Put the batteries in the remote control and connect the AM and FM antennas as detailed in your Quick Use Guide (or on the rear of the system. G Reposition the loop antenna to receive the clearest sound for area stations.
User manual
Page 13
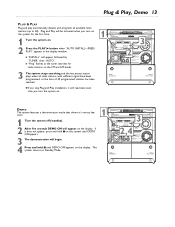
... for the first time. 1 Turn the system on . 1 DISC CHANGE DISC 1 THREE DISC DIRECT PLAY DISC 2 DISC 3 FW-996 MINI HIFI SYSTEM STANDBY-ON OPENCLOSE CD/CDR/CD-RW COMPATIBLE CD SYNCHRO RECORDING 3 VOLUME PR INCREDIBLE SURROUND ECO POWER EV PRESET NE DEMO STOP/ CLEAR PLAYPAUSE SEARCH-TUNING DISPLAY PROG CLOCKTIMER 2AUTO REPLAY DUBBING REC INTERACTIVE VU METER CD 1-2-3 AM-FM CD TUNER SOURCE TAPE AUX TAPE 1-2 CDR/DVD -MAX BASS DYNAMIC AMPLIFICATION CONTROL (DAC) -MAX BASS POR SOUND NAVIGATION - The system returns to 40). AUTO TIMER REPLAY DUBBING REC...
... for the first time. 1 Turn the system on . 1 DISC CHANGE DISC 1 THREE DISC DIRECT PLAY DISC 2 DISC 3 FW-996 MINI HIFI SYSTEM STANDBY-ON OPENCLOSE CD/CDR/CD-RW COMPATIBLE CD SYNCHRO RECORDING 3 VOLUME PR INCREDIBLE SURROUND ECO POWER EV PRESET NE DEMO STOP/ CLEAR PLAYPAUSE SEARCH-TUNING DISPLAY PROG CLOCKTIMER 2AUTO REPLAY DUBBING REC INTERACTIVE VU METER CD 1-2-3 AM-FM CD TUNER SOURCE TAPE AUX TAPE 1-2 CDR/DVD -MAX BASS DYNAMIC AMPLIFICATION CONTROL (DAC) -MAX BASS POR SOUND NAVIGATION - The system returns to 40). AUTO TIMER REPLAY DUBBING REC...
User manual
Page 14
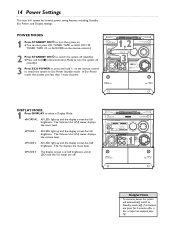
... Mode to turn the system on the remote control to switch the system to Eco Power Standby mode. In Eco Power mode, the system uses less than 1 watt of power. The Volume Unit (VU) meter displays the volume level. DISC CHANGE DISC 1 THREE DISC DIRECT PLAY DISC 2 DISC 3 FW-996 MINI HIFI SYSTEM STANDBY-ON OPENCLOSE CD/CDR/CD-RW COMPATIBLE CD SYNCHRO RECORDING VOLUME PR INCREDIBLE SURROUND ECO POWER EV PRESET NE DEMO STOP/ CLEAR PLAYPAUSE SEARCH-TUNING DISPLAY PROG CLOCK- AUTO TIMER REPLAY DUBBING REC INTERACTIVE VU METER CD 1-2-3 AM-FM CD TUNER SOURCE TAPE AUX TAPE...
... Mode to turn the system on the remote control to switch the system to Eco Power Standby mode. In Eco Power mode, the system uses less than 1 watt of power. The Volume Unit (VU) meter displays the volume level. DISC CHANGE DISC 1 THREE DISC DIRECT PLAY DISC 2 DISC 3 FW-996 MINI HIFI SYSTEM STANDBY-ON OPENCLOSE CD/CDR/CD-RW COMPATIBLE CD SYNCHRO RECORDING VOLUME PR INCREDIBLE SURROUND ECO POWER EV PRESET NE DEMO STOP/ CLEAR PLAYPAUSE SEARCH-TUNING DISPLAY PROG CLOCK- AUTO TIMER REPLAY DUBBING REC INTERACTIVE VU METER CD 1-2-3 AM-FM CD TUNER SOURCE TAPE AUX TAPE...
User manual
Page 17
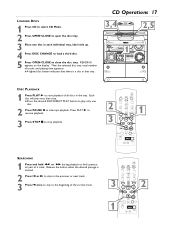
CD Operations 17 3,4 DISC CHANGE DISC 1 THREE DISC DIRECT PLAY DISC 2 DISC 3 OPENCLOSE 2,5 CD/CDR/CD-RW COMPATIBLE CD SYNCHRO RECORDING PR INCREDIBLE SURROUND ECO POWER EV PRESET NE DEMO STOP/ CLEAR PLAYPAUSE SEARCH-TUNING DISPLAY 1 el volume INTERACTIVE VU METER PROG CLOCK- AUTO TIMER REPLAY DUBBING REC CD 1-2-3 AM-FM CD TUNER MAX SOUND SOURCE TAPE AUX TAPE 1-2 CDR/DVD -MAX BASS DYNAMIC AMPLIFICATION CONTROL (DAC) -MAX BASS POR SOUND NAVIGATION - LOADING DISCS 1 Press CD to select CD Mode. 2 Press OPEN•CLOSE to open the disc tray. 3 Place ...
CD Operations 17 3,4 DISC CHANGE DISC 1 THREE DISC DIRECT PLAY DISC 2 DISC 3 OPENCLOSE 2,5 CD/CDR/CD-RW COMPATIBLE CD SYNCHRO RECORDING PR INCREDIBLE SURROUND ECO POWER EV PRESET NE DEMO STOP/ CLEAR PLAYPAUSE SEARCH-TUNING DISPLAY 1 el volume INTERACTIVE VU METER PROG CLOCK- AUTO TIMER REPLAY DUBBING REC CD 1-2-3 AM-FM CD TUNER MAX SOUND SOURCE TAPE AUX TAPE 1-2 CDR/DVD -MAX BASS DYNAMIC AMPLIFICATION CONTROL (DAC) -MAX BASS POR SOUND NAVIGATION - LOADING DISCS 1 Press CD to select CD Mode. 2 Press OPEN•CLOSE to open the disc tray. 3 Place ...

User manual
Page 20
...be replaced. 2-3 1 1 AUTOMATIC PRESET PROGRAMMING 1 Press TUNER. You can manually tune to begin programming from a specific preset number. 3 Press and hold 3 until "AUTO" appears on the display. 3 Press 3 to start installation G All previously programmed stations will be activated when you turn on the system for the first time. 1 Turn the system off (standby mode). 2 Press and hold PROG until "AUTO INSTALL--PRESS PLAY" appears on the display. 20 Programming Radio Presets TUNING TO RADIO STATIONS There are several ways to tune to program radio stations. Plug and Play will...
...be replaced. 2-3 1 1 AUTOMATIC PRESET PROGRAMMING 1 Press TUNER. You can manually tune to begin programming from a specific preset number. 3 Press and hold 3 until "AUTO" appears on the display. 3 Press 3 to start installation G All previously programmed stations will be activated when you turn on the system for the first time. 1 Turn the system off (standby mode). 2 Press and hold PROG until "AUTO INSTALL--PRESS PLAY" appears on the display. 20 Programming Radio Presets TUNING TO RADIO STATIONS There are several ways to tune to program radio stations. Plug and Play will...

User manual
Page 22
...stop playback. AUTO TIMER REPLAY DUBBING REC volume INTERACTIVE VU METER CD 1-2-3 AM-FM CD TUNER MAX SOUND SOURCE TAPE AUX TAPE 1-2 CDR/DVD -MAX BASS DYNAMIC AMPLIFICATION CONTROL (DAC) -MAX BASS POR 2 TAPE 1 PLAYBACK SOUND NAVIGATION - JOG DSC DBB TAPE 2 REC / PLAY PLAYBACK MODE 1 Press AUTO REPLAY ("AUTO RE." on the display. DISC CHANGE DISC 1 THREE DISC DIRECT PLAY DISC 2 DISC 3 FW-996 MINI HIFI SYSTEM STANDBY-ON OPENCLOSE CD/CDR/CD-RW COMPATIBLE CD SYNCHRO RECORDING VOLUME PR INCREDIBLE SURROUND VAC XT 3-5 1 ECO POWER EV PRESET NE DEMO STOP/ CLEAR...
...stop playback. AUTO TIMER REPLAY DUBBING REC volume INTERACTIVE VU METER CD 1-2-3 AM-FM CD TUNER MAX SOUND SOURCE TAPE AUX TAPE 1-2 CDR/DVD -MAX BASS DYNAMIC AMPLIFICATION CONTROL (DAC) -MAX BASS POR 2 TAPE 1 PLAYBACK SOUND NAVIGATION - JOG DSC DBB TAPE 2 REC / PLAY PLAYBACK MODE 1 Press AUTO REPLAY ("AUTO RE." on the display. DISC CHANGE DISC 1 THREE DISC DIRECT PLAY DISC 2 DISC 3 FW-996 MINI HIFI SYSTEM STANDBY-ON OPENCLOSE CD/CDR/CD-RW COMPATIBLE CD SYNCHRO RECORDING VOLUME PR INCREDIBLE SURROUND VAC XT 3-5 1 ECO POWER EV PRESET NE DEMO STOP/ CLEAR...

User manual
Page 23
... stop recording. 3 DISC CHANGE DISC 1 THREE DISC DIRECT PLAY DISC 2 DISC 3 OPENCLOSE FW-996 MINI HIFI SYSTEM STANDBY-ON ECO POWER 2 1 CD/CDR/CD-RW COMPATIBLE CD SYNCHRO RECORDING VOLUME VAC XT PR INCREDIBLE SURROUND EV PRESET NE DEMO STOP/ CLEAR PLAYPAUSE SEARCH-TUNING DISPLAY PROG CLOCKTIMER AUTO REPLAY DUBBING REC INTERACTIVE VU METER CD 1-2-3 AM-FM CD TUNER SOURCE TAPE AUX TAPE 1-2 CDR/DVD -MAX BASS DYNAMIC AMPLIFICATION CONTROL (DAC) -MAX BASS POR SOUND NAVIGATION - See page 18 for CD programming. 2 Press REC to start playback automatically. 4 3 To...
... stop recording. 3 DISC CHANGE DISC 1 THREE DISC DIRECT PLAY DISC 2 DISC 3 OPENCLOSE FW-996 MINI HIFI SYSTEM STANDBY-ON ECO POWER 2 1 CD/CDR/CD-RW COMPATIBLE CD SYNCHRO RECORDING VOLUME VAC XT PR INCREDIBLE SURROUND EV PRESET NE DEMO STOP/ CLEAR PLAYPAUSE SEARCH-TUNING DISPLAY PROG CLOCKTIMER AUTO REPLAY DUBBING REC INTERACTIVE VU METER CD 1-2-3 AM-FM CD TUNER SOURCE TAPE AUX TAPE 1-2 CDR/DVD -MAX BASS DYNAMIC AMPLIFICATION CONTROL (DAC) -MAX BASS POR SOUND NAVIGATION - See page 18 for CD programming. 2 Press REC to start playback automatically. 4 3 To...

User manual
Page 24
... indicate clock setting is not displayed in Standby (off (standby mode). The time blinks to exit with saving the setting. 2 1,5 DISPLAY PROG CLOCK- or 24-hour mode. It is active. 2 Press PROG to indicate Clock setting mode is pressed for 90 seconds, the system automatically exits the clock setting mode. The display brightens to select 12- AUTO TIMER REPLAY DUBBING REC INTERACTIVE VU METER CD 1-2-3 AM-FM CD TUNER SOURCE TAPE AUX TAPE 1-2 CDR/DVD TAPE 1 PLAYBACK 3-4,6 TAPE 2 REC / PLAY Helpful Hints • The clock setting erases...
... indicate clock setting is not displayed in Standby (off (standby mode). The time blinks to exit with saving the setting. 2 1,5 DISPLAY PROG CLOCK- or 24-hour mode. It is active. 2 Press PROG to indicate Clock setting mode is pressed for 90 seconds, the system automatically exits the clock setting mode. The display brightens to select 12- AUTO TIMER REPLAY DUBBING REC INTERACTIVE VU METER CD 1-2-3 AM-FM CD TUNER SOURCE TAPE AUX TAPE 1-2 CDR/DVD TAPE 1 PLAYBACK 3-4,6 TAPE 2 REC / PLAY Helpful Hints • The clock setting erases...
User manual
Page 25
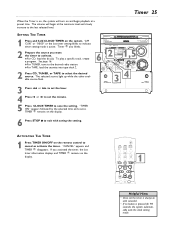
... followed by the selected time and source. If you want the timer to activate. G For TAPE, load the cassette into tape deck 2. 2 Press CD, TUNER, or TAPE to cancel or activate the timer. ACTIVATING THE TIMER 1 Press TIMER ON/OFF on the remote control to select the desired source. To play a specific track, create a program. The selected source light up while the other available source flash. 3 Press 1 or ¡ to set the hour. 4 Press w or...
... followed by the selected time and source. If you want the timer to activate. G For TAPE, load the cassette into tape deck 2. 2 Press CD, TUNER, or TAPE to cancel or activate the timer. ACTIVATING THE TIMER 1 Press TIMER ON/OFF on the remote control to select the desired source. To play a specific track, create a program. The selected source light up while the other available source flash. 3 Press 1 or ¡ to set the hour. 4 Press w or...

User manual
Page 27
... working. • Set the clock properly. • Press TIMER ON/OFF to repair the system yourself. The timer is no work properly. • Select the correct source (CD, TUNER, TAPE, AUX) before pressing a button. • Move the remote closer to a risk of problems and possible solutions before requesting service. If you are having problems with your product, check this list of electric shock. Poor radio Reception. • Adjust the antenna or connect an external antenna...
... working. • Set the clock properly. • Press TIMER ON/OFF to repair the system yourself. The timer is no work properly. • Select the correct source (CD, TUNER, TAPE, AUX) before pressing a button. • Move the remote closer to a risk of problems and possible solutions before requesting service. If you are having problems with your product, check this list of electric shock. Poor radio Reception. • Adjust the antenna or connect an external antenna...
User manual
Page 29
...rear panel 10 remote control 7 repeat 19 repeat button 7 reverse 1 button 7 Index 29 antenna connections 11 automatic preset programming 20 autoreplay button 7 basic recording 23 batteries 11 cassette recording 23 cd direct buttons 7 cd operations cd synchro recoding 23 clock button 7 connections 12 dbb/dsc/vac buttons 7 deleting preset stations 21 demo 13 digital sound control (dsc 15 disc playback 17 display button 7 display mode 14 dynamic bass boost (dbb 16 safety information 6 safety instructions 4 searching 17 setting the clock 24 setting the timer 25 setup...
...rear panel 10 remote control 7 repeat 19 repeat button 7 reverse 1 button 7 Index 29 antenna connections 11 automatic preset programming 20 autoreplay button 7 basic recording 23 batteries 11 cassette recording 23 cd direct buttons 7 cd operations cd synchro recoding 23 clock button 7 connections 12 dbb/dsc/vac buttons 7 deleting preset stations 21 demo 13 digital sound control (dsc 15 disc playback 17 display button 7 display mode 14 dynamic bass boost (dbb 16 safety information 6 safety instructions 4 searching 17 setting the clock 24 setting the timer 25 setup...

User manual
Page 30
.... WHAT IS COVERED? Please record the model and serial numbers found on all countries where the product is given in case you need to a Philips factory service center (see enclosed list) or authorized service center for us to you pay for the replacement or repair of merchantability or fitness for a particular purpose, are expressed or implied, including any direct, indirect, special, incidental or consequential...
.... WHAT IS COVERED? Please record the model and serial numbers found on all countries where the product is given in case you need to a Philips factory service center (see enclosed list) or authorized service center for us to you pay for the replacement or repair of merchantability or fitness for a particular purpose, are expressed or implied, including any direct, indirect, special, incidental or consequential...

Quick start guide
Page 1
Quick Use Guide Use this simple and quick way to listen to your favorite CD, cassette, or radio station. 1C TO CONNECT YOUR FWC555 MINI HI-FI SYSTEM FOLLOW THESE STEPS: 1 ANTENNA CONNECTIONS A Connect the supplied AM loop antenna to the "+" jack. Connect the colored wire to the "-" jack and the black wire to the AM ANTENNA jacks. For better reception connect an outdoor FM antenna (not supplied). B Connect the Left speaker wires to the "+" jack. 3 FINAL PREPARATION A Insert two (2) AA batteries into...
Quick Use Guide Use this simple and quick way to listen to your favorite CD, cassette, or radio station. 1C TO CONNECT YOUR FWC555 MINI HI-FI SYSTEM FOLLOW THESE STEPS: 1 ANTENNA CONNECTIONS A Connect the supplied AM loop antenna to the "+" jack. Connect the colored wire to the "-" jack and the black wire to the AM ANTENNA jacks. For better reception connect an outdoor FM antenna (not supplied). B Connect the Left speaker wires to the "+" jack. 3 FINAL PREPARATION A Insert two (2) AA batteries into...

Quick start guide
Page 2
...on . Quick Use Guide 1 DISC CHANGE DISC 1 THREE DISC DIRECT PLAY DISC 2 DISC 3 FW-996 MINI HIFI SYSTEM STANDBY-ON OPENCLOSE CD/CDR/CD-RW COMPATIBLE CD SYNCHRO RECORDING 3 VOLUME PR INCREDIBLE SURROUND ECO POWER EV PRESET NE DEMO STOP/ CLEAR PLAYPAUSE SEARCH-TUNING DISPLAY PROG 2CLOCK- TIMER AUTO REPLAY DUBBING REC CD 1-2-3 AM-FM INTERACTIVE VU METER CD TUNER AX SOUND SOURCE TAPE AUX TAPE 1-2 CDR/DVD -MAX BASS DYNAMIC AMPLIFICATION CONTROL (DAC) -MAX BASS POR SOUND NAVIGATION - Press the PLAY 3 button. • "INSTALL" will appear, followed by "TUNER" then...
...on . Quick Use Guide 1 DISC CHANGE DISC 1 THREE DISC DIRECT PLAY DISC 2 DISC 3 FW-996 MINI HIFI SYSTEM STANDBY-ON OPENCLOSE CD/CDR/CD-RW COMPATIBLE CD SYNCHRO RECORDING 3 VOLUME PR INCREDIBLE SURROUND ECO POWER EV PRESET NE DEMO STOP/ CLEAR PLAYPAUSE SEARCH-TUNING DISPLAY PROG 2CLOCK- TIMER AUTO REPLAY DUBBING REC CD 1-2-3 AM-FM INTERACTIVE VU METER CD TUNER AX SOUND SOURCE TAPE AUX TAPE 1-2 CDR/DVD -MAX BASS DYNAMIC AMPLIFICATION CONTROL (DAC) -MAX BASS POR SOUND NAVIGATION - Press the PLAY 3 button. • "INSTALL" will appear, followed by "TUNER" then...


