Leaflet
Page 3
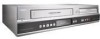
...out, S-Video in Convenience • Programmable Events: 12 • Programming Period: 1 month • Programming/Timer Enhancements: Daily/Weekly Repeat Program, Manual Timer, One Touch Recording Power • Power supply: 120V, 60Hz • Power consumption: 30 W • Standby power consumption: < 3.3 ...-14 Version: 1.1.12 12 NC: 8670 000 29843 UPC: 6 09585 13276 4 © 2009 Koninklijke Philips Electronics N.V. All Rights reserved. DVD recorder/VCR Specifications DVDR3545V/37 Picture/Display • D/A converter: 10 bit, 54 MHz • Picture enhancement: Progressive scan Sound...
...out, S-Video in Convenience • Programmable Events: 12 • Programming Period: 1 month • Programming/Timer Enhancements: Daily/Weekly Repeat Program, Manual Timer, One Touch Recording Power • Power supply: 120V, 60Hz • Power consumption: 30 W • Standby power consumption: < 3.3 ...-14 Version: 1.1.12 12 NC: 8670 000 29843 UPC: 6 09585 13276 4 © 2009 Koninklijke Philips Electronics N.V. All Rights reserved. DVD recorder/VCR Specifications DVDR3545V/37 Picture/Display • D/A converter: 10 bit, 54 MHz • Picture enhancement: Progressive scan Sound...
User manual
Page 1
Introduction Connections DIGITAL VIDEO DISC RECORDER & VIDEO CASSETTE RECORDER WITH DIGITAL TUNER User Manual STOP ARRÊT DVDR3545V/37 ALTO Basic Setup Recording Playback Editing Function Setup VCR Functions Others E9H90UD.indd 1 2007/06/20 13:35:48
Introduction Connections DIGITAL VIDEO DISC RECORDER & VIDEO CASSETTE RECORDER WITH DIGITAL TUNER User Manual STOP ARRÊT DVDR3545V/37 ALTO Basic Setup Recording Playback Editing Function Setup VCR Functions Others E9H90UD.indd 1 2007/06/20 13:35:48
User manual
Page 4
...harmful interference in a particular installation. patents and other limited viewing uses only unless otherwise authorized by Macrovision. Declaration of this manual. Only a qualified service person should not be determined by turning the device off and on, the user is connected. ...play back DVD/CD/cassette tape. Use of Conformity Model Number: DVDR3545V/37 Trade Name: Philips Responsible Party: Philips Consumer Electronics Company Marietta, GA 30006-0026 1-888-PHILIPS (744-5477) Copyright 2007 Philips. Radio/TV Interference: This device has been tested and found to ...
...harmful interference in a particular installation. patents and other limited viewing uses only unless otherwise authorized by Macrovision. Declaration of this manual. Only a qualified service person should not be determined by turning the device off and on, the user is connected. ...play back DVD/CD/cassette tape. Use of Conformity Model Number: DVDR3545V/37 Trade Name: Philips Responsible Party: Philips Consumer Electronics Company Marietta, GA 30006-0026 1-888-PHILIPS (744-5477) Copyright 2007 Philips. Radio/TV Interference: This device has been tested and found to ...

User manual
Page 5
...problems occur. HDMI, the HDMI logo and HighDefinition Multimedia Interface are trademarks of HDMI Licensing LLC. philips.com/welcome Cleaning the cabinet • Wipe the front panel and other exterior surfaces of the unit... Supplied Accessories remote control with batteries (AAAx2) RF coaxial cable RCA audio/video cables user manual User Manual quick start guide Maintenance Servicing • Please refer to relevant topics on "TROUBLESHOOTING" on ...a horizontal and stable position. EN 5 Editing Function Setup VCR Functions Others E9H90UD.indd 5 2007/05/16 15:43:46
...problems occur. HDMI, the HDMI logo and HighDefinition Multimedia Interface are trademarks of HDMI Licensing LLC. philips.com/welcome Cleaning the cabinet • Wipe the front panel and other exterior surfaces of the unit... Supplied Accessories remote control with batteries (AAAx2) RF coaxial cable RCA audio/video cables user manual User Manual quick start guide Maintenance Servicing • Please refer to relevant topics on "TROUBLESHOOTING" on ...a horizontal and stable position. EN 5 Editing Function Setup VCR Functions Others E9H90UD.indd 5 2007/05/16 15:43:46

User manual
Page 6
... SYSTEM 20 Basic Setup BEFORE YOU START 21 Finding the Viewing Channel on Your TV 21 On-Screen Display / Menu 22 Main Menu 24 Switching VCR / DVD Mode 25 How to Insert a Disc / Cassette Tape 25 INITIAL SETTING 26 CHANNEL SETTING 27 Auto Channel Scan 27 Adding / Deleting ...Channels 28 SETTING THE CLOCK 30 Auto Clock Setting 30 Manual Clock Setting 31 Daylight Saving Time 31 TUNER SETTINGS 32 Switching Analog Mode / Digital Mode 32 Channel Selection 32 Selecting TV Audio 33 DTV ...
... SYSTEM 20 Basic Setup BEFORE YOU START 21 Finding the Viewing Channel on Your TV 21 On-Screen Display / Menu 22 Main Menu 24 Switching VCR / DVD Mode 25 How to Insert a Disc / Cassette Tape 25 INITIAL SETTING 26 CHANNEL SETTING 27 Auto Channel Scan 27 Adding / Deleting ...Channels 28 SETTING THE CLOCK 30 Auto Clock Setting 30 Manual Clock Setting 31 Daylight Saving Time 31 TUNER SETTINGS 32 Switching Analog Mode / Digital Mode 32 Channel Selection 32 Selecting TV Audio 33 DTV ...

User manual
Page 9
Recording Playback Editing Function Setup VCR Functions Others E9H90UD.indd 9 EN 9 2007/05/16 15:43:48 Symbol Description For Recording, Playing Back, and Editing Description refers to DVD+RW Description ... DivX® files If you erase all contents in the disc (refer to all media. Introduction Connections Basic Setup FEATURES Symbols Used in this User Manual To specify for what disc type each function is, we put the following symbols at the beginning of each item to operate. * DVD-RW/-R recorded...
Recording Playback Editing Function Setup VCR Functions Others E9H90UD.indd 9 EN 9 2007/05/16 15:43:48 Symbol Description For Recording, Playing Back, and Editing Description refers to DVD+RW Description ... DivX® files If you erase all contents in the disc (refer to all media. Introduction Connections Basic Setup FEATURES Symbols Used in this User Manual To specify for what disc type each function is, we put the following symbols at the beginning of each item to operate. * DVD-RW/-R recorded...

User manual
Page 16
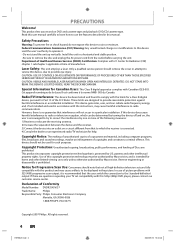
... TV company TO TV R L AUDIO IN VIDEO IN 3 4 CHANNEL ANT. If your RF modulator has a modulator/antenna switch, set it according to the manual supplied with the RF modulator. 4) Plug in the power cords of picture may become poor if this unit is connected to . For more details, follow...rear of the devices from the AC outlet. 2) Make the connection as illustrated below . 1) Disconnect the power cords of this unit S-VIDEO DVD/VCR DVD DVD/VCR OUT DIGITAL AUDIO S-VIDEO COMPONENT S-VIDEO IN ---AUDIO---OUT IN --- rear of the necessary cables at your local store. • The quality of...
... TV company TO TV R L AUDIO IN VIDEO IN 3 4 CHANNEL ANT. If your RF modulator has a modulator/antenna switch, set it according to the manual supplied with the RF modulator. 4) Plug in the power cords of picture may become poor if this unit is connected to . For more details, follow...rear of the devices from the AC outlet. 2) Make the connection as illustrated below . 1) Disconnect the power cords of this unit S-VIDEO DVD/VCR DVD DVD/VCR OUT DIGITAL AUDIO S-VIDEO COMPONENT S-VIDEO IN ---AUDIO---OUT IN --- rear of the necessary cables at your local store. • The quality of...

User manual
Page 20
... • The audio source on a disc in a Dolby Digital multi channel surround format cannot be turned off. • Refer to the manual accompanying external devices for more information. 2 Channel Analog Audio Connection stereo system audio Digital Audio Connection Dolby Digital decoder, MD deck or DAT deck... OUT L OUT PB /CB COAXIAL R PR /CR digital audio coaxial cable DIGITAL AUDIO OUT DVD AUDIO S-VIDEO COMPONENT S-VIDEO OUT VIDEO OUT Y DVD/VCR IN ---AUDIO---OUT L L OUT IN COAXIAL L OUT R PB /CB IN PR /CR ANTENNA R R IN ---VIDEO---OUT DIGITAL AUDIO OUT Supplied ...
... • The audio source on a disc in a Dolby Digital multi channel surround format cannot be turned off. • Refer to the manual accompanying external devices for more information. 2 Channel Analog Audio Connection stereo system audio Digital Audio Connection Dolby Digital decoder, MD deck or DAT deck... OUT L OUT PB /CB COAXIAL R PR /CR digital audio coaxial cable DIGITAL AUDIO OUT DVD AUDIO S-VIDEO COMPONENT S-VIDEO OUT VIDEO OUT Y DVD/VCR IN ---AUDIO---OUT L L OUT IN COAXIAL L OUT R PB /CB IN PR /CR ANTENNA R R IN ---VIDEO---OUT DIGITAL AUDIO OUT Supplied ...

User manual
Page 21
In such case, press it is switched off or in "INITIAL SETTING" on page 26. Refer to your TV's user manual for details. • If more than 10 minutes have past since you have completed all the necessary connections, press [STANDBY-ON y] to turn on ...none of the above is the correct viewing channel (external input channel) for different brand's models of TVs. • Consult your TV. PHILIPS screen saver: Recording Playback Editing Function Setup VCR Functions Note • Video input selection varies for the recorder. • For some TVs, there may be labeled "SOURCE", "AV", or...
In such case, press it is switched off or in "INITIAL SETTING" on page 26. Refer to your TV's user manual for details. • If more than 10 minutes have past since you have completed all the necessary connections, press [STANDBY-ON y] to turn on ...none of the above is the correct viewing channel (external input channel) for different brand's models of TVs. • Consult your TV. PHILIPS screen saver: Recording Playback Editing Function Setup VCR Functions Note • Video input selection varies for the recorder. • For some TVs, there may be labeled "SOURCE", "AV", or...
User manual
Page 26
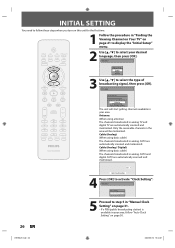
... Clock Setting -- : -- -- 5 Proceed to step 5 in analog CATV and digital CATV are automatically scanned and memorized. Antenna: (When using basic cable) The channels broadcasted in "Manual Clock Setting" on page 31. • If a PBS (public broadcasting station) is connected to "ANTENNA IN" jack. Cable (Analog / Digital): (When using antenna) The channels...
... Clock Setting -- : -- -- 5 Proceed to step 5 in analog CATV and digital CATV are automatically scanned and memorized. Antenna: (When using basic cable) The channels broadcasted in "Manual Clock Setting" on page 31. • If a PBS (public broadcasting station) is connected to "ANTENNA IN" jack. Cable (Analog / Digital): (When using antenna) The channels...

User manual
Page 28
"General Setting" menu will appear. 4 Use [K / L] to select "Manual Channel Preset", then press [OK]. Adding channel is only available for the analog TV channels. Make sure • You perform "Auto Channel Scan" before adding ... or if you are deleting digital TV/CATV channels, go to ANALOG to continue. • If you no longer watch some channels. Auto Channel Preset Manual Channel Preset TV Audio Select • If you are adding or deleting analog TV/CATV channels, go to DIGITAL to select "General Setting", then press...
"General Setting" menu will appear. 4 Use [K / L] to select "Manual Channel Preset", then press [OK]. Adding channel is only available for the analog TV channels. Make sure • You perform "Auto Channel Scan" before adding ... or if you are deleting digital TV/CATV channels, go to ANALOG to continue. • If you no longer watch some channels. Auto Channel Preset Manual Channel Preset TV Audio Select • If you are adding or deleting analog TV/CATV channels, go to DIGITAL to select "General Setting", then press...

User manual
Page 29
...will automatically switch to the next channel so that you perform the auto channel preset again. 7 Press [SETUP] to exit. Recording Playback Editing Function Setup VCR Functions Others E9H90UD.indd 29 EN 29 2007/05/16 15:44:04 Then select the next channel to delete. • If the setting is... checked and highlighted as a default. 6 Use [K / L] to select "Delete", then press [OK]. Manual Channel Preset CH 2 Add Delete DIGITAL 5 Select the channel number to delete. • Only the major channel is displayed in...
...will automatically switch to the next channel so that you perform the auto channel preset again. 7 Press [SETUP] to exit. Recording Playback Editing Function Setup VCR Functions Others E9H90UD.indd 29 EN 29 2007/05/16 15:44:04 Then select the next channel to delete. • If the setting is... checked and highlighted as a default. 6 Use [K / L] to select "Delete", then press [OK]. Manual Channel Preset CH 2 Add Delete DIGITAL 5 Select the channel number to delete. • Only the major channel is displayed in...

User manual
Page 30
... [SETUP] to exit. 6 Press [STANDBY-ON y] to enter your area, follow "Manual Clock Setting" on them to set the PBS channel manually by referring to select "General Setting", then press [OK]. SETTING THE CLOCK Set the clock before you connect the antenna/cable ...General Setting" menu will appear. 2 Use [K / L] to select "Auto", then press [OK]. Set Channel No. If not, follow "Auto Clock Setting" below . 1 Select "Manual" at 12:00 a.m. / p.m. Make sure • The antenna/cable TV connections are correct. • Channels are set. (Refer to page 27.) • If this unit...
... [SETUP] to exit. 6 Press [STANDBY-ON y] to enter your area, follow "Manual Clock Setting" on them to set the PBS channel manually by referring to select "General Setting", then press [OK]. SETTING THE CLOCK Set the clock before you connect the antenna/cable ...General Setting" menu will appear. 2 Use [K / L] to select "Auto", then press [OK]. Set Channel No. If not, follow "Auto Clock Setting" below . 1 Select "Manual" at 12:00 a.m. / p.m. Make sure • The antenna/cable TV connections are correct. • Channels are set. (Refer to page 27.) • If this unit...

User manual
Page 31
... the contents to suit your preference, then press [OK] when you press [OK]. 6 Press [SETUP] to exit. Recording Playback Editing Function Setup VCR Functions Note • Your setting will be canceled if you press [BACK ] before pressing [OK] at step 5. • Your clock setting will... appear. 2 Use [K / L] to select "General Setting", then press [OK]. Introduction Connections Basic Setup SETTING THE CLOCK Manual Clock Setting Daylight Saving Time 1 Press [SETUP] and use [K / L] to select "Clock", then press [OK]. "General Setting" menu will be...
... the contents to suit your preference, then press [OK] when you press [OK]. 6 Press [SETUP] to exit. Recording Playback Editing Function Setup VCR Functions Note • Your setting will be canceled if you press [BACK ] before pressing [OK] at step 5. • Your clock setting will... appear. 2 Use [K / L] to select "General Setting", then press [OK]. Introduction Connections Basic Setup SETTING THE CLOCK Manual Clock Setting Daylight Saving Time 1 Press [SETUP] and use [K / L] to select "Clock", then press [OK]. "General Setting" menu will be...

User manual
Page 32
.... • If there is completed. Channel Selection Select channels by using [CH / ] or [the Number buttons] found on remote control. [CH / ] Use [CH / ] to change manually by a signal network. By using [CH / ] 32 EN E9H90UD.indd 32 2007/05/16 15:44:06 Press [DTV/TV] on one program per major...
.... • If there is completed. Channel Selection Select channels by using [CH / ] or [the Number buttons] found on remote control. [CH / ] Use [CH / ] to change manually by a signal network. By using [CH / ] 32 EN E9H90UD.indd 32 2007/05/16 15:44:06 Press [DTV/TV] on one program per major...

User manual
Page 42
... timer recording will start without canceling the recording currently in advance. TIMER RECORDING You can turn on the power and use the component (VCR or DVD) which is about to begin, the unit automatically switches to 12 programs within a month in progress. Timer Programming Date MON... at step 1. Before recording, make sure • Set the clock before setting a timer programming. • Insert a recordable disc with the step 4 in "Manual Clock Setting" on page 31 before setting a timer programming. • Use [s / B] to move the cursor to the left and the right in the entry...
... timer recording will start without canceling the recording currently in advance. TIMER RECORDING You can turn on the power and use the component (VCR or DVD) which is about to begin, the unit automatically switches to 12 programs within a month in progress. Timer Programming Date MON... at step 1. Before recording, make sure • Set the clock before setting a timer programming. • Insert a recordable disc with the step 4 in "Manual Clock Setting" on page 31 before setting a timer programming. • Use [s / B] to move the cursor to the left and the right in the entry...

User manual
Page 90
... End of Timer Rec ON OFF Dubbing Mode Pages 53-54 Make Recording Compatible Page 39 VCR DVD DVD VCR ON OFF Clock Clock Setting Pages 30-31 Auto Clock Setting Daylight Saving Time OFF Auto Manual ON(MAR-NOV) ON(APR-OCT) OFF Contents Set edge type of your TV. Set a picture...
... End of Timer Rec ON OFF Dubbing Mode Pages 53-54 Make Recording Compatible Page 39 VCR DVD DVD VCR ON OFF Clock Clock Setting Pages 30-31 Auto Clock Setting Daylight Saving Time OFF Auto Manual ON(MAR-NOV) ON(APR-OCT) OFF Contents Set edge type of your TV. Set a picture...

User manual
Page 91
... Setup Recording Playback Editing Function Setup VCR Functions Others Note • Your change to each settings stays on even when the power is off. • An item which is not currently available is the default) Channel Auto Channel Preset Pages 27-29 DivX Page 100 Manual Channel Preset TV Audio Select Pages...
... Setup Recording Playback Editing Function Setup VCR Functions Others Note • Your change to each settings stays on even when the power is off. • An item which is not currently available is the default) Channel Auto Channel Preset Pages 27-29 DivX Page 100 Manual Channel Preset TV Audio Select Pages...

User manual
Page 104
...VCR] first. 1) Insert a recordable tape with cellophane tape. Press [STOP C] to stop playback. To resume playback: Press [PLAY B]. Note • When a cassette tape without erase-protection tab is not available on this unit. protection tab. To pause recording: Press [PAUSE F]. To adjust the tracking manually... [REC I ] to pages 42-45 for 5 minutes, it later, cover the hole with an erase-protection tab intact. Playback VCR FUNCTIONS Recording Press [VCR] first. 1) Insert a prerecorded tape (refer to page 25 on how to insert a cassette tape). 2) Press [PLAY B] to...
...VCR] first. 1) Insert a recordable tape with cellophane tape. Press [STOP C] to stop playback. To resume playback: Press [PLAY B]. Note • When a cassette tape without erase-protection tab is not available on this unit. protection tab. To pause recording: Press [PAUSE F]. To adjust the tracking manually... [REC I ] to pages 42-45 for 5 minutes, it later, cover the hole with an erase-protection tab intact. Playback VCR FUNCTIONS Recording Press [VCR] first. 1) Insert a prerecorded tape (refer to page 25 on how to insert a cassette tape). 2) Press [PLAY B] to...
User manual
Page 107
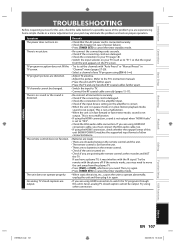
... connection, sound is not output when "HDMI Audio" is set the channels with "Auto Preset" or "Manual Preset" in fast forward or fast reverse mode, sound is not output. Playback Editing Function Setup VCR Functions Others E9H90UD.indd 107 EN 107 2007/05/16 15:45:25 TV channels cannot be...table below for a possible cause of any TV program using [CH / ]. • Adjust TV antenna. • Adjust the picture. (Refer to the TV's instruction manual.) • Place the unit and TV farther apart. • Place the TV and any bunched RF coaxial cables farther apart. • Switch the input to...
... connection, sound is not output when "HDMI Audio" is set the channels with "Auto Preset" or "Manual Preset" in fast forward or fast reverse mode, sound is not output. Playback Editing Function Setup VCR Functions Others E9H90UD.indd 107 EN 107 2007/05/16 15:45:25 TV channels cannot be...table below for a possible cause of any TV program using [CH / ]. • Adjust TV antenna. • Adjust the picture. (Refer to the TV's instruction manual.) • Place the unit and TV farther apart. • Place the TV and any bunched RF coaxial cables farther apart. • Switch the input to...


