
Leaflet
Page 1
Keep what you like on DVD in lasting quality. Philips Hard disk/DVD recorder DVDR3350H Hard Disk/ DVD Recorder Record on Hard Disk without having to worry where to watch the beginning while you record the end Recording made easy • i.LINK digital input for perfect digital camcorder copies • VCR Plus+ for ...8226; Photos (JPEG) with musical slideshow • Music: CD, MP3-CD, CD-R/RW & Windows Media™ Audio Watch what you want • Record up to 100 hours of TV on the 80GB hard drive • One Touch Pause Live TV freezes the action instantly • Instant Replay for...
Keep what you like on DVD in lasting quality. Philips Hard disk/DVD recorder DVDR3350H Hard Disk/ DVD Recorder Record on Hard Disk without having to worry where to watch the beginning while you record the end Recording made easy • i.LINK digital input for perfect digital camcorder copies • VCR Plus+ for ...8226; Photos (JPEG) with musical slideshow • Music: CD, MP3-CD, CD-R/RW & Windows Media™ Audio Watch what you want • Record up to 100 hours of TV on the 80GB hard drive • One Touch Pause Live TV freezes the action instantly • Instant Replay for...

Leaflet
Page 2
... you can copy your 'live' TV program with no loss in picture and sound quality. Dual Media Philips DVD Recorders support 'dual media' recording - Hard disk/DVD recorder Highlights DVDR3350H/37 80 GB hard drive (100 hrs) Record up to 100 hours of TV on DVD+R/RW and DVD-R/RW discs. the ability to take a break...
... you can copy your 'live' TV program with no loss in picture and sound quality. Dual Media Philips DVD Recorders support 'dual media' recording - Hard disk/DVD recorder Highlights DVDR3350H/37 80 GB hard drive (100 hrs) Record up to 100 hours of TV on DVD+R/RW and DVD-R/RW discs. the ability to take a break...

Leaflet
Page 3
...recorder Specifications DVDR3350H/37 Picture/Display • D/A converter: 10 bit, 54 MHz • A/D converter: 10 bit, 54 MHz • Picture enhancement: Progressive Scan Sound • D/A converter: 24 bit, 96 kHz • A/D converter: 24 bit, 96 kHz Video Recording • Recording system: NTSC • Compression formats: MPEG2 • Recording...: Daily/Weekly Repeat Program, Manual Timer, One Touch Recording, VCR Plus+ • Child Protection: Parental Control • Ease of Koninklijke Philips Electronics N.V. Specifications are the property of Installation: Autoinstall ...
...recorder Specifications DVDR3350H/37 Picture/Display • D/A converter: 10 bit, 54 MHz • A/D converter: 10 bit, 54 MHz • Picture enhancement: Progressive Scan Sound • D/A converter: 24 bit, 96 kHz • A/D converter: 24 bit, 96 kHz Video Recording • Recording system: NTSC • Compression formats: MPEG2 • Recording...: Daily/Weekly Repeat Program, Manual Timer, One Touch Recording, VCR Plus+ • Child Protection: Parental Control • Ease of Koninklijke Philips Electronics N.V. Specifications are the property of Installation: Autoinstall ...

User manual
Page 6
......11 Region codes ...11 Copyright notice ...11 Product Overview Remote Control ...12 Inserting Batteries ...14 Main Unit...15 Connections Step 1: Basic Recorder Connections 16 Connecting the antenna cables...16 Connecting the video cable ...17 Connecting the audio cables...18 TV has only an antenna input jack...27 Watching TV Control TV programs 28 Switching on to TV program ...28 Pause live TV function ...28 FlexTime function ...28 Recording Before Recording...29 About temporary HDD storage (Time Shift Buffer 29 Accessing the HDD (Hard Disk Storage) Setup Menu 30 HDD settings ...31 Default...
......11 Region codes ...11 Copyright notice ...11 Product Overview Remote Control ...12 Inserting Batteries ...14 Main Unit...15 Connections Step 1: Basic Recorder Connections 16 Connecting the antenna cables...16 Connecting the video cable ...17 Connecting the audio cables...18 TV has only an antenna input jack...27 Watching TV Control TV programs 28 Switching on to TV program ...28 Pause live TV function ...28 FlexTime function ...28 Recording Before Recording...29 About temporary HDD storage (Time Shift Buffer 29 Accessing the HDD (Hard Disk Storage) Setup Menu 30 HDD settings ...31 Default...

User manual
Page 7
English Table of Contents Record on Hard Disk 34 Recording TV programs...34 Recording from a DV camcorder ...34 Recording from an external device (Camcorder/VCR/ DVD player 35 Record on other DVD players 58 Preparing your DVD-RW disc for recording...37 Recording from various sources...38 Timer Recording ...40 About timer recording ...40 Timer recording (VCR Plus+® System) ...40...
English Table of Contents Record on Hard Disk 34 Recording TV programs...34 Recording from a DV camcorder ...34 Recording from an external device (Camcorder/VCR/ DVD player 35 Record on other DVD players 58 Preparing your DVD-RW disc for recording...37 Recording from various sources...38 Timer Recording ...40 About timer recording ...40 Timer recording (VCR Plus+® System) ...40...
User manual
Page 8
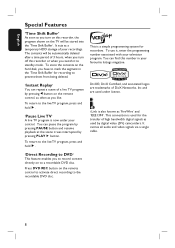
... hold É. 'Pause Live TV' A live TV program is a simple programming system for the transfer of 3 hours, when you to record content directly on to the recordable DVD disc. 8 To return to prevent them from being deleted. 'Instant Replay' You can find this number in the 'Time Shift Buffer... logos are trademarks of your television program. It carries all audio and video signals via a single cable. 'Direct Recording to DVD' This feature enables you turn off this recorder, the program shown on the TV will be stored into the 'Time Shift Buffer'. To return to standby mode....
... hold É. 'Pause Live TV' A live TV program is a simple programming system for the transfer of 3 hours, when you to record content directly on to the recordable DVD disc. 8 To return to prevent them from being deleted. 'Instant Replay' You can find this number in the 'Time Shift Buffer... logos are trademarks of your television program. It carries all audio and video signals via a single cable. 'Direct Recording to DVD' This feature enables you turn off this recorder, the program shown on the TV will be stored into the 'Time Shift Buffer'. To return to standby mode....

User manual
Page 9
...can add chapters manually. - Frequently Asked Questions English What kind of disc should I set up Titles and Chapters? You can be able to record over the same disc repeatedly. DVD+R/+RW is only compatible with virtually any more than one DV camcorder at the lowest quality (VHS standard.)... via the DV IN jack. Yes, but when the disc is broken down into Chapters, or individual scenes from "HQ" (1 hour recording at VHS quality) on the recording settings. A DVD disc contains Titles and Chapters, which are estimates only. A Title is often a complete movie and is full, you...
...can add chapters manually. - Frequently Asked Questions English What kind of disc should I set up Titles and Chapters? You can be able to record over the same disc repeatedly. DVD+R/+RW is only compatible with virtually any more than one DV camcorder at the lowest quality (VHS standard.)... via the DV IN jack. Yes, but when the disc is broken down into Chapters, or individual scenes from "HQ" (1 hour recording at VHS quality) on the recording settings. A DVD disc contains Titles and Chapters, which are estimates only. A Title is often a complete movie and is full, you...

User manual
Page 10
...to replace the HDD unit. The machine does not contain any sources of device that you copy the important video content to its long recording capacity and high speed operation. - Setup precautions Cleaning discs Some problems occur because the disc inside the unit. Do not put anything under... Information English CAUTION! Do not place any user-serviceable parts. Do not move the unit while it up . If the HDD fails, playback and recording will be cleaned on . - Place the set on top of getting an electric shock. WARNING! Space for ventilation - Do not open the device...
...to replace the HDD unit. The machine does not contain any sources of device that you copy the important video content to its long recording capacity and high speed operation. - Setup precautions Cleaning discs Some problems occur because the disc inside the unit. Do not put anything under... Information English CAUTION! Do not place any user-serviceable parts. Do not move the unit while it up . If the HDD fails, playback and recording will be cleaned on . - Place the set on top of getting an electric shock. WARNING! Space for ventilation - Do not open the device...

User manual
Page 11
...DVD players are given in the guarantee booklet. - It contains important information and notes regarding operations of the product for your recorder. Audio/Video (AV) cables - Before you can start using your country. Remote control and batteries - This equipment should ...ALL'. ALL 1 Copyright notice The making of unauthorized copies of copy-protected material, including computer programs, files, broadcasts and sound recordings, may be used for safekeeping or later viewing. Furthermore, you need further assistance, please call the customer support service for identification...
...DVD players are given in the guarantee booklet. - It contains important information and notes regarding operations of the product for your recorder. Audio/Video (AV) cables - Before you can start using your country. Remote control and batteries - This equipment should ...ALL'. ALL 1 Copyright notice The making of unauthorized copies of copy-protected material, including computer programs, files, broadcasts and sound recordings, may be used for safekeeping or later viewing. Furthermore, you need further assistance, please call the customer support service for identification...

User manual
Page 12
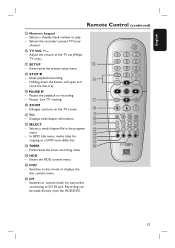
... title playback in DVD mode. It shows the timing of title, chapter, track or disc in HDD mode. - Displays the on the recorder or switch to DVD' mode. Plays a disc. g REC - Select to the left/ right or making a forward/reverse search. - Activates the 'direct... + / - - f PLAYÉ - Switches to jump backward by 10 seconds. : Cursor buttons for moving up/down. k REPEAT - In tuner or DVD REC mode, selects the recorder's video input source from the TV channel or external sources. ( EXT1, CAM1, CAM2.) m DVD REC - Switches to previous or next Chapter/Track. Stores/confirms an...
... title playback in DVD mode. It shows the timing of title, chapter, track or disc in HDD mode. - Displays the on the recorder or switch to DVD' mode. Plays a disc. g REC - Select to the left/ right or making a forward/reverse search. - Activates the 'direct... + / - - f PLAYÉ - Switches to jump backward by 10 seconds. : Cursor buttons for moving up/down. k REPEAT - In tuner or DVD REC mode, selects the recorder's video input source from the TV channel or external sources. ( EXT1, CAM1, CAM2.) m DVD REC - Switches to previous or next Chapter/Track. Stores/confirms an...
User manual
Page 13
.../track number to DV IN jack. Adjust the volume of the TV set (Philips TV only.) q SETUP o - Enters/exits the system setup menu. s PAUSEÅ - Enters/exits the timer recording menu. y DVD - Selects a track/chapter/file in the program v menu... mode or displays the disc content menu. Selects the recorder's preset TV tuner channel. Stops playback/recording. Holding down the button will open and close the disc tray. Pauses the playback or recording. - x HDD - Enters the HDD content menu. Switches to a DVD recordable disc. r u T/C s - t v SELECT ...
.../track number to DV IN jack. Adjust the volume of the TV set (Philips TV only.) q SETUP o - Enters/exits the system setup menu. s PAUSEÅ - Enters/exits the timer recording menu. y DVD - Selects a track/chapter/file in the program v menu... mode or displays the disc content menu. Selects the recorder's preset TV tuner channel. Stops playback/recording. Holding down the button will open and close the disc tray. Pauses the playback or recording. - x HDD - Enters the HDD content menu. Switches to a DVD recordable disc. r u T/C s - t v SELECT ...

User manual
Page 15
... digital camcorders or other suitable devices using this input source. d Display panel - e iR - Blue ring lights up while recording to the S-VIDEO or VIDEO jack. Stops playback/recording. In tuner mode, press SOURCE on the remote control repeatedly to select 'CAM2' when using this sensor f HDD Active indicator...tray c OPEN CLOSE ç - Point the remote control towards this input source. 15 Input for SVHS/Hi8 camcorders or SVHS/Hi8 video recorders. Skips to the previous or next chapter/ track, or hold down the door as indicated by the OPENÉ label at the right ...
... digital camcorders or other suitable devices using this input source. d Display panel - e iR - Blue ring lights up while recording to the S-VIDEO or VIDEO jack. Stops playback/recording. In tuner mode, press SOURCE on the remote control repeatedly to select 'CAM2' when using this sensor f HDD Active indicator...tray c OPEN CLOSE ç - Point the remote control towards this input source. 15 Input for SVHS/Hi8 camcorders or SVHS/Hi8 video recorders. Skips to the previous or next chapter/ track, or hold down the door as indicated by the OPENÉ label at the right ...

User manual
Page 16
... AUDIO OUT 1 COAXIAL DIGITAL AUDIO OUT TV AU D IO O UT S-V ID E O IN V ID E O IN Connecting the antenna cables These connections enable you to watch or record the cable programs. If your TV is equipped with an Antenna In (RF IN) jack only, see page 20~22 for the complete connection to..., ensure that all the devices are turned on how you have currently connected your TV. Depending on in order to the ANTENNA jack on the recorder. If you make sure that these devices are disconnected from the power outlet. 16 A Connect the existing Antenna/Cable TV signal (or from an off...
... AUDIO OUT 1 COAXIAL DIGITAL AUDIO OUT TV AU D IO O UT S-V ID E O IN V ID E O IN Connecting the antenna cables These connections enable you to watch or record the cable programs. If your TV is equipped with an Antenna In (RF IN) jack only, see page 20~22 for the complete connection to..., ensure that all the devices are turned on how you have currently connected your TV. Depending on in order to the ANTENNA jack on the recorder. If you make sure that these devices are disconnected from the power outlet. 16 A Connect the existing Antenna/Cable TV signal (or from an off...

User manual
Page 17
... S-Video jack (excellent picture quality) Use an S-video cable (not supplied) to make sure that all the devices are disconnected from the recorder. B If your video connection. The progressive scan video quality is only available through a Y PB PR connection and a progressive TV is strongly...video cables (red/ blue/green - You only need to choose one of the options below to connect the S-VIDEO (Y/C) - It is required. Step 1: Basic Recorder Connections (continued) English ANTENNA TV VIDEO (CVBS) L AUDIO R EXT1 VIDEO (CVBS) S-VIDEO (Y/C) L AUDIO R OUT 2 Y PB PR AUDIO OUT 1 ...
... S-Video jack (excellent picture quality) Use an S-video cable (not supplied) to make sure that all the devices are disconnected from the recorder. B If your video connection. The progressive scan video quality is only available through a Y PB PR connection and a progressive TV is strongly...video cables (red/ blue/green - You only need to choose one of the options below to connect the S-VIDEO (Y/C) - It is required. Step 1: Basic Recorder Connections (continued) English ANTENNA TV VIDEO (CVBS) L AUDIO R EXT1 VIDEO (CVBS) S-VIDEO (Y/C) L AUDIO R OUT 2 Y PB PR AUDIO OUT 1 ...

User manual
Page 18
... to enjoy multichannel surround sound. Use a coaxial cable (not supplied) to connect the COAXIAL jack to the digital input on this recorder, this may produce a strong, distorted sound or no sound at all the devices are disconnected from the power outlet. 18 Do ... unwanted noise. TIPS: Before making or changing any connections, make sure that all . Helpful Hint: - Before you to listen to the sound. English Step 1: Basic Recorder Connections (continued) ANTENNA TV VIDEO (CVBS) L AUDIO R EXT1 VIDEO (CVBS) S-VIDEO (Y/C) L AUDIO R OUT 2 Y PB PR AUDIO OUT 1 COAXIAL DIGITAL...
... to enjoy multichannel surround sound. Use a coaxial cable (not supplied) to connect the COAXIAL jack to the digital input on this recorder, this may produce a strong, distorted sound or no sound at all the devices are disconnected from the power outlet. 18 Do ... unwanted noise. TIPS: Before making or changing any connections, make sure that all . Helpful Hint: - Before you to listen to the sound. English Step 1: Basic Recorder Connections (continued) ANTENNA TV VIDEO (CVBS) L AUDIO R EXT1 VIDEO (CVBS) S-VIDEO (Y/C) L AUDIO R OUT 2 Y PB PR AUDIO OUT 1 COAXIAL DIGITAL...

User manual
Page 19
... (or from the Cable Box/Satellite Receiver/VCR) connected to your TV to channel 3 or 4. A You may have used the TV jack to connect your recorder to TV, set the TV to the appropriate video input channel. - E Use the supplied AV cables (red/white ends) to connect the AUDIO L/R OUT2 jacks... the RF modulator. TIPS: Before making or changing any audio/video jacks. B Use the supplied RF coaxial cable to connect the TV jack on the recorder to the antenna input jack on RF modulator availability and operations. C Use an RF coaxial cable (not supplied) to connect the TO TV jack on...
... (or from the Cable Box/Satellite Receiver/VCR) connected to your TV to channel 3 or 4. A You may have used the TV jack to connect your recorder to TV, set the TV to the appropriate video input channel. - E Use the supplied AV cables (red/white ends) to connect the AUDIO L/R OUT2 jacks... the RF modulator. TIPS: Before making or changing any audio/video jacks. B Use the supplied RF coaxial cable to connect the TV jack on the recorder to the antenna input jack on RF modulator availability and operations. C Use an RF coaxial cable (not supplied) to connect the TO TV jack on...

User manual
Page 20
...Satellite Receiver to your TV. C Use a RF coaxial cable to connect the TV jack on the recorder to the antenna input jack on your TV (VHF/UHF RF IN.) D Use the audio/video ...cables to connect the VIDEO/AUDIO -EXT1 on the recorder to the RF OUT jack on the Cable Box/Satellite Receiver. Step 2: Optional Connections (continued) English CABLE ... on the TV. E Use the audio/video cables to connect the VIDEO/AUDIO -OUT2 on the recorder to your Cable Box/Satellite Receiver has video/audio output jacks, A Keep the existing antenna connection from...
...Satellite Receiver to your TV. C Use a RF coaxial cable to connect the TV jack on the recorder to the antenna input jack on your TV (VHF/UHF RF IN.) D Use the audio/video ...cables to connect the VIDEO/AUDIO -EXT1 on the recorder to the RF OUT jack on the Cable Box/Satellite Receiver. Step 2: Optional Connections (continued) English CABLE ... on the TV. E Use the audio/video cables to connect the VIDEO/AUDIO -OUT2 on the recorder to your Cable Box/Satellite Receiver has video/audio output jacks, A Keep the existing antenna connection from...

User manual
Page 21
... TV signal to the ANTENNA jack on the TV. Most commercial video cassettes and DVDs are disconnected from a video tape to the HDD or a DVD recordable disc and allows the VCR to be used for all the connections to your TV (VHF/UHF RF IN.) C Use the audio/video cables to... RF IN VHF/UHF RF OUT OUT VIDEO OUT AUDIO L AUDIO R C IN VIDEO IN AUDIO L AUDIO R Back of the copy protection system built into the recorder. TIPS: Before making or changing any connections, make sure that all the devices are copy-protected and therefore cannot be poor because of a VCR (Example...
... TV signal to the ANTENNA jack on the TV. Most commercial video cassettes and DVDs are disconnected from a video tape to the HDD or a DVD recordable disc and allows the VCR to be used for all the connections to your TV (VHF/UHF RF IN.) C Use the audio/video cables to... RF IN VHF/UHF RF OUT OUT VIDEO OUT AUDIO L AUDIO R C IN VIDEO IN AUDIO L AUDIO R Back of the copy protection system built into the recorder. TIPS: Before making or changing any connections, make sure that all the devices are copy-protected and therefore cannot be poor because of a VCR (Example...

User manual
Page 22
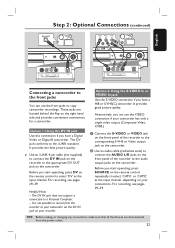
... to the antenna input (RF IN) jack on the Cable Box/Satellite Receiver. C Use a RF coaxial cable to connect the TV jack on the recorder to the antenna input jack on your TV (VHF/UHF RF IN.) D Use the supplied audio/video cables to connect the VIDEO/AUDIO -EXT1 jacks... (continued) CABLE SATELLITE ANTENNA A IN OUT RF VIDEO AUDIO R L S-VIDEO Back of a Cable Box F or Satellite Receiver (Example only) B D ~ MAINS Front Panel of HDD recorder VHF/UHF RF IN VHF/UHF RF OUT OUT VIDEO OUT AUDIO L AUDIO R F ANTENNA TV VIDEO (CVBS) L AUDIO R EXT1 C IN VIDEO S-VIDEO IN AUDIO L AUDIO...
... to the antenna input (RF IN) jack on the Cable Box/Satellite Receiver. C Use a RF coaxial cable to connect the TV jack on the recorder to the antenna input jack on your TV (VHF/UHF RF IN.) D Use the supplied audio/video cables to connect the VIDEO/AUDIO -EXT1 jacks... (continued) CABLE SATELLITE ANTENNA A IN OUT RF VIDEO AUDIO R L S-VIDEO Back of a Cable Box F or Satellite Receiver (Example only) B D ~ MAINS Front Panel of HDD recorder VHF/UHF RF IN VHF/UHF RF OUT OUT VIDEO OUT AUDIO L AUDIO R F ANTENNA TV VIDEO (CVBS) L AUDIO R EXT1 C IN VIDEO S-VIDEO IN AUDIO L AUDIO...
User manual
Page 23
... the power outlet. 23 B Use an audio cable (red/white ends) to connect the AUDIO L/R jacks on the front panel of the recorder to the corresponding S-VHS or Video output jack on your connections. English Step 2: Optional Connections (continued) DV OUT L AR B OR Connecting a camcorder to ...IN jack on your camcorder has only a single video output (Composite Video, CVBS.) A Connect the S-VIDEO or VIDEO jack on the front panel of the recorder to the audio output jacks on the camcorder. Before you have a Digital Video or Digital 8 camcorder. Option 2: Using the S-VIDEO In or VIDEO In...
... the power outlet. 23 B Use an audio cable (red/white ends) to connect the AUDIO L/R jacks on the front panel of the recorder to the corresponding S-VHS or Video output jack on your connections. English Step 2: Optional Connections (continued) DV OUT L AR B OR Connecting a camcorder to ...IN jack on your camcorder has only a single video output (Composite Video, CVBS.) A Connect the S-VIDEO or VIDEO jack on the front panel of the recorder to the audio output jacks on the camcorder. Before you have a Digital Video or Digital 8 camcorder. Option 2: Using the S-VIDEO In or VIDEO In...


