

User manual
Page 3
...Place the handset on the charging 5.2.2 How to access the phonebook 16 cradle 11 5.2.3 How to edit a phonebook entry 16 3.4 Configure your phone 12 5.2.4 How to delete a phonebook entry 17 3.5 How to power off or on the handset 5.2.5 How to delete all phonebook entries 17... power 12 5.2.6 How to store direct access memory 17 4 Using your phone 4.1 Make a call 4.1.1 Predialing 4.1.2 Direct dialing 4.1.3 Call from the call log 4.1.4 Call from the phonebook 4.1.5 Call from the redial list 4.1.6 Call ...
...Place the handset on the charging 5.2.2 How to access the phonebook 16 cradle 11 5.2.3 How to edit a phonebook entry 16 3.4 Configure your phone 12 5.2.4 How to delete a phonebook entry 17 3.5 How to power off or on the handset 5.2.5 How to delete all phonebook entries 17... power 12 5.2.6 How to store direct access memory 17 4 Using your phone 4.1 Make a call 4.1.1 Predialing 4.1.2 Direct dialing 4.1.3 Call from the call log 4.1.4 Call from the phonebook 4.1.5 Call from the redial list 4.1.6 Call ...
User manual
Page 4
... to set a wallpaper to be displayed in 6.5 standby mode 21 6.6 5.6.3 How to adjust the contrast level 21 6.6.1 5.6.4 How to set the color theme of your 6.6.2 phone 21 5.6.5 How to rename the handset 21 6.6.3 5.6.6 How to set the auto pick-up 21 6.6.4 5.6.7 How to set the auto hang-up 21 6.6.5 5.6.8 How to...
... to set a wallpaper to be displayed in 6.5 standby mode 21 6.6 5.6.3 How to adjust the contrast level 21 6.6.1 5.6.4 How to set the color theme of your 6.6.2 phone 21 5.6.5 How to rename the handset 21 6.6.3 5.6.6 How to set the auto pick-up 21 6.6.4 5.6.7 How to set the auto hang-up 21 6.6.5 5.6.8 How to...

User manual
Page 7
...1.7 Conformity The Declaration of conformity is available on www.p4c.philips.com. 1.8 Environmental care Please remember to observe the local regulations regarding the disposal of your packaging materials, exhausted batteries and old phone and, where possible, promote their recycling. Important Safety Instructions... supplied with this telephone. Philips has marked the packaging with standard symbols designed to promote the recycling and appropriate disposal of your eventual waste. It is recommended that users unplug the phone from the USB socket and the phone line from such appliances. ...
...1.7 Conformity The Declaration of conformity is available on www.p4c.philips.com. 1.8 Environmental care Please remember to observe the local regulations regarding the disposal of your packaging materials, exhausted batteries and old phone and, where possible, promote their recycling. Important Safety Instructions... supplied with this telephone. Philips has marked the packaging with standard symbols designed to promote the recycling and appropriate disposal of your eventual waste. It is recommended that users unplug the phone from the USB socket and the phone line from such appliances. ...
User manual
Page 8
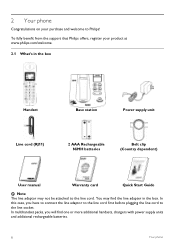
2 Your phone Congratulations on your product at www.philips.com/welcome. 2.1 What's in the box. In this case, you will find the line adapter in the box Handset Base station Power supply unit Line ... card Quick Start Guide Note The line adaptor may find one or more additional handsets, chargers with power supply units and additional rechargeable batteries. 6 Your phone You may not be attached to the line cord. In multihandset packs, you have to connect the line adaptor to the line cord first before...
2 Your phone Congratulations on your product at www.philips.com/welcome. 2.1 What's in the box. In this case, you will find the line adapter in the box Handset Base station Power supply unit Line ... card Quick Start Guide Note The line adaptor may find one or more additional handsets, chargers with power supply units and additional rechargeable batteries. 6 Your phone You may not be attached to the line cord. In multihandset packs, you have to connect the line adaptor to the line cord first before...

User manual
Page 9
2.2 Overview of your phone 2.2.1 Handset A Event LED OFF: No new events RED BLINKING: Unread events (example: a missed call if you have subscribed the Caller A Line Identification Service (CLI) from ... down to other entries During call connection: Press to decrease earpiece volume In editing mode: Press to go to the next character or digit Your phone 7
2.2 Overview of your phone 2.2.1 Handset A Event LED OFF: No new events RED BLINKING: Unread events (example: a missed call if you have subscribed the Caller A Line Identification Service (CLI) from ... down to other entries During call connection: Press to decrease earpiece volume In editing mode: Press to go to the next character or digit Your phone 7

User manual
Page 10
... off, short press to power off M Headset jack (Country dependent) Allow handsfree communication through the headset by plugging the headset into the headset jack 8 Your phone If the handset is an incoming external or internal call During call connection: Press to insert R for about 5 seconds to power on the handset.
... off, short press to power off M Headset jack (Country dependent) Allow handsfree communication through the headset by plugging the headset into the headset jack 8 Your phone If the handset is an incoming external or internal call During call connection: Press to insert R for about 5 seconds to power on the handset.

User manual
Page 11
... TAM messages are received and not read yet. Blink when there is an incoming internal call or when an internal call is in use. Your phone 9 Blink when the handset is out of range or is registered and within the range of the base station. Display when the alarm clock is... running low Display when the battery is partially charged Display when the battery is fully charged Display battery icon animation during charging Display when the phone is put on hold . Blink when there is an external incoming call or when an internal call is turned on. Blink when there is a missed...
... TAM messages are received and not read yet. Blink when there is an incoming internal call or when an internal call is in use. Your phone 9 Blink when the handset is out of range or is registered and within the range of the base station. Display when the alarm clock is... running low Display when the battery is partially charged Display when the battery is fully charged Display battery icon animation during charging Display when the phone is put on hold . Blink when there is an external incoming call or when an internal call is turned on. Blink when there is a missed...

User manual
Page 12
.... 2.2.3 Base station A B C D E F G H A Stop / Play key Press to play the message (the first recorded will not be played first) Press to start registration procedure 10 Your phone blink alternately: When there are new messages (e.g. 09 is the total number of old messages (e.g. steady: Indicate that there is off and 05 has the...
.... 2.2.3 Base station A B C D E F G H A Stop / Play key Press to play the message (the first recorded will not be played first) Press to start registration procedure 10 Your phone blink alternately: When there are new messages (e.g. 09 is the total number of old messages (e.g. steady: Indicate that there is off and 05 has the...

User manual
Page 13
.... 2 Insert the plug of the line cord into the socket under the base station. When the battery is fully charged, the talk time of your phone is approximately 12 hours and the standby time is displayed. 11 This can impair the range and sound quality. Therefore, ensure that the electricity socket...
.... 2 Insert the plug of the line cord into the socket under the base station. When the battery is fully charged, the talk time of your phone is approximately 12 hours and the standby time is displayed. 11 This can impair the range and sound quality. Therefore, ensure that the electricity socket...

User manual
Page 14
... seconds to power off your selected country and back to power on the handset again 12 Getting started Follow these steps to configure your phone: 1 Press < to display the list of use wrongly or would like to change the country after the first configuration, you need ...country 3 Press < to confirm your selection • Your phone is pressed, the handset will be applied to your phone, you can power off the handset 2 Press e to idle screen. 3.4 Configure your phone Depending on your phone. Before using your phone automatically. Tip If you chose the country in order to save...
... seconds to power off your selected country and back to power on the handset again 12 Getting started Follow these steps to configure your phone: 1 Press < to display the list of use wrongly or would like to change the country after the first configuration, you need ...country 3 Press < to confirm your selection • Your phone is pressed, the handset will be applied to your phone, you can power off the handset 2 Press e to idle screen. 3.4 Configure your phone Depending on your phone. Before using your phone automatically. Tip If you chose the country in order to save...
User manual
Page 15
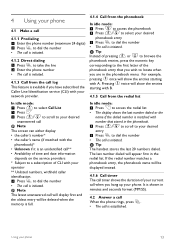
... dialed or the name if the dialed number is matched with number that you wish to locate when you hang up your phone. 4 Using your phone 4.1 Make a call 4.1.1 Predialing 1 Enter the phone number (maximum 24 digits) 2 Press r to dial the number • The call is initiated. 4.1.2 Direct dialing 1 Press ...r to take the line 2 Enter the phone number • The call is initiated. 4.1.3 Call from the call log This feature is available if you have subscribed the Caller Line Identification service (CLI...
... dialed or the name if the dialed number is matched with number that you wish to locate when you hang up your phone. 4 Using your phone 4.1 Make a call 4.1.1 Predialing 1 Enter the phone number (maximum 24 digits) 2 Press r to dial the number • The call is initiated. 4.1.2 Direct dialing 1 Press ...r to take the line 2 Enter the phone number • The call is initiated. 4.1.3 Call from the call log This feature is available if you have subscribed the Caller Line Identification service (CLI...

User manual
Page 16
...reject the second call list may damage your local service provider. ! During displaying caller ID, press < and u/ d to select functions to select your phone Whenever there is activated, you can lift up mode is an incoming call, other events. Note You can press < and u/d to select Switch Calls... to answer the call. 4.4 End a call Press e during an incoming call, please do not hold the handset too close to your ear as phone settings, menu navigation, etc will be emitted from the calling handset. 14 Using your desired handset 3 Press < on the calling handset • Your...
...reject the second call list may damage your local service provider. ! During displaying caller ID, press < and u/ d to select functions to select your phone Whenever there is activated, you can lift up mode is an incoming call, other events. Note You can press < and u/d to select Switch Calls... to answer the call. 4.4 End a call Press e during an incoming call, please do not hold the handset too close to your ear as phone settings, menu navigation, etc will be emitted from the calling handset. 14 Using your desired handset 3 Press < on the calling handset • Your...

User manual
Page 17
... tone to inform you may decide whether to answer the call or not. The number or name of the caller will be displayed when the phone rings so that you that there is a second incoming call. Using your desired handset • Your desired handset rings. 4 Press r on the called handset... for intercom will be displayed and the external call is put on hold automatically. 2 Press u/d to select your desired handset 3 Press < to call your phone 15 All the handsets registered to the base will be displayed and the external call , press r. 4.7 How to be in intercom). The three parties can...
... tone to inform you may decide whether to answer the call or not. The number or name of the caller will be displayed when the phone rings so that you that there is a second incoming call. Using your desired handset • Your desired handset rings. 4 Press r on the called handset... for intercom will be displayed and the external call is put on hold automatically. 2 Press u/d to select your desired handset 3 Press < to call your phone 15 All the handsets registered to the base will be displayed and the external call , press r. 4.7 How to be in intercom). The three parties can...
User manual
Page 18
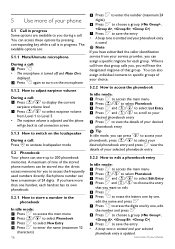
... 1 Press > • The microphone is turned off and Mute On is displayed. 2 Press > again to turn on the loudspeaker During a call . Each phone number can assign a specific ringtone for each handset has its own phonebook. 5.2.1 How to store a number in the phonebook In idle mode: 1 Press < to...) 16 5 Press < to enter the number (maximum 24 digits) 6 Press < to choose a group (, , , ) 7 Press < to activate loudspeaker mode 5.2 Phonebook Your phone can be stored into the direct access memories for you can access these options by one handset, each group. Note If you have more of...
... 1 Press > • The microphone is turned off and Mute On is displayed. 2 Press > again to turn on the loudspeaker During a call . Each phone number can assign a specific ringtone for each handset has its own phonebook. 5.2.1 How to store a number in the phonebook In idle mode: 1 Press < to...) 16 5 Press < to enter the number (maximum 24 digits) 6 Press < to choose a group (, , , ) 7 Press < to activate loudspeaker mode 5.2 Phonebook Your phone can be stored into the direct access memories for you can access these options by one handset, each group. Note If you have more of...

User manual
Page 19
... operator respectively. If the identity of the caller is not withheld, the name (or number) of the caller will automatically dial the stored phone number. Your phone can store up to 9 direct access memories (Key 1 to the called handset will blink to 50 unanswered calls. The Use more than.... 5.2.6 How to store direct access memory You can store up to remind you of any unanswered calls received. Note If there are more of your phone 17 5.2.4 How to delete a phonebook entry In idle mode: 1 Press < to access the main menu 2 Press u/d to select Phonebook 3 Press < and u/d ...
... operator respectively. If the identity of the caller is not withheld, the name (or number) of the caller will automatically dial the stored phone number. Your phone can store up to 9 direct access memories (Key 1 to the called handset will blink to 50 unanswered calls. The Use more than.... 5.2.6 How to store direct access memory You can store up to remind you of any unanswered calls received. Note If there are more of your phone 17 5.2.4 How to delete a phonebook entry In idle mode: 1 Press < to access the main menu 2 Press u/d to select Phonebook 3 Press < and u/d ...

User manual
Page 20
... • A beep tone is displayed at the top of the list. ! Only the first 24 digits of each number are deleted. 5.4 Redial list Your phone can review the caller ID with the selected dialing sequence directly or store this number in your phonebook. 1 2 Press u to access the call log Press...chronological order with the most recent unanswered call at the top of the list. 2 Press u/d to view other dialed numbers 18 Use more of your phone The original incoming number from the call list may not work for all received numbers. 5.4.1 How to access the redial list In idle mode: 1...
... • A beep tone is displayed at the top of the list. ! Only the first 24 digits of each number are deleted. 5.4 Redial list Your phone can review the caller ID with the selected dialing sequence directly or store this number in your phonebook. 1 2 Press u to access the call log Press...chronological order with the most recent unanswered call at the top of the list. 2 Press u/d to view other dialed numbers 18 Use more of your phone The original incoming number from the call list may not work for all received numbers. 5.4.1 How to access the redial list In idle mode: 1...

User manual
Page 21
The selected redial entry was copied to your phone 19 When the alarm is emitted. 5.4.2 How to save the settings Note When the alarm is selected as On Once or On Daily, will display ... u/d to select Clock & Alarm Press < and u/d to select Alarm Tone 4 Press < and u/d to choose your desired alarm tone from Melody 1 to Melody 10 Note The phone will play the corresponding melody when browsing the melody list. 5 Press < to save the settings 5.5.4 How to set the date and time format 1 Press < to...
The selected redial entry was copied to your phone 19 When the alarm is emitted. 5.4.2 How to save the settings Note When the alarm is selected as On Once or On Daily, will display ... u/d to select Clock & Alarm Press < and u/d to select Alarm Tone 4 Press < and u/d to choose your desired alarm tone from Melody 1 to Melody 10 Note The phone will play the corresponding melody when browsing the melody list. 5 Press < to save the settings 5.5.4 How to set the date and time format 1 Press < to...

User manual
Page 22
... for you must subscribe to the Caller Line Identification service. 5.6 Personal settings 5.6.1 Handset tone 5.6.1.1 How to set the ring volume Your phone provides five ringer volume levels (one ring melody to activate/deactivate the keypad lock 1 Press and hold * • is displayed if ... u/d to scroll to your desired group (Group A, Group B, Group C) 6 Press < and u/d to scroll to your desired group melody Note The phone will play the corresponding melody when browsing the melody list. 7 Press < to save the settings 5.6.1.5 How to each group. You can associate one bar...
... for you must subscribe to the Caller Line Identification service. 5.6 Personal settings 5.6.1 Handset tone 5.6.1.1 How to set the ring volume Your phone provides five ringer volume levels (one ring melody to activate/deactivate the keypad lock 1 Press and hold * • is displayed if ... u/d to scroll to your desired group (Group A, Group B, Group C) 6 Press < and u/d to scroll to your desired group melody Note The phone will play the corresponding melody when browsing the melody list. 7 Press < to save the settings 5.6.1.5 How to each group. You can associate one bar...

User manual
Page 23
... display when browsing different contrast levels. 5 Press < to save the settings 5.6.3 How to adjust the contrast level There are three wallpapers pre-installed in your phone. up 4 5 Press < and u/d to select On or Off Press < to save the settings 5.6.7 How to set the auto hang-up 4 Press < and u/d to... select On or Off 5 Press < to save the settings 5.6.8 How to set the menu language Depending on your country, your phone may not have this menu language option if only one language is 14 characters. 5 Press < to save the settings 5.6.6 How to set the auto pick...
... display when browsing different contrast levels. 5 Press < to save the settings 5.6.3 How to adjust the contrast level There are three wallpapers pre-installed in your phone. up 4 5 Press < and u/d to select On or Off Press < to save the settings 5.6.7 How to set the auto hang-up 4 Press < and u/d to... select On or Off 5 Press < to save the settings 5.6.8 How to set the menu language Depending on your country, your phone may not have this menu language option if only one language is 14 characters. 5 Press < to save the settings 5.6.6 How to set the auto pick...

User manual
Page 24
.... If the calling handset want to reach the monitored handset. Note You must have at least 2 handsets registered to your base station in your phone should be monitored. Note If room monitor is an external incoming call or internal call. To turn on the LCD backlight, press < or >....standby. 5.6.10How to turn on idle screen. 22 Use more of your country network and therefore you to restrict selected handsets from dialing a phone number beginning with each number containing up to four different barring numbers, with certain numbers. Note You will be required to enter the 4-...
.... If the calling handset want to reach the monitored handset. Note You must have at least 2 handsets registered to your base station in your phone should be monitored. Note If room monitor is an external incoming call or internal call. To turn on the LCD backlight, press < or >....standby. 5.6.10How to turn on idle screen. 22 Use more of your country network and therefore you to restrict selected handsets from dialing a phone number beginning with each number containing up to four different barring numbers, with certain numbers. Note You will be required to enter the 4-...


