
Leaflet
Page 1
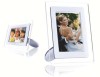
..., share and relive your memories with rechargeable battery no programming needed • Your choice of landscape or portrait display • Operate on AC power or cordlessly with Philips Photo Frame, the easiest way to match ambient light conditions Easily display your digital photos • View photos directly from your PC Great convenience • Automatically turn on your digital photos in print-like picture display • High pixel density for all stored photos • Play slideshows...
..., share and relive your memories with rechargeable battery no programming needed • Your choice of landscape or portrait display • Operate on AC power or cordlessly with Philips Photo Frame, the easiest way to match ambient light conditions Easily display your digital photos • View photos directly from your PC Great convenience • Automatically turn on your digital photos in print-like picture display • High pixel density for all stored photos • Play slideshows...

Leaflet
Page 2
... photos in daylight or at a time, in for easy viewing and sharing of your photos one image at night. Intelligent photo storage Intelligent photo storage employs smart software that minimizes required storage space without notice. Issue date 2009-05-07 Version: 6.0.12 12 NC: 8639 000 16478 UPC: 0 37849 96429 3 © 2009 Koninklijke Philips Electronics N.V. All Rights reserved. Off • Power LED indicator: Operation - PhotoFrame 7" Specifications 7FF1AW/37 Highlights Picture/Display • Effective viewing...
... photos in daylight or at a time, in for easy viewing and sharing of your photos one image at night. Intelligent photo storage Intelligent photo storage employs smart software that minimizes required storage space without notice. Issue date 2009-05-07 Version: 6.0.12 12 NC: 8639 000 16478 UPC: 0 37849 96429 3 © 2009 Koninklijke Philips Electronics N.V. All Rights reserved. Off • Power LED indicator: Operation - PhotoFrame 7" Specifications 7FF1AW/37 Highlights Picture/Display • Effective viewing...

User manual
Page 3
Packing List Power outlet Digital Photos on camera, memory card or PC RETURN TO TOP OF THE PAGE ©2005 Koninklijke Philips Electronics NV All rights reserved. Reproduction, copying, use, modification, hiring, renting, public performance, transmission and/or broadcasting in whole or in part is prohibited without written consent of Philips Electronics NV file:///D|/EDFU/Digital_photo_Display/edoc/PhotoDisplay/english/a1_pack.htm (2 of 2)2005-10-03 04:45:53
Packing List Power outlet Digital Photos on camera, memory card or PC RETURN TO TOP OF THE PAGE ©2005 Koninklijke Philips Electronics NV All rights reserved. Reproduction, copying, use, modification, hiring, renting, public performance, transmission and/or broadcasting in whole or in part is prohibited without written consent of Philips Electronics NV file:///D|/EDFU/Digital_photo_Display/edoc/PhotoDisplay/english/a1_pack.htm (2 of 2)2005-10-03 04:45:53

User manual
Page 4
... to a power outlet . Initial setup • Packing list • Initial setup • Specification Getting started Initial setup Philips digital photo display can place it somewhere in -place C. Removing the protective bag/film on display. A. Attaching the Photo Display stand • Place head of 3)2005-10-03 04:45:55 Connecting to a power source • Connect the supplied power cable from Photo Display to fit the photos on parts B. The internal battery will start charging and the battery LED turn orange. Or...
... to a power outlet . Initial setup • Packing list • Initial setup • Specification Getting started Initial setup Philips digital photo display can place it somewhere in -place C. Removing the protective bag/film on display. A. Attaching the Photo Display stand • Place head of 3)2005-10-03 04:45:55 Connecting to a power source • Connect the supplied power cable from Photo Display to fit the photos on parts B. The internal battery will start charging and the battery LED turn orange. Or...

User manual
Page 6
...file:///D|/EDFU/Digital_photo_Display/edoc/PhotoDisplay/english/a2_initial.htm (3 of Photo Display) A menu with general settings for Photo Display will be effective immediately. • Press again to choose your preferred language • Press the key (the 3rd key from the left on the rear of 3)2005-10-03 04:45:55 The new setting will appear. • Use... the or key to highlight Language and press the key to select. • Use the or key to leave the Language menu. Choose your preferred language. Press ...
...file:///D|/EDFU/Digital_photo_Display/edoc/PhotoDisplay/english/a2_initial.htm (3 of Photo Display) A menu with general settings for Photo Display will be effective immediately. • Press again to choose your preferred language • Press the key (the 3rd key from the left on the rear of 3)2005-10-03 04:45:55 The new setting will appear. • Use... the or key to highlight Language and press the key to select. • Use the or key to leave the Language menu. Choose your preferred language. Press ...

User manual
Page 7
... - Viewing angle (CR>5): Horizontal (-85°~85°), Vertical (-85°~85°) - Card (MS, reader: Built-in Secure digital (SD), Multimedia MS Pro), Compact flash (CF) type I only. card (MMC), Memory stick Convenience Photo format supported: Up to 12M pixels, JPEG photos following EXIF and DCF standards Memory size: 50 photos or more Placement supported: Landscape, Portrait Control buttons: 6 buttons Display mode Automatic slideshow, Full-Screen browse, Thumbnail browse Setup menu: file:///D|/EDFU...
... - Viewing angle (CR>5): Horizontal (-85°~85°), Vertical (-85°~85°) - Card (MS, reader: Built-in Secure digital (SD), Multimedia MS Pro), Compact flash (CF) type I only. card (MMC), Memory stick Convenience Photo format supported: Up to 12M pixels, JPEG photos following EXIF and DCF standards Memory size: 50 photos or more Placement supported: Landscape, Portrait Control buttons: 6 buttons Display mode Automatic slideshow, Full-Screen browse, Thumbnail browse Setup menu: file:///D|/EDFU...

User manual
Page 9
Specification Photo menu: OSD languages: English, French, German, Italian, Spanish, Simplified Chinese, Russian, Japanese Plug & Play compatibility: Windows 2000/XP or later, Mac OS X or later, Linux Accessories - Included accessories: AC power adaptor, USB cables, Quick start guide - User manual: Yes (in CD-ROM) Power - Power mode supported Battery powered, AC powered RETURN TO TOP OF THE PAGE file:///D|/EDFU/Digital_photo_Display/edoc/PhotoDisplay/english/a3_spec.htm (3 of 4)2005-10-03 04:45:55 Battery LED...
Specification Photo menu: OSD languages: English, French, German, Italian, Spanish, Simplified Chinese, Russian, Japanese Plug & Play compatibility: Windows 2000/XP or later, Mac OS X or later, Linux Accessories - Included accessories: AC power adaptor, USB cables, Quick start guide - User manual: Yes (in CD-ROM) Power - Power mode supported Battery powered, AC powered RETURN TO TOP OF THE PAGE file:///D|/EDFU/Digital_photo_Display/edoc/PhotoDisplay/english/a3_spec.htm (3 of 4)2005-10-03 04:45:55 Battery LED...

User manual
Page 14
...; Remove any . (If there are photos in \DCIM\ subdirectories of your memory card, Photo Display may need a separate memory card reader to connect your memory card to PC.) • Make sure the memory card is empty. Viewing digital camera photos from photo Display. Viewing Photos D Total photo count E Resolution of current photo (in -place. Viewing PC photos from PC • Make sure Photo Display is simply represented as "\" on the memory card will appear. Photos stored in or you may only display these photos) • Copy...
...; Remove any . (If there are photos in \DCIM\ subdirectories of your memory card, Photo Display may need a separate memory card reader to connect your memory card to PC.) • Make sure the memory card is empty. Viewing digital camera photos from photo Display. Viewing Photos D Total photo count E Resolution of current photo (in -place. Viewing PC photos from PC • Make sure Photo Display is simply represented as "\" on the memory card will appear. Photos stored in or you may only display these photos) • Copy...

User manual
Page 15
A CF Card B SD/ MMC/MS Card Viewing photos from a digital camera • Connect the supplied USB cable to Digital Camera to Photo Display. • Connect your digital camera to the USB cable that came with the camera. • Connect the two USB cables and switch on your memory card will appear. Viewing Photos (If you turn on Photo Display after memory card is inserted, the photos in the root directory will be copied to Photo Display automatically.) • After a few seconds photos in play mode. (Note: Some cameras do not support direct playback...
A CF Card B SD/ MMC/MS Card Viewing photos from a digital camera • Connect the supplied USB cable to Digital Camera to Photo Display. • Connect your digital camera to the USB cable that came with the camera. • Connect the two USB cables and switch on your memory card will appear. Viewing Photos (If you turn on Photo Display after memory card is inserted, the photos in the root directory will be copied to Photo Display automatically.) • After a few seconds photos in play mode. (Note: Some cameras do not support direct playback...

User manual
Page 19
... Photo Display. • After a few seconds, all the photos you may need to remove some already stored photos first before the copy screen disappears upon completion. Automatically copying PC Photos to Photo Display with a small copy icon . to remove photos Do not remove the memory card or disconnect the camera before copying more photos. • You may move , to add photos to copy list, from PC. • Make sure Photo Display is simply represented as a mass storage device. (like a camera) file...
... Photo Display. • After a few seconds, all the photos you may need to remove some already stored photos first before the copy screen disappears upon completion. Automatically copying PC Photos to Photo Display with a small copy icon . to remove photos Do not remove the memory card or disconnect the camera before copying more photos. • You may move , to add photos to copy list, from PC. • Make sure Photo Display is simply represented as a mass storage device. (like a camera) file...

User manual
Page 20
.... For Windows 2000 systems, remember to safely remove hardware before disconnection After a few seconds, all photos in the sub-directories of a digital camera to limited internal memory on Photo Display. Therefore, it is highly recommended to put the photos on the Photo Display drive. file:///D|/EDFU/Digital_photo_Display/edoc/PhotoDisplay/english/b2_copy.htm (4 of Photo Display. Copying Photos To copy from that memory card. • Disconnect the USB cable. NOTE: Only JPEG format photos are not supported.
.... For Windows 2000 systems, remember to safely remove hardware before disconnection After a few seconds, all photos in the sub-directories of a digital camera to limited internal memory on Photo Display. Therefore, it is highly recommended to put the photos on the Photo Display drive. file:///D|/EDFU/Digital_photo_Display/edoc/PhotoDisplay/english/b2_copy.htm (4 of Photo Display. Copying Photos To copy from that memory card. • Disconnect the USB cable. NOTE: Only JPEG format photos are not supported.

User manual
Page 21
the one to which you copy photos from a memory card. Destination Photo Display Source Photo Display • Select and copy photos from Source Photo Display, the way you want to transfer photos with the supplied USB cable to a digital camera or a memory card This operation is not supported. Copying from Photo Display to Digital Camera. • Connect the two USB cables together. Copying Photos Copying from one Photo Display to be copied - the one with supplied USB cable to external memory cards or digital cameras. file:///D|/EDFU/Digital_photo_Display/edoc/PhotoDisplay/...
the one to which you copy photos from a memory card. Destination Photo Display Source Photo Display • Select and copy photos from Source Photo Display, the way you want to transfer photos with the supplied USB cable to a digital camera or a memory card This operation is not supported. Copying from Photo Display to Digital Camera. • Connect the two USB cables together. Copying Photos Copying from one Photo Display to be copied - the one with supplied USB cable to external memory cards or digital cameras. file:///D|/EDFU/Digital_photo_Display/edoc/PhotoDisplay/...

User manual
Page 23
... to photos stored on Photo Display's internal memory. • Change view mode to Browse or Thumbnail. • Press the key (the 4th key from the left on screen - file:///D|/EDFU/Digital_photo_Display/edoc/PhotoDisplay/english/b3_slideshow.htm (1 of Photo Display). Viewing Photo Slideshows • Viewing photos • Copying photos • Viewing photo slideshows • Deleting and Rotating photos Enjoying photos Viewing Photo Slideshows When you set the Photo Display view mode to Slideshow, it will appear. • Press the key to select Show in slideshow setting and use the...
... to photos stored on Photo Display's internal memory. • Change view mode to Browse or Thumbnail. • Press the key (the 4th key from the left on screen - file:///D|/EDFU/Digital_photo_Display/edoc/PhotoDisplay/english/b3_slideshow.htm (1 of Photo Display). Viewing Photo Slideshows • Viewing photos • Copying photos • Viewing photo slideshows • Deleting and Rotating photos Enjoying photos Viewing Photo Slideshows When you set the Photo Display view mode to Slideshow, it will appear. • Press the key to select Show in slideshow setting and use the...

User manual
Page 25
... to photos stored on all media. • Press the key (the 3rd key from the left on the rear of Photo Display). Now your selection. A menu with general settings for Photo Display will appear. • Press the key to leave this menu. key to move to the • Use the or key to highlight the way one photo replaces the next on screen.
... to photos stored on all media. • Press the key (the 3rd key from the left on the rear of Photo Display). Now your selection. A menu with general settings for Photo Display will appear. • Press the key to leave this menu. key to move to the • Use the or key to highlight the way one photo replaces the next on screen.

User manual
Page 38
... LED light indicator in the back, you can be stored, how much battery power remains, which media are currently connected, or the Photo Display software version. whether the system is ON, if the battery is charging, how many more photos can determine whether the system is ON or the battery is charging: Power LED Battery LED Green: System ON Off: System OFF Orange: Battery is charging Off: Battery...
... LED light indicator in the back, you can be stored, how much battery power remains, which media are currently connected, or the Photo Display software version. whether the system is ON, if the battery is charging, how many more photos can determine whether the system is ON or the battery is charging: Power LED Battery LED Green: System ON Off: System OFF Orange: Battery is charging Off: Battery...

User manual
Page 42
... to control Digital photo display. 2) Q: Can I use Digital photo display to Digital photo display, it with "photo copied" message. You may then remove the card/camera to delete photos on its Auto-off periods? A: Yes. Photo Display will slideshow photos stored on memory card or camera? A: No, it does not support operations to view internal photos. 8) Q: How does Digital photo display show high-resolution 4:3 digital photos on external devices such as 7PM-11PM Brightness? A: Yes. A: No. It cannot be damaged if I check if the photos are copied after the screen confirms...
... to control Digital photo display. 2) Q: Can I use Digital photo display to Digital photo display, it with "photo copied" message. You may then remove the card/camera to delete photos on its Auto-off periods? A: Yes. Photo Display will slideshow photos stored on memory card or camera? A: No, it does not support operations to view internal photos. 8) Q: How does Digital photo display show high-resolution 4:3 digital photos on external devices such as 7PM-11PM Brightness? A: Yes. A: No. It cannot be damaged if I check if the photos are copied after the screen confirms...

User manual
Page 43
... photos by using the USB connection, but cannot change them in RAW format from my PC directly to camera industry standards. After a few seconds, all photos in the root directory will be automatically added to camera industry standards and therefore cannot be correctly displayed on memory cards or cameras because DPD only reads such photos but I set Current Time, Auto-off status at correctly. Please use a pin to trigger the Reset button...
... photos by using the USB connection, but cannot change them in RAW format from my PC directly to camera industry standards. After a few seconds, all photos in the root directory will be automatically added to camera industry standards and therefore cannot be correctly displayed on memory cards or cameras because DPD only reads such photos but I set Current Time, Auto-off status at correctly. Please use a pin to trigger the Reset button...

User manual
Page 45
... your memory card. Warning message: "No photo on Photo Display's screen. Consequently, some upper and bottom parts of Photo Display. Situations Recommended actions Warning message: "Low battery" Recharge Photo Display or turn off Photo Display before it onto Photo Display. If the Photo Display's internal battery level drops completely to Serial Number and Model Name sticker). Warning message: "No free space to store more photos" It means your Photo Display. Such camera owners could consider using memory card as a medium to view and copy photos...
... your memory card. Warning message: "No photo on Photo Display's screen. Consequently, some upper and bottom parts of Photo Display. Situations Recommended actions Warning message: "Low battery" Recharge Photo Display or turn off Photo Display before it onto Photo Display. If the Photo Display's internal battery level drops completely to Serial Number and Model Name sticker). Warning message: "No free space to store more photos" It means your Photo Display. Such camera owners could consider using memory card as a medium to view and copy photos...
User manual
Page 63
... made illegible; q repairs or product modifications and alterations have been altered in countries for additional support before contacting the Philips helpdesk: q Philips type number q Philips serial number q PC environment Processor: r 286/386/486/Pentium Pro/Internal memory r Operating system and version (Windows, DOS, OS/2, MAC) q Type and brand of Memory card used (Model, brand and memory size of memory card) q Digital camera type r Brand, type r Memory card type and brand used in digital camera Having the following...
... made illegible; q repairs or product modifications and alterations have been altered in countries for additional support before contacting the Philips helpdesk: q Philips type number q Philips serial number q PC environment Processor: r 286/386/486/Pentium Pro/Internal memory r Operating system and version (Windows, DOS, OS/2, MAC) q Type and brand of Memory card used (Model, brand and memory size of memory card) q Digital camera type r Brand, type r Memory card type and brand used in digital camera Having the following...

User manual
Page 66
... a service contract agreement with the PHILIPS partnership within ninety (90) days of the date of sale, the limitation on the product, and installation or repair of antenna systems outside of the product. • Product repair and/or part replacement because of improper installation, connections to improper voltage supply, abuse, neglect, misuse, accident, unauthorized repair or other cause not within the control of...
... a service contract agreement with the PHILIPS partnership within ninety (90) days of the date of sale, the limitation on the product, and installation or repair of antenna systems outside of the product. • Product repair and/or part replacement because of improper installation, connections to improper voltage supply, abuse, neglect, misuse, accident, unauthorized repair or other cause not within the control of...


