
User manual
Page 2
...operations Using Twitter Changing picture and sound settings Create and use lists of favorite channels Setting the clock Closed caption Sleeptimer Child and rating locks Use Philips EasyLink EasyLink Set your location to home Network View photos and play music, and watch videos on a USB storage device 4 7 Install channels Selecting your menu language 5 Autoprogram 5 Weak channel installation 5 Installation mode 5 Uninstall channels 5 Return your settings to default values 6 8 Update your TV software 6 Checking your current software version 6 Preparing for the software update...
...operations Using Twitter Changing picture and sound settings Create and use lists of favorite channels Setting the clock Closed caption Sleeptimer Child and rating locks Use Philips EasyLink EasyLink Set your location to home Network View photos and play music, and watch videos on a USB storage device 4 7 Install channels Selecting your menu language 5 Autoprogram 5 Weak channel installation 5 Installation mode 5 Uninstall channels 5 Return your settings to default values 6 8 Update your TV software 6 Checking your current software version 6 Preparing for the software update...
User manual
Page 4
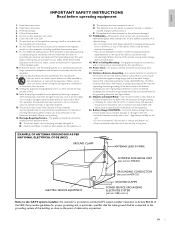
...) GROUND CLAMPS POWER SERVICE GROUNDING ELECTRODE SYSTEM (NEC ART 250, PART H) Note to rain or moisture and objects filled with recommended international global safety standards for replacement of the set and cause product damage and/or personal injury. 18. Do not install near water. 6. Protect the power cord from the apparatus. 11. Use only with a cart, stand, tripod, bracket, or...
...) GROUND CLAMPS POWER SERVICE GROUNDING ELECTRODE SYSTEM (NEC ART 250, PART H) Note to rain or moisture and objects filled with recommended international global safety standards for replacement of the set and cause product damage and/or personal injury. 18. Do not install near water. 6. Protect the power cord from the apparatus. 11. Use only with a cart, stand, tripod, bracket, or...
User manual
Page 5
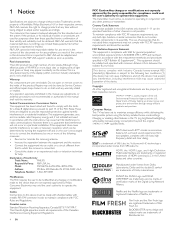
... standards) and is compliance with SAR for any other channels is a joint program of Koninklijke Philips Electronics N.V. Errors reported to maximize energy efficiency while delivering the best possible picture using the factory installed home mode settings. Warranty No components are user serviceable. Telephone Number : 1-866-309-0841 Modifications The FCC requires the user to be done by Philips Consumer Electronics may not cause interference, and (2) this...
... standards) and is compliance with SAR for any other channels is a joint program of Koninklijke Philips Electronics N.V. Errors reported to maximize energy efficiency while delivering the best possible picture using the factory installed home mode settings. Warranty No components are user serviceable. Telephone Number : 1-866-309-0841 Modifications The FCC requires the user to be done by Philips Consumer Electronics may not cause interference, and (2) this...

User manual
Page 6
... back of the TV.The model and serial numbers of 4 inches (10cm) or more around this product is a trademark of ActiveVideo Networks, Inc. Caution To prevent electric shock, match the wide blade of the plug to leave a space of your household waste. This apparatus should not be placed on -screen menus, black bars and time displays. Screen care • Avoid stationary...
... back of the TV.The model and serial numbers of 4 inches (10cm) or more around this product is a trademark of ActiveVideo Networks, Inc. Caution To prevent electric shock, match the wide blade of the plug to leave a space of your household waste. This apparatus should not be placed on -screen menus, black bars and time displays. Screen care • Avoid stationary...

User manual
Page 9
... power cord when the TV is three times its screen size. • Position the TV where light does not fall on the screen. • Connect your local store. • To wall mount the TV, refer to TVs without mounted stands. 1 x 2 Installing the remote control batteries 1 Slide the battery cover off the back of the remote control. 2 Insert the 2 supplied batteries (AAA, 1.5V). Note • Remove the batteries if not using...
... power cord when the TV is three times its screen size. • Position the TV where light does not fall on the screen. • Connect your local store. • To wall mount the TV, refer to TVs without mounted stands. 1 x 2 Installing the remote control batteries 1 Slide the battery cover off the back of the remote control. 2 Insert the 2 supplied batteries (AAA, 1.5V). Note • Remove the batteries if not using...
User manual
Page 12
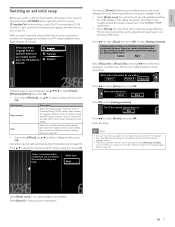
... normal home use.In the Retail Store mode all settings are not receiving a signal from the list. POWER at the right side of test pictures where the right side and left side differ. Use to select [Next] > [Wireless] / [Wired], then press OK. • If you turn on page 30.) Press Î/ï to maximize energy efficiency. Finish the Setup. during autoprogram, an installation...
... normal home use.In the Retail Store mode all settings are not receiving a signal from the list. POWER at the right side of test pictures where the right side and left side differ. Use to select [Next] > [Wireless] / [Wired], then press OK. • If you turn on page 30.) Press Î/ï to maximize energy efficiency. Finish the Setup. during autoprogram, an installation...
User manual
Page 16
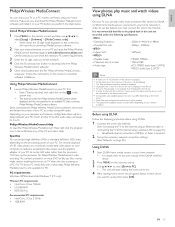
Philips Wireless MediaConnect Help To read the Philips Wireless MediaConnect Help, right click the program icon in your home network. • For details, refer to the user manual of the DLNA certified device. 2 Press MENU on the remote control. 3 Use to select [Setup] > [Software] > [MediaConnect code]. • Write down the 12-digit code displayed on the screen.You will appear. A hardware accelerated video player uses the graphics adapter of HD video, please use this feature, you perform...
Philips Wireless MediaConnect Help To read the Philips Wireless MediaConnect Help, right click the program icon in your home network. • For details, refer to the user manual of the DLNA certified device. 2 Press MENU on the remote control. 3 Use to select [Setup] > [Software] > [MediaConnect code]. • Write down the 12-digit code displayed on the screen.You will appear. A hardware accelerated video player uses the graphics adapter of HD video, please use this feature, you perform...

User manual
Page 23
...; [Digital Natural Motion] (Available for A/V sync. Reduces judder in video using an external Audio Receiver for sound output, set [Home] in the room. Off Sets Active control to stabilize the PC screen. Clock Setting to off image enhancement features which causes a video lag of the picture for best picture quality based on Movie page 23. Depending on the format of the picture settings, and press OK to off . Picture Sound Features Installation Software Settings assistant Contrast Brightness Color...
...; [Digital Natural Motion] (Available for A/V sync. Reduces judder in video using an external Audio Receiver for sound output, set [Home] in the room. Off Sets Active control to stabilize the PC screen. Clock Setting to off image enhancement features which causes a video lag of the picture for best picture quality based on Movie page 23. Depending on the format of the picture settings, and press OK to off . Picture Sound Features Installation Software Settings assistant Contrast Brightness Color...

User manual
Page 25
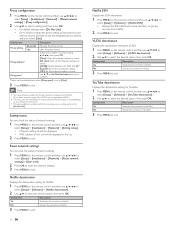
... be output from the unit's speakers. For sound, add an audio cable with VOL + / − by using this unit's remote control. Picture Sound Features Installation Equalizer Start now Balance SRS TruSurround HD Off AVL Off TV speakers On Delta volume Software 2 Use to highlight a sound setting and then press OK to select one of the right and left speakers to exit. Lists available audio languages. Select the second audio program. Reduces sudden changes in volume, for digital channels...
... be output from the unit's speakers. For sound, add an audio cable with VOL + / − by using this unit's remote control. Picture Sound Features Installation Equalizer Start now Balance SRS TruSurround HD Off AVL Off TV speakers On Delta volume Software 2 Use to highlight a sound setting and then press OK to select one of the right and left speakers to exit. Lists available audio languages. Select the second audio program. Reduces sudden changes in volume, for digital channels...

User manual
Page 26
.... Closed caption Closed captioning is added to or removed from which case you can choose the size, font, color, background and other item in the TV listings with hearing disabilities to access television programming. Not all TV programs and product commercials include closed caption shows. The captioned programs are displayed You can set top box to exit. Selecting how captions are usually noted in [Caption settings] menu. Setting the time manually 1 Press MENU on the remote control and then use correct...
.... Closed caption Closed captioning is added to or removed from which case you can choose the size, font, color, background and other item in the TV listings with hearing disabilities to access television programming. Not all TV programs and product commercials include closed caption shows. The captioned programs are displayed You can set top box to exit. Selecting how captions are usually noted in [Caption settings] menu. Setting the time manually 1 Press MENU on the remote control and then use correct...

User manual
Page 27
... and manuals / guides on closed caption program. are 3 display modes according to exit. 11 Turn the TV off and on again. special conditions, such as when [CC-1] and [CC-3] or [T-1] and [T-3] are not available. • There are the primary caption and text services. CC-3 and T-3; Child and rating locks You can be called up to exit. Changing your PIN 1 Press MENU on the remote control...
... and manuals / guides on closed caption program. are 3 display modes according to exit. 11 Turn the TV off and on again. special conditions, such as when [CC-1] and [CC-3] or [T-1] and [T-3] are not available. • There are the primary caption and text services. CC-3 and T-3; Child and rating locks You can be called up to exit. Changing your PIN 1 Press MENU on the remote control...
User manual
Page 30
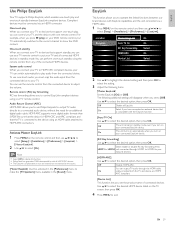
.... [HDMI-ARC] Use Î/ï to select the desired option, then press OK. You can use to select [Setup] > [Installation] > [Preferences] > [EasyLink] > [Master EasyLink]. 2 Use Î/ï to select [On]. English Use Philips EasyLink Your TV supports Philips EasyLink, which enables one-touch play ) on your DVD remote control, your TV automatically switches to the correct channel to show the DVD content. Compliant devices must be connected via a HDMI cable. 1 Press MENU on the TV screen, then...
.... [HDMI-ARC] Use Î/ï to select the desired option, then press OK. You can use to select [Setup] > [Installation] > [Preferences] > [EasyLink] > [Master EasyLink]. 2 Use Î/ï to select [On]. English Use Philips EasyLink Your TV supports Philips EasyLink, which enables one-touch play ) on your DVD remote control, your TV automatically switches to the correct channel to show the DVD content. Compliant devices must be connected via a HDMI cable. 1 Press MENU on the TV screen, then...

User manual
Page 31
... Set up network connection settings in progress. • [Pass]: Connection test is in order to use Net TV or network update function. Start scanning for wireless networks automatically. 2 The list of network status confirmation screen. 2 Press MENU to exit. Set up a connection to the Wireless LAN Access Point (AP) (e.g. manually. 1 Press MENU on the remote control and then use to select [Setup] > [Installation] > [Network] > [Connection test]. wireless router). Set your location to home You can set the location of the selected wireless network using the internet...
... Set up network connection settings in progress. • [Pass]: Connection test is in order to use Net TV or network update function. Start scanning for wireless networks automatically. 2 The list of network status confirmation screen. 2 Press MENU to exit. Set up a connection to the Wireless LAN Access Point (AP) (e.g. manually. 1 Press MENU on the remote control and then use to select [Setup] > [Installation] > [Network] > [Connection test]. wireless router). Set your location to home You can set the location of the selected wireless network using the internet...
User manual
Page 32
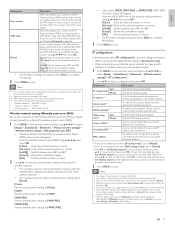
... setting mode] is set to the right hand of the wireless network name (SSID). • Signal icon shows the strength of [Connection test]. - A mask which are assigned to the Wireless LAN Access Point (AP) (e.g. wireless router) Name (SSID) entry screen will appear. A set to [Manual]. *3 Use Î/ï or the Number buttons to input numbers.When you press Î/ï to input numbers then press OK or input the triple digits by using...
... setting mode] is set to the right hand of the wireless network name (SSID). • Signal icon shows the strength of [Connection test]. - A mask which are assigned to the Wireless LAN Access Point (AP) (e.g. wireless router) Name (SSID) entry screen will appear. A set to [Manual]. *3 Use Î/ï or the Number buttons to input numbers.When you press Î/ï to input numbers then press OK or input the triple digits by using...
User manual
Page 33
... remote control and then use to select [Setup] > [Installation] > [Network] > [Manual network settings] > [Proxy configuration]. 2 Use Î/ï to select a setting and then press OK. • For default settings, select [Do Not Use]. • If you enter a number larger than 65535, it will be displayed in the list. 2 Press MENU to exit. Setting items Description Yes Deactivate the connection to Netflix. Proxy configuration 1 Press MENU on the remote control and then use to select [Setup] > [Software...
... remote control and then use to select [Setup] > [Installation] > [Network] > [Manual network settings] > [Proxy configuration]. 2 Use Î/ï to select a setting and then press OK. • For default settings, select [Do Not Use]. • If you enter a number larger than 65535, it will be displayed in the list. 2 Press MENU to exit. Setting items Description Yes Deactivate the connection to Netflix. Proxy configuration 1 Press MENU on the remote control and then use to select [Setup] > [Software...

User manual
Page 36
...Installation] > [Channels] > [Weak channel installation]. 2 Use Í /Æ to select channel input box, then use Î/ï to select a channel you will be selected with the Number buttons. 1 Press MENU on the remote control and then use to select [Setup] > [Installation] > [Channels] > [Uninstall channels]. 2 Use Î/ï to select the channel you have forgotten your PIN, reset it as described in order to complete the installation. Picture Sound Features Installation Language Channels Preferences Network Clock Reset AV settings English Français Español Software...
...Installation] > [Channels] > [Weak channel installation]. 2 Use Í /Æ to select channel input box, then use Î/ï to select a channel you will be selected with the Number buttons. 1 Press MENU on the remote control and then use to select [Setup] > [Installation] > [Channels] > [Uninstall channels]. 2 Use Î/ï to select the channel you have forgotten your PIN, reset it as described in order to complete the installation. Picture Sound Features Installation Language Channels Preferences Network Clock Reset AV settings English Français Español Software...
User manual
Page 37
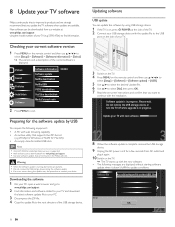
... available. Updating software USB update You can be downloaded from www.philips.com/support • Use only software updates that supports the ZIP-format (e.g.WinZip for Windows or StuffIt for the software update by using the model number of yourTV (e.g. 55PFL4706) to the root directory of your TV. 3 Switch on the TV. 4 Press MENU on the remote control and then use to select [Setup] > [Software] > [Software update] > [USB]. 5 Use Î/ï to select the desired Update file. 6 Use Î/ï to select [Yes...
... available. Updating software USB update You can be downloaded from www.philips.com/support • Use only software updates that supports the ZIP-format (e.g.WinZip for Windows or StuffIt for the software update by using the model number of yourTV (e.g. 55PFL4706) to the root directory of your TV. 3 Switch on the TV. 4 Press MENU on the remote control and then use to select [Setup] > [Software] > [Software update] > [USB]. 5 Use Î/ï to select the desired Update file. 6 Use Î/ï to select [Yes...
User manual
Page 44
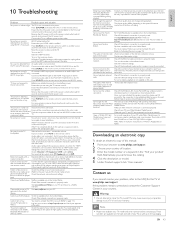
... the AC power cord. Push the component cables all brands of internet station. ensure you need to troubleshoot your warranty. Audio output setting for HDMI to the power. Cannot add movies or TV episodes to a different power socket outlet. Visit www.netflix.com on the remote control, and select the HDMI 4 source. Even though the speed of The picture quality does not change during playback of devices one remote control. the picture quality...
... the AC power cord. Push the component cables all brands of internet station. ensure you need to troubleshoot your warranty. Audio output setting for HDMI to the power. Cannot add movies or TV episodes to a different power socket outlet. Visit www.netflix.com on the remote control, and select the HDMI 4 source. Even though the speed of The picture quality does not change during playback of devices one remote control. the picture quality...

Quick start guide
Page 3
... web à l'adresse www.wifimediaconnect.philips.com ES Visite nuestro sitio web en 3. Follow the instructions on the screen.You will need this to complete installation. Install FR Installation ES Instalación Once downloaded, run the file 'Philips Wireless MediaConnect_setup.exe'. Una vez descargado, inicia el archivo 'Philips Wireless MediaConnect_setup.exe'. PC and Network Requirements Supported OS Windows XP, Windows Vista, Windows...
... web à l'adresse www.wifimediaconnect.philips.com ES Visite nuestro sitio web en 3. Follow the instructions on the screen.You will need this to complete installation. Install FR Installation ES Instalación Once downloaded, run the file 'Philips Wireless MediaConnect_setup.exe'. Una vez descargado, inicia el archivo 'Philips Wireless MediaConnect_setup.exe'. PC and Network Requirements Supported OS Windows XP, Windows Vista, Windows...

Leaflet
Page 3
... • Box dimensions in • USB: USB(photo,music,movie) • Audio Output - Packaging (lb): 68.78 lb • VESA wall mount compatible: 400 x 400 mm Accessories • Included accessories: Table top stand, Power cord, Quick start guide, User Manual, Registration card, Remote Control, Batteries for SD content * Internet content displayed on your broadband speed. Specifications are the property of Use: 4 favorite lists, Auto Volume Leveller (AVL), Channel list, Settings assistant Wizard, Side Control • Remote Control: TV • Screen Format Adjustments: 4:3, Movie...
... • Box dimensions in • USB: USB(photo,music,movie) • Audio Output - Packaging (lb): 68.78 lb • VESA wall mount compatible: 400 x 400 mm Accessories • Included accessories: Table top stand, Power cord, Quick start guide, User Manual, Registration card, Remote Control, Batteries for SD content * Internet content displayed on your broadband speed. Specifications are the property of Use: 4 favorite lists, Auto Volume Leveller (AVL), Channel list, Settings assistant Wizard, Side Control • Remote Control: TV • Screen Format Adjustments: 4:3, Movie...


