
Leaflet
Page 1
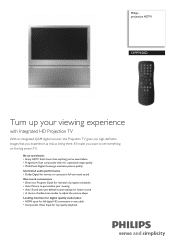
... Projection TV With an integrated QAM digital receiver, this Projection TV gives you high-definition images that 's truer than anything you've seen before • Progressive Scan component video for optimized image quality • Multi-Point Digital Converge maintains picture quality Unrivalled audio performance • Dolby Digital for movies or concerts in one cable • Component Video Input for better sound • A choice of widescreen modes to see everything on this big screen TV...
... Projection TV With an integrated QAM digital receiver, this Projection TV gives you high-definition images that 's truer than anything you've seen before • Progressive Scan component video for optimized image quality • Multi-Point Digital Converge maintains picture quality Unrivalled audio performance • Dolby Digital for movies or concerts in one cable • Component Video Input for better sound • A choice of widescreen modes to see everything on this big screen TV...
Leaflet
Page 2
... analog signal, it delivers an unblemished image. HDMI intelligently communicates the highest output resolution with realistic spatial cues. Component Video Input (YPbPr) Component Video is sharper than anything you with DVI sources but includes digital audio. It is fully backward compatible with an overview, listing the program information Auto Picture Auto Picture button on the remote control enables one-touch selection of various preset optimized image settings to a clearer picture. Electronic Program Guide The Electronic Program Guide...
... analog signal, it delivers an unblemished image. HDMI intelligently communicates the highest output resolution with realistic spatial cues. Component Video Input (YPbPr) Component Video is sharper than anything you with DVI sources but includes digital audio. It is fully backward compatible with an overview, listing the program information Auto Picture Auto Picture button on the remote control enables one-touch selection of various preset optimized image settings to a clearer picture. Electronic Program Guide The Electronic Program Guide...

Leaflet
Page 3
... Philips Electronics N.V. Digital: AC3 over S/PDIF (Optical) • Front / Side connections: CVBS in, S-video in • AV 2: CVBS, S-Video • AV 4: HDMI, YPbPr • Audio Output - or their respective owners. 12 NC: 8670 000 23275 www.philips.com Trademarks are subject to change without notice. Projection HDTV Specifications 51PP9100D/37 Picture/Display • Aspect ratio: 16:9, Widescreen • Display screen type: CRT Rear Projection TV • Picture enhancement: AutoPicture (5 modes), Progressive Scan, Color Temperature Adjustment, Black stretch, Color...
... Philips Electronics N.V. Digital: AC3 over S/PDIF (Optical) • Front / Side connections: CVBS in, S-video in • AV 2: CVBS, S-Video • AV 4: HDMI, YPbPr • Audio Output - or their respective owners. 12 NC: 8670 000 23275 www.philips.com Trademarks are subject to change without notice. Projection HDTV Specifications 51PP9100D/37 Picture/Display • Aspect ratio: 16:9, Widescreen • Display screen type: CRT Rear Projection TV • Picture enhancement: AutoPicture (5 modes), Progressive Scan, Color Temperature Adjustment, Black stretch, Color...

User manual
Page 4
...Reset 15 USING THE PICTURE MENU CONTROL Adjusting the Picture Control 16 ADJUSTING THE MANUAL CONVERGE CONTROLS Converge Red/Blue 17 Multipoint Red/Blue 18 USING THE SOUND MENU CONTROL Sound Menu Controls 19 USING THE FEATURES MENU How to use the Tuner Mode Control .9 Programming Part 2 - Analog 29 Close Captioning Services-Digital 30 Caption Option and Size-Digital 30 Auto Picture 31 Auto Sound 31 GENERAL INFORMATION Troubleshooting 32-33 Care and Cleaning 34 Model Specifications 35 Glossary of Television Terms 36 Index 37 Limited Warranty 38 Items Included with This TV...
...Reset 15 USING THE PICTURE MENU CONTROL Adjusting the Picture Control 16 ADJUSTING THE MANUAL CONVERGE CONTROLS Converge Red/Blue 17 Multipoint Red/Blue 18 USING THE SOUND MENU CONTROL Sound Menu Controls 19 USING THE FEATURES MENU How to use the Tuner Mode Control .9 Programming Part 2 - Analog 29 Close Captioning Services-Digital 30 Caption Option and Size-Digital 30 Auto Picture 31 Auto Sound 31 GENERAL INFORMATION Troubleshooting 32-33 Care and Cleaning 34 Model Specifications 35 Glossary of Television Terms 36 Index 37 Limited Warranty 38 Items Included with This TV...

User manual
Page 5
... cable TV (CATV) channel capability, as well as advanced capability for high-fidelity color and picture resolution when using digital video source material, such as horizontal and vertical sync. As an Energy Star® Partner, Philips has determined this filter easily supports the demands of channels stored in both analog sources (cable TV and DVD) and digital sources (HD and progressive scan DVD) have different aspect ratios (4:3, 16:9, 21:9, etc.) the picture on screen changes...
... cable TV (CATV) channel capability, as well as advanced capability for high-fidelity color and picture resolution when using digital video source material, such as horizontal and vertical sync. As an Energy Star® Partner, Philips has determined this filter easily supports the demands of channels stored in both analog sources (cable TV and DVD) and digital sources (HD and progressive scan DVD) have different aspect ratios (4:3, 16:9, 21:9, etc.) the picture on screen changes...

User manual
Page 6
Press to display the onscreen menu. Press to adjust the TV sound level. Press the ˙button to the AV inputs on the next time slot. The four factory-set according to turn the TV ON and OFF. REMOTE CONTROL BUTTONS 2 Power 2 button - AV (Source) button - Channel (+) or (-) buttons - A/CH - Volume (+) or (-) - Exit/Info - Press to select the different signal sources connected to access the program information on the TV. Choose from four factory-set controls-Movies, Sports, Weak Signal, and...
Press to display the onscreen menu. Press to adjust the TV sound level. Press the ˙button to the AV inputs on the next time slot. The four factory-set according to turn the TV ON and OFF. REMOTE CONTROL BUTTONS 2 Power 2 button - AV (Source) button - Channel (+) or (-) buttons - A/CH - Volume (+) or (-) - Exit/Info - Press to select the different signal sources connected to access the program information on the TV. Choose from four factory-set controls-Movies, Sports, Weak Signal, and...

User manual
Page 7
... the signal inputs you have connected to the TV. 4 Press the CHANNEL buttons to turn the TV on (or off the remote. 2 Place the two "AA" size batteries in injury to you or damage to power on. 2 Press the VOLUME + or - Use only a soft, lightly moistened cloth. 7 buttons to display the onscreen menu. Using the Remote Control OPERATING THE TELEVISION AND REMOTE CONTROL TELEVISION POWER TV SWAP VCR PIP CH ACC ACTIVE CONTROL FREEZE DN UP SOUND PICTURE STATUS/ EXIT MENU/ SELECT...
... the signal inputs you have connected to the TV. 4 Press the CHANNEL buttons to turn the TV on (or off the remote. 2 Place the two "AA" size batteries in injury to you or damage to power on. 2 Press the VOLUME + or - Use only a soft, lightly moistened cloth. 7 buttons to display the onscreen menu. Using the Remote Control OPERATING THE TELEVISION AND REMOTE CONTROL TELEVISION POWER TV SWAP VCR PIP CH ACC ACTIVE CONTROL FREEZE DN UP SOUND PICTURE STATUS/ EXIT MENU/ SELECT...

User manual
Page 8
... Language control only makes the TV's on -screen text features such as Closed Caption (CC) TV shows. 8 q For Analog Mode: Use the CURSOR RIGHT q button to highlight x y the Language Control option, then press CURSOR UP x or DOWN y to select English, French or Spanish. 6 When finished, press the EXIT/INFO button to remove the menu from the TV's screen. 7 To switch between Digital and Analog Channels, use the A/D button on screen menu. 2 x y Press...
... Language control only makes the TV's on -screen text features such as Closed Caption (CC) TV shows. 8 q For Analog Mode: Use the CURSOR RIGHT q button to highlight x y the Language Control option, then press CURSOR UP x or DOWN y to select English, French or Spanish. 6 When finished, press the EXIT/INFO button to remove the menu from the TV's screen. 7 To switch between Digital and Analog Channels, use the A/D button on screen menu. 2 x y Press...

User manual
Page 9
... Install features until the word Tuner Mode is highlighted. 5 For Digital mode: q Press the CURSOR RIGHT q button once to remove the menu from the TV's screen. 7 To switch between Digital and Analog Channels, use the A/D button on the Remote Control. It's important for the TV to know which type of signal to look for the selection of Antenna or cable tuner mode. Press the CURSOR UP x or DOWN y button to ANTENNA or CABLE, mode. When ANTENNA is selected, channels...
... Install features until the word Tuner Mode is highlighted. 5 For Digital mode: q Press the CURSOR RIGHT q button once to remove the menu from the TV's screen. 7 To switch between Digital and Analog Channels, use the A/D button on the Remote Control. It's important for the TV to know which type of signal to look for the selection of Antenna or cable tuner mode. Press the CURSOR UP x or DOWN y button to ANTENNA or CABLE, mode. When ANTENNA is selected, channels...

User manual
Page 10
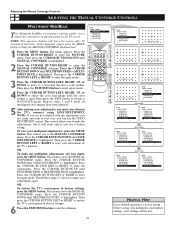
... remove the menu from the TV's screen. 8 To switch between Digital and Analog Channels, use the A/D button on the Remote Control. * Digital installation may take 20 to scroll through the Install features until the word Auto Program is selected, channels 2-69 are available. Using the Installation Menu PROGRAMMING PART 2 - AUTOMATIC PROGRAM Your TV can automatically set itself for you to select only the TV stations in your area when the CHANNEL (+), (-) buttons are pressed. 1 Make sure the antenna or cable signal connection...
... remove the menu from the TV's screen. 8 To switch between Digital and Analog Channels, use the A/D button on the Remote Control. * Digital installation may take 20 to scroll through the Install features until the word Auto Program is selected, channels 2-69 are available. Using the Installation Menu PROGRAMMING PART 2 - AUTOMATIC PROGRAM Your TV can automatically set itself for you to select only the TV stations in your area when the CHANNEL (+), (-) buttons are pressed. 1 Make sure the antenna or cable signal connection...

User manual
Page 13
... to seek the time. 9 When finished, press the EXIT/INFO button to remove the menu from the TV's screen. Use the NUMBERED buttons to enter the channel you can set the clock of the TV manually. 6 Use the NUMBERED buttons to seek clock. For Automatic selection With the Auto Chron™ options displayed, and Auto highlighted; Using the Installation Menu HELPFUL HINT To switch between Digital and Analog Channels, use the A/D button on the remote control to show the...
... to seek the time. 9 When finished, press the EXIT/INFO button to remove the menu from the TV's screen. Use the NUMBERED buttons to enter the channel you can set the clock of the TV manually. 6 Use the NUMBERED buttons to seek clock. For Automatic selection With the Auto Chron™ options displayed, and Auto highlighted; Using the Installation Menu HELPFUL HINT To switch between Digital and Analog Channels, use the A/D button on the remote control to show the...

User manual
Page 16
... button to exit the menu. 5 To switch between Digital and Analog Channels, use the A/D button on the remote control to obtain natural skin tones. TINT adjusts the picture to show the onscreen menu. 2 Press the CURSOR BUTTON RIGHT. NORMAL keeps whites, white. Picture adjustments are at midrange levels. COOL makes whites, bluish. *SMART CONTRAST sharpen the picture quality by making dark portions of the picture darker and light portions of the picture. COLOR adds or eliminates color. Picture-adjustment...
... button to exit the menu. 5 To switch between Digital and Analog Channels, use the A/D button on the remote control to obtain natural skin tones. TINT adjusts the picture to show the onscreen menu. 2 Press the CURSOR BUTTON RIGHT. NORMAL keeps whites, white. Picture adjustments are at midrange levels. COOL makes whites, bluish. *SMART CONTRAST sharpen the picture quality by making dark portions of the picture darker and light portions of the picture. COLOR adds or eliminates color. Picture-adjustment...
User manual
Page 18
... factory settings, press the MENU button. Press the CURSOR BUTTON LEFT or RIGHT to bring the MANUAL CONVERGE submenu back. 1 Press the MENU button. If this happens, simply press the MENU button to undo the adjustments. This returns you to adjust the convergence at specific points on the TV screen. Press the CURSOR BUTTON DOWN until RESTORE FACTORY is highlighted. Adjusting the Manual Converge Controls ADJUSTING THE MANUAL CONVERGE CONTROLS MULTIPOINT RED/BLUE T he Multipoint Red/Blue Convergence controls enable you to the MANUAL CONVERGE menu...
... factory settings, press the MENU button. Press the CURSOR BUTTON LEFT or RIGHT to bring the MANUAL CONVERGE submenu back. 1 Press the MENU button. If this happens, simply press the MENU button to undo the adjustments. This returns you to adjust the convergence at specific points on the TV screen. Press the CURSOR BUTTON DOWN until RESTORE FACTORY is highlighted. Adjusting the Manual Converge Controls ADJUSTING THE MANUAL CONVERGE CONTROLS MULTIPOINT RED/BLUE T he Multipoint Red/Blue Convergence controls enable you to the MANUAL CONVERGE menu...

User manual
Page 19
... right speakers. 4 p AVL: (Auto Volume Leveler) Press the CURSOR qq or p buttons to adjust the control. SAP is short for Secondary Audio Programming and is sent as a third audio channel, a SAP signal can be heard apart from the current TV program sound.Note: If SAP is placed in volume occur during commercial breaks or channel changes. 5 p q Incr. Using the Sound Menu Control HELPFUL HINT To switch between Dolby Virtual or Stereo settings (If...
... right speakers. 4 p AVL: (Auto Volume Leveler) Press the CURSOR qq or p buttons to adjust the control. SAP is short for Secondary Audio Programming and is sent as a third audio channel, a SAP signal can be heard apart from the current TV program sound.Note: If SAP is placed in volume occur during commercial breaks or channel changes. 5 p q Incr. Using the Sound Menu Control HELPFUL HINT To switch between Dolby Virtual or Stereo settings (If...

User manual
Page 20
... power to the set to turn on the remote control to the selected items by following the steps below. HELPFUL HINTS Remember, be set is highlighted. 3 q Press the CURSOR RIGHT q button to display the Features menu. 4 q Press the CURSOR RIGHT q button to display the Timer menu. 5 x y Press the CURSOR UP x or DOWN y buttons to remove the onscreen menu from the TV screen. The TV's clock settings may be displayed all the time...
... power to the set to turn on the remote control to the selected items by following the steps below. HELPFUL HINTS Remember, be set is highlighted. 3 q Press the CURSOR RIGHT q button to display the Features menu. 4 q Press the CURSOR RIGHT q button to display the Timer menu. 5 x y Press the CURSOR UP x or DOWN y buttons to remove the onscreen menu from the TV screen. The TV's clock settings may be displayed all the time...

User manual
Page 32
... progressive-scan mode. See page 7 for the location of the remote-sensor window. • Clean the remote control and the remote-sensor window on a wall switch. Charges for the correct tuner setting. See page 9. • Try running the Auto Program feature. Difficulties and Possible Solutions The TV remote control does not work • Check that the batteries are using the AV (remote) or Source Select (TV) buttons. See Connection Guide. • Check the Tuner Mode control for TV installation and adjustment...
... progressive-scan mode. See page 7 for the location of the remote-sensor window. • Clean the remote control and the remote-sensor window on a wall switch. Charges for the correct tuner setting. See page 9. • Try running the Auto Program feature. Difficulties and Possible Solutions The TV remote control does not work • Check that the batteries are using the AV (remote) or Source Select (TV) buttons. See Connection Guide. • Check the Tuner Mode control for TV installation and adjustment...

User manual
Page 34
... be broadcast channels, cable channels, satellite channels, digital television boxes, DVD discs, laser discs, video games, CD-i discs, videotapes, and others in the back cover of the set . All picture tubes age with use thinners, insecticide sprays, or other chemicals on or near the cabinet, as they are less likely to and from the electrical outlet before cleaning. • Regularly dust the TV with their light output diminishing...
... be broadcast channels, cable channels, satellite channels, digital television boxes, DVD discs, laser discs, video games, CD-i discs, videotapes, and others in the back cover of the set . All picture tubes age with use thinners, insecticide sprays, or other chemicals on or near the cabinet, as they are less likely to and from the electrical outlet before cleaning. • Regularly dust the TV with their light output diminishing...

User manual
Page 36
...; A picture-scanning technique that improves the appearance of sound that surrounds the listener and heightens overall viewing pleasure. Menu • An onscreen list of feature controls available for the input of audio and video signals. PTV • Projection Television. (Rear- RF • Radio Frequency or modulated signal design used as a satellite receiver, DVD player, S (Super)-VHS videocassette recorder, or video games. Tint • TV function that allows you to adjust or set. Channel Edit...
...; A picture-scanning technique that improves the appearance of sound that surrounds the listener and heightens overall viewing pleasure. Menu • An onscreen list of feature controls available for the input of audio and video signals. PTV • Projection Television. (Rear- RF • Radio Frequency or modulated signal design used as a satellite receiver, DVD player, S (Super)-VHS videocassette recorder, or video games. Tint • TV function that allows you to adjust or set. Channel Edit...

User manual
Page 37
... Picture, 31 Auto Program, 10 Auto Sound, 31 AV Button, 6 AVL Control, 19 B Balance Control, 19 Bass Control, 19 Brightness Control, 16 Buttons (TV), 7 Buttons (Remote), 6 C Channel Edit Control, 11 Cleaning (TV/Screen), 34 Clock (See Timer Control) Closed Captioning Control, 29-30 Color Control, 16 Color Temp Control, 16 Convergence Controls Red/blue, 17 Restore factory, 18 Multipoint red/blue, 18 Save multipoint settings, 18 Undo multipoint, 18 INDEX General Information: Glossary of Television Terms G Glossary, 36 H High-definition Television (Definition), 36 L Language Control (See Menu...
... Picture, 31 Auto Program, 10 Auto Sound, 31 AV Button, 6 AVL Control, 19 B Balance Control, 19 Bass Control, 19 Brightness Control, 16 Buttons (TV), 7 Buttons (Remote), 6 C Channel Edit Control, 11 Cleaning (TV/Screen), 34 Clock (See Timer Control) Closed Captioning Control, 29-30 Color Control, 16 Color Temp Control, 16 Convergence Controls Red/blue, 17 Restore factory, 18 Multipoint red/blue, 18 Save multipoint settings, 18 Undo multipoint, 18 INDEX General Information: Glossary of Television Terms G Glossary, 36 H High-definition Television (Definition), 36 L Language Control (See Menu...

User manual
Page 38
PARTS: For a period of one (1) year from the date of purchase, Philips will supply, at no charge, a new or rebuilt active display device in shipment and no charge, or pay the labor charges to any Philips authorized repair facility. Philips authorized service centers will provide removal and installation of purchase, Philips will repair or replace the product, at its option, at : 1-888-PHILIPS (1-888-744...
PARTS: For a period of one (1) year from the date of purchase, Philips will supply, at no charge, a new or rebuilt active display device in shipment and no charge, or pay the labor charges to any Philips authorized repair facility. Philips authorized service centers will provide removal and installation of purchase, Philips will repair or replace the product, at its option, at : 1-888-PHILIPS (1-888-744...


