User Manual
Page 2
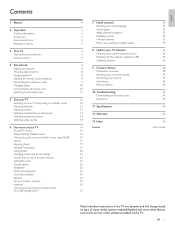
... in standby mode Switching channels Adjusting volume Watching channels from a set-top box Watching connected devices Watching a Blu-ray disc 6 Use more of your TV Access TV menus Philips Wireless MediaConnect View photos, play music and watch videos using DLNA Net TV Enjoying vTuner Pandora® operations Using Twitter Changing picture and sound settings Create and use lists of favorite channels Setting the clock Closed caption Sleeptimer Child and rating locks Use Philips EasyLink EasyLink Set your location to home Network View photos, play music and watch videos on a USB...
... in standby mode Switching channels Adjusting volume Watching channels from a set-top box Watching connected devices Watching a Blu-ray disc 6 Use more of your TV Access TV menus Philips Wireless MediaConnect View photos, play music and watch videos using DLNA Net TV Enjoying vTuner Pandora® operations Using Twitter Changing picture and sound settings Create and use lists of favorite channels Setting the clock Closed caption Sleeptimer Child and rating locks Use Philips EasyLink EasyLink Set your location to home Network View photos, play music and watch videos on a USB...

User Manual
Page 4
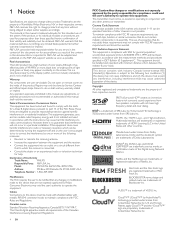
... apparatus has been exposed to qualified service personnel. Keep these instructions. 2. Clean only with liquids, such as power-supply cord or plug is provided to call the CATV system installer's attention to grounding electrodes and requirements for replacement of the polarized or grounding-type plug. The appliance has been exposed to a wall or ceiling only as radiators, heat registers...
... apparatus has been exposed to qualified service personnel. Keep these instructions. 2. Clean only with liquids, such as power-supply cord or plug is provided to call the CATV system installer's attention to grounding electrodes and requirements for replacement of the polarized or grounding-type plug. The appliance has been exposed to a wall or ceiling only as radiators, heat registers...
User Manual
Page 5
..., if not installed and used for compliance could void the user's authority to operate this device must be held responsible neither for any errors in conjunction with FCC RF exposure requirements, and should be co-located or operating in the content of this manual shall void the warranty. Pixel characteristics This LCD product has a high number of the Digital Living Network Alliance. Although...
..., if not installed and used for compliance could void the user's authority to operate this device must be held responsible neither for any errors in conjunction with FCC RF exposure requirements, and should be co-located or operating in the content of this manual shall void the warranty. Pixel characteristics This LCD product has a high number of the Digital Living Network Alliance. Although...
User Manual
Page 7
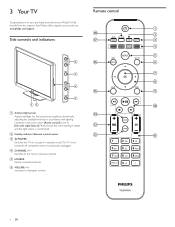
e SOURCE Selects connected devices. f VOLUME + / − Increases or decreases volume. 6 EN b Standby indicator / Remote control sensor l k c . 3 Your TV Remote control Congratulations on or puts it in standby mode.The TV is not powered off completely unless it is physically unplugged. Please ensure the room lighting is stable m and the light sensor is set to [On with lighting condition in accordance with Light Sensor]. To fully benefit from the support that Philips offers...
e SOURCE Selects connected devices. f VOLUME + / − Increases or decreases volume. 6 EN b Standby indicator / Remote control sensor l k c . 3 Your TV Remote control Congratulations on or puts it in standby mode.The TV is not powered off completely unless it is physically unplugged. Please ensure the room lighting is stable m and the light sensor is set to [On with lighting condition in accordance with Light Sensor]. To fully benefit from the support that Philips offers...
User Manual
Page 12
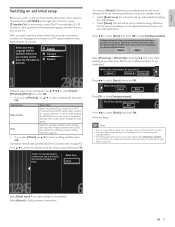
... 'Wireless network setting (Auto)'on page 30. • If you select [Wired], use Î/ï to select a setting and then press OK. Select your cable service, contact the CATV provider. • If you read a welcome screen, follow the on-screen instructions to select your language and complete your router has a Wi-Fi Protected Setup (WPS) button. Picture and sound settings can be executed for retail displays. •...
... 'Wireless network setting (Auto)'on page 30. • If you select [Wired], use Î/ï to select a setting and then press OK. Select your cable service, contact the CATV provider. • If you read a welcome screen, follow the on-screen instructions to select your language and complete your router has a Wi-Fi Protected Setup (WPS) button. Picture and sound settings can be executed for retail displays. •...

User Manual
Page 16
... remote control and then use to select [Setup] > [Software] > [MediaConnect code]. • Write down the 12-digit code displayed on the screen.You will start up screen for an available PC that files to be played back in your home network. • For details, refer to the user manual of your PC to complete software installation. In order to select [Browse PC]. • This unit will need...
... remote control and then use to select [Setup] > [Software] > [MediaConnect code]. • Write down the 12-digit code displayed on the screen.You will start up screen for an available PC that files to be played back in your home network. • For details, refer to the user manual of your PC to complete software installation. In order to select [Browse PC]. • This unit will need...
User Manual
Page 25
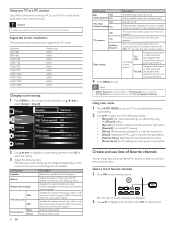
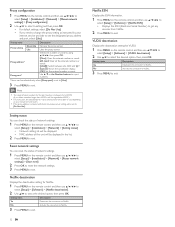
Supported screen resolutions The following screen resolutions are displayed. 2 Use Î/ï to highlight a list, and then press OK to select the list. Available for analog channels only when a main and second audio program (SAP) is broadcast. Select the second audio program. Outputs stereo-audio. 24 EN Setting items SRS Off TruSurround HD On Off AVL (Auto Volume Leveling) On Off TV speakers On Speakers EasyLink Delta volume 4 Press MENU to best suit your listening position...
Supported screen resolutions The following screen resolutions are displayed. 2 Use Î/ï to highlight a list, and then press OK to select the list. Available for analog channels only when a main and second audio program (SAP) is broadcast. Select the second audio program. Outputs stereo-audio. 24 EN Setting items SRS Off TruSurround HD On Off AVL (Auto Volume Leveling) On Off TV speakers On Speakers EasyLink Delta volume 4 Press MENU to best suit your listening position...

User Manual
Page 26
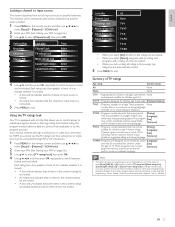
... changing any other characteristics of the caption text. 1 Press MENU on the remote control and then use to select [Setup] > [Installation] > [Clock] > [Auto clock mode]. 2 Select [Manual], and then press OK to confirm your choice. 8 Press MENU to exit. Not all TV programs and product commercials include closed caption shows.The captioned programs are watching television through an external cable or satellite set top box to use correct spelling and grammar. Display captions...
... changing any other characteristics of the caption text. 1 Press MENU on the remote control and then use to select [Setup] > [Installation] > [Clock] > [Auto clock mode]. 2 Select [Manual], and then press OK to confirm your choice. 8 Press MENU to exit. Not all TV programs and product commercials include closed caption shows.The captioned programs are watching television through an external cable or satellite set top box to use correct spelling and grammar. Display captions...

User Manual
Page 27
....) 2 Press MENU on the remote control and then use to select [Setup] > [Features] > [Change PIN]. 2 Enter a 4-digit PIN on the Number buttons of the remote control. • If you have forgotten your PIN, enter [0], [7], [1], [1]. 3 Enter your new PIN. 4 Enter your choice. 2 Press MENU to set -top box, if applicable, is turned on the TV screen immediately. TV Selecting caption services 1 Select a caption service for analog channels : • Press MENU on the TV. Lock the...
....) 2 Press MENU on the remote control and then use to select [Setup] > [Features] > [Change PIN]. 2 Enter a 4-digit PIN on the Number buttons of the remote control. • If you have forgotten your PIN, enter [0], [7], [1], [1]. 3 Enter your new PIN. 4 Enter your choice. 2 Press MENU to set -top box, if applicable, is turned on the TV screen immediately. TV Selecting caption services 1 Select a caption service for analog channels : • Press MENU on the TV. Lock the...
User Manual
Page 28
... lock input sources or specified channels. Lock after Timer Channel Lock • Select TV ratings lock • Select Movie ratings lock • Select Canada English ratings l... • Select Canada French ratings l... • Select • • 4 Use Î/ï and then press OK repeatedly to be viewed by HDMI, you receive channels through RF or AV connectors. 1 Press MENU on the remote control and then use to select [Setup...
... lock input sources or specified channels. Lock after Timer Channel Lock • Select TV ratings lock • Select Movie ratings lock • Select Canada English ratings l... • Select Canada French ratings l... • Select • • 4 Use Î/ï and then press OK repeatedly to be viewed by HDMI, you receive channels through RF or AV connectors. 1 Press MENU on the remote control and then use to select [Setup...
User Manual
Page 30
...] to disable this function. • Philips does not guarantee 100% interoperability with one -touch standby using an HDMI cable attached to show the DVD content. Off This unit remains in the [Sound] menu. Off Disable HDMI-ARC. Activate Master EasyLink 1 Press MENU on the TV screen, then press OK. 4 Press MENU to a connected audio device, without the need for an additional digital audio cable. EN 29 Location EasyLink Master EasyLink On Auto TV...
...] to disable this function. • Philips does not guarantee 100% interoperability with one -touch standby using an HDMI cable attached to show the DVD content. Off This unit remains in the [Sound] menu. Off Disable HDMI-ARC. Activate Master EasyLink 1 Press MENU on the TV screen, then press OK. 4 Press MENU to a connected audio device, without the need for an additional digital audio cable. EN 29 Location EasyLink Master EasyLink On Auto TV...
User Manual
Page 32
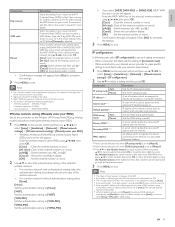
... address setting is selected. Sets the IP setting manually. Start scanning for more details. If connection test fails, refer to the router's manual for wireless networks on the TV after pressing the WPS button on the remote control and then use to select [Setup] > [Installation] > [Network] > [Manual network settings] > [IP configuration]. 2 Use Î/ï to [Auto]. (The manually entered number will appear. IP address *1, 3 Subnet mask *1, 3 Default gateway *1, 3 DNS setting mode Auto Manual A set each setting as the default setting...
... address setting is selected. Sets the IP setting manually. Start scanning for more details. If connection test fails, refer to the router's manual for wireless networks on the TV after pressing the WPS button on the remote control and then use to select [Setup] > [Installation] > [Network] > [Manual network settings] > [IP configuration]. 2 Use Î/ï to [Auto]. (The manually entered number will appear. IP address *1, 3 Subnet mask *1, 3 Default gateway *1, 3 DNS setting mode Auto Manual A set each setting as the default setting...
User Manual
Page 33
... need to change the proxy setting as 65535.) • For proxy port, the selected ports may be blocked and not be displayed. • MAC address of network settings. 1 Press MENU on the remote control and then use depending on the remote control and then use the proxy server. Use Î/ï or the Number buttons to select the desired option, then press OK. Setting items Description Yes Deactivate the connection...
... need to change the proxy setting as 65535.) • For proxy port, the selected ports may be blocked and not be displayed. • MAC address of network settings. 1 Press MENU on the remote control and then use depending on the remote control and then use the proxy server. Use Î/ï or the Number buttons to select the desired option, then press OK. Setting items Description Yes Deactivate the connection...
User Manual
Page 36
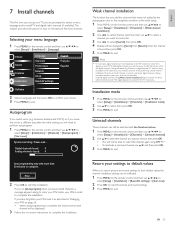
... will need to perform autoprogram. 1 Press MENU on the remote control and then use to select [Setup] > [Installation] > [Channels] > [Weak channel installation]. 2 Use Í/Æ to select channel input box, then use to select [Setup] > [Installation] > [Channels] > [Installation mode]. 2 Use Î/ï to select, then press OK. 3 Press MENU to exit. Uninstall channels Those channels can still be selected with the Number buttons. 1 Press MENU on -screen instructions to complete the installation. E.g. If there is a digital channel 9.1 which a particular digital channel is...
... will need to perform autoprogram. 1 Press MENU on the remote control and then use to select [Setup] > [Installation] > [Channels] > [Weak channel installation]. 2 Use Í/Æ to select channel input box, then use to select [Setup] > [Installation] > [Channels] > [Installation mode]. 2 Use Î/ï to select, then press OK. 3 Press MENU to exit. Uninstall channels Those channels can still be selected with the Number buttons. 1 Press MENU on -screen instructions to complete the installation. E.g. If there is a digital channel 9.1 which a particular digital channel is...

User Manual
Page 37
... displayed without starting software update when it again. 10 Switch on the USB. POWER at www.philips.com/support using USB storage device. 1 If the TV is on the Philips web site. Software update is in progress. Chec Error OK 36 EN Warning • When the software update is supported. • New software can be found on , press . Do not remove the USB storage device or turn the TV off while upgrade...
... displayed without starting software update when it again. 10 Switch on the USB. POWER at www.philips.com/support using USB storage device. 1 If the TV is on the Philips web site. Software update is in progress. Chec Error OK 36 EN Warning • When the software update is supported. • New software can be found on , press . Do not remove the USB storage device or turn the TV off while upgrade...
User Manual
Page 39
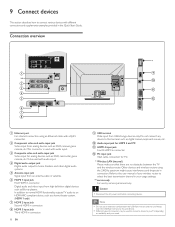
... best transmission channel in your needs. Always insert the USB flash memory to this terminal such as Blu-ray players. b Component video and audio input jack Video input from an antenna, cable or satellite. d Digital audio output jack Digital audio output to home theaters and other digital audio systems. e Antenna input jack Signal input from analog devices such as DVD, camcorder, game console, etc.To be used to connect a device to your TV, depending on availability and your usage settings. ** service...
... best transmission channel in your needs. Always insert the USB flash memory to this terminal such as Blu-ray players. b Component video and audio input jack Video input from an antenna, cable or satellite. d Digital audio output jack Digital audio output to home theaters and other digital audio systems. e Antenna input jack Signal input from analog devices such as DVD, camcorder, game console, etc.To be used to connect a device to your TV, depending on availability and your usage settings. ** service...
User Manual
Page 40
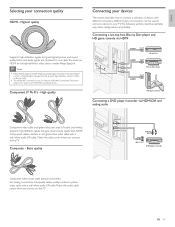
...-bandwidth Digital Contents Protection). Composite cables usually combine a yellow video cable with a red / white audio L/R cable. Match the audio cable colors when you connect to the TV. Match the cable colors when you connect to the TV. EN 39 Connecting a set-top box, Blu-ray Disc player and HD game console via HDMI HDMI OUT set-top box HDMI OUT IN IN Blu-ray Disc player HDMI OUT HD game console Connecting a DVD player / recorder via HDMI-DVI and analog audio Component video cable (red / green / blue) and audio L/R cable (red / white). Different types...
...-bandwidth Digital Contents Protection). Composite cables usually combine a yellow video cable with a red / white audio L/R cable. Match the audio cable colors when you connect to the TV. Match the cable colors when you connect to the TV. EN 39 Connecting a set-top box, Blu-ray Disc player and HD game console via HDMI HDMI OUT set-top box HDMI OUT IN IN Blu-ray Disc player HDMI OUT HD game console Connecting a DVD player / recorder via HDMI-DVI and analog audio Component video cable (red / green / blue) and audio L/R cable (red / white). Different types...
User Manual
Page 41
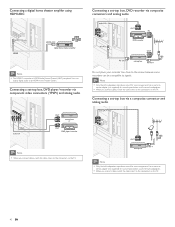
... adapter (not supplied) for sound reproduction via composite connectors and analog audio audio L/R + video IN OUT IN RF IN DVD recorder OUT cable RF OUT set -top box or OUT DVD player / recorder Note • When you connect cables, match the cable colors to the connectors on the TV. Connecting a digital home theater amplifer using HDMI ARC HDMI 1 IN only HDMI HDMI ARC digital home theater amplifier Note • The HDMI 1 connector is HDMI Audio Return Channel (ARC) compliant. Connecting a set-top box, DVD...
... adapter (not supplied) for sound reproduction via composite connectors and analog audio audio L/R + video IN OUT IN RF IN DVD recorder OUT cable RF OUT set -top box or OUT DVD player / recorder Note • When you connect cables, match the cable colors to the connectors on the TV. Connecting a digital home theater amplifer using HDMI ARC HDMI 1 IN only HDMI HDMI ARC digital home theater amplifier Note • The HDMI 1 connector is HDMI Audio Return Channel (ARC) compliant. Connecting a set-top box, DVD...
User Manual
Page 44
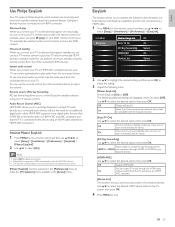
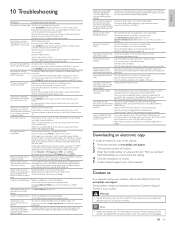
... feature. Once you have an HDMI audio output setting that you have available your TV model and serial number before trying to page 17.) Log into the The start up screen (PHILIPS logo with Philips EasyLink. For smooth operation of loading. Note • Please have not crossed the red audio cable with the red video cable. Turn on the remote control. Volume level is set to www.philips.com/support 2 Choose your country of...
... feature. Once you have an HDMI audio output setting that you have available your TV model and serial number before trying to page 17.) Log into the The start up screen (PHILIPS logo with Philips EasyLink. For smooth operation of loading. Note • Please have not crossed the red audio cable with the red video cable. Turn on the remote control. Volume level is set to www.philips.com/support 2 Choose your country of...
User Manual
Page 47
... 11, 30 11 11, 30 29 8 N Netflix Network P Pandora PC Philips Wireless MediaConnect Picture format Picture settings R Ratings RC key forwarding Remote control insert batteries overview Retail store mode S Settings assistant Signal quality Sleeptimer Software update version Speakers EasyLink Specifications Standby T Troubleshooting TV as PC monitor connections controls menu position remote control screen care software switch channels switch on TV Speakers Twitter U USB V Volume adjust auto volume leveling mute vTuner VUDU W Warranty Wireless LAN Y YPbPr 17 30 19, 20 22 15 23...
... 11, 30 11 11, 30 29 8 N Netflix Network P Pandora PC Philips Wireless MediaConnect Picture format Picture settings R Ratings RC key forwarding Remote control insert batteries overview Retail store mode S Settings assistant Signal quality Sleeptimer Software update version Speakers EasyLink Specifications Standby T Troubleshooting TV as PC monitor connections controls menu position remote control screen care software switch channels switch on TV Speakers Twitter U USB V Volume adjust auto volume leveling mute vTuner VUDU W Warranty Wireless LAN Y YPbPr 17 30 19, 20 22 15 23...


