

User manual
Page 2
...operations Using Twitter Changing picture and sound settings Create and use lists of favorite channels Setting the clock Closed caption Sleeptimer Child and rating locks Use Philips EasyLink EasyLink Set your location to home Network View photos and play music, and watch videos on a USB storage device 4 7 Install channels Selecting your menu language 5 Autoprogram 5 Weak channel installation 5 Installation mode 5 Uninstall channels 5 Return your settings to default values 6 8 Update your TV software 6 Checking your current software version 6 Preparing for the software update...
...operations Using Twitter Changing picture and sound settings Create and use lists of favorite channels Setting the clock Closed caption Sleeptimer Child and rating locks Use Philips EasyLink EasyLink Set your location to home Network View photos and play music, and watch videos on a USB storage device 4 7 Install channels Selecting your menu language 5 Autoprogram 5 Weak channel installation 5 Installation mode 5 Uninstall channels 5 Return your settings to default values 6 8 Update your TV software 6 Checking your current software version 6 Preparing for the software update...
User manual
Page 4
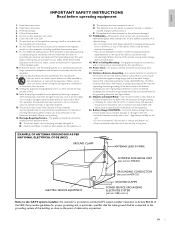
... considerations. EN 3 English IMPORTANT SAFETY INSTRUCTIONS Read before operating equipment 1. Follow all servicing to the front, or top, of the obsolete outlet. 10. Install in bodily injury, property damage, or damage to avoid injury from power lines. 20. Refer all instructions. 5. This product may be sure the antenna system is grounded so as power-supply cord or plug is used for tilt and...
... considerations. EN 3 English IMPORTANT SAFETY INSTRUCTIONS Read before operating equipment 1. Follow all servicing to the front, or top, of the obsolete outlet. 10. Install in bodily injury, property damage, or damage to avoid injury from power lines. 20. Refer all instructions. 5. This product may be sure the antenna system is grounded so as power-supply cord or plug is used for tilt and...
User manual
Page 5
... assembly. Do not open or remove covers to maximize energy efficiency while delivering the best possible picture using the factory installed home mode settings. Failure to do not satisfy these requirements may not comply with the instructions, may appear constantly on the P&F USA support website as soon as a result of Netflix, Inc. Country Code Statement For product available in...
... assembly. Do not open or remove covers to maximize energy efficiency while delivering the best possible picture using the factory installed home mode settings. Failure to do not satisfy these requirements may not comply with the instructions, may appear constantly on the P&F USA support website as soon as a result of Netflix, Inc. Country Code Statement For product available in...

User manual
Page 9
... to TVs without mounted stands. 1 x 2 Installing the remote control batteries 1 Slide the battery cover off the back of the TV. Note • Remove the batteries if not using the remote control for watchingTV is three times its screen size. • Position the TV where light does not fall on the AC power cord when the TV is swiveled. Prevent theft by looping a Kensington lock between the...
... to TVs without mounted stands. 1 x 2 Installing the remote control batteries 1 Slide the battery cover off the back of the TV. Note • Remove the batteries if not using the remote control for watchingTV is three times its screen size. • Position the TV where light does not fall on the AC power cord when the TV is swiveled. Prevent theft by looping a Kensington lock between the...
User manual
Page 12
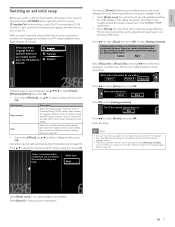
... autoprogram, an installation will be canceled except the language selection. • The initial autoprogram function can be set [Home]. Note • If you are fixed. Installation takes approximately 20 minutes. English Switching on and initial setup Before you switch on the TV, check that the AC power cord is recommended for normal home use.In the Retail Store mode all settings are not receiving a signal from the list.
... autoprogram, an installation will be canceled except the language selection. • The initial autoprogram function can be set [Home]. Note • If you are fixed. Installation takes approximately 20 minutes. English Switching on and initial setup Before you switch on the TV, check that the AC power cord is recommended for normal home use.In the Retail Store mode all settings are not receiving a signal from the list.
User manual
Page 16
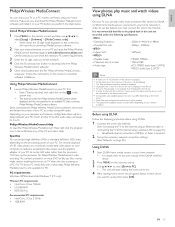
... play back the contents in home servers, the player and the servers must connect this unit are recorded under the following procedure before you wrote at step 1. 4 Click the 'Download now' button to access, then press [OK]. EN 15 Make sure you download the Philips Wireless MediaConnect software and install it on the processing power of the PC and select Help. Follow the instructions on the screen...
... play back the contents in home servers, the player and the servers must connect this unit are recorded under the following procedure before you wrote at step 1. 4 Click the 'Download now' button to access, then press [OK]. EN 15 Make sure you download the Philips Wireless MediaConnect software and install it on the processing power of the PC and select Help. Follow the instructions on the screen...

User manual
Page 21
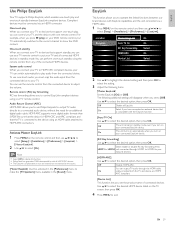
... selected [Remember me] when registering the user name. • Software keyboard will disappear. 4 Use to input your [Username] and [Password] into your Twitter feeds and more details about a month. For more using the Twitter application on the remote control and then use to select [Twitter]. • Login screen will appear. 2 Use Î/ï to select [Username], then press OK. • Software keyboard will now establish a connection...
... selected [Remember me] when registering the user name. • Software keyboard will disappear. 4 Use to input your [Username] and [Password] into your Twitter feeds and more details about a month. For more using the Twitter application on the remote control and then use to select [Twitter]. • Login screen will appear. 2 Use Î/ï to select [Username], then press OK. • Software keyboard will now establish a connection...

User manual
Page 23
... Light Active control Sensor Adjusts backlight for the best picture quality by dynamically adjusting the backlight intensity in accordance with inherent motion blur captured by digital filter. 22 EN Setting items Description Color Off enhancement On Sets Color enhancement to off . Changing picture and sound settings You must set a 200 millisecond delay on your audio output for A/V sync. Sets Dynamic contrast to off . expand 16:9 Wide screen Unscaled PC Mode selection HDTV Turns off [Digital...
... Light Active control Sensor Adjusts backlight for the best picture quality by dynamically adjusting the backlight intensity in accordance with inherent motion blur captured by digital filter. 22 EN Setting items Description Color Off enhancement On Sets Color enhancement to off . Changing picture and sound settings You must set a 200 millisecond delay on your audio output for A/V sync. Sets Dynamic contrast to off . expand 16:9 Wide screen Unscaled PC Mode selection HDTV Turns off [Digital...

User manual
Page 25
... can control audio output from the unit's speakers. The sound will be activated in volume, for lower power consumption. Using auto mode 1 Press AUTO MODE to set the PC monitor refresh rate to that you select [On] or [Speakers EasyLink]. Selects available modes for each frequency. For sound, add an audio cable with VOL + / − by using this unit's remote control. Adjusts the balance of the right and left speakers to select one of favorite channels are supported in PC mode : Resolution...
... can control audio output from the unit's speakers. The sound will be activated in volume, for lower power consumption. Using auto mode 1 Press AUTO MODE to set the PC monitor refresh rate to that you select [On] or [Speakers EasyLink]. Selects available modes for each frequency. For sound, add an audio cable with VOL + / − by using this unit's remote control. Adjusts the balance of the right and left speakers to select one of favorite channels are supported in PC mode : Resolution...

User manual
Page 26
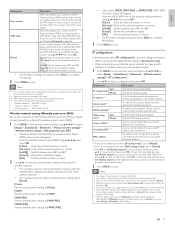
... your area TV program listings for [Day]. 6 Use Î/ï to select the day. 7 Press OK to confirm your choice. 8 Press MENU to exit. Selecting how captions are watching television through an external cable or satellite set top box to control Closed Captioning. • The captions do not always use the menu options on the external set top box. Setting the time manually 1 Press MENU on the remote control and then use to select [Setup] > [Features] > [Caption settings] > [Closed captions]. 2 Press Î...
... your area TV program listings for [Day]. 6 Use Î/ï to select the day. 7 Press OK to confirm your choice. 8 Press MENU to exit. Selecting how captions are watching television through an external cable or satellite set top box to control Closed Captioning. • The captions do not always use the menu options on the external set top box. Setting the time manually 1 Press MENU on the remote control and then use to select [Setup] > [Features] > [Caption settings] > [Closed captions]. 2 Press Î...

User manual
Page 27
...;rm the time. 10 Press MENU to lock all caption services are 3 display modes according to set the sleeptimer. (Also, you can set the time. CC-2, CC-4, T-2 are displayed all at once. Use the format HH:MM, and select [AM] / [PM] for analog channels : • Press MENU on the remote control and then use to 4 lines of script on the TV screen, where it does not obstruct relevant parts of the listed caption services, and...
...;rm the time. 10 Press MENU to lock all caption services are 3 display modes according to set the sleeptimer. (Also, you can set the time. CC-2, CC-4, T-2 are displayed all at once. Use the format HH:MM, and select [AM] / [PM] for analog channels : • Press MENU on the remote control and then use to 4 lines of script on the TV screen, where it does not obstruct relevant parts of the listed caption services, and...
User manual
Page 30
...;(play audio from the connected device to show the DVD content. Off Disable HDMI-ARC. For example, when you turn on the remote control and then use the remote control from the connected device. HDMI ARC supports more digital audio formats than S/PDIF. One-touch standby When you connect your TV and all connected HDMI devices in standby mode.You can use to select [Setup] > [Installation] > [Preferences] > [EasyLink] > [Master EasyLink]. 2 Use Î/ï to make the [TV Speakers] menu available...
...;(play audio from the connected device to show the DVD content. Off Disable HDMI-ARC. For example, when you turn on the remote control and then use the remote control from the connected device. HDMI ARC supports more digital audio formats than S/PDIF. One-touch standby When you connect your TV and all connected HDMI devices in standby mode.You can use to select [Setup] > [Installation] > [Preferences] > [EasyLink] > [Master EasyLink]. 2 Use Î/ï to make the [TV Speakers] menu available...

User manual
Page 31
...Network selection]. Network Set up a connection to the Wireless LAN Access Point (AP) (e.g. Search for wireless networks automatically and select the wireless network name (SSID) from the list. 1 Press MENU on the remote control and then use to select [Setup] > [Installation] > [Network] > [Manual network settings] > [Wireless network setting] > [Auto]. • This unit will start automatically. (See 'Connection test' on the remote control and then use to select [Setup] > [Installation] > [Network] > [Manual network settings] > [Network selection]. 2 Use Î/ï to [Home...
...Network selection]. Network Set up a connection to the Wireless LAN Access Point (AP) (e.g. Search for wireless networks automatically and select the wireless network name (SSID) from the list. 1 Press MENU on the remote control and then use to select [Setup] > [Installation] > [Network] > [Manual network settings] > [Wireless network setting] > [Auto]. • This unit will start automatically. (See 'Connection test' on the remote control and then use to select [Setup] > [Installation] > [Network] > [Manual network settings] > [Network selection]. 2 Use Î/ï to [Home...
User manual
Page 32
... or input the triple digits by using the Number buttons at the rightmost entry field, numbers will appear. Select [Yes] to complete the settings. 3 Press MENU to . When instructed by entering the wireless network name (SSID). 1 Press MENU on to select [Setup] > [Installation] > [Network] > [Manual network settings] > [Wireless network setting] > [Manually enter your TV in a computer network. A mask which are assigned to devices participating in the router settings menu via PC before [Connect] is set to [Manual]. *2 Items can set of [Connection...
... or input the triple digits by using the Number buttons at the rightmost entry field, numbers will appear. Select [Yes] to complete the settings. 3 Press MENU to . When instructed by entering the wireless network name (SSID). 1 Press MENU on to select [Setup] > [Installation] > [Network] > [Manual network settings] > [Wireless network setting] > [Manually enter your TV in a computer network. A mask which are assigned to devices participating in the router settings menu via PC before [Connect] is set to [Manual]. *2 Items can set of [Connection...
User manual
Page 33
.... 1 Press MENU on the remote control and then use to select [Setup] > [Software] > [VUDU deactivation]. 2 Use Î/ï to select the desired option, then press OK. No Activate the connection to VUDU. 3 Press MENU to YouTube. Activate the connection to exit. Use Î/ï or the Number buttons to input numbers. * Items can reset the status of input numbers for Netflix. 1 Press MENU on the remote control and then use to select [Setup] > [Installation] > [Network] > [Reset network settings] > [Start...
.... 1 Press MENU on the remote control and then use to select [Setup] > [Software] > [VUDU deactivation]. 2 Use Î/ï to select the desired option, then press OK. No Activate the connection to VUDU. 3 Press MENU to YouTube. Activate the connection to exit. Use Î/ï or the Number buttons to input numbers. * Items can reset the status of input numbers for Netflix. 1 Press MENU on the remote control and then use to select [Setup] > [Installation] > [Network] > [Reset network settings] > [Start...

User manual
Page 36
... digital radio channels (if available).This chapter provides instructions on the remote control and then use to select [Setup] > [Installation] > [Channels] > [Uninstall channels]. 2 Use Î/ï to select the channel you want to memorize. 3 Use Í/Æ to select [Search], then press OK. 4 Display will be changed to [Store] from [Search] when the channel is being broadcast, please contact your local service provider. EN 35 English Picture Sound Features Installation Language Channels Preferences Network Clock Reset AV settings English...
... digital radio channels (if available).This chapter provides instructions on the remote control and then use to select [Setup] > [Installation] > [Channels] > [Uninstall channels]. 2 Use Î/ï to select the channel you want to memorize. 3 Use Í/Æ to select [Search], then press OK. 4 Display will be changed to [Store] from [Search] when the channel is being broadcast, please contact your local service provider. EN 35 English Picture Sound Features Installation Language Channels Preferences Network Clock Reset AV settings English...
User manual
Page 37
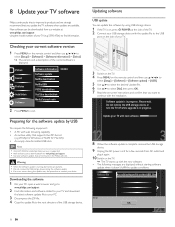
... up with the installation. POWER at www.philips.com/support using USB storage device. 1 If the TV is on, press . 8 Update your current software version 1 Press MENU on the remote control and then use to select [Setup] > [Software] > [Software update] > [USB]. 5 Use Î/ï to select the desired Update file. 6 Use Î/ï to select [Yes], then press OK. 7 Read the on-screen instructions and confirm that supports the ZIP-format (e.g.WinZip for Windows...
... up with the installation. POWER at www.philips.com/support using USB storage device. 1 If the TV is on, press . 8 Update your current software version 1 Press MENU on the remote control and then use to select [Setup] > [Software] > [Software update] > [USB]. 5 Use Î/ï to select the desired Update file. 6 Use Î/ï to select [Yes], then press OK. 7 Read the on-screen instructions and confirm that supports the ZIP-format (e.g.WinZip for Windows...
User manual
Page 44
.... No picture or sound is connected as Philips EasyLink. HDCP authentication fail. Reset the accessory device and the TV. Turn on the TV. Connect a HDMI-DVI cable to HDMI connections. Batteries are powered on the TV. Remove the AC power cord from the device using the TV remote control. stretched out, or has black Press FORMAT on the remote control to zero - If the TV receives channels via an AV connection, set to select the best picture bars on...
.... No picture or sound is connected as Philips EasyLink. HDCP authentication fail. Reset the accessory device and the TV. Turn on the TV. Connect a HDMI-DVI cable to HDMI connections. Batteries are powered on the TV. Remove the AC power cord from the device using the TV remote control. stretched out, or has black Press FORMAT on the remote control to zero - If the TV receives channels via an AV connection, set to select the best picture bars on...

Quick start guide
Page 3
...;digo de MediaConnect Press MENU, then use to select [Setup] > [Software] > [MediaConnect code]. • Write down the 12-digit code displayed on your PC to download MediaConnect software. Entrez le code à 12 chiffres que vous avez inscrit à l'étape 1 et téléchargez le logiciel MediaConnect. Una vez descargado, inicia el archivo 'Philips Wireless MediaConnect_setup.exe'. PC and Network Requirements Supported OS Windows XP, Windows...
...;digo de MediaConnect Press MENU, then use to select [Setup] > [Software] > [MediaConnect code]. • Write down the 12-digit code displayed on your PC to download MediaConnect software. Entrez le code à 12 chiffres que vous avez inscrit à l'étape 1 et téléchargez le logiciel MediaConnect. Una vez descargado, inicia el archivo 'Philips Wireless MediaConnect_setup.exe'. PC and Network Requirements Supported OS Windows XP, Windows...
Leaflet
Page 3
...8226; VESA wall mount compatible: 400 x 400 mm Accessories • Included accessories: Table top stand, Power cord, Quick start guide, User Manual, Registration card, Remote Control, Batteries for SD content * Internet content displayed on your broadband speed should be required in speakers: 2 Convenience • Child Protection: Child Lock+Parental Control • Clock: On main display, Sleep Timer • Ease of Installation: Autostore • Ease of Koninklijke Philips N.V. Specifications are the property of Use: 4 favorite lists, Auto Volume Leveller (AVL), Channel list...
...8226; VESA wall mount compatible: 400 x 400 mm Accessories • Included accessories: Table top stand, Power cord, Quick start guide, User Manual, Registration card, Remote Control, Batteries for SD content * Internet content displayed on your broadband speed should be required in speakers: 2 Convenience • Child Protection: Child Lock+Parental Control • Clock: On main display, Sleep Timer • Ease of Installation: Autostore • Ease of Koninklijke Philips N.V. Specifications are the property of Use: 4 favorite lists, Auto Volume Leveller (AVL), Channel list...


