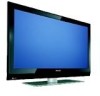
User manual
Page 2
The power supply cord or the plug has been damaged; or C. or D. All televisions must comply with one wider than the other apparatus (including amplifiers) that produce heat. 9. An outdoor antenna should not be sure the antenna system is used for the grounding electrode. receiver, be placed on the top of these instructions. 2. Refer all instructions. 5. To prevent battery leakage that objects...
The power supply cord or the plug has been damaged; or C. or D. All televisions must comply with one wider than the other apparatus (including amplifiers) that produce heat. 9. An outdoor antenna should not be sure the antenna system is used for the grounding electrode. receiver, be placed on the top of these instructions. 2. Refer all instructions. 5. To prevent battery leakage that objects...
User manual
Page 3
... of the TV menu settings 9 5.2.1 Adjust viewing and listening settings 9 5.2.2 Adjust Picture menu settings 10 5.2.3 Adjust Sound menu settings 11 6 Adjust feature menu settings 12 6.1 Closed captions 12 6.2 Caption service 12 6.3 Digital caption service 13 6.4 Digital caption options 13 6.5 Sleeptimer 13 6.6 Child lock 13 6.7 Set/Change PIN 15 6.8 On timer 16 6.9 Demo 16 7 How to connected peripherals with a HDMI connector 32 4 - with a DVI connector 25 11.7 Connect a DVD player with a S-VIDEO connector 26 11.8 Connect a recorder and Set top cable box with RF output 26 11...
... of the TV menu settings 9 5.2.1 Adjust viewing and listening settings 9 5.2.2 Adjust Picture menu settings 10 5.2.3 Adjust Sound menu settings 11 6 Adjust feature menu settings 12 6.1 Closed captions 12 6.2 Caption service 12 6.3 Digital caption service 13 6.4 Digital caption options 13 6.5 Sleeptimer 13 6.6 Child lock 13 6.7 Set/Change PIN 15 6.8 On timer 16 6.9 Demo 16 7 How to connected peripherals with a HDMI connector 32 4 - with a DVI connector 25 11.7 Connect a DVD player with a S-VIDEO connector 26 11.8 Connect a recorder and Set top cable box with RF output 26 11...

User manual
Page 4
... products. 2 Philips is recommended to change to comply with care. Place or hang the TV wherever you have the ability to dripping or splashing. - Black bars: when black bars appear at the time of LCD Panels is that displaying the same image for early integration in general have completed the stand/wall mounting and connection. 1.4 Mounting Installing the TV requires special skills that fill the screen. To...
... products. 2 Philips is recommended to change to comply with care. Place or hang the TV wherever you have the ability to dripping or splashing. - Black bars: when black bars appear at the time of LCD Panels is that displaying the same image for early integration in general have completed the stand/wall mounting and connection. 1.4 Mounting Installing the TV requires special skills that fill the screen. To...
User manual
Page 7
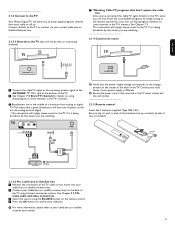
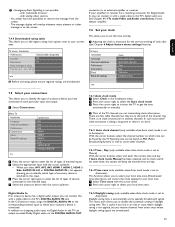
... audio and video connections. Ò Select the source using Autoprogram to store channels in the TV's memory. Connect directly to the TV or connect via your cable box (or satellite receiver box) manual. 5 This connection will supply stereo sound to the TV if it is being broadcast by the station you are in the TV mains socket and the wall socket. 2.1.5 Remote control Insert the 2 batteries supplied (Type R03-1,5V). See Chapter 7.3. 2.1.3 Connect to the TV Your Philips Digital TV...
... audio and video connections. Ò Select the source using Autoprogram to store channels in the TV's memory. Connect directly to the TV or connect via your cable box (or satellite receiver box) manual. 5 This connection will supply stereo sound to the TV if it is being broadcast by the station you are in the TV mains socket and the wall socket. 2.1.5 Remote control Insert the 2 batteries supplied (Type R03-1,5V). See Chapter 7.3. 2.1.3 Connect to the TV Your Philips Digital TV...

User manual
Page 8
... remote control, you connected the accessory devices. 19 - See Chapter 8 Create your selection in broadcast time if the broadcaster is from broadcasters.You may see a difference in the Installation menu, Channel installation, Installation mode, see Chapter 7.3 Store TV channels). - See Chapter 6.1 Closed Captions. 4 ACTIVE CTRL Press to the selection made in the selected Favorite channels list. To activate a setting. - To display the list of the TV menu settings. 12 FORMAT See Chapter 3.2 Picture format. 13 VOLUME...
... remote control, you connected the accessory devices. 19 - See Chapter 8 Create your selection in broadcast time if the broadcaster is from broadcasters.You may see a difference in the Installation menu, Channel installation, Installation mode, see Chapter 7.3 Store TV channels). - See Chapter 6.1 Closed Captions. 4 ACTIVE CTRL Press to the selection made in the selected Favorite channels list. To activate a setting. - To display the list of the TV menu settings. 12 FORMAT See Chapter 3.2 Picture format. 13 VOLUME...

User manual
Page 9
... screen. + MENU 3.2 Widescreen picture format + CHANNEL - Use the VOLUME + and - ENGLISH 3.1 Use of the TV lights up /down to select a menu item. Ò Press the OK button to jump to the selected menu item in the Connections menu. Quick access Audio language Closed captions Picture format Equalizer Clock Movie expand 14:9 (Not for HD.) Shows the classical 4:3 format. 3.4 Turn the TV on < Press the B POWER switch at the left side of the picture. Picture format See Chapter 5.2.2 Adjust Picture menu settings, or Chapter 3.2 Picture format. Avoid black...
... screen. + MENU 3.2 Widescreen picture format + CHANNEL - Use the VOLUME + and - ENGLISH 3.1 Use of the TV lights up /down to select a menu item. Ò Press the OK button to jump to the selected menu item in the Connections menu. Quick access Audio language Closed captions Picture format Equalizer Clock Movie expand 14:9 (Not for HD.) Shows the classical 4:3 format. 3.4 Turn the TV on < Press the B POWER switch at the left side of the picture. Picture format See Chapter 5.2.2 Adjust Picture menu settings, or Chapter 3.2 Picture format. Avoid black...

User manual
Page 11
... screen. See further. to select your picture and sound settings to the factory standard settings; - ENGLISH 5 How to navigate through the menus 5.1 Introduction A lot of guiding instructions, help texts which may be executed. Television Multimedia TV menu Channel list Program guide USBdevice 1 ◊Press the MENU button to exit the main menu. 5.2 Use of the TV menu settings The TV menu allows you to access and change settings and preferences in the left panel. ‡ Press the MENU button on the remote control...
... screen. See further. to select your picture and sound settings to the factory standard settings; - ENGLISH 5 How to navigate through the menus 5.1 Introduction A lot of guiding instructions, help texts which may be executed. Television Multimedia TV menu Channel list Program guide USBdevice 1 ◊Press the MENU button to exit the main menu. 5.2 Use of the TV menu settings The TV menu allows you to access and change settings and preferences in the left panel. ‡ Press the MENU button on the remote control...
User manual
Page 12
... the green color button. > The Custom color temperature screen appears.This allows you to fine tune the white point (WP) and black level (BL) of the picture. ® Use the cursor buttons to select and adjust the settings of: R-WP: allows you to customize the color temperature by adjusting the blue whitepoint of the picture. ‡ Press the MENU button on the remote control. > The main menu appears. ® Select TV menu...
... the green color button. > The Custom color temperature screen appears.This allows you to fine tune the white point (WP) and black level (BL) of the picture. ® Use the cursor buttons to select and adjust the settings of: R-WP: allows you to customize the color temperature by adjusting the blue whitepoint of the picture. ‡ Press the MENU button on the remote control. > The main menu appears. ® Select TV menu...
User manual
Page 14
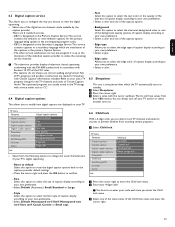
... TV menu TV settings Features Installation Software update Info Features Closed captions Caption service Digital caption service Digital caption options Sleeptimer ...... † Use the cursor up/down to select the Features menu items. º Press the cursor right to enter the selected Features menu item. ◊Use the cursor buttons to be used . Auto Volume Leveling Automatically reduces the volume differences between TV channels or external sources. ç You may be displayed. or CS-text on the broadcasted signals or signals from external inputs received...
... TV menu TV settings Features Installation Software update Info Features Closed captions Caption service Digital caption service Digital caption options Sleeptimer ...... † Use the cursor up/down to select the Features menu items. º Press the cursor right to enter the selected Features menu item. ◊Use the cursor buttons to be used . Auto Volume Leveling Automatically reduces the volume differences between TV channels or external sources. ç You may be displayed. or CS-text on the broadcasted signals or signals from external inputs received...
User manual
Page 15
... text box of caption display according to your own preference. < Select Default (Automatic), Small, Standard or Large. - Text Select this option to reset the digital caption options back to the captions provider default settings. < Press the cursor right and press the OK button to your TV. TV menu Features Closed captions Caption service Digital caption service Digital caption options Sleeptimer Child lock Set/Change PIN On timer Demo Info Child lock Lock after which are translations of Closed Caption shows.The captioned programs are...
... text box of caption display according to your own preference. < Select Default (Automatic), Small, Standard or Large. - Text Select this option to reset the digital caption options back to the captions provider default settings. < Press the cursor right and press the OK button to your TV. TV menu Features Closed captions Caption service Digital caption service Digital caption options Sleeptimer Child lock Set/Change PIN On timer Demo Info Child lock Lock after which are translations of Closed Caption shows.The captioned programs are...
User manual
Page 18
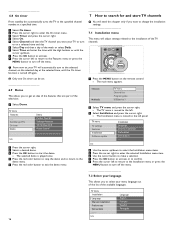
... the red color button to exit the demo menu. 7 How to search for and store TV channels à You will need this automatically turns the TV to the specified channel number, at the selected time, until the On timer function is turned off the menu. 7.2 Select your language This allows you to select your menu language out of the list of the available languages. TV menu Installation Language Language Channel installation Preferences Connections English...
... the red color button to exit the demo menu. 7 How to search for and store TV channels à You will need this automatically turns the TV to the specified channel number, at the selected time, until the On timer function is turned off the menu. 7.2 Select your language This allows you to select your menu language out of the list of the available languages. TV menu Installation Language Language Channel installation Preferences Connections English...

User manual
Page 19
... 6 Adjust features menu settings. ‹ Press the green corresponding color button on the remote control for as well the available Antenna as well as compared to the map. from 2 to 135 - from 1 to 69 If a tuned channel is not available. TV menu / Installation Channel installation Autoprogram Installation update Weak channel installat.. TV menu/Installation Installation mode Antenna Cable Please select your PIN code to unlock all available channels, without altering the sorting of analog and digital TV channels found will search for TV channels installed...
... 6 Adjust features menu settings. ‹ Press the green corresponding color button on the remote control for as well the available Antenna as well as compared to the map. from 2 to 135 - from 1 to 69 If a tuned channel is not available. TV menu / Installation Channel installation Autoprogram Installation update Weak channel installat.. TV menu/Installation Installation mode Antenna Cable Please select your PIN code to unlock all available channels, without altering the sorting of analog and digital TV channels found will search for TV channels installed...
User manual
Page 21
... Alert Signalling is set to Manual) With the cursor buttons, select and enter the correct time and day. with analog video sources. - with multimedia browser; - If your amplifier or receiver has a matching connector for Digital Audio In, you to enter the list of types of external inputs. Ò Select the appropriate input with the cursor up /down. There are few cable channels but you to add region ratings lock...
... Alert Signalling is set to Manual) With the cursor buttons, select and enter the correct time and day. with analog video sources. - with multimedia browser; - If your amplifier or receiver has a matching connector for Digital Audio In, you to enter the list of types of external inputs. Ò Select the appropriate input with the cursor up /down. There are few cable channels but you to add region ratings lock...

User manual
Page 23
... mode. > The selected Favorite list will be able to browse through the TV channels of the screen. † To quit the Program Guide page, press the MENU button again. 10 Multimedia browser The Multimedia browser lets you display pictures or play audio files stored on a USB device.The Multimedia browser application is invoked from the main menu. ‡ Press the MENU button on the remote control. Only FAT/DOS-formatted...
... mode. > The selected Favorite list will be able to browse through the TV channels of the screen. † To quit the Program Guide page, press the MENU button again. 10 Multimedia browser The Multimedia browser lets you display pictures or play audio files stored on a USB device.The Multimedia browser application is invoked from the main menu. ‡ Press the MENU button on the remote control. Only FAT/DOS-formatted...
User manual
Page 26
... HDMI adapter or a HDMI to the center of the screen with this case you experience a discolored line on the left or right side of the set, adjust the picture position to DVI cable and separate audio cables, all types of connectors with the exception of the DVI connector but some of differing output standards which may be equipped with the cursor buttons. - Connect red to red, white...
... HDMI adapter or a HDMI to the center of the screen with this case you experience a discolored line on the left or right side of the set, adjust the picture position to DVI cable and separate audio cables, all types of connectors with the exception of the DVI connector but some of differing output standards which may be equipped with the cursor buttons. - Connect red to red, white...

User manual
Page 27
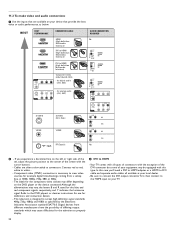
Sound and picture interruptions ? In case of AV1. 11.6 Connect a DVD player/DVD recorder, Set top box, game console,... DISPLAY SYNC. OUT L IN DIGITAL AUDIO + AV 1 HDMI 1 AV 2 HDMI 2 AV 3 R ANALOG AUDIO IN + HDMI 1 HDMI 2 HDMI 1 HDMI HDMI 2 HDMI 3 DIGITAL AUDIO OUT DVI 11.6.2 With ANALOG AUDIO OUT ç When using the S-VIDEO connector do not connect any device to stereo adapter (not supplied) for signals. OUT L IN DIGITAL AUDIO + AV 1 HDMI 1 AV 2 HDMI 2 AV 3 R ANALOG AUDIO IN + HDMI 1 HDMI 2 HDMI 1 ANALOG AUDIO IN HDMI 2 HDMI 3 HDMI DVI 25 OUT L IN ...
Sound and picture interruptions ? In case of AV1. 11.6 Connect a DVD player/DVD recorder, Set top box, game console,... DISPLAY SYNC. OUT L IN DIGITAL AUDIO + AV 1 HDMI 1 AV 2 HDMI 2 AV 3 R ANALOG AUDIO IN + HDMI 1 HDMI 2 HDMI 1 HDMI HDMI 2 HDMI 3 DIGITAL AUDIO OUT DVI 11.6.2 With ANALOG AUDIO OUT ç When using the S-VIDEO connector do not connect any device to stereo adapter (not supplied) for signals. OUT L IN DIGITAL AUDIO + AV 1 HDMI 1 AV 2 HDMI 2 AV 3 R ANALOG AUDIO IN + HDMI 1 HDMI 2 HDMI 1 ANALOG AUDIO IN HDMI 2 HDMI 3 HDMI DVI 25 OUT L IN ...
User manual
Page 30
... the TV. • Possible broadcast station trouble.Try another channel. • Adjust the contrast and brightness settings. • Verify the Closed Captions control. power drop, power cord plug out), starting up /down buttons on the remote control. • When no picture • Adjust the contrast, color, tint and brightness setting. • Select Reset AV settings in standby mode. Sound and picture interruptions using DVI to HDMI connection • Verify whether you properly connected the audio cable to see the manual of 50". Control...
... the TV. • Possible broadcast station trouble.Try another channel. • Adjust the contrast and brightness settings. • Verify the Closed Captions control. power drop, power cord plug out), starting up /down buttons on the remote control. • When no picture • Adjust the contrast, color, tint and brightness setting. • Select Reset AV settings in standby mode. Sound and picture interruptions using DVI to HDMI connection • Verify whether you properly connected the audio cable to see the manual of 50". Control...

User manual
Page 31
... HDMI-equipped audio/video component, such as digital STV, digital TV receivers and digital VCRs. Firmware upgrade files for electrical and electronic products. To obtain the source code, write to NV Philips Innovative Applications, Assistant to state and local-level emergencies and warnings. Like all information you all LCD products, this set top box, DVD player and AV receiver. QAM Digital scrambled and unscrambled cable signals with HDTV programming. 14.2 Disposal of resolution 720p Displays images using progressive scanning...
... HDMI-equipped audio/video component, such as digital STV, digital TV receivers and digital VCRs. Firmware upgrade files for electrical and electronic products. To obtain the source code, write to NV Philips Innovative Applications, Assistant to state and local-level emergencies and warnings. Like all information you all LCD products, this set top box, DVD player and AV receiver. QAM Digital scrambled and unscrambled cable signals with HDTV programming. 14.2 Disposal of resolution 720p Displays images using progressive scanning...

User manual
Page 37
... Volume 6,11 W Widescreen picture format 7 35 ENGLISH Index A Autoprogram 17 Auto surround 12 Alternate audio 11 Antenna 5 Auto volume levelling 12 B Balance 11 Batteries 5,29 Button cursor 6 MENU 6 MUTE 6 OK 6 POWER 6 Brightness 10 C Cable 5 Care of the screen 2 Clock 19 Closed captions 12 service 13 options 13 Camera 23 Channels uninstall 18 edit 18 installation 17 store 17 Code Set 15 Change 15 Color 10 buttons 6 temperature 10 Connections 19 side 23 audio/video 24 Connector HDMI...
... Volume 6,11 W Widescreen picture format 7 35 ENGLISH Index A Autoprogram 17 Auto surround 12 Alternate audio 11 Antenna 5 Auto volume levelling 12 B Balance 11 Batteries 5,29 Button cursor 6 MENU 6 MUTE 6 OK 6 POWER 6 Brightness 10 C Cable 5 Care of the screen 2 Clock 19 Closed captions 12 service 13 options 13 Camera 23 Channels uninstall 18 edit 18 installation 17 store 17 Code Set 15 Change 15 Color 10 buttons 6 temperature 10 Connections 19 side 23 audio/video 24 Connector HDMI...
Leaflet
Page 3
... respective owners. Packaging (lb): 87.3 lb • VESA wall mount compatible: 600 x 400 mm • Rear connectors AUDIO OUT DIGITAL AUDIO ANALOG AUDIO IN HDMI 1 / HDMI 2 / HDMI 3 R IN R AUDIO DISPLAY SYNC. Flat HDTV with stand in inch (H x D): 29.5 x 10.4 inch • Product weight (lb): 58.2 lb • Product weight (+stand) (lb): 73.6 lb • Box dimensions in speakers: 2 • Loudspeaker types: Front Speakers, Dome tweeter Convenience • Child Protection: Child Lock+Parental Control • Clock: Smart Clock • Ease of Installation: Auto Program Naming...
... respective owners. Packaging (lb): 87.3 lb • VESA wall mount compatible: 600 x 400 mm • Rear connectors AUDIO OUT DIGITAL AUDIO ANALOG AUDIO IN HDMI 1 / HDMI 2 / HDMI 3 R IN R AUDIO DISPLAY SYNC. Flat HDTV with stand in inch (H x D): 29.5 x 10.4 inch • Product weight (lb): 58.2 lb • Product weight (+stand) (lb): 73.6 lb • Box dimensions in speakers: 2 • Loudspeaker types: Front Speakers, Dome tweeter Convenience • Child Protection: Child Lock+Parental Control • Clock: Smart Clock • Ease of Installation: Auto Program Naming...


