
Leaflet
Page 1
Philips TV 20" real flat 20PT6245 Turn up your viewing experience Watching all your favorite DVDs is made a lot more enjoyable with a Component Video Input that reveal more detail • Real ...
Philips TV 20" real flat 20PT6245 Turn up your viewing experience Watching all your favorite DVDs is made a lot more enjoyable with a Component Video Input that reveal more detail • Real ...

Leaflet
Page 2
TV 20" real flat Specifications 20PT6245/37 Highlights Picture/Display • Aspect ratio: 4:3 • Visible screen diagonal (inch): 20 inch • Display screen type: Real Flat picture tube • Picture enhancement:... N.V. or their respective owners. www.philips.com This wider spread greatly enhances the stereo effect and creates a more convenient to change without the use of Use: Auto Volume Leveller (AVL) • Remote control type: RCLU011 • Remote Control: TV • Teletext: Closed Captioning • Screen Format Adjustments: 4:3, 4:3 expand • Clock: Sleep ...
TV 20" real flat Specifications 20PT6245/37 Highlights Picture/Display • Aspect ratio: 4:3 • Visible screen diagonal (inch): 20 inch • Display screen type: Real Flat picture tube • Picture enhancement:... N.V. or their respective owners. www.philips.com This wider spread greatly enhances the stereo effect and creates a more convenient to change without the use of Use: Auto Volume Leveller (AVL) • Remote control type: RCLU011 • Remote Control: TV • Teletext: Closed Captioning • Screen Format Adjustments: 4:3, 4:3 expand • Clock: Sleep ...
User manual
Page 2
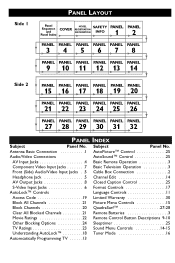
... Channels 21 Remote Batteries 3 Movie Ratings 22 Remote Control Button Descriptions 9-10 Other Blocking Options 24 Sleeptimer 25 TV Ratings 23 Sound Menu Controls 14-15 Understanding AutoLock 18 Tuner Mode 16 Automcatically Programming TV . . . . . .13 Subject Panel No. Side 1 PANEL LAYOUT Panel Sequence and COVER MODEL REGISTRATION INFORMATION SAFETY INFO Panel...
... Channels 21 Remote Batteries 3 Movie Ratings 22 Remote Control Button Descriptions 9-10 Other Blocking Options 24 Sleeptimer 25 TV Ratings 23 Sound Menu Controls 14-15 Understanding AutoLock 18 Tuner Mode 16 Automcatically Programming TV . . . . . .13 Subject Panel No. Side 1 PANEL LAYOUT Panel Sequence and COVER MODEL REGISTRATION INFORMATION SAFETY INFO Panel...
User manual
Page 5
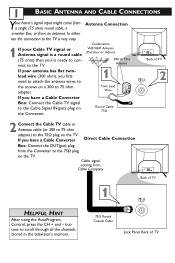
...; plug on the Converter. Round Cable 75Ω AV out CVI AV in the television's memory. 75Ω Round Coaxial Cable Jack Panel Back of TV 1 75 ⍀ HELPFUL HINT After using the AutoProgram Control, press the CH + and - buttons to scroll through all the channels stored in 75‰...) to the Cable Signal IN(put ) plug from Cable Company AV out CVI AV in 75‰ VIDEO Y L S-VIDEO Pb AUDIO R Pr Back of TV 1 BASIC ANTENNA AND CABLE CONNECTIONS Your home's signal input might come from Antenna Connection a single (75 ohm) round cable, a onverter Box, or from an ...
...; plug on the Converter. Round Cable 75Ω AV out CVI AV in the television's memory. 75Ω Round Coaxial Cable Jack Panel Back of TV 1 75 ⍀ HELPFUL HINT After using the AutoProgram Control, press the CH + and - buttons to scroll through all the channels stored in 75‰...) to the Cable Signal IN(put ) plug from Cable Company AV out CVI AV in 75‰ VIDEO Y L S-VIDEO Pb AUDIO R Pr Back of TV 1 BASIC ANTENNA AND CABLE CONNECTIONS Your home's signal input might come from Antenna Connection a single (75 ohm) round cable, a onverter Box, or from an ...

User manual
Page 6
...ill automatically tune to Cable Box (w/RF In/Outputs): omplete the connection. Jack Panel Back of TV NOTE: Use the AV button on the TV emote control to tune to the 75Ω input on the back of the Cable Box. Screw... box. Jack Panel Back of the Audio Left and Right Cable to the signal IN(put ) (TO TV) plug on the cable box. AV out CVI AV in 75‰ VIDEO Y L S-VIDEO Pb AUDIO R Pr Jack Panel ...Back of TV able box to the AV In Audio L & R Input jacks on the back of the round coaxial cable to...
...ill automatically tune to Cable Box (w/RF In/Outputs): omplete the connection. Jack Panel Back of TV NOTE: Use the AV button on the TV emote control to tune to the 75Ω input on the back of the Cable Box. Screw... box. Jack Panel Back of the Audio Left and Right Cable to the signal IN(put ) (TO TV) plug on the cable box. AV out CVI AV in 75‰ VIDEO Y L S-VIDEO Pb AUDIO R Pr Jack Panel ...Back of TV able box to the AV In Audio L & R Input jacks on the back of the round coaxial cable to...
User manual
Page 7
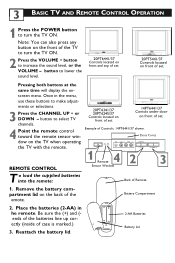
...Pressing both buttons at the same time will display the onscreen menu. REMOTE CONTROL 20PT6341/37 20PT6245/37 Controls located on front of set . 14PT6441/37 Contols under door on the TV when operating the TV with the remote. Remove the battery compartment lid on front of set . 20PT5441/37 ...Controls located on the back of the TV to turn the TV ON. Battery Compartment 2. VOLUME + 2 CHANNEL 3 T o load the supplied batteries into the remote: Back of case is marked.) 3. Example of set . Once in...
...Pressing both buttons at the same time will display the onscreen menu. REMOTE CONTROL 20PT6341/37 20PT6245/37 Controls located on front of set . 14PT6441/37 Contols under door on the TV when operating the TV with the remote. Remove the battery compartment lid on front of set . 20PT5441/37 ...Controls located on the back of the TV to turn the TV ON. Battery Compartment 2. VOLUME + 2 CHANNEL 3 T o load the supplied batteries into the remote: Back of case is marked.) 3. Example of set . Once in...

User manual
Page 8
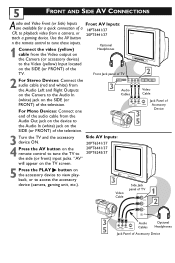
... the VCR. The AV channels can be added to select the AV channel. VCR with 5 Turn the VCR (accessory device) Audio/Video Outputs and the TV ON. 5 7 6 Press the AV button on the television. 6 VOL HELPFUL HINT All the AV channels can also be selected by pressing the Channel ... a VCR (or similar device) hat has audio/video output jacks. 4 AV (AUDIO/VIDEO) INPUT CONNECTION The TV's audio/video input jacks are for quick access. Back of TV 1 222 75 ⍀ AV Out CVI AV In VIDEO Y L Pb AUDIO R Pr 2 S-VIDEO Audio Cables (Red & White) Video Cable (Yellow) 3 OUT R ...
... the VCR. The AV channels can be added to select the AV channel. VCR with 5 Turn the VCR (accessory device) Audio/Video Outputs and the TV ON. 5 7 6 Press the AV button on the television. 6 VOL HELPFUL HINT All the AV channels can also be selected by pressing the Channel ... a VCR (or similar device) hat has audio/video output jacks. 4 AV (AUDIO/VIDEO) INPUT CONNECTION The TV's audio/video input jacks are for quick access. Back of TV 1 222 75 ⍀ AV Out CVI AV In VIDEO Y L Pb AUDIO R Pr 2 S-VIDEO Audio Cables (Red & White) Video Cable (Yellow) 3 OUT R ...
User manual
Page 9
... the accessory device to view playback, or to access the accessory device (camera, gaming unit, etc.). 3 Video Cable Side Jack 1 panel of TV VIDEO L AUDIO R 2 3 Audio Optional 5 AUDIO VIDEO LEFT RIGHT S-VIDEO Cables Headphones Jack Panel of Accessory Device VOLUME + CHANNEL Audio Cables... AUDIO VIDEO LEFT RIGHT S-VIDEO 3 5 Jack Panel of TV Front VIDEO L AUDIO R INSTALL/MENU - "AV" will appear on the TV screen. 5 Press the PLAY ᮣ button on the remote control to tune the TV to 20PT6441/37 20PT6245/37 Front the side (or front) input jacks. 5 ...
... the accessory device to view playback, or to access the accessory device (camera, gaming unit, etc.). 3 Video Cable Side Jack 1 panel of TV VIDEO L AUDIO R 2 3 Audio Optional 5 AUDIO VIDEO LEFT RIGHT S-VIDEO Cables Headphones Jack Panel of Accessory Device VOLUME + CHANNEL Audio Cables... AUDIO VIDEO LEFT RIGHT S-VIDEO 3 5 Jack Panel of TV Front VIDEO L AUDIO R INSTALL/MENU - "AV" will appear on the TV screen. 5 Press the PLAY ᮣ button on the remote control to tune the TV to 20PT6441/37 20PT6245/37 Front the side (or front) input jacks. 5 ...

User manual
Page 10
... or CH - external source will be audible, as DBS (digital broad- AV out CVI AV in 75‰ VIDEO Y L S-VIDEO Pb AUDIO R Pr 1 Back of TV CVI AV In VIDEO Y L Pb AUDIO R Pr S-VIDEO Audio Cables (Red & White) OUT R AUDIO L IN OUT S-VHS OUT VIDEO ANTENNA IN ANTENNA IN OUT ... connections. Then connect the other ends of the AUDIO (red and white) CABLES to the AUDIO (left and right) jacks on the rear of the TV. 2 Connect other inputs, including S-Video ast satellite), DVD (digital video discs), video (S-VHS) and AV. NOTE: The accessory device must have an -VIDEO...
... or CH - external source will be audible, as DBS (digital broad- AV out CVI AV in 75‰ VIDEO Y L S-VIDEO Pb AUDIO R Pr 1 Back of TV CVI AV In VIDEO Y L Pb AUDIO R Pr S-VIDEO Audio Cables (Red & White) OUT R AUDIO L IN OUT S-VHS OUT VIDEO ANTENNA IN ANTENNA IN OUT ... connections. Then connect the other ends of the AUDIO (red and white) CABLES to the AUDIO (left and right) jacks on the rear of the TV. 2 Connect other inputs, including S-Video ast satellite), DVD (digital video discs), video (S-VHS) and AV. NOTE: The accessory device must have an -VIDEO...

User manual
Page 11
... DVD players. Y, Cr, Cb). buttons to the Audio (L and R) AV In Input Jacks COMP VIDEO Y Pb S-VIDEO VIDEO AUDIO R OUT OUT OUT on the TV. Y, B-Y, R-Y; Back of sound inputs. CVI AV In Y Pb Pr 2 VIDEO L AUDIO R S-VIDEO When using composite video or S- The will dominate over the... AV input. eceived separately, which allows for the blue and red color component signal connectors, and Y indicates the luminance signal. Pr L 3 Turn the TV and the DVD (or digital accessory device) ON. 4 Press the AV button or the CH + or CH - Component Video (CVI) input material, ...
... DVD players. Y, Cr, Cb). buttons to the Audio (L and R) AV In Input Jacks COMP VIDEO Y Pb S-VIDEO VIDEO AUDIO R OUT OUT OUT on the TV. Y, B-Y, R-Y; Back of sound inputs. CVI AV In Y Pb Pr 2 VIDEO L AUDIO R S-VIDEO When using composite video or S- The will dominate over the... AV input. eceived separately, which allows for the blue and red color component signal connectors, and Y indicates the luminance signal. Pr L 3 Turn the TV and the DVD (or digital accessory device) ON. 4 Press the AV button or the CH + or CH - Component Video (CVI) input material, ...

User manual
Page 12
.... AV Out CVI AV In VIDEO Y L 1 Connect one end of the first VCR. AUDIO SYSTEM CONNECTION: Back of TV 1 AV Out CVI AV In VIDEO Y L Pb AUDIO R Pr S-VIDEO 1 R L AUX/TV INPUT PHONO INPUT Audio Cables (Red and White) ECOND VCR CONNECTION: NOTE: Refer to panel number 4 for the 2 roper...your watching it 's ready to record what's being viewed on the audio system, you to 1 onnect a second VCR to a normal listening level. 2 Turn the TV and audio system ON. AUDIO SYSTEM CONNECTION: 1 Connect one end of the red and white Audio cable from the AV Out AUDIO L and R plugs on...
.... AV Out CVI AV In VIDEO Y L 1 Connect one end of the first VCR. AUDIO SYSTEM CONNECTION: Back of TV 1 AV Out CVI AV In VIDEO Y L Pb AUDIO R Pr S-VIDEO 1 R L AUX/TV INPUT PHONO INPUT Audio Cables (Red and White) ECOND VCR CONNECTION: NOTE: Refer to panel number 4 for the 2 roper...your watching it 's ready to record what's being viewed on the audio system, you to 1 onnect a second VCR to a normal listening level. 2 Turn the TV and audio system ON. AUDIO SYSTEM CONNECTION: 1 Connect one end of the red and white Audio cable from the AV Out AUDIO L and R plugs on...

User manual
Page 13
... can VOL e used when watching movies). Buttons ress the VOL + button to activate the Closed Captioning ptions. CC Button ress to increase the TV's ound level. Press repeatedly to 10 channels you choose or each colored button. 9 REMOTE CONTROL BUTTON DESCRIPTIONS QUADRASURF Buttons Red, Green, Yellow, ...or 240 minutes. SMILEY Button ress to add channels to eliminate the sound eing heard from the TV's screen. Press again to estore the TV's volume to set period of the on the TV's screen. Works with speakng only), Music (for programming with all colored buttons. MUTE Button ress...
... can VOL e used when watching movies). Buttons ress the VOL + button to activate the Closed Captioning ptions. CC Button ress to increase the TV's ound level. Press repeatedly to 10 channels you choose or each colored button. 9 REMOTE CONTROL BUTTON DESCRIPTIONS QUADRASURF Buttons Red, Green, Yellow, ...or 240 minutes. SMILEY Button ress to add channels to eliminate the sound eing heard from the TV's screen. Press again to estore the TV's volume to set period of the on the TV's screen. Works with speakng only), Music (for programming with all colored buttons. MUTE Button ress...

User manual
Page 14
...not contain these TIMER features, therefore the button will pause for video games). Also use the CURSOR 3 or CURSOR 4 to turn the TV on or off. A/CH Button (Alternate Channel) Press to toggle between the last viewed channel and the channel presently being received is dedicated ...to enter certain values within certain TV models. NOTE: This button is not great), or Multimedia (for a second or two before changing to choose from the "Quadra Surf" lists ...
...not contain these TIMER features, therefore the button will pause for video games). Also use the CURSOR 3 or CURSOR 4 to turn the TV on or off. A/CH Button (Alternate Channel) Press to toggle between the last viewed channel and the channel presently being received is dedicated ...to enter certain values within certain TV models. NOTE: This button is not great), or Multimedia (for a second or two before changing to choose from the "Quadra Surf" lists ...

User manual
Page 15
...3 or DOWN 4 buttons to scroll though the on-screen menu until the word LANGUAGE is highlighted. With the LANGUAGE control ou can set the TV's on -screen MENU items appear n English, Spanish, or French text. Brightness Color Picture Sharpness Tint More... 2 46 Main Picture Sound Features ... Press the CURSOR UP 3 or DOWN 4 buttons to be hown in English, French, or Spanish. Progr. HELPFUL HINT The Language contol only makes the TV's on -screen menu to scroll 4 through the Install features until 1 the word INSTALL is high- Fran ais 6 When finished, press the STATUS/EXIT ...
...3 or DOWN 4 buttons to scroll though the on-screen menu until the word LANGUAGE is highlighted. With the LANGUAGE control ou can set the TV's on -screen MENU items appear n English, Spanish, or French text. Brightness Color Picture Sharpness Tint More... 2 46 Main Picture Sound Features ... Press the CURSOR UP 3 or DOWN 4 buttons to be hown in English, French, or Spanish. Progr. HELPFUL HINT The Language contol only makes the TV's on -screen menu to scroll 4 through the Install features until 1 the word INSTALL is high- Fran ais 6 When finished, press the STATUS/EXIT ...

User manual
Page 16
... remote to show the on-screen menu. 2 Press the CURSOR UP 3 or DOWN 4 buttons to scroll through the on -screen menu from the TV's screen. When ANTENNA is activated. Main Picture Sound Features Install Brightness Color Picture Sharpness Tint More... In the AUTO mode, when the UTO PROGRAM feature... Channel Edit English Cable OR 5 Press the CURSOR RIGHT button to select either NTENNA, CABLE, or AUTO mode. When AUTO is selected, the TV will automatically set itself to remove the on -screen menu until the word INSTALL is highlighted. 3 Press the CURSOR RIGHT button to display the ...
... remote to show the on-screen menu. 2 Press the CURSOR UP 3 or DOWN 4 buttons to scroll through the on -screen menu from the TV's screen. When ANTENNA is activated. Main Picture Sound Features Install Brightness Color Picture Sharpness Tint More... In the AUTO mode, when the UTO PROGRAM feature... Channel Edit English Cable OR 5 Press the CURSOR RIGHT button to select either NTENNA, CABLE, or AUTO mode. When AUTO is selected, the TV will automatically set itself to remove the on -screen menu until the word INSTALL is highlighted. 3 Press the CURSOR RIGHT button to display the ...

User manual
Page 17
... automatically set itself for you to select only the TV tations in the TV's memory then tune to remove the menu from the TV's screen. Note: Make sure the antenna or cable sigal connection has been completed before UTO PROGRAM is selected, channels 1125 are available. ...CURSOR UP 3 or DOWN 4 buttons to start the Auto Program scanning of signal it easy for local area (or Cable TV) channels. When CABLE is activated. When AUTO is selected, the TV will store all available channels in your area when the CHANNEL +), (-) buttons are pressed. Helpful Hints 6 When finished,...
... automatically set itself for you to select only the TV tations in the TV's memory then tune to remove the menu from the TV's screen. Note: Make sure the antenna or cable sigal connection has been completed before UTO PROGRAM is selected, channels 1125 are available. ...CURSOR UP 3 or DOWN 4 buttons to start the Auto Program scanning of signal it easy for local area (or Cable TV) channels. When CABLE is activated. When AUTO is selected, the TV will store all available channels in your area when the CHANNEL +), (-) buttons are pressed. Helpful Hints 6 When finished,...

User manual
Page 18
... use the NUMBERED buttons to go directly to a specific numbered channel that you want to add or skip. highlighted; HELPFUL HINTS An "X" appearing in the TV's memory. 1 Press the MENU button on the remote control to show the onscreen menu. 2 Press the CURSOR UP 3 or DOWN 4 buttons to scroll though the... when scrolling channels with the CH+ or CH- 14 CHANNEL EDIT Channel Edit makes it easy for you to ADD or DELETE channels from the TV's memory. you can use the CH+ or CH- buttons. 9 When finished, press the STATUS/EXIT button to toggle between ON or OFF...
... use the NUMBERED buttons to go directly to a specific numbered channel that you want to add or skip. highlighted; HELPFUL HINTS An "X" appearing in the TV's memory. 1 Press the MENU button on the remote control to show the onscreen menu. 2 Press the CURSOR UP 3 or DOWN 4 buttons to scroll though the... when scrolling channels with the CH+ or CH- 14 CHANNEL EDIT Channel Edit makes it easy for you to ADD or DELETE channels from the TV's memory. you can use the CH+ or CH- buttons. 9 When finished, press the STATUS/EXIT button to toggle between ON or OFF...

User manual
Page 19
... are as bright as you prefer. 2 COLOR CONTROL - The Contrast + control helps to toggle the control On or OFF. 15 PICTURE MENU CONTROLS T o adjust your TV picture controls, select a channel and use the Picture Menu Controls sted below: 1 BRIGHTNESS CONTROL Press the CURSOR RIGHT 2 or LEFT 1 buttons until lightest parts of...
... are as bright as you prefer. 2 COLOR CONTROL - The Contrast + control helps to toggle the control On or OFF. 15 PICTURE MENU CONTROLS T o adjust your TV picture controls, select a channel and use the Picture Menu Controls sted below: 1 BRIGHTNESS CONTROL Press the CURSOR RIGHT 2 or LEFT 1 buttons until lightest parts of...

User manual
Page 20
... in the Mono mode. The control will level out the sound being heard when sudden changes in the Stereo mode, the sound coming from the TV will enhance the low frequency sounds. 3BALANCE: Press the CURSOR RIGHT 2 or LEFT 1 buttons to select between Incr. Surround or Stereo settings (If ... adjust the control. Balance L R AVL Incr. Note: If Stereo is not present on a selected show and the TV is placed in volume occur during com- 16 SOUND MENU CONTROLS T o adjust your TV sound, select and use the Sound Menu Controls listed below: 1 TREBLE: Press the CURSOR RIGHT 2 or LEFT 1 ...
... in the Mono mode. The control will level out the sound being heard when sudden changes in the Stereo mode, the sound coming from the TV will enhance the low frequency sounds. 3BALANCE: Press the CURSOR RIGHT 2 or LEFT 1 buttons to select between Incr. Surround or Stereo settings (If ... adjust the control. Balance L R AVL Incr. Note: If Stereo is not present on a selected show and the TV is placed in volume occur during com- 16 SOUND MENU CONTROLS T o adjust your TV sound, select and use the Sound Menu Controls listed below: 1 TREBLE: Press the CURSOR RIGHT 2 or LEFT 1 ...

User manual
Page 21
... 4 button until the word Features is highlighted. 3 Press the CURSOR RIGHT 2 button to display the on-screen menu. Standard format for the TV. Enlarges the picture to remove the menu from a DVD player the image is shown in movie theaters. when shown on top and bottom of... the two options 4:3 or Expand 4:3. 4:3 4:3 - Expand 4:3 - ressing these buttons will have areas of ack on TV screen, the image will toggle the andard 4:3 format and the Expand 4:3 ormat. This is the format that shown in etter box" format. VOL 2 4 3 5...
... 4 button until the word Features is highlighted. 3 Press the CURSOR RIGHT 2 button to display the on-screen menu. Standard format for the TV. Enlarges the picture to remove the menu from a DVD player the image is shown in movie theaters. when shown on top and bottom of... the two options 4:3 or Expand 4:3. 4:3 4:3 - Expand 4:3 - ressing these buttons will have areas of ack on TV screen, the image will toggle the andard 4:3 format and the Expand 4:3 ormat. This is the format that shown in etter box" format. VOL 2 4 3 5...


