User manual
Page 2
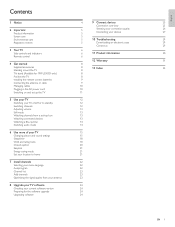
... Installing the remote control batteries Connecting the antenna or cable Managing cables Plugging in the AC power cord Switching on and set up the TV 5 Use your TV Switching your TV on/off or to standby Switching channels Adjusting volume Still mode Watching channels from a set-top box Watching connected devices Watching a Blu-ray Disc Switching audio mode 6 Use more of your TV Changing picture and sound settings Sleeptimer Child and rating locks Closed caption EasyLink Energy saving mode Set your location to home 7 Install channels Selecting your menu language Autoprogram Channel list...
... Installing the remote control batteries Connecting the antenna or cable Managing cables Plugging in the AC power cord Switching on and set up the TV 5 Use your TV Switching your TV on/off or to standby Switching channels Adjusting volume Still mode Watching channels from a set-top box Watching connected devices Watching a Blu-ray Disc Switching audio mode 6 Use more of your TV Changing picture and sound settings Sleeptimer Child and rating locks Closed caption EasyLink Energy saving mode Set your location to home 7 Install channels Selecting your menu language Autoprogram Channel list...

User manual
Page 4
..., stand, tripod, bracket, or table specified by qualified service personnel when: A. The power supply cord or the plug has been damaged; Objects have fallen into the appliance; All televisions must comply with one wider than the other apparatus (including amplifiers) that the cable ground shall be serviced by the manufacturer, or sold with the manufacturers instructions. 8. Wall...
..., stand, tripod, bracket, or table specified by qualified service personnel when: A. The power supply cord or the plug has been damaged; Objects have fallen into the appliance; All televisions must comply with one wider than the other apparatus (including amplifiers) that the cable ground shall be serviced by the manufacturer, or sold with the manufacturers instructions. 8. Wall...

User manual
Page 5
... television reception, which the receiver is not a malfunction. Model : 19PFL3505D, 22PFL3505D Address : PO Box 430 Daleville, IN 47334-0430 U.S.A. Telephone Number : 1-866-309-0841 4 EN Modifications The FCC requires the user to be adapted and published on the Philips support website as soon as a result of the U.S. Manufactured under license from that any warranty, stated or implied. Portions of color...
... television reception, which the receiver is not a malfunction. Model : 19PFL3505D, 22PFL3505D Address : PO Box 430 Daleville, IN 47334-0430 U.S.A. Telephone Number : 1-866-309-0841 4 EN Modifications The FCC requires the user to be adapted and published on the Philips support website as soon as a result of the U.S. Manufactured under license from that any warranty, stated or implied. Portions of color...

User manual
Page 8
... setting. o MENU/EXIT Turns the menu on page 16). e FREEZE Press to the previously viewed channel. The quality and accuracy of the information depends on the broadcaster.You might see 'Changing auto picture mode' on page 15). m PREV CH Returns to pause screen image. Analog Mode (TV) • Press to select the audio language. g (Navigation buttons) Navigates through the preset sound setting (see 'Changing picture format' on or off. d SAP Digital Mode...
... setting. o MENU/EXIT Turns the menu on page 16). e FREEZE Press to the previously viewed channel. The quality and accuracy of the information depends on the broadcaster.You might see 'Changing auto picture mode' on page 15). m PREV CH Returns to pause screen image. Analog Mode (TV) • Press to select the audio language. g (Navigation buttons) Navigates through the preset sound setting (see 'Changing picture format' on or off. d SAP Digital Mode...
User manual
Page 9
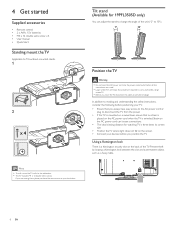
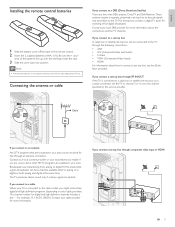
... the AC power cord can adjust the stand to prevent breakage. 4 Get started Supplied accessories • Remote control • 2 x AAA, 1.5V batteries • M4 x 12 double sems screw x 4 • User manual • Quick Start Standing mount the TV Applicable to TVs without mounted stands. 1 2 x 4 Note • To wall mount the TV, refer to disconnect the TV from the power. • If the TV is mounted on a swivel base, ensure that...
... the AC power cord can adjust the stand to prevent breakage. 4 Get started Supplied accessories • Remote control • 2 x AAA, 1.5V batteries • M4 x 12 double sems screw x 4 • User manual • Quick Start Standing mount the TV Applicable to TVs without mounted stands. 1 2 x 4 Note • To wall mount the TV, refer to disconnect the TV from the power. • If the TV is mounted on a swivel base, ensure that...
User manual
Page 10
.... If you connect to an antenna Any DTV programs that are transitioning from analog to connect a set -top box through component video input or HDMI EN 9 Broadcasters are broadcast in digital, or both analog and digital at the same time. The channel number for more information about how to digital TV.This means that a given broadcaster can have channels available either in analog or in your cable provider for digital and high...
.... If you connect to an antenna Any DTV programs that are transitioning from analog to connect a set -top box through component video input or HDMI EN 9 Broadcasters are broadcast in digital, or both analog and digital at the same time. The channel number for more information about how to digital TV.This means that a given broadcaster can have channels available either in analog or in your cable provider for digital and high...

User manual
Page 12
... select the desired mode for your menu language. Otherwise, the settings of picture and sound quality you adjusted will see a series of the pictures that you . Select the side that the AC power cord is most pleasing to select the side of test pictures where the right side and left side differ. on -screen instructions to be memorized after you turn off the unit...
... select the desired mode for your menu language. Otherwise, the settings of picture and sound quality you adjusted will see a series of the pictures that you . Select the side that the AC power cord is most pleasing to select the side of test pictures where the right side and left side differ. on -screen instructions to be memorized after you turn off the unit...

User manual
Page 13
... the TV. • Press . (Standby-On) on /off • Press . Note • Energy consumption contributes to 135). e.g. 108.30. • Press CH +/- POWER at the side of the TV. For digital channels, press a number (1 to standby Switching channels CHANNEL . When the AC power cord is plugged in, your TV This section helps you perform basic TV operations. on • Press . Switching your TV on the remote control.
... the TV. • Press . (Standby-On) on /off • Press . Note • Energy consumption contributes to 135). e.g. 108.30. • Press CH +/- POWER at the side of the TV. For digital channels, press a number (1 to standby Switching channels CHANNEL . When the AC power cord is plugged in, your TV This section helps you perform basic TV operations. on • Press . Switching your TV on the remote control.
User manual
Page 14
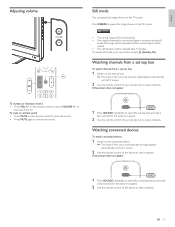
... screen. If the picture does not appear 1 Press SOURCE repeatedly to select the connected device and wait a few seconds for the picture to appear. 2 Use the remote control of the device to select channels. Watching channels from your set -top box to select channels. EN 13 FREEZE • The sound output will not be paused. • If no signal is detected or protected signal is received during still mode...
... screen. If the picture does not appear 1 Press SOURCE repeatedly to select the connected device and wait a few seconds for the picture to appear. 2 Use the remote control of the device to select channels. Watching channels from your set -top box to select channels. EN 13 FREEZE • The sound output will not be paused. • If no signal is detected or protected signal is received during still mode...

User manual
Page 18
...;er which is compatible with the TV's remote control. [Audio Setting] You can set the output mode as a default for each frequency. Press or to select the desired option, then press OK. Summary of sound settings The following screen resolutions are supported in volume, for example, during commercials or when switching channels. EN 17 Select [On] or [Off]. • [TV Speakers] : Select [On] or [Off], or output sound to an...
...;er which is compatible with the TV's remote control. [Audio Setting] You can set the output mode as a default for each frequency. Press or to select the desired option, then press OK. Summary of sound settings The following screen resolutions are supported in volume, for example, during commercials or when switching channels. EN 17 Select [On] or [Off]. • [TV Speakers] : Select [On] or [Off], or output sound to an...
User manual
Page 19
.... Using the TV ratings lock Your TV is muted. 1 Press MENU on the remote control and select [Features] > [Child Lock] > [Channel Lock]. 2 Enter your PIN (see 'Setting your PIN 1 Press MENU on the remote control and select [Features] > [Child Lock]. 2 Enter a 4-digit PIN on the TV screen. Picture Sound Setup Features Language T V- Y Select FV V S L D BACK OK View / Block Back • When you to control access to individual programs based on page 18). Press SLEEP...
.... Using the TV ratings lock Your TV is muted. 1 Press MENU on the remote control and select [Features] > [Child Lock] > [Channel Lock]. 2 Enter your PIN (see 'Setting your PIN 1 Press MENU on the remote control and select [Features] > [Child Lock]. 2 Enter a 4-digit PIN on the TV screen. Picture Sound Setup Features Language T V- Y Select FV V S L D BACK OK View / Block Back • When you to control access to individual programs based on page 18). Press SLEEP...

User manual
Page 21
... script on the remote control and select [Features] > [Closed Caption] > [Digital Caption Service]. • Press or to access television programming. Press or to select [On], then press OK. 2 Press or to highlight an option for digital captions, and press OK to select the option. 3 Press or to highlight a setting for the TV channels and times of closed captions for digital channels : • Press MENU on the TV screen, where it does...
... script on the remote control and select [Features] > [Closed Caption] > [Digital Caption Service]. • Press or to access television programming. Press or to select [On], then press OK. 2 Press or to highlight an option for digital captions, and press OK to select the option. 3 Press or to highlight a setting for the TV channels and times of closed captions for digital channels : • Press MENU on the TV screen, where it does...

User manual
Page 25
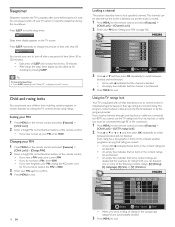
... TV scans the USB device for the upgraded software and automatically enters upgrade mode. 5 Read the on the remote control and select [Features] > [Current Software Info]. » The version and a description of the current software is supported. • New software can be obtained from your dealer or can be downloaded from our website at www.philips.com/welcome using the type number of your TV software Philips continuously tries...
... TV scans the USB device for the upgraded software and automatically enters upgrade mode. 5 Read the on the remote control and select [Features] > [Current Software Info]. » The version and a description of the current software is supported. • New software can be obtained from your dealer or can be downloaded from our website at www.philips.com/welcome using the type number of your TV software Philips continuously tries...
User manual
Page 27
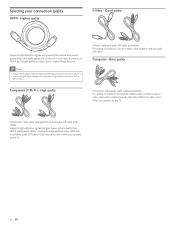
...HDMI for full high-definition video and to enable Philips EasyLink. Match the cable colors when you connect to the TV. Composite - Basic quality Composite video/audio cable (yellow/red/white) For analog connections. High quality S-Video cable and audio L/R cable (red/white) For analog connections. Use an S-Video cable together with a red/white audio L/R cable. Composite cables usually combine a yellow video cable with an audio L/R cable. Component video cable (red/green/blue) and audio L/R cable (red/ white) Supports high-definition signals but gives lower picture...
...HDMI for full high-definition video and to enable Philips EasyLink. Match the cable colors when you connect to the TV. Composite - Basic quality Composite video/audio cable (yellow/red/white) For analog connections. High quality S-Video cable and audio L/R cable (red/white) For analog connections. Use an S-Video cable together with a red/white audio L/R cable. Composite cables usually combine a yellow video cable with an audio L/R cable. Component video cable (red/green/blue) and audio L/R cable (red/ white) Supports high-definition signals but gives lower picture...
User manual
Page 28
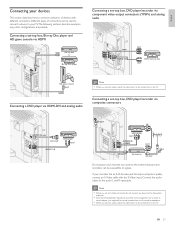
... describes how to connect a selection of connectors can be used to connect a device to signals. Connect the audio cables to the Composite video jack. • Only the left loudspeaker reproduces sound for improved picture quality, connect an S-Video cable with different connectors. Connecting a set -top box, DVD player/recorder via component video output connectors (YPbPr) and analog audio YPbPr IN AUDIO L/R IN OUT OUT DVD / Set-top box Note • When you connect cables, match the cable colors to the connectors...
... describes how to connect a selection of connectors can be used to connect a device to signals. Connect the audio cables to the Composite video jack. • Only the left loudspeaker reproduces sound for improved picture quality, connect an S-Video cable with different connectors. Connecting a set -top box, DVD player/recorder via component video output connectors (YPbPr) and analog audio YPbPr IN AUDIO L/R IN OUT OUT DVD / Set-top box Note • When you connect cables, match the cable colors to the connectors...

User manual
Page 29
... S-Video cable to the S-Video input of VIDEO. Connecting a set-top box via all internal loudspeakers. • When you use an S-Video connector, do not connect any device to the audio L and R input jacks of VIDEO. • Connect the audio cables to the Composite video jack. • Only the left loudspeaker reproduces sound for mono equipment. Note • When you connect cables, match the cable colors to the connectors on accessory devices connected through HDMI. Connecting...
... S-Video cable to the S-Video input of VIDEO. Connecting a set-top box via all internal loudspeakers. • When you use an S-Video connector, do not connect any device to the audio L and R input jacks of VIDEO. • Connect the audio cables to the Composite video jack. • Only the left loudspeaker reproduces sound for mono equipment. Note • When you connect cables, match the cable colors to the connectors on accessory devices connected through HDMI. Connecting...

User manual
Page 30
... HDMI connection. Connect an audio cable to your warranty. The picture is set to an accessory device via component or HDMI cables. No picture or sound. Incomplete channel installation. Turn on the TV. top. Push the component cables all the way into the YPbPr sockets on the TV blinks when you can browse the catalogue. 4 Click the description or model. 5 Under Product support, click "User manuals". connected to [On]. increase the volume. No sound will be replaced. connection...
... HDMI connection. Connect an audio cable to your warranty. The picture is set to an accessory device via component or HDMI cables. No picture or sound. Incomplete channel installation. Turn on the TV. top. Push the component cables all the way into the YPbPr sockets on the TV blinks when you can browse the catalogue. 4 Click the description or model. 5 Under Product support, click "User manuals". connected to [On]. increase the volume. No sound will be replaced. connection...
User manual
Page 32
... OF THIS WARRANTY. Some states do not allow the exclusions or limitation of incidental or consequential damages, or allow limitations on the product, and installation or repair of antenna/signal source systems outside of the product. • Product repair and/or part replacement because of improper installation or maintenance, connections to return defective product. • Labor charges for you specific legal rights...
... OF THIS WARRANTY. Some states do not allow the exclusions or limitation of incidental or consequential damages, or allow limitations on the product, and installation or repair of antenna/signal source systems outside of the product. • Product repair and/or part replacement because of improper installation or maintenance, connections to return defective product. • Labor charges for you specific legal rights...
User manual
Page 33
..., 27 5 21 21 21 5 17 11, 21 11 11, 21 21 P PC Picture format Picture settings Product information R Ratings Remote control insert batteries overview Retail store mode S Settings assistant Side controls Signal quality Sleeptimer Software upgrade version Sound settings Speakers EasyLink Standby Stand mount the TV Subtitles T Tilt stand Troubleshooting TV as PC monitor connections controls menu position remote control screen care software switch channels switch on TV Speakers V Volume adjust Auto Volume Leveling mute W Warranty Y YPbPr 15 16, 17 15 30 18, 19 9 6, 7 11, 21 11...
..., 27 5 21 21 21 5 17 11, 21 11 11, 21 21 P PC Picture format Picture settings Product information R Ratings Remote control insert batteries overview Retail store mode S Settings assistant Side controls Signal quality Sleeptimer Software upgrade version Sound settings Speakers EasyLink Standby Stand mount the TV Subtitles T Tilt stand Troubleshooting TV as PC monitor connections controls menu position remote control screen care software switch channels switch on TV Speakers V Volume adjust Auto Volume Leveling mute W Warranty Y YPbPr 15 16, 17 15 30 18, 19 9 6, 7 11, 21 11...

Leaflet
Page 3
..., S-Video • HDMI 1: Analog audio L/R in inch (W x H x D): 22.3 x 16.7 x 7.0 inch • Weight incl. Packaging (lb): 11.5 • VESA wall mount compatible: 100 x 100 mm Accessories • Included accessories: Table top stand, Power cord, Quick start guide, User Manual, Registration card, Remote Control, Batteries for remote control • Issue date 2010-09-06 Version: 2.1.1 12 NC: 8670 000 60463 UPC: 6 09585 18614 9 © 2010 Koninklijke Philips Electronics N.V. or their respective owners. All Rights reserved. www.philips.com LCD TV...
..., S-Video • HDMI 1: Analog audio L/R in inch (W x H x D): 22.3 x 16.7 x 7.0 inch • Weight incl. Packaging (lb): 11.5 • VESA wall mount compatible: 100 x 100 mm Accessories • Included accessories: Table top stand, Power cord, Quick start guide, User Manual, Registration card, Remote Control, Batteries for remote control • Issue date 2010-09-06 Version: 2.1.1 12 NC: 8670 000 60463 UPC: 6 09585 18614 9 © 2010 Koninklijke Philips Electronics N.V. or their respective owners. All Rights reserved. www.philips.com LCD TV...


