

Owner's Manual
Page 3
..., or when making any adjustments in or drop into water. Keep fingers away from the electric outlet immediately after using this appliance from all moving parts. Hold plug when rewinding into any air openings blocked. Do not allow to break. 13. Replace bulb with any opening. 6. Never drop or insert any...
..., or when making any adjustments in or drop into water. Keep fingers away from the electric outlet immediately after using this appliance from all moving parts. Hold plug when rewinding into any air openings blocked. Do not allow to break. 13. Replace bulb with any opening. 6. Never drop or insert any...

Owner's Manual
Page 5
Parts of your sewing machine 100 Carrying handle 101 Hinged top cover 102 Hand wheel 103 Stop motion knob 104 Display 105 "Correct/erase" key 106 "...
Parts of your sewing machine 100 Carrying handle 101 Hinged top cover 102 Hand wheel 103 Stop motion knob 104 Display 105 "Correct/erase" key 106 "...

Owner's Manual
Page 25
... of the stitch length selected (see page 22 for pattern compensation (see above). 21 The pattern length is independent of reverse stitch length for explanation). 2. A part of pattern length in pro grams 22 to 6 mm. ELELj ()O10 & 94&4&2 2 N Balancing out and pattern length setting: Key 124 has two functions: 1. 7/li L/Wi...
... of the stitch length selected (see page 22 for pattern compensation (see above). 21 The pattern length is independent of reverse stitch length for explanation). 2. A part of pattern length in pro grams 22 to 6 mm. ELELj ()O10 & 94&4&2 2 N Balancing out and pattern length setting: Key 124 has two functions: 1. 7/li L/Wi...
Owner's Manual
Page 30
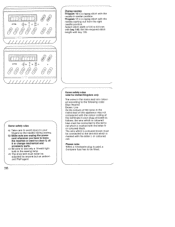
Select stitch width of 0,5 to 6.0 mm with key 140, Set the required stitch length with key 125. [iii' L11rn1 prOg Program 11 is a zigzag stitch with the needle in center position. [LwwiJ&4 prog ()o o o o && 6 9 fi & 4 Zigzag sewing: Program 10 is a zigzag stitch with the needle starting out from the right needle position.
Select stitch width of 0,5 to 6.0 mm with key 140, Set the required stitch length with key 125. [iii' L11rn1 prOg Program 11 is a zigzag stitch with the needle in center position. [LwwiJ&4 prog ()o o o o && 6 9 fi & 4 Zigzag sewing: Program 10 is a zigzag stitch with the needle starting out from the right needle position.
Owner's Manual
Page 35
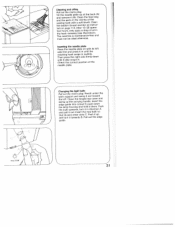
... . Push the bulb upwards, turn it out. Tilt the needle plate up at the back (A) and remove it there. Clean the feed dog and the parts in the vicinity of the needle plate. 4 Changing the light bulb: N Pull out the mains plug. Then press the right side firmly down the lamp...
... . Push the bulb upwards, turn it out. Tilt the needle plate up at the back (A) and remove it there. Clean the feed dog and the parts in the vicinity of the needle plate. 4 Changing the light bulb: N Pull out the mains plug. Then press the right side firmly down the lamp...
Owner's Manual
Page 37
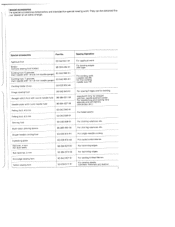
... work. Needle plate with round needle hole 98-694 821 -00 ---------- They can be obtained fror -our dealer at an extra charge. 4_ Special accessories Part No. Special accessories The special accessories listed below are intended for basting Straight-stitch foot with round needle hole 98-694 827-00 For topstitching...
... work. Needle plate with round needle hole 98-694 821 -00 ---------- They can be obtained fror -our dealer at an extra charge. 4_ Special accessories Part No. Special accessories The special accessories listed below are intended for basting Straight-stitch foot with round needle hole 98-694 827-00 For topstitching...

Owner's Manual
Page 85
...: 2 mm Needle: 80 Sewing thread: Machine embroidery thread Bashng is completed. Sew along the marked lines with tailoring chalk on a garment, we recommend secur the parts previously with basting stitches. Remove the bastii thread after sewing. 76 Sew c stitch. S the stitch length at 6 mm stitch length prog çq 00 ± . First...
...: 2 mm Needle: 80 Sewing thread: Machine embroidery thread Bashng is completed. Sew along the marked lines with tailoring chalk on a garment, we recommend secur the parts previously with basting stitches. Remove the bastii thread after sewing. 76 Sew c stitch. S the stitch length at 6 mm stitch length prog çq 00 ± . First...
Owner's Manual
Page 96
... How to the rear. 4 87 How to be shirred awafoarluwoebtrreakisrycsestwifenagpnbto.hreteioscEfgunodensoututdhrreiceenrurgttotwhhsueiaetthftw(oFitotnihhgtge.ea;1ns)bd.hgyiLatrhtirtghihenheigtssrlmeyfdmosotoeortmaethntiacnsotheuoyrttinhoeaeeulr determine the degree of gathering. Shirring with its front part down. How to gather Both outer fabric and the material to disengage the foot: Raise the presser bar lifter. Press hold the presser bar lifter...
... How to the rear. 4 87 How to be shirred awafoarluwoebtrreakisrycsestwifenagpnbto.hreteioscEfgunodensoututdhrreiceenrurgttotwhhsueiaetthftw(oFitotnihhgtge.ea;1ns)bd.hgyiLatrhtirtghihenheigtssrlmeyfdmosotoeortmaethntiacnsotheuoyrttinhoeaeeulr determine the degree of gathering. Shirring with its front part down. How to gather Both outer fabric and the material to disengage the foot: Raise the presser bar lifter. Press hold the presser bar lifter...
Owner's Manual
Page 101
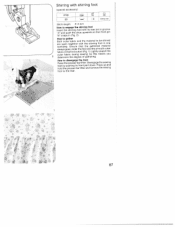
.... 2. Closed overlock stitch prog 17 -- ( * Knit-edge foot (special accessory) Needle: 70 or 80 Fashion-knitted parts can easily be joined with a slight tension while I - In order to obtain a perfect seam on fashion knitted parts, we recommend to insert a w thread and hold it with closed overlock stitch. this way, the edge thread...
.... 2. Closed overlock stitch prog 17 -- ( * Knit-edge foot (special accessory) Needle: 70 or 80 Fashion-knitted parts can easily be joined with a slight tension while I - In order to obtain a perfect seam on fashion knitted parts, we recommend to insert a w thread and hold it with closed overlock stitch. this way, the edge thread...

Owner's Manual
Page 102
Push the part prepared in this way between the elastic tape and pin it on using straight stitch. Honeycomb stitch prog -- 19 Overlap the fabric edges by 1.5 cm ...
Push the part prepared in this way between the elastic tape and pin it on using straight stitch. Honeycomb stitch prog -- 19 Overlap the fabric edges by 1.5 cm ...

Owner's Manual
Page 166
... fabric during sewing; Press up and hold the presser bar lifter and remove the sewing foot to be shirred are sewn together with its front part down. c7 How to engage the shirring foot Insert the shirring foot with the shirring foot in (Fig. 2). How to gather Both outer fabric and...
... fabric during sewing; Press up and hold the presser bar lifter and remove the sewing foot to be shirred are sewn together with its front part down. c7 How to engage the shirring foot Insert the shirring foot with the shirring foot in (Fig. 2). How to gather Both outer fabric and...
Owner's Manual
Page 171
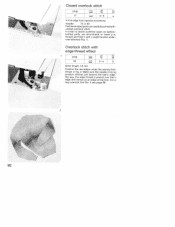
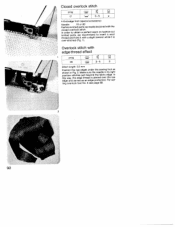
In order to obtain a perfect seam on fashion-cut knitted parts, we recommend to insert a wool thread and hold it is placed over -stitched (Fig. 1). Overlock stitch with a slight tension while it with edge-thread effect L ... edges under the sewing foot as an edge protection. Closed overlock stitch prog 17 -- 3-5 * - * Knit-edge foot (special accessory) Needle: 70 or 80 Fashion-knitted parts can easily be joined with the closed overlock stitch. In this way, the edge thread is over the raw edge and serves as shown in...
In order to obtain a perfect seam on fashion-cut knitted parts, we recommend to insert a wool thread and hold it is placed over -stitched (Fig. 1). Overlock stitch with a slight tension while it with edge-thread effect L ... edges under the sewing foot as an edge protection. Closed overlock stitch prog 17 -- 3-5 * - * Knit-edge foot (special accessory) Needle: 70 or 80 Fashion-knitted parts can easily be joined with the closed overlock stitch. In this way, the edge thread is over the raw edge and serves as shown in...

Owner's Manual
Page 172
..., then neaten each edge with: • Program 16 and • stitch length 0.5 mm (Fig. 2). Finally over-stitch the closed tape with elastic stitches. Push the part prepared in this way between the elastic tape and pin it on using straight stitch. Elastic stitch (for underwear) prog -- 16 3-5 0 Cut off the stretched...
..., then neaten each edge with: • Program 16 and • stitch length 0.5 mm (Fig. 2). Finally over-stitch the closed tape with elastic stitches. Push the part prepared in this way between the elastic tape and pin it on using straight stitch. Elastic stitch (for underwear) prog -- 16 3-5 0 Cut off the stretched...


