

Owner's Manual
Page 5
... 111 Needle holder with retaining screw 112 Bobbin thread monitor light 113 "Needle down" key 114 Sew slow" key 115 'Reverse' key 116 "Tie-off/buttonhole/single pattern" key 117 Presser bar 118 Presser bar lifter 119 Program display 120 Program chart 121 Bobbin winder 122 "Pattern mirroring" key 123 "Pattern...
... 111 Needle holder with retaining screw 112 Bobbin thread monitor light 113 "Needle down" key 114 Sew slow" key 115 'Reverse' key 116 "Tie-off/buttonhole/single pattern" key 117 Presser bar 118 Presser bar lifter 119 Program display 120 Program chart 121 Bobbin winder 122 "Pattern mirroring" key 123 "Pattern...

Owner's Manual
Page 18
... adjusting screw must interlock in order. 2. and bobbin thread tensions must be turned minimally. \' Checking the needle thread tension: Normal setting is essential for sewing buttonholes. The threads must only be in the middle of the material. Operating the foot control: The farther you press the pedal down, the faster the...
... adjusting screw must interlock in order. 2. and bobbin thread tensions must be turned minimally. \' Checking the needle thread tension: Normal setting is essential for sewing buttonholes. The threads must only be in the middle of the material. Operating the foot control: The farther you press the pedal down, the faster the...

Owner's Manual
Page 22
Important: Free arm cover 127 must be kept closed. 4 Needle up and down positions: When the machine stops, the needle is tied off /buttonhole/single pattern: When you press key 116, the indicator light goes on and the machine sews backwards as long as you press the key during ... to flash when the bobbin thread is tied off right away, while a pattern is run ning out. Then the light goes out, Button hole: When buttonhole program 13 is resumed. Reverse sewing: Press "reverse" key 115 before you press key 113 again, the light goes out, the needle moves up and...
Important: Free arm cover 127 must be kept closed. 4 Needle up and down positions: When the machine stops, the needle is tied off /buttonhole/single pattern: When you press key 116, the indicator light goes on and the machine sews backwards as long as you press the key during ... to flash when the bobbin thread is tied off right away, while a pattern is run ning out. Then the light goes out, Button hole: When buttonhole program 13 is resumed. Reverse sewing: Press "reverse" key 115 before you press key 113 again, the light goes out, the needle moves up and...

Owner's Manual
Page 33
Sewing feet (standard accessories) O Ordinary sewing foot 1 Fancy-stitch foot, for dual feed 2 Fancy-stitch foot, for bottom feed 3 Blindstitch- Underneath the box is an accessory compartment B. and edge-sewing foot 5 Buttonhole foot 6 Darning foot 7 Hemming foot 8 Edge guide I Open its lid and take out accessory box C. Illustration D shows how to arrange sewing feet, needles and bobbins in the accessory box. and overlock foot 4 Zipper- t Detachable work support and acces sories: The work support can be lifted out (A).
Sewing feet (standard accessories) O Ordinary sewing foot 1 Fancy-stitch foot, for dual feed 2 Fancy-stitch foot, for bottom feed 3 Blindstitch- Underneath the box is an accessory compartment B. and edge-sewing foot 5 Buttonhole foot 6 Darning foot 7 Hemming foot 8 Edge guide I Open its lid and take out accessory box C. Illustration D shows how to arrange sewing feet, needles and bobbins in the accessory box. and overlock foot 4 Zipper- t Detachable work support and acces sories: The work support can be lifted out (A).

Owner's Manual
Page 34
E is the sewing foot screw. 30 Fitting the sewing foot: Lower lifting lever and locate foot so that pins A enter grooves B. I N C and D are for attaching accessories. To change the buttonhole foot, first pull the runner of the foot fully to the front and than swing the work support to the left. 4 Removing sewing foot: switch off ma ster switch 107. The foot snaps out. Push the sewing foot downwards at the front. Needle must be raised.
E is the sewing foot screw. 30 Fitting the sewing foot: Lower lifting lever and locate foot so that pins A enter grooves B. I N C and D are for attaching accessories. To change the buttonhole foot, first pull the runner of the foot fully to the front and than swing the work support to the left. 4 Removing sewing foot: switch off ma ster switch 107. The foot snaps out. Push the sewing foot downwards at the front. Needle must be raised.

Owner's Manual
Page 39
...control elements, we have compiled ideas and suggestions for you read the following section just as a Creative fashion designer. These are divided into three groups, as buttonhole program There will enable you to time concerning sewing problems you have . When you encoun ter ...will certainly be glad to contact your nearest PFAFF dealer at any time. Programming embroidery stitches, numbers and letters 3. Congratu'ations! From the vast range of enjoyable and successful sewing and creative needle work. 35 Your new PFAFF Creative makes you many hours of sewing possibilities offered...
...control elements, we have compiled ideas and suggestions for you read the following section just as a Creative fashion designer. These are divided into three groups, as buttonhole program There will enable you to time concerning sewing problems you have . When you encoun ter ...will certainly be glad to contact your nearest PFAFF dealer at any time. Programming embroidery stitches, numbers and letters 3. Congratu'ations! From the vast range of enjoyable and successful sewing and creative needle work. 35 Your new PFAFF Creative makes you many hours of sewing possibilities offered...

Owner's Manual
Page 40
...é work Assembly and serging seams Balancing out letters and numbers Basting Binding edges Binding edges with non-woven tape Blind stitch Buttonholes Capacity of MEM-memory Changing the needle position Changing the stitch length Changing the stitch width Checking the programs stored Closed overlock stitch ...Cording Correcting programs Cross stitches Darning Dual feed Edge binder Elastic stitch Embroidery stitch programs Eyelet buttonholes Eyelet embroidery 59 91,92 72 76 96 96 97 102-106 62, 66 78, 79 65 65 63 91 56, 57 ...
...é work Assembly and serging seams Balancing out letters and numbers Basting Binding edges Binding edges with non-woven tape Blind stitch Buttonholes Capacity of MEM-memory Changing the needle position Changing the stitch length Changing the stitch width Checking the programs stored Closed overlock stitch ...Cording Correcting programs Cross stitches Darning Dual feed Edge binder Elastic stitch Embroidery stitch programs Eyelet buttonholes Eyelet embroidery 59 91,92 72 76 96 96 97 102-106 62, 66 78, 79 65 65 63 91 56, 57 ...

Owner's Manual
Page 42
...-stitch and utility-stitch programs from 00 to 21 • Embroidery-stitch programs from 22 to 36 and from 40 to 50 • Buttonhole program Lingerie buttonhole (Program 13) Eyelet buttonhole (Program 14) Button sewing program (Program 15) • Cross-stitch program (Program 37) • Hem-stitching programs (Programs 38 and 39) •...
...-stitch and utility-stitch programs from 00 to 21 • Embroidery-stitch programs from 22 to 36 and from 40 to 50 • Buttonhole program Lingerie buttonhole (Program 13) Eyelet buttonhole (Program 14) Button sewing program (Program 15) • Cross-stitch program (Program 37) • Hem-stitching programs (Programs 38 and 39) •...

Owner's Manual
Page 46
... through 1800. • Sew the pattern backwards in down position Sew the programmed stitch pattern, as illusi ted. At h end of h seam, press the "tieoff/buttonhole" key. Shortly before you reach the end of the pattern the needle remains dowr the material. The second sil motif can be sewn without turning...
... through 1800. • Sew the pattern backwards in down position Sew the programmed stitch pattern, as illusi ted. At h end of h seam, press the "tieoff/buttonhole" key. Shortly before you reach the end of the pattern the needle remains dowr the material. The second sil motif can be sewn without turning...

Owner's Manual
Page 84
... away seam allowances. Needle must be in grain direction with light needle thread tension and elastic seams. Machine-embroidery silk: to 3 mm. lower than the buttonhole range. 75 Twill/jeans: use special needles for different materia's Woollen fabrics: well balanced stitch length and tension. When sewing over thick intersections t is advis...
... away seam allowances. Needle must be in grain direction with light needle thread tension and elastic seams. Machine-embroidery silk: to 3 mm. lower than the buttonhole range. 75 Twill/jeans: use special needles for different materia's Woollen fabrics: well balanced stitch length and tension. When sewing over thick intersections t is advis...

Owner's Manual
Page 91
... fit the straight-stitch foot, set relatively high. To obtain particularly promine seams, we recommen using buttonhole threa Buttonhole thread as needle thread prog '- Fe this , selection of a suitable thread important. L Needle: 100/120 Needle thread: buttonhole thread Bobbin thread: sewing thread Stitch length: longest stitch Top-stitch seams produce nice ornament effects...
... fit the straight-stitch foot, set relatively high. To obtain particularly promine seams, we recommen using buttonhole threa Buttonhole thread as needle thread prog '- Fe this , selection of a suitable thread important. L Needle: 100/120 Needle thread: buttonhole thread Bobbin thread: sewing thread Stitch length: longest stitch Top-stitch seams produce nice ornament effects...

Owner's Manual
Page 92
... the left of the fabric with two needle threads I prog oo -- °L 3-5 0 Stitch length: 6.0 mm Needle: 80 Thread: sewing thread If you cannot find a suitable buttonhole thread, try to the reverse side and baste it down. Sew on the reverse side. (For threading instructions see page 56). ol 0%.. Trim excess material...
... the left of the fabric with two needle threads I prog oo -- °L 3-5 0 Stitch length: 6.0 mm Needle: 80 Thread: sewing thread If you cannot find a suitable buttonhole thread, try to the reverse side and baste it down. Sew on the reverse side. (For threading instructions see page 56). ol 0%.. Trim excess material...

Owner's Manual
Page 111
...length, press key 116 again. Without actuating further keys, the follow ing buttonholes can be placed underneath during sewing. The display will f good to lift the fabric a little in order not to the final bartack that the Pfaff Creative sews the first bar and the reverse seam (Fig. 1 b). Sew... the first lengthwise seam at the required length (Fig. 1 a). After that is now stored. The buttonhole is to determine the 2nd bar for a pro grammed buttonhole, press key 116. First mark ...
...length, press key 116 again. Without actuating further keys, the follow ing buttonholes can be placed underneath during sewing. The display will f good to lift the fabric a little in order not to the final bartack that the Pfaff Creative sews the first bar and the reverse seam (Fig. 1 b). Sew... the first lengthwise seam at the required length (Fig. 1 a). After that is now stored. The buttonhole is to determine the 2nd bar for a pro grammed buttonhole, press key 116. First mark ...

Owner's Manual
Page 112
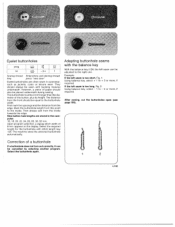
... the length required and • the first bartack. • Set balance key 124 toward + or - A buttonhole width of 4.5 mm is changed automatically (Fig. 4). and adjust the second buttonhole seam to the first one (Fig. 3). • Sew last bartack. • This change will be maintained ...you determine the required but tonhole • Sew the first buttonhole seam in order to maintain the same button hole length as on the 3-ply buttonhole strip. For heavy materials select a wide buttonhole and a narrow one . the buttonhole strip may consist of different numbers of fabric plies, e....
... the length required and • the first bartack. • Set balance key 124 toward + or - A buttonhole width of 4.5 mm is changed automatically (Fig. 4). and adjust the second buttonhole seam to the first one (Fig. 3). • Sew last bartack. • This change will be maintained ...you determine the required but tonhole • Sew the first buttonhole seam in order to maintain the same button hole length as on the 3-ply buttonhole strip. For heavy materials select a wide buttonhole and a narrow one . the buttonhole strip may consist of different numbers of fabric plies, e....
Owner's Manual
Page 113
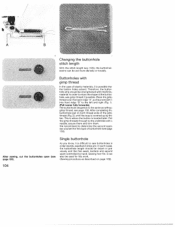
...this work. (Sewing procedure as withou gimp thread, see page 106). In such cases, the buttonhole length should be set more densely or loosely. material. The buttonhole sequence is located later. z B Changing the buttonhole stitch length With the stitch length key (125), the buttonholf seams can also be drawn in... collar stands, waistband strips etc. Buttonholes with a needle, secure them and trim them. We recommend to determine the second scanE bar yourself for this type of elastic materials,...
...this work. (Sewing procedure as withou gimp thread, see page 106). In such cases, the buttonhole length should be set more densely or loosely. material. The buttonhole sequence is located later. z B Changing the buttonhole stitch length With the stitch length key (125), the buttonholf seams can also be drawn in... collar stands, waistband strips etc. Buttonholes with a needle, secure them and trim them. We recommend to determine the second scanE bar yourself for this type of elastic materials,...
Owner's Manual
Page 114
...key (124) the left seam is too long, Fig. 2: Using balance key, select - 1 to + 3 or more , if required. The buttonhole must be sewn with backing material underneath. First mark the spacings and the distance from the front should be adjusted to the inside towards the... edge. Mark the buttonhole length from the inside . The machine sews the selected buttonhole automatically. Select the buttonhole again. 1 2 i ni; If the left seam is too short, Fig. 1: Using balance key, select + 1 to...
...key (124) the left seam is too long, Fig. 2: Using balance key, select - 1 to + 3 or more , if required. The buttonhole must be sewn with backing material underneath. First mark the spacings and the distance from the front should be adjusted to the inside towards the... edge. Mark the buttonhole length from the inside . The machine sews the selected buttonhole automatically. Select the buttonhole again. 1 2 i ni; If the left seam is too short, Fig. 1: Using balance key, select + 1 to...

Owner's Manual
Page 115
... from the bartack. If you have no punch pliers to make sure the needle enterr the right hole of pointed scissors. Now carefully cut the buttonhole open a buttonhole it is important not to the middle, then repeat this , insert the seam ripper about 1 mm away from the bartack at the other end... the button. Turn th hand wheel towards you and adjust the position ot the button so that the needle stitches into its upper position. Cutting buttonholes open When you cut open to damage the bartacks.
... from the bartack. If you have no punch pliers to make sure the needle enterr the right hole of pointed scissors. Now carefully cut the buttonhole open a buttonhole it is important not to the middle, then repeat this , insert the seam ripper about 1 mm away from the bartack at the other end... the button. Turn th hand wheel towards you and adjust the position ot the button so that the needle stitches into its upper position. Cutting buttonholes open When you cut open to damage the bartacks.

Owner's Manual
Page 119
...of the material. Medium ball point Heavy ball point Stretch-fabric needle developed especially for delicate stretch and knitted fabrics. Particularly suitable for Pfaff. Wide-meshed corsetry, Lycra, Simplex and Lastex. 130/705 H-J 90-110 Acute round point Twill, workwear, heavy linen, blue ...Narrow wedge point with left-twist groove Light ball point, long eye Imitation leathers, plastic materials, plastic sheeting and oilcloth, Seams topstitched with buttonhole silk or No. 3013 synthetic thread. 130/705 H-WING 100 _- light Needle size: 60, 70, 75 Needle points medium Needle size...
...of the material. Medium ball point Heavy ball point Stretch-fabric needle developed especially for delicate stretch and knitted fabrics. Particularly suitable for Pfaff. Wide-meshed corsetry, Lycra, Simplex and Lastex. 130/705 H-J 90-110 Acute round point Twill, workwear, heavy linen, blue ...Narrow wedge point with left-twist groove Light ball point, long eye Imitation leathers, plastic materials, plastic sheeting and oilcloth, Seams topstitched with buttonhole silk or No. 3013 synthetic thread. 130/705 H-WING 100 _- light Needle size: 60, 70, 75 Needle points medium Needle size...
Owner's Manual
Page 124
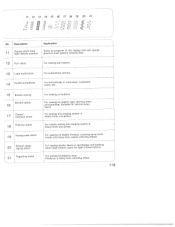
... -. No. I -- - _ -. - - L 21 Stretch triple zigzag stitch , Fagotting stitch For sewing elastic tapes in outerwear, costumes, coats, etc. -- I -- -- 1A Eyelet buttonhole For buttonholes in sportswear and bathing wear (high-stretch seam for light knitted fabrics). ____ _ _ _ . 12 13 14 15 16 17 18 19 20 21 cçjj...). Suitable for zigzag from left needle position push pattern reverse key). 1 2 Purl stitch For sewing purl seams. - 13 Light buttonhole For buttonhole sewing. - For joining foundation wear Produces a fancy hem-stitching effect. 115
... -. No. I -- - _ -. - - L 21 Stretch triple zigzag stitch , Fagotting stitch For sewing elastic tapes in outerwear, costumes, coats, etc. -- I -- -- 1A Eyelet buttonhole For buttonholes in sportswear and bathing wear (high-stretch seam for light knitted fabrics). ____ _ _ _ . 12 13 14 15 16 17 18 19 20 21 cçjj...). Suitable for zigzag from left needle position push pattern reverse key). 1 2 Purl stitch For sewing purl seams. - 13 Light buttonhole For buttonhole sewing. - For joining foundation wear Produces a fancy hem-stitching effect. 115

Owner's Manual
Page 148
..., you want to check the correctness of key 140 (Figs. 2 and 2 a). . Press mem+ key 106 (Fig. 2) . For ii e oal oat few pre ns key 1 6 off /buttonhole after sewing start . The individual letters will then appear in the spacings (Fig. 1). The height of the text on the fabric. key 140 to the...
..., you want to check the correctness of key 140 (Figs. 2 and 2 a). . Press mem+ key 106 (Fig. 2) . For ii e oal oat few pre ns key 1 6 off /buttonhole after sewing start . The individual letters will then appear in the spacings (Fig. 1). The height of the text on the fabric. key 140 to the...


