
Owner's Manual
Page 2
...pattern length setting 21. 22 Bobbin winding preparations 4, 5 C Changing the light bulb 31 Changing the needle 27 Changing the sewing foot 30 Checking the bobbin thread tension 8 Checking the needle thread tension 14 Cleaning and oiling 31 Creative computer keyboard 19 D Detachable work support and accessories Drawing up the bobbin thread Dual feed 28, 29 12 16 E Electrical connection 2, F Foot control 14 Function keys of the electronic system 18 Important notes 32 Inserting the bobbin 8 Inserting the bobbin case L Lowering the feed dog 27 N Needle position...
...pattern length setting 21. 22 Bobbin winding preparations 4, 5 C Changing the light bulb 31 Changing the needle 27 Changing the sewing foot 30 Checking the bobbin thread tension 8 Checking the needle thread tension 14 Cleaning and oiling 31 Creative computer keyboard 19 D Detachable work support and accessories Drawing up the bobbin thread Dual feed 28, 29 12 16 E Electrical connection 2, F Foot control 14 Function keys of the electronic system 18 Important notes 32 Inserting the bobbin 8 Inserting the bobbin case L Lowering the feed dog 27 N Needle position...

Owner's Manual
Page 3
... all moving parts. winding. Do not allow plug to break. 13. Never operate the sewing machine with same type rated 15 Watts. . Special care is being used as threading needle, changing needle, threading bobbin, or changing presser foot, etc. 16. Keep ventilation openings of lint, dust, and loose cloth. 5. Do not operate where aerosol (spray> products are being administered. 8. To unplug, grasp the plug, not the cord. 11. The wrong plate can...
... all moving parts. winding. Do not allow plug to break. 13. Never operate the sewing machine with same type rated 15 Watts. . Special care is being used as threading needle, changing needle, threading bobbin, or changing presser foot, etc. 16. Keep ventilation openings of lint, dust, and loose cloth. 5. Do not operate where aerosol (spray> products are being administered. 8. To unplug, grasp the plug, not the cord. 11. The wrong plate can...

Owner's Manual
Page 5
.../buttonhole/single pattern" key 117 Presser bar 118 Presser bar lifter 119 Program display 120 Program chart 121 Bobbin winder 122 "Pattern mirroring" key 123 "Pattern start' key 124 Balancing-out & pattern length keys 125 Stitch length & pattern length keys (program check) 126 Base plate 127 Free arm cover, enclosing sewing hook 128 Free arm 129 Threader 130 Sewing light 131 Threading slots 132 Needle thread tension 133 Bobbin winder thread guide 134 Take-up lever 135 Dual feed 136 Bobbin winder thread guide (swing-out) 137 Spool holder with unreeling disc 138 Second spool holder...
.../buttonhole/single pattern" key 117 Presser bar 118 Presser bar lifter 119 Program display 120 Program chart 121 Bobbin winder 122 "Pattern mirroring" key 123 "Pattern start' key 124 Balancing-out & pattern length keys 125 Stitch length & pattern length keys (program check) 126 Base plate 127 Free arm cover, enclosing sewing hook 128 Free arm 129 Threader 130 Sewing light 131 Threading slots 132 Needle thread tension 133 Bobbin winder thread guide 134 Take-up lever 135 Dual feed 136 Bobbin winder thread guide (swing-out) 137 Spool holder with unreeling disc 138 Second spool holder...

Owner's Manual
Page 22
... speed. Function keys of the electronic system Description on the following pages. 112 Bobbin thread monitor light 113 "Needle down" key 114 "Sew slow" key 115 "Reverse" key 116 "Tie-off/buttonhole/single pattern" key N Electronic bobbin thread monitor: Bobbin thread monitor light 112 starts to determine and memorize the seam length. When you start sewing. When you press the key during sewing, the light does not go on and the machine sews...
... speed. Function keys of the electronic system Description on the following pages. 112 Bobbin thread monitor light 113 "Needle down" key 114 "Sew slow" key 115 "Reverse" key 116 "Tie-off/buttonhole/single pattern" key N Electronic bobbin thread monitor: Bobbin thread monitor light 112 starts to determine and memorize the seam length. When you start sewing. When you press the key during sewing, the light does not go on and the machine sews...

Owner's Manual
Page 24
... program dis play 119 using program keys 139, The alphabet and number symbols are selected with the left key, while letters and numbers are selected with the right key. Stitch width setting The stitch width ranges from 0 to 6 mm. Selection of the size of stitch width for programs 00, 02 and 03 (13 positions). Selection of straight stitch needle position for the respective...
... program dis play 119 using program keys 139, The alphabet and number symbols are selected with the left key, while letters and numbers are selected with the right key. Stitch width setting The stitch width ranges from 0 to 6 mm. Selection of the size of stitch width for programs 00, 02 and 03 (13 positions). Selection of straight stitch needle position for the respective...

Owner's Manual
Page 26
... + 1 to + 7). 2. The stitch length of individual patterns (also in the MEM-memory) 5I , ' Combination: -''J=. ..' or program combinations which are sewn with or "+" and entered, this correction applies to correct pattern- Correction of the reverse stit- Balancing out or reverse stitch correction Balancing out serves to the entire program combination. P ' minus settings shorten the reverse stitches and the patterns or programs become...
... + 1 to + 7). 2. The stitch length of individual patterns (also in the MEM-memory) 5I , ' Combination: -''J=. ..' or program combinations which are sewn with or "+" and entered, this correction applies to correct pattern- Correction of the reverse stit- Balancing out or reverse stitch correction Balancing out serves to the entire program combination. P ' minus settings shorten the reverse stitches and the patterns or programs become...

Owner's Manual
Page 40
ndex Sewing instructions Appliqué work Assembly and serging seams Balancing out letters and numbers Basting Binding edges Binding edges with non-woven tape Blind stitch Buttonholes Capacity of MEM-memory Changing the needle position Changing the stitch length Changing the stitch width Checking the programs stored Closed overlock stitch Cording Correcting programs Cross stitches Darning Dual feed Edge binder Elastic stitch Embroidery stitch programs Eyelet buttonholes Eyelet embroidery 59 91,92 72 76 96 96 97 102-106 62, 66 78...
ndex Sewing instructions Appliqué work Assembly and serging seams Balancing out letters and numbers Basting Binding edges Binding edges with non-woven tape Blind stitch Buttonholes Capacity of MEM-memory Changing the needle position Changing the stitch length Changing the stitch width Checking the programs stored Closed overlock stitch Cording Correcting programs Cross stitches Darning Dual feed Edge binder Elastic stitch Embroidery stitch programs Eyelet buttonholes Eyelet embroidery 59 91,92 72 76 96 96 97 102-106 62, 66 78...

Owner's Manual
Page 41
... machine settings oIled hem, roll hemmer ecuring hems with the twin needle electing the MEM-memory erging with the overlock foot erging with zigzag stitch ewing aid for thick seams ewing dots ewing hyphens/dashes ewing in zippers ewing numbers ewing on buttons 62 89 89 73 67 68 107, 108 66 106 Shell edging Shirring with elastic thread Shirring with shirring foot Shirring with straight stitch Single patterns Smocking with elastic thread...
... machine settings oIled hem, roll hemmer ecuring hems with the twin needle electing the MEM-memory erging with the overlock foot erging with zigzag stitch ewing aid for thick seams ewing dots ewing hyphens/dashes ewing in zippers ewing numbers ewing on buttons 62 89 89 73 67 68 107, 108 66 106 Shell edging Shirring with elastic thread Shirring with shirring foot Shirring with straight stitch Single patterns Smocking with elastic thread...
Owner's Manual
Page 56
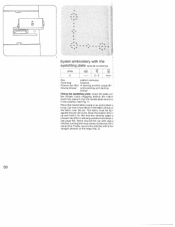
... fabric over the needle plate and sn it for the first few straight stitches at tt e same time. hoop. Draw the bobbin thre: d up and hold it into position (see page 98). The fabric must be tiç,it over the pin. Place the traced fabric tautly in an embroideri i. Key: pattern mirroring Feed dog: lowered Presser bar lifter: in darning position (page 9l Sewing thread: embroidering and darning thread Fitting the eyeletting plate: insert the plate w ti the double...
... fabric over the needle plate and sn it for the first few straight stitches at tt e same time. hoop. Draw the bobbin thre: d up and hold it into position (see page 98). The fabric must be tiç,it over the pin. Place the traced fabric tautly in an embroideri i. Key: pattern mirroring Feed dog: lowered Presser bar lifter: in darning position (page 9l Sewing thread: embroidering and darning thread Fitting the eyeletting plate: insert the plate w ti the double...
Owner's Manual
Page 82
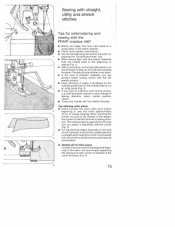
... stitches in the case of soft materials, a round-hole needle plate and J a straight-stitch sewing foot with round needle 3 hole can produce good sewing results (special accessories). • Sewing aid for embroidering and sewing with a piece of material of the same thickness (Fig, 4). 4 73 Top-stitching collar points • Insert a thread into each collar point before 2 beginning to interrupt work during sewing, e.g. with long fabric panels or upon change of sewing direction, select needle position "down". • Thread...
... stitches in the case of soft materials, a round-hole needle plate and J a straight-stitch sewing foot with round needle 3 hole can produce good sewing results (special accessories). • Sewing aid for embroidering and sewing with a piece of material of the same thickness (Fig, 4). 4 73 Top-stitching collar points • Insert a thread into each collar point before 2 beginning to interrupt work during sewing, e.g. with long fabric panels or upon change of sewing direction, select needle position "down". • Thread...

Owner's Manual
Page 85
... by the requir stitch length to avoid damag the material (Fig. 1). Repeat this application do not lower the feed dog. First mark all lines have been basted, pull the fabric plies apart to find the joining threads: cut these through carefully, to the rear. In order to I :, - .L. Pl the workpiece under the sewing foot. Making taor's tacks Fringe foot, special accessory Z 10 -a....- + Fnge I basting direction.
... by the requir stitch length to avoid damag the material (Fig. 1). Repeat this application do not lower the feed dog. First mark all lines have been basted, pull the fabric plies apart to find the joining threads: cut these through carefully, to the rear. In order to I :, - .L. Pl the workpiece under the sewing foot. Making taor's tacks Fringe foot, special accessory Z 10 -a....- + Fnge I basting direction.

Owner's Manual
Page 91
... the machine with Select the longest stitch. For topstitching the fabric placed in the needle. L Needle: 100/120 Needle thread: buttonhole thread Bobbin thread: sewing thread Stitch length: longest stitch Top-stitch seams produce nice ornament effects. the reverse side ut • For topstitching, a No.80 needle may be user • For difficult top-stitch seams we recommend using the straight-stitch foot (special acce: sory). • Before you fit the straight-stitch foot, set relatively high. set th needle at its central position...
... the machine with Select the longest stitch. For topstitching the fabric placed in the needle. L Needle: 100/120 Needle thread: buttonhole thread Bobbin thread: sewing thread Stitch length: longest stitch Top-stitch seams produce nice ornament effects. the reverse side ut • For topstitching, a No.80 needle may be user • For difficult top-stitch seams we recommend using the straight-stitch foot (special acce: sory). • Before you fit the straight-stitch foot, set relatively high. set th needle at its central position...

Owner's Manual
Page 97
... amount be set Iooser The greater the bob thread tension the greater the shirring effect The most suitable fabrics are nylon, satin, bab and fine-knit fabrics. free on bobbin) Needle thread: sewing thread For sewing with elastic thread F oo Stitch length: 3 to be determined by testing on the bo case has to 4 mm Bobbin thread: elastic thread, (wind tension- Because elastic threads are much thicker thar ordinary bobbin thread, the tension on a of gathering piece of the seams. If there...
... amount be set Iooser The greater the bob thread tension the greater the shirring effect The most suitable fabrics are nylon, satin, bab and fine-knit fabrics. free on bobbin) Needle thread: sewing thread For sewing with elastic thread F oo Stitch length: 3 to be determined by testing on the bo case has to 4 mm Bobbin thread: elastic thread, (wind tension- Because elastic threads are much thicker thar ordinary bobbin thread, the tension on a of gathering piece of the seams. If there...
Owner's Manual
Page 98
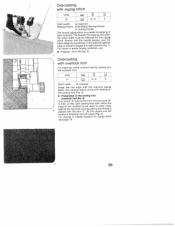
... sewing foot side, Allow the edge of the sewing foot (overlock foot No. 3) Turn screw 'A" fully to enter close 2 against the red mark. g rz Lr 11 3-5 3 Stitchwidth: as required j Sewing thread: Embroidery/darning thread or sewing thread Ttlihghehetssmttiotacrtheedriwazilidsg.thzTahmge-ushtsiettacbvheieisrsesthlueeictamtebadletefrfoioarrl,tshteheregziwniggizdaoegrf stitch. During sewing, the thread is placed over the fabric edge during serging use : • Program: 16 or 09 (Fig. 3). The red mark "B" is properly serged and well covered...
... sewing foot side, Allow the edge of the sewing foot (overlock foot No. 3) Turn screw 'A" fully to enter close 2 against the red mark. g rz Lr 11 3-5 3 Stitchwidth: as required j Sewing thread: Embroidery/darning thread or sewing thread Ttlihghehetssmttiotacrtheedriwazilidsg.thzTahmge-ushtsiettacbvheieisrsesthlueeictamtebadletefrfoioarrl,tshteheregziwniggizdaoegrf stitch. During sewing, the thread is placed over the fabric edge during serging use : • Program: 16 or 09 (Fig. 3). The red mark "B" is properly serged and well covered...

Owner's Manual
Page 104
... into the hemmer foot scroll. cE Narrow hem with the hemmer foot prog -- 3-5 * Hemmer foot (special accessory) Hemming secures the fabric edge against fraying and produces a neat and durable edge. The hem width is obtained, 3 Make sure the fabric con tacts the edge of the right half of sewn-on threads. 2 Set the stitch width just wide enough that the needle stitches close to which...
... into the hemmer foot scroll. cE Narrow hem with the hemmer foot prog -- 3-5 * Hemmer foot (special accessory) Hemming secures the fabric edge against fraying and produces a neat and durable edge. The hem width is obtained, 3 Make sure the fabric con tacts the edge of the right half of sewn-on threads. 2 Set the stitch width just wide enough that the needle stitches close to which...

Owner's Manual
Page 107
... the length of stitching close together (Fig. 3). Insert the pin of the foot in darning position embroidery and darning thread Darning position (Fig. 1): Lower presser bar lifter "A". at right angles the preceding row of its slot. F sew a few stitches. Push lever "E" towards the b and hold it there. Hold both three until it rests against stop. Draw up the bobbin thread. screw "D". _____ Darning with straight stitch -n prog -- (J 00 L__ - - 2-3 6 L Feed dog: Presser bar lifter: Sewing thread: lowered in h "C" and insert the foot so...
... the length of stitching close together (Fig. 3). Insert the pin of the foot in darning position embroidery and darning thread Darning position (Fig. 1): Lower presser bar lifter "A". at right angles the preceding row of its slot. F sew a few stitches. Push lever "E" towards the b and hold it there. Hold both three until it rests against stop. Draw up the bobbin thread. screw "D". _____ Darning with straight stitch -n prog -- (J 00 L__ - - 2-3 6 L Feed dog: Presser bar lifter: Sewing thread: lowered in h "C" and insert the foot so...

Owner's Manual
Page 123
No. Closed overlock stitch For sewing and serging in elastic materials (securing edges>. . i J I 11/ / cç cz :1" 1%, - NN r! ,/ '% lJ7 -. stitch length 3 to 6 mm Stem stitch For embroidering with 13 needle positions special needle positions. 01 Basting stitch For basting cuttings. A high-stretch seam for inside leg seams on sports- Stretch blind stitch -- Cross stitch . For invisible hemming in one operation. DescripUon AppHcation Straight stitch For all sewing work requiring '-"-' with the embroidery programs. 05 r 06 07 Blind stitch For...
No. Closed overlock stitch For sewing and serging in elastic materials (securing edges>. . i J I 11/ / cç cz :1" 1%, - NN r! ,/ '% lJ7 -. stitch length 3 to 6 mm Stem stitch For embroidering with 13 needle positions special needle positions. 01 Basting stitch For basting cuttings. A high-stretch seam for inside leg seams on sports- Stretch blind stitch -- Cross stitch . For invisible hemming in one operation. DescripUon AppHcation Straight stitch For all sewing work requiring '-"-' with the embroidery programs. 05 r 06 07 Blind stitch For...

Owner's Manual
Page 154
... Fringe foot, special accessory prog w cc] J 10 -3 + Fonge toot Stitchwidth: 2 mm Needle: Sewing thread: 80 Machine embroidery thread Sasting is a useful method of transferring seam lines First onto mark cuttings. S bastir1 thread after sewing. all contours with tailoring chalk on the tSW fcoaeupbhwtreimtnchaalepotasellnelirgeiasltihltnhareppeolsyaum.rghthaatvrokceaefrdibenefdlueinltnlheyse,bwtajoosiittnhaeivdnto,hgiedptuhfdlrrliaenmatghdeaesgfeotawnotodtc the material (Fig. 1). 1 Basting prog 01 cc] 1} --3+ 0 Feed dog: lowered Sewing thread: normal sewing thread...
... Fringe foot, special accessory prog w cc] J 10 -3 + Fonge toot Stitchwidth: 2 mm Needle: Sewing thread: 80 Machine embroidery thread Sasting is a useful method of transferring seam lines First onto mark cuttings. S bastir1 thread after sewing. all contours with tailoring chalk on the tSW fcoaeupbhwtreimtnchaalepotasellnelirgeiasltihltnhareppeolsyaum.rghthaatvrokceaefrdibenefdlueinltnlheyse,bwtajoosiittnhaeivdnto,hgiedptuhfdlrrliaenmatghdeaesgfeotawnotodtc the material (Fig. 1). 1 Basting prog 01 cc] 1} --3+ 0 Feed dog: lowered Sewing thread: normal sewing thread...

Owner's Manual
Page 174
Lower the foot and secure the hem in hem edge (Fig. 3). Hold the fabric tight as it during sewing. Make sure the fabric con tacts the edge of the right half of sewn-on threads. I 95 Draw the fabric into the hemmer scroll with the aid of the hemmer foot as you guide it enters the scroll. Set the stitch width just wide enough that...
Lower the foot and secure the hem in hem edge (Fig. 3). Hold the fabric tight as it during sewing. Make sure the fabric con tacts the edge of the right half of sewn-on threads. I 95 Draw the fabric into the hemmer scroll with the aid of the hemmer foot as you guide it enters the scroll. Set the stitch width just wide enough that...

Owner's Manual
Page 177
.... Darning with straight stitch Feed dog: Presser bar lifter: Sewing thread: lowered in darning position embroidery and darning thread Darning position (Fig. 1): Lower presser bar lifter 'A", at the same time pushing it back slightly until the machine has made a few stitches in the unworn area of the fabric. Insert the pin of the foot in serpentine fashion, placing the lines of stitches (see Fig. 4). Tighten screw 'D" Draw up the bobbin thread. When the damaged spot has been covered completely, turn the work through...
.... Darning with straight stitch Feed dog: Presser bar lifter: Sewing thread: lowered in darning position embroidery and darning thread Darning position (Fig. 1): Lower presser bar lifter 'A", at the same time pushing it back slightly until the machine has made a few stitches in the unworn area of the fabric. Insert the pin of the foot in serpentine fashion, placing the lines of stitches (see Fig. 4). Tighten screw 'D" Draw up the bobbin thread. When the damaged spot has been covered completely, turn the work through...


