User Manual
Page 9
...Flash (Optional 153 Settings During Playback 160 Changing Playback Display Method 160 Displaying Bright Portion Warning 160 Setting the Slideshow Display Interval 161 Camera Settings 162 Formatting the SD Memory Card 162 Turning the Beep On and Off 163 Changing the Date and Time and the Display Style... Setting the Display Language 167 Turning the Guide Display On and Off 167 Adjusting the Brightness of the LCD Monitor 168 Selecting the Video Output Format 168 Setting Auto Power Off 169 Resetting the File Number 169 Setting the Instant Review 170 Resetting to Default Settings 171 ...
...Flash (Optional 153 Settings During Playback 160 Changing Playback Display Method 160 Displaying Bright Portion Warning 160 Setting the Slideshow Display Interval 161 Camera Settings 162 Formatting the SD Memory Card 162 Turning the Beep On and Off 163 Changing the Date and Time and the Display Style... Setting the Display Language 167 Turning the Guide Display On and Off 167 Adjusting the Brightness of the LCD Monitor 168 Selecting the Video Output Format 168 Setting Auto Power Off 169 Resetting the File Number 169 Setting the Instant Review 170 Resetting to Default Settings 171 ...
User Manual
Page 15
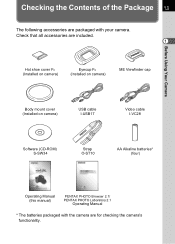
... included. 1 Hot shoe cover FK (Installed on camera) Eyecup FN (Installed on camera) ME Viewfinder cap Before Using Your Camera Body mount cover (Installed on camera) USB cable I-USB17 Video cable I-VC28 Software (CD-ROM) S-SW34 Strap O-ST10 AA Alkaline batteries* (four) Operating Manual (this manual) PENTAX PHOTO Browser 2.1/ PENTAX PHOTO Laboratory 2.1 Operating Manual * The batteries packaged...
... included. 1 Hot shoe cover FK (Installed on camera) Eyecup FN (Installed on camera) ME Viewfinder cap Before Using Your Camera Body mount cover (Installed on camera) USB cable I-USB17 Video cable I-VC28 Software (CD-ROM) S-SW34 Strap O-ST10 AA Alkaline batteries* (four) Operating Manual (this manual) PENTAX PHOTO Browser 2.1/ PENTAX PHOTO Laboratory 2.1 Operating Manual * The batteries packaged...
User Manual
Page 17
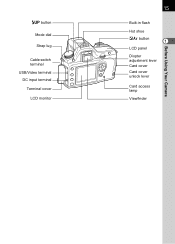
K button Mode dial Strap lug Cable switch terminal USB/Video terminal DC input terminal Terminal cover LCD monitor 15 Before Using Your Camera Built-in flash Hot shoe mc button 1 LCD panel Diopter adjustment lever Card cover Card cover unlock lever Card access lamp Viewfinder
K button Mode dial Strap lug Cable switch terminal USB/Video terminal DC input terminal Terminal cover LCD monitor 15 Before Using Your Camera Built-in flash Hot shoe mc button 1 LCD panel Diopter adjustment lever Card cover Card cover unlock lever Card access lamp Viewfinder

User Manual
Page 72
...device, and select the video IN jack to use the camera continuously for a long period, use of the video cable to the video IN jack on the TV. 3 Turn the TV and camera on. • If you can play back images using the video cable, you intend to which the camera is connected. Make ...sure that both the TV and the camera are turned off before connecting the cable. 1Selecting the Video Output Format (p.168) 3 1 Connect the video cable to the USB/Video terminal on the camera. 2 Connect the other end ...
...device, and select the video IN jack to use the camera continuously for a long period, use of the video cable to the video IN jack on the TV. 3 Turn the TV and camera on. • If you can play back images using the video cable, you intend to which the camera is connected. Make ...sure that both the TV and the camera are turned off before connecting the cable. 1Selecting the Video Output Format (p.168) 3 1 Connect the video cable to the USB/Video terminal on the camera. 2 Connect the other end ...

User Manual
Page 87
5 Use the four-way controller (23) to the Printer 1 Turn the camera off. 2 Connect the camera and PictBridge compatible printer using the USB cable supplied with the camera. The PictBridge logo is changed. 7 Press the 3 button. 85 Set-up Brightness Level Video Out Transfer Mode Auto Power Off File # Sensor Cleaning Cancel 0 NTSC PC PictBridge PC-F OK OK 3 Basic Operations Connecting the Camera to select [PictBridge]. 6 Press the 4 button. The setting is displayed on PictBridge compatible printers.
5 Use the four-way controller (23) to the Printer 1 Turn the camera off. 2 Connect the camera and PictBridge compatible printer using the USB cable supplied with the camera. The PictBridge logo is changed. 7 Press the 3 button. 85 Set-up Brightness Level Video Out Transfer Mode Auto Power Off File # Sensor Cleaning Cancel 0 NTSC PC PictBridge PC-F OK OK 3 Basic Operations Connecting the Camera to select [PictBridge]. 6 Press the 4 button. The setting is displayed on PictBridge compatible printers.
User Manual
Page 101
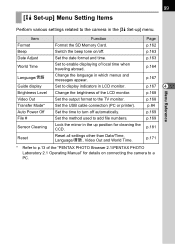
p.162 Beep Switch the beep tone on connecting the camera to a PC. p.167 Guide display Set to the TV monitor. p.168 Video Out Set the output format to display indicators in LCD monitor. p.171 * Refer to p.13 of the "PENTAX PHOTO Browser 2.1/PENTAX PHOTO Laboratory 2.1 Operating Manual" for cleaning the CCD. p.169 Sensor Cleaning Lock...
p.162 Beep Switch the beep tone on connecting the camera to a PC. p.167 Guide display Set to the TV monitor. p.168 Video Out Set the output format to display indicators in LCD monitor. p.171 * Refer to p.13 of the "PENTAX PHOTO Browser 2.1/PENTAX PHOTO Laboratory 2.1 Operating Manual" for cleaning the CCD. p.169 Sensor Cleaning Lock...

User Manual
Page 170
... Transfer Mode Auto Power Off File # Sensor Cleaning 0 1 min SerialNo OK OK Function Reference 5 Selecting the Video Output Format When you connect the camera to AV equipment such as a TV, choose the appropriate video output format (NTSC or PAL) for playing back images. Set in [Brightness Level] in North America is hard to...
... Transfer Mode Auto Power Off File # Sensor Cleaning 0 1 min SerialNo OK OK Function Reference 5 Selecting the Video Output Format When you connect the camera to AV equipment such as a TV, choose the appropriate video output format (NTSC or PAL) for playing back images. Set in [Brightness Level] in North America is hard to...
User Manual
Page 171
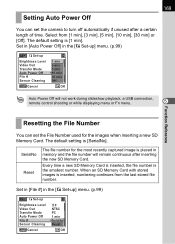
...file number is [SerialNo]. Set in [File #] in the [H Set-up] menu. (p.99) Set-up Brightness Level Video Out Transfer Mode Auto Power Off File # Sensor Cleaning Cancel 0 NTSC PC 1 min SerialNo Reset OK OK SerialNo Reset ...is [1 min]. Set in [Auto Power Off] in the [H Set-up] menu. (p.99) Set-up Brightness Level Video Out Transfer Mode Auto Power Off File # Sensor Cleaning Cancel 1 min 3 min 5 min 10 min 30 min Off...Fn menu. 5 Function Reference Resetting the File Number You can set the camera to turn off automatically if unused after inserting the new SD Memory Card.
...file number is [SerialNo]. Set in [File #] in the [H Set-up] menu. (p.99) Set-up Brightness Level Video Out Transfer Mode Auto Power Off File # Sensor Cleaning Cancel 0 NTSC PC 1 min SerialNo Reset OK OK SerialNo Reset ...is [1 min]. Set in [Auto Power Off] in the [H Set-up] menu. (p.99) Set-up Brightness Level Video Out Transfer Mode Auto Power Off File # Sensor Cleaning Cancel 1 min 3 min 5 min 10 min 30 min Off...Fn menu. 5 Function Reference Resetting the File Number You can set the camera to turn off automatically if unused after inserting the new SD Memory Card.

User Manual
Page 173
Mode] menu, [Q Playback] menu and [H Set-up] menu are not reset. 1 Select [Reset] on the [H Set-up Menu Settings in [A Rec. Mode/Playback/Set-up ] menu. 2 Press the four-way controller (5) to display the [Reset] screen. 5 3 Use the four-way controller (2) Reset to default settings. However, Date Adjust, Language/ , Video Out and World Time are reset to select [Reset]. Back to take or play back images. The camera is ready to initial settings Reset Cancel OK OK 4 Press the 4 button. Function Reference Resetting to Default Settings 171 Resetting Rec.
Mode] menu, [Q Playback] menu and [H Set-up] menu are not reset. 1 Select [Reset] on the [H Set-up Menu Settings in [A Rec. Mode/Playback/Set-up ] menu. 2 Press the four-way controller (5) to display the [Reset] screen. 5 3 Use the four-way controller (2) Reset to default settings. However, Date Adjust, Language/ , Video Out and World Time are reset to select [Reset]. Back to take or play back images. The camera is ready to initial settings Reset Cancel OK OK 4 Press the 4 button. Function Reference Resetting to Default Settings 171 Resetting Rec.

User Manual
Page 177
... Hometown Yes No Same as Hometown Yes No Language/ Guide display According to default setting Yes O (On) Yes No p.167 6 Yes p.167 Appendix Brightness Level Video Out Transfer Mode Auto Power Off File # 0 Yes According to default setting Yes PC Yes 1 min Yes SerialNo Yes Yes p.168 No p.168 Yes p.84...
... Hometown Yes No Same as Hometown Yes No Language/ Guide display According to default setting Yes O (On) Yes No p.167 6 Yes p.167 Appendix Brightness Level Video Out Transfer Mode Auto Power Off File # 0 Yes According to default setting Yes PC Yes 1 min Yes SerialNo Yes Yes p.168 No p.168 Yes p.84...
User Manual
Page 194
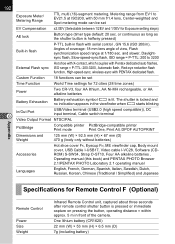
...cover FK, Eyecup FN, ME viewfinder cap, Body mount cover, USB Cable I-USB17, Video cable I-VC28, Software (CDROM) S-SW34, Strap O-ST10, Four AA alkaline batteries , Operating manual (this book) and PENTAX PHOTO Browser 2.1/PENTAX PHOTO Laboratory 2.1 operating manual Languages English, French, German, Spanish, Italian, Swedish, Dutch,... indication appears in flash with serial control , GN 15.6 (ISO 200/m), Angles of coverage: 18 mm lens angle of the camera. is halfway pressed) Built-in flash P-TTL built-in the viewfinder when ? The shutter is pressed or immediate capture on pressing...
...cover FK, Eyecup FN, ME viewfinder cap, Body mount cover, USB Cable I-USB17, Video cable I-VC28, Software (CDROM) S-SW34, Strap O-ST10, Four AA alkaline batteries , Operating manual (this book) and PENTAX PHOTO Browser 2.1/PENTAX PHOTO Laboratory 2.1 operating manual Languages English, French, German, Spanish, Italian, Swedish, Dutch,... indication appears in flash with serial control , GN 15.6 (ISO 200/m), Angles of coverage: 18 mm lens angle of the camera. is halfway pressed) Built-in flash P-TTL built-in the viewfinder when ? The shutter is pressed or immediate capture on pressing...

User Manual
Page 197
... C (Best), D (Better), or E (Good). NTSC is useful when you wish to refer to e-mail. This is mainly used in Europe and in JPEG format are video output formats. JPEG An image compression method. Noise Reduction Process to the image compression ratio. Quality Level This refers to reduce noise (image roughness or...
... C (Best), D (Better), or E (Good). NTSC is useful when you wish to refer to e-mail. This is mainly used in Europe and in JPEG format are video output formats. JPEG An image compression method. Noise Reduction Process to the image compression ratio. Quality Level This refers to reduce noise (image roughness or...

User Manual
Page 203
...Shutter Priority Mode b ......134 Shutter release button 45, 92, 94 Shutter speed 127 Single mode l 122 Slideshow 68, 161 Slim (Digital Filter 71 Soft (Digital Filter 71 Spot 121 Spot Metering 131 sRGB 117 Strap 24 T Transfer Mode 84 Tungsten Light (White Balance) 112 Turning 167 TV... 70 6 b (Shutter Priority) mode ....134 Appendix U USB cable 83 Using aperture ring 180 V Video cable 70 Video Output Format 168 ...
...Shutter Priority Mode b ......134 Shutter release button 45, 92, 94 Shutter speed 127 Single mode l 122 Slideshow 68, 161 Slim (Digital Filter 71 Soft (Digital Filter 71 Spot 121 Spot Metering 131 sRGB 117 Strap 24 T Transfer Mode 84 Tungsten Light (White Balance) 112 Turning 167 TV... 70 6 b (Shutter Priority) mode ....134 Appendix U USB cable 83 Using aperture ring 180 V Video cable 70 Video Output Format 168 ...

