
User Manual
Page 2
...or of items on display. PRINT Image Matching enabled digital still cameras, printers and software help photographers to produce images more faithful to connect the printer and digital camera directly, using the unified standard for purchasing the PENTAX L Digital Camera. You can be erased or that can use In...lens or accessory, see p.37 and p.180. Lenses you can be used with the purpose of obtaining copyrights also cannot be used outside the scope of use any other brands or product names are not PRINT Image Matching III compliant. Regarding trademarks • PENTAX and smc PENTAX...
...or of items on display. PRINT Image Matching enabled digital still cameras, printers and software help photographers to produce images more faithful to connect the printer and digital camera directly, using the unified standard for purchasing the PENTAX L Digital Camera. You can be erased or that can use In...lens or accessory, see p.37 and p.180. Lenses you can be used with the purpose of obtaining copyrights also cannot be used outside the scope of use any other brands or product names are not PRINT Image Matching III compliant. Regarding trademarks • PENTAX and smc PENTAX...
User Manual
Page 3
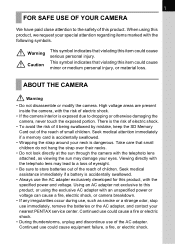
... at the sun through the camera with the following symbols. ABOUT THE CAMERA Warning • Do not disassemble or modify the camera. High voltage areas are present inside the camera, with the risk of the AC adapter. There is dangerous. Viewing directly with the telephoto lens may damage your nearest PENTAX service center. Seek medical assistance...
... at the sun through the camera with the following symbols. ABOUT THE CAMERA Warning • Do not disassemble or modify the camera. High voltage areas are present inside the camera, with the risk of the AC adapter. There is dangerous. Viewing directly with the telephoto lens may damage your nearest PENTAX service center. Seek medical assistance...
User Manual
Page 5
...; The temperature range for cleaning as temperatures normalize. • The LCD display may damage the lens. • Please do not press forcefully on the inside and outside of the camera and surroundings are recommended every one to two years to maintain high performance. • Sudden temperature...molding. This could get wet. • Do not subject the camera to remove dust accumulated on the camera. • Refer to "Precautions When Using the SD Memory Card" (p.30) regarding the SD Memory Card. • Use a lens brush to strong vibrations, shocks, or pressure. 3 • Do...
...; The temperature range for cleaning as temperatures normalize. • The LCD display may damage the lens. • Please do not press forcefully on the inside and outside of the camera and surroundings are recommended every one to two years to maintain high performance. • Sudden temperature...molding. This could get wet. • Do not subject the camera to remove dust accumulated on the camera. • Refer to "Precautions When Using the SD Memory Card" (p.30) regarding the SD Memory Card. • Use a lens brush to strong vibrations, shocks, or pressure. 3 • Do...
User Manual
Page 6
... Care to be Taken During Handling 2 Contents 4 Composition of the Operating Manual 9 Before Using Your Camera 11 L Camera Characteristics 12 Checking the Contents of the Package 13 Names of Working Parts 14 Camera 14 LCD Monitor Indications 16 Viewfinder Indications 20 LCD Panel Indications 22 Getting Started 23 Attaching the Strap... 27 Using the AC Adapter (Optional 28 Inserting/Removing the SD Memory Card 29 Recorded Pixels and Quality Level 31 Turning the Camera On and Off 32 Initial Settings 33 Setting the Display Language 33 Setting the Date and Time 35 Attaching the...
... Care to be Taken During Handling 2 Contents 4 Composition of the Operating Manual 9 Before Using Your Camera 11 L Camera Characteristics 12 Checking the Contents of the Package 13 Names of Working Parts 14 Camera 14 LCD Monitor Indications 16 Viewfinder Indications 20 LCD Panel Indications 22 Getting Started 23 Attaching the Strap... 27 Using the AC Adapter (Optional 28 Inserting/Removing the SD Memory Card 29 Recorded Pixels and Quality Level 31 Turning the Camera On and Off 32 Initial Settings 33 Setting the Display Language 33 Setting the Date and Time 35 Attaching the...

User Manual
Page 7
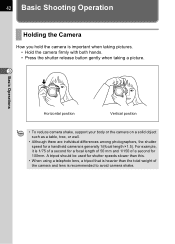
Basic Operations 5 41 Basic Shooting Operation 42 Holding the Camera 42 Letting the Camera Choose the Optimal Settings 43 Selecting the Appropriate Capturing Mode for Scenes 47 Using the Zoom Lens 48 Using the Built-in Flash 49 Using the Built-in Flash 49 Other Shooting Modes 53 Continuous ...Shooting 53 Self-Timer Shooting 55 Remote Control Shooting (Remote Control F: Sold Separately) ........59 Using Mirror Lock Up Function to Prevent Camera Shake 62 Playing ...
Basic Operations 5 41 Basic Shooting Operation 42 Holding the Camera 42 Letting the Camera Choose the Optimal Settings 43 Selecting the Appropriate Capturing Mode for Scenes 47 Using the Zoom Lens 48 Using the Built-in Flash 49 Using the Built-in Flash 49 Other Shooting Modes 53 Continuous ...Shooting 53 Self-Timer Shooting 55 Remote Control Shooting (Remote Control F: Sold Separately) ........59 Using Mirror Lock Up Function to Prevent Camera Shake 62 Playing ...
User Manual
Page 9
... the Custom Function Menu 172 7 Distance and Aperture when Using the Built-in Flash 149 DA, D FA , FA J, FA and F Lens Compatibility with the Built-in Flash 151 Using an External Flash (Optional 153 Settings During Playback 160 Changing Playback Display Method 160 Displaying Bright Portion... Warning 160 Setting the Slideshow Display Interval 161 Camera Settings 162 Formatting the SD Memory Card 162 Turning the Beep On and Off 163 Changing the Date and Time and the Display...
... the Custom Function Menu 172 7 Distance and Aperture when Using the Built-in Flash 149 DA, D FA , FA J, FA and F Lens Compatibility with the Built-in Flash 151 Using an External Flash (Optional 153 Settings During Playback 160 Changing Playback Display Method 160 Displaying Bright Portion... Warning 160 Setting the Slideshow Display Interval 161 Camera Settings 162 Formatting the SD Memory Card 162 Turning the Beep On and Off 163 Changing the Date and Time and the Display...

User Manual
Page 10
8 Appendix 173 Default Settings 174 Functions Available with Various Lens Combinations .......... 178 Notes on [Using Aperture Ring 180 Cleaning the CCD 181 Optional Accessories 183 Error Messages 186 Troubleshooting 188 Main Specifications 190 Specifications for Remote Control F (Optional 192 Glossary 193 Index 198 WARRANTY POLICY 202
8 Appendix 173 Default Settings 174 Functions Available with Various Lens Combinations .......... 178 Notes on [Using Aperture Ring 180 Cleaning the CCD 181 Optional Accessories 183 Error Messages 186 Troubleshooting 188 Main Specifications 190 Specifications for Remote Control F (Optional 192 Glossary 193 Index 198 WARRANTY POLICY 202
User Manual
Page 14
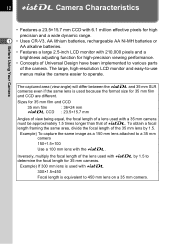
...of Universal Design have been implemented to 450 mm lens on a 35 mm camera. Example) To capture the same image as a 150 mm lens attached to operate. The captured area (view angle) will differ between the L and 35 mm SLR cameras even if the same lens is used with L 300×1.5=450 Focal ...length is used because the format size for high-precision viewing performance. • Concepts of L. Example) If 300 mm lens is equivalent to various parts of the 35 mm...
...of Universal Design have been implemented to 450 mm lens on a 35 mm camera. Example) To capture the same image as a 150 mm lens attached to operate. The captured area (view angle) will differ between the L and 35 mm SLR cameras even if the same lens is used with L 300×1.5=450 Focal ...length is used because the format size for high-precision viewing performance. • Concepts of L. Example) If 300 mm lens is equivalent to various parts of the 35 mm...

User Manual
Page 16
14 Names of Working Parts Before Using Your Camera Camera 1 Lens mount index Shutter release button Main switch Self-Timer lamp/ Remote control receiver Lens unlock button 3 button i button M button Q button Mirror AF coupler Focus mode lever Lens information contacts e-dial L/Z button Four-way controller 4 button { button Battery cover Tripod socket
14 Names of Working Parts Before Using Your Camera Camera 1 Lens mount index Shutter release button Main switch Self-Timer lamp/ Remote control receiver Lens unlock button 3 button i button M button Q button Mirror AF coupler Focus mode lever Lens information contacts e-dial L/Z button Four-way controller 4 button { button Battery cover Tripod socket
User Manual
Page 19
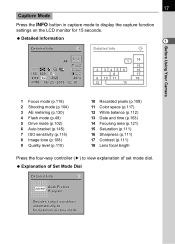
... Detailed Info AF ISO 800 sRGB 40mm 06 / 25 / 2005 12 : 30 1 14 15 2 3456 16 7 8 17 9 10 11 18 12 13 Before Using Your Camera 1 Focus mode (p.118) 2 Shooting mode (p.104) 3 AE metering (p.130) 4 Flash mode (p.49) 5 Drive mode (p.102) 6 Auto bracket (p.145) 7 ISO sensitivity (p.115) ...112) 13 Date and time (p.163) 14 Focusing area (p.121) 15 Saturation (p.111) 16 Sharpness (p.111) 17 Contrast (p.111) 18 Lens focal length Press the four-way controller (5) to view explanation of Set Mode Dial Detailed Info Auto Picture Program Decides subjct condition automatically to display...
... Detailed Info AF ISO 800 sRGB 40mm 06 / 25 / 2005 12 : 30 1 14 15 2 3456 16 7 8 17 9 10 11 18 12 13 Before Using Your Camera 1 Focus mode (p.118) 2 Shooting mode (p.104) 3 AE metering (p.130) 4 Flash mode (p.49) 5 Drive mode (p.102) 6 Auto bracket (p.145) 7 ISO sensitivity (p.115) ...112) 13 Date and time (p.163) 14 Focusing area (p.121) 15 Saturation (p.111) 16 Sharpness (p.111) 17 Contrast (p.111) 18 Lens focal length Press the four-way controller (5) to view explanation of Set Mode Dial Detailed Info Auto Picture Program Decides subjct condition automatically to display...

User Manual
Page 20
... screen displays every time you press M button during playback. 1 You can change the information initially displayed by pressing the Q button. (p.160) Before Using Your Camera Detailed Information 100-0001 AF 1 / 2000 F2 . 8 + 1 . 5EV ISO 800 sRGB 40mm 06 / 25 / 2005 12 : 30 2 1 5 7 8 9 11 12 13 14 15 17 18 20 ... (p.111) 17 ISO sensitivity (p.115) 18 Image tone (p.108) 19 Contrast (p.111) 20 Quality level (p.110) 21 Recorded pixels (p.109) 22 Color space (p.117) 23 Lens focal length 24 White balance (p.112) 25 Captured date and time (p.163)
... screen displays every time you press M button during playback. 1 You can change the information initially displayed by pressing the Q button. (p.160) Before Using Your Camera Detailed Information 100-0001 AF 1 / 2000 F2 . 8 + 1 . 5EV ISO 800 sRGB 40mm 06 / 25 / 2005 12 : 30 2 1 5 7 8 9 11 12 13 14 15 17 18 20 ... (p.111) 17 ISO sensitivity (p.115) 18 Image tone (p.108) 19 Contrast (p.111) 20 Quality level (p.110) 21 Recorded pixels (p.109) 22 Color space (p.117) 23 Lens focal length 24 White balance (p.112) 25 Captured date and time (p.163)

User Manual
Page 24
22 LCD Panel Indications The following information appears in the LCD panel on top of the camera. 1 Before Using Your Camera 1 72 8 3 9 4 5 610 11 1 Shutter speed (p.134) 5 Focusing area (p.121) 2 Aperture (p.136) No indicator : Wide 3 Flash mode (p.49) M ...: Spot b : Built-in flash is ready 6 AE metering (p.130) (when blinking, flash should be used or incompatible lens is being used) No indicator: Multi-segment ...
22 LCD Panel Indications The following information appears in the LCD panel on top of the camera. 1 Before Using Your Camera 1 72 8 3 9 4 5 610 11 1 Shutter speed (p.134) 5 Focusing area (p.121) 2 Aperture (p.136) No indicator : Wide 3 Flash mode (p.49) M ...: Spot b : Built-in flash is ready 6 AE metering (p.130) (when blinking, flash should be used or incompatible lens is being used) No indicator: Multi-segment ...
User Manual
Page 25
Attaching the Strap 24 Inserting the Batteries 25 Inserting/Removing the SD Memory Card .........29 Turning the Camera On and Off 32 Initial Settings 33 Attaching the Lens 37 Adjusting the Viewfinder Diopter 39 2 Getting Started This chapter explains your first steps from purchasing the camera to read it and follow the instructions. Be sure to taking pictures.
Attaching the Strap 24 Inserting the Batteries 25 Inserting/Removing the SD Memory Card .........29 Turning the Camera On and Off 32 Initial Settings 33 Attaching the Lens 37 Adjusting the Viewfinder Diopter 39 2 Getting Started This chapter explains your first steps from purchasing the camera to read it and follow the instructions. Be sure to taking pictures.
User Manual
Page 27
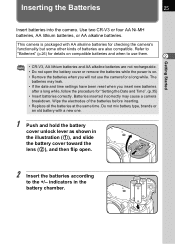
...while, follow the procedure for a long while. Do not mix battery type, brands or an old battery with AA alkaline batteries for checking the camera's functionality but some other kinds of the batteries before inserting. • Replace all the batteries at the same time. indicators in the illustration (... 1 ), and slide the battery cover toward the 1 lens ( 2 ), and then flip open the battery cover or remove the batteries while the power is packaged with a new one. 1 Push and hold...
...while, follow the procedure for a long while. Do not mix battery type, brands or an old battery with AA alkaline batteries for checking the camera's functionality but some other kinds of the batteries before inserting. • Replace all the batteries at the same time. indicators in the illustration (... 1 ), and slide the battery cover toward the 1 lens ( 2 ), and then flip open the battery cover or remove the batteries while the power is packaged with a new one. 1 Push and hold...
User Manual
Page 39
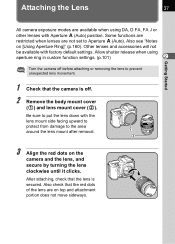
... other lenses with Aperture s (Auto) position. Also check that the lens is off before attaching or removing the lens to the area around the lens mount after removal. 1 2 3 Align the red dots on the camera and the lens, and secure by turning the lens clockwise until it clicks. Be sure to put the... lens down with factory default settings. Also see "Notes...
... other lenses with Aperture s (Auto) position. Also check that the lens is off before attaching or removing the lens to the area around the lens mount after removal. 1 2 3 Align the red dots on the camera and the lens, and secure by turning the lens clockwise until it clicks. Be sure to put the... lens down with factory default settings. Also see "Notes...
User Manual
Page 40
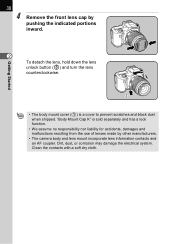
Getting Started 2 To detach the lens, hold down the lens unlock button ( 3 ) and turn the lens counterclockwise. 3 • The body mount cover ( 1 ) is sold separately and has a lock function. • We assume no responsibility nor liability for accidents, damages ... inward. "Body Mount Cap K" is a cover to prevent scratches and block dust when shipped. 38 4 Remove the front lens cap by other manufacturers. • The camera body and lens mount incorporate lens information contacts and an AF coupler. Clean the contacts with a soft dry cloth. Dirt, dust, or corrosion may damage the...
Getting Started 2 To detach the lens, hold down the lens unlock button ( 3 ) and turn the lens counterclockwise. 3 • The body mount cover ( 1 ) is sold separately and has a lock function. • We assume no responsibility nor liability for accidents, damages ... inward. "Body Mount Cap K" is a cover to prevent scratches and block dust when shipped. 38 4 Remove the front lens cap by other manufacturers. • The camera body and lens mount incorporate lens information contacts and an AF coupler. Clean the contacts with a soft dry cloth. Dirt, dust, or corrosion may damage the...
User Manual
Page 43
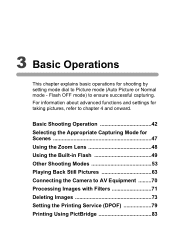
... Using PictBridge 83 For information about advanced functions and settings for Scenes 47 Using the Zoom Lens 48 Using the Built-in Flash 49 Other Shooting Modes 53 Playing Back Still Pictures 63 Connecting the Camera to chapter 4 and onward. Flash OFF mode) to Picture mode (Auto Picture or Normal mode - 3 Basic...
... Using PictBridge 83 For information about advanced functions and settings for Scenes 47 Using the Zoom Lens 48 Using the Built-in Flash 49 Other Shooting Modes 53 Playing Back Still Pictures 63 Connecting the Camera to chapter 4 and onward. Flash OFF mode) to Picture mode (Auto Picture or Normal mode - 3 Basic...
User Manual
Page 44
... used for shutter speeds slower than this. • When using a telephoto lens, a tripod that is heavier than the total weight of the camera and lens is 1/75 of a second for a focal length of 50 mm and 1/150 of a second for a handheld camera is generally 1/(focal length ×1.5). For example, it is recommended to avoid...
... used for shutter speeds slower than this. • When using a telephoto lens, a tripod that is heavier than the total weight of the camera and lens is 1/75 of a second for a focal length of 50 mm and 1/150 of a second for a handheld camera is generally 1/(focal length ×1.5). For example, it is recommended to avoid...

User Manual
Page 46
... operates. The picture is not set to [Auto].) 1OPERATING THE SHUTTER RELEASE BUTTON (p.45) 1Hard-to determine the size of the subject. 1Using the Zoom Lens (p.48) Basic Operations 4 3 Position the subject inside the autofocus frame and press the shutter release button halfway. Determine the size of the subject.
... operates. The picture is not set to [Auto].) 1OPERATING THE SHUTTER RELEASE BUTTON (p.45) 1Hard-to determine the size of the subject. 1Using the Zoom Lens (p.48) Basic Operations 4 3 Position the subject inside the autofocus frame and press the shutter release button halfway. Determine the size of the subject.

User Manual
Page 50
... number, the more magnified the image appears. • Power Zoom functions (Image Size Tracking, Zoom Clip, and Auto Zoom Effect) are not compatible with a zoom lens. Wide Angle Telephoto Basic Operations • The smaller the number of the displayed focal length, the wider the angle. 48 Using the Zoom...
... number, the more magnified the image appears. • Power Zoom functions (Image Size Tracking, Zoom Clip, and Auto Zoom Effect) are not compatible with a zoom lens. Wide Angle Telephoto Basic Operations • The smaller the number of the displayed focal length, the wider the angle. 48 Using the Zoom...

