User Manual
Page 3
...Viewing directly with the telephoto lens may damage your nearest PENTAX service center. There is the risk of electric shock. • To avoid the risk of it being swallowed by mistake, keep the SD Memory Card out of the reach of children. Seek medical assistance immediately...close attention to the safety of electric shock. • If the camera interior is exposed due to dropping or otherwise damaging the camera, never touch the exposed portion. Seek medical attention immediately if a memory card is accidentally swallowed. • Wrapping the strap around your special ...
...Viewing directly with the telephoto lens may damage your nearest PENTAX service center. There is the risk of electric shock. • To avoid the risk of it being swallowed by mistake, keep the SD Memory Card out of the reach of children. Seek medical assistance immediately...close attention to the safety of electric shock. • If the camera interior is exposed due to dropping or otherwise damaging the camera, never touch the exposed portion. Seek medical attention immediately if a memory card is accidentally swallowed. • Wrapping the strap around your special ...
User Manual
Page 4
... not been used in fire. Do not disassemble the batteries. Of the batteries that it is not possible due to a malfunction of your camera or recording media (SD Memory Card), etc. • Do not clean the product with organic solvents such as thinner or alcohol benzene. • Do not subject to taking important...
... not been used in fire. Do not disassemble the batteries. Of the batteries that it is not possible due to a malfunction of your camera or recording media (SD Memory Card), etc. • Do not clean the product with organic solvents such as thinner or alcohol benzene. • Do not subject to taking important...
User Manual
Page 5
... to normal as it may damage the lens. • Please do not press forcefully on the inside and outside of the camera and surroundings are equalized. • Avoid contact with preservatives and chemicals. Storage in your bag or a plastic bag, removing the... high temperatures and high humidity can cause molding. Wipe dry any rain or water drops on the camera. • Refer to "Precautions When Using the SD Memory Card" (p.30) regarding the SD Memory Card. • Use a lens brush to strong vibrations, shocks, or pressure. This could cause breakage or malfunction. 3 • ...
... to normal as it may damage the lens. • Please do not press forcefully on the inside and outside of the camera and surroundings are equalized. • Avoid contact with preservatives and chemicals. Storage in your bag or a plastic bag, removing the... high temperatures and high humidity can cause molding. Wipe dry any rain or water drops on the camera. • Refer to "Precautions When Using the SD Memory Card" (p.30) regarding the SD Memory Card. • Use a lens brush to strong vibrations, shocks, or pressure. This could cause breakage or malfunction. 3 • ...
User Manual
Page 6
... Approximate Image Storage Capacity and Playback Time (new batteries 27 Using the AC Adapter (Optional 28 Inserting/Removing the SD Memory Card 29 Recorded Pixels and Quality Level 31 Turning the Camera On and Off 32 Initial Settings 33 Setting the Display Language 33 Setting the Date and Time 35 Attaching the Lens...
... Approximate Image Storage Capacity and Playback Time (new batteries 27 Using the AC Adapter (Optional 28 Inserting/Removing the SD Memory Card 29 Recorded Pixels and Quality Level 31 Turning the Camera On and Off 32 Initial Settings 33 Setting the Display Language 33 Setting the Date and Time 35 Attaching the Lens...
User Manual
Page 9
... (Optional 153 Settings During Playback 160 Changing Playback Display Method 160 Displaying Bright Portion Warning 160 Setting the Slideshow Display Interval 161 Camera Settings 162 Formatting the SD Memory Card 162 Turning the Beep On and Off 163 Changing the Date and Time and the Display Style 163 Setting the World Time 164...
... (Optional 153 Settings During Playback 160 Changing Playback Display Method 160 Displaying Bright Portion Warning 160 Setting the Slideshow Display Interval 161 Camera Settings 162 Formatting the SD Memory Card 162 Turning the Beep On and Off 163 Changing the Date and Time and the Display Style 163 Setting the World Time 164...
User Manual
Page 25
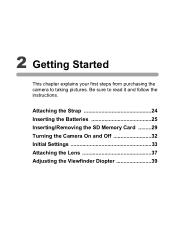
Be sure to taking pictures. 2 Getting Started This chapter explains your first steps from purchasing the camera to read it and follow the instructions. Attaching the Strap 24 Inserting the Batteries 25 Inserting/Removing the SD Memory Card .........29 Turning the Camera On and Off 32 Initial Settings 33 Attaching the Lens 37 Adjusting the Viewfinder Diopter 39
Be sure to taking pictures. 2 Getting Started This chapter explains your first steps from purchasing the camera to read it and follow the instructions. Attaching the Strap 24 Inserting the Batteries 25 Inserting/Removing the SD Memory Card .........29 Turning the Camera On and Off 32 Initial Settings 33 Attaching the Lens 37 Adjusting the Viewfinder Diopter 39

User Manual
Page 30
...connecting or disconnecting the AC adapter. • Make sure connections are secure between the camera, AC adapter, AC plug cord terminal and the power outlet. SD Memory Card and data will be corrupted if disconnected while camera is turned off before opening the terminal cover. 2 Connect the DC terminal on ...the AC adapter to the DC input terminal on the camera. 3 Connect the AC plug cord to the ...
...connecting or disconnecting the AC adapter. • Make sure connections are secure between the camera, AC adapter, AC plug cord terminal and the power outlet. SD Memory Card and data will be corrupted if disconnected while camera is turned off before opening the terminal cover. 2 Connect the DC terminal on ...the AC adapter to the DC input terminal on the camera. 3 Connect the AC plug cord to the ...

User Manual
Page 31
... way with other cameras. Push the SD Memory Card in once to "Formatting the SD Memory Card" (p.162) for details on the SD Memory Card. Getting Started Inserting/Removing the SD Memory 29 Card Captured images are recorded on formatting. 2 1 Press the card cover unlock lever in the indicated direction. Also format SD Memory Card used with the SD Memory Card label toward the...
... way with other cameras. Push the SD Memory Card in once to "Formatting the SD Memory Card" (p.162) for details on the SD Memory Card. Getting Started Inserting/Removing the SD Memory 29 Card Captured images are recorded on formatting. 2 1 Press the card cover unlock lever in the indicated direction. Also format SD Memory Card used with the SD Memory Card label toward the...
User Manual
Page 32
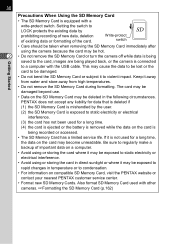
...information on compatible SD Memory Card, visit the PENTAX website or contact your nearest PENTAX customer service center. • Format new SD Memory Cards. 30 Getting Started Precautions When Using the SD Memory Card • The SD Memory Card is exposed to static electricity or electrical interference. (3) the card has not been ...remove the SD Memory Card during formatting. The card may be damaged beyond use. • Data on the SD Memory Card may cause the data to be lost or the card to be hot. 2 • Do not remove the SD Memory Card or turn the camera off while data...
...information on compatible SD Memory Card, visit the PENTAX website or contact your nearest PENTAX customer service center. • Format new SD Memory Cards. 30 Getting Started Precautions When Using the SD Memory Card • The SD Memory Card is exposed to static electricity or electrical interference. (3) the card has not been ...remove the SD Memory Card during formatting. The card may be damaged beyond use. • Data on the SD Memory Card may cause the data to be lost or the card to be hot. 2 • Do not remove the SD Memory Card or turn the camera off while data...
User Manual
Page 33
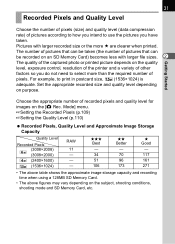
The number of pictures that can be taken (the number of pictures that can be recorded on an SD Memory Card) becomes less with larger recorded size or the more than the required number of the captured photo or printed picture depends on purpose. Mode] menu. ... D Better - 70 96 173 E Good - 117 161 271 • The above table shows the approximate image storage capacity and recording time when using a 128MB SD Memory Card. • The above figures may vary depending on the [A Rec. 31 Recorded Pixels and Quality Level Choose the number of pixels (size) and quality level...
The number of pictures that can be taken (the number of pictures that can be recorded on an SD Memory Card) becomes less with larger recorded size or the more than the required number of the captured photo or printed picture depends on purpose. Mode] menu. ... D Better - 70 96 173 E Good - 117 161 271 • The above table shows the approximate image storage capacity and recording time when using a 128MB SD Memory Card. • The above figures may vary depending on the [A Rec. 31 Recorded Pixels and Quality Level Choose the number of pixels (size) and quality level...
User Manual
Page 70
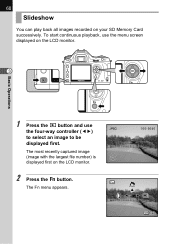
68 Slideshow You can play back all images recorded on the LCD monitor. 3 Basic Operations 1 Press the Q button and use the four-way controller (45) to select an image to be displayed first. To start continuous playback, use the menu screen displayed on your SD Memory Card successively. Fn The Fn menu appears. 100-0046 OK Exit The most recently captured image (image with the largest file number) is displayed first on the LCD monitor. 2 Press the { button.
68 Slideshow You can play back all images recorded on the LCD monitor. 3 Basic Operations 1 Press the Q button and use the four-way controller (45) to select an image to be displayed first. To start continuous playback, use the menu screen displayed on your SD Memory Card successively. Fn The Fn menu appears. 100-0046 OK Exit The most recently captured image (image with the largest file number) is displayed first on the LCD monitor. 2 Press the { button.
User Manual
Page 76
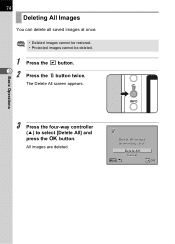
Basic Operations 3 Press the four-way controller (2) to select [Delete All] and press the 4 button. All images are deleted. 74 Deleting All Images You can delete all images on memory card? Delete All Cancel OK OK The Delete All screen appears. Delete all saved images at once. • Deleted images cannot be restored. • Protected images cannot be deleted. 1 32 Press the Q button. Press the i button twice.
Basic Operations 3 Press the four-way controller (2) to select [Delete All] and press the 4 button. All images are deleted. 74 Deleting All Images You can delete all images on memory card? Delete All Cancel OK OK The Delete All screen appears. Delete all saved images at once. • Deleted images cannot be restored. • Protected images cannot be deleted. 1 32 Press the Q button. Press the i button twice.
User Manual
Page 79
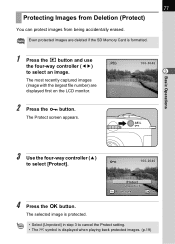
... Protect Unprotect All images OK OK 4 Press the 4 button. The most recently captured images (image with the largest file number) are deleted if the SD Memory Card is displayed when playing back protected images. (p.19) 77 Protecting Images from Deletion (Protect) You can protect images from being accidentally erased.
... Protect Unprotect All images OK OK 4 Press the 4 button. The most recently captured images (image with the largest file number) are deleted if the SD Memory Card is displayed when playing back protected images. (p.19) 77 Protecting Images from Deletion (Protect) You can protect images from being accidentally erased.
User Manual
Page 80
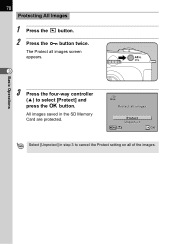
Protect all images Protect Unprotect OK OK Select [Unprotect] in the SD Memory Card are protected. All images saved in step 3 to cancel the Protect setting on all images screen appears. 3 Basic Operations 3 Press the four-way controller (2) to select [Protect] and press the 4 button. 78 Protecting All Images 1 Press the Q button. 2 Press the Z button twice. The Protect all of the images.
Protect all images Protect Unprotect OK OK Select [Unprotect] in the SD Memory Card are protected. All images saved in step 3 to cancel the Protect setting on all images screen appears. 3 Basic Operations 3 Press the four-way controller (2) to select [Protect] and press the 4 button. 78 Protecting All Images 1 Press the Q button. 2 Press the Z button twice. The Protect all of the images.
User Manual
Page 81
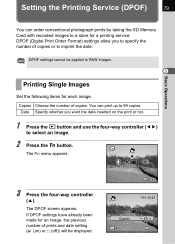
... the number of copies or to select an image. 2 Press the { button. OK Exit 100-0046 Copies Date Fn All images 00 OK OK DPOF (Digital Print Order Format) settings allow you want the date inserted on ) or P (off)) will be applied to RAW images. 3 Printing Single Images Set the ... not. 1 Press the Q button and use the four-way controller (45) to imprint the date. You can order conventional photograph prints by taking the SD Memory Card with recorded images to 99 copies. If DPOF settings have already been made for an image, the previous number of copies. Basic Operations Setting the...
... the number of copies or to select an image. 2 Press the { button. OK Exit 100-0046 Copies Date Fn All images 00 OK OK DPOF (Digital Print Order Format) settings allow you want the date inserted on ) or P (off)) will be applied to RAW images. 3 Printing Single Images Set the ... not. 1 Press the Q button and use the four-way controller (45) to imprint the date. You can order conventional photograph prints by taking the SD Memory Card with recorded images to 99 copies. If DPOF settings have already been made for an image, the previous number of copies. Basic Operations Setting the...
User Manual
Page 101
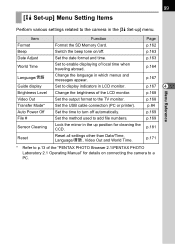
Item Function Page Format Format the SD Memory Card. p.164 Language/ Change the language in the up position for details on /off automatically. p.167 Guide display Set to enable displaying of local time when ... Browser 2.1/PENTAX PHOTO Laboratory 2.1 Operating Manual" for cleaning the CCD. p.163 Date Adjust Set the date format and time. p.162 Beep Switch the beep tone on connecting the camera to the camera in LCD monitor. 99 [H Set-up] Menu Setting Items Menu Reference Perform various settings related to a PC. p.169 Sensor Cleaning Lock...
Item Function Page Format Format the SD Memory Card. p.164 Language/ Change the language in the up position for details on /off automatically. p.167 Guide display Set to enable displaying of local time when ... Browser 2.1/PENTAX PHOTO Laboratory 2.1 Operating Manual" for cleaning the CCD. p.163 Date Adjust Set the date format and time. p.162 Beep Switch the beep tone on connecting the camera to the camera in LCD monitor. 99 [H Set-up] Menu Setting Items Menu Reference Perform various settings related to a PC. p.169 Sensor Cleaning Lock...
User Manual
Page 163
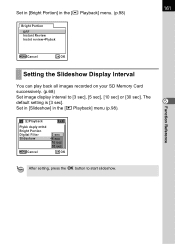
... OK Function Reference Setting the Slideshow Display Interval You can play back all images recorded on your SD Memory Card successively. (p.68) Set image display interval to start slideshow. Playback Plybk dsply mthd Bright Portion Digital Filter Slideshow Cancel 3 sec 5 sec 10 sec 30 sec OK OK After setting, press the 4 button to...
... OK Function Reference Setting the Slideshow Display Interval You can play back all images recorded on your SD Memory Card successively. (p.68) Set image display interval to start slideshow. Playback Plybk dsply mthd Bright Portion Digital Filter Slideshow Cancel 3 sec 5 sec 10 sec 30 sec OK OK After setting, press the 4 button to...

User Manual
Page 164
... (2) to format new SD Memory Card with the camera before using the card. Formatting starts. 162 Camera Settings Function Reference Formatting the SD Memory Card Be sure to select [Format]. Be aware. 1 52 Select [Format] on the SD Memory Card. • Do not open the card cover while formatting SD Memory Card. When formatting is completed, the camera is ready to take pictures...
... (2) to format new SD Memory Card with the camera before using the card. Formatting starts. 162 Camera Settings Function Reference Formatting the SD Memory Card Be sure to select [Format]. Be aware. 1 52 Select [Format] on the SD Memory Card. • Do not open the card cover while formatting SD Memory Card. When formatting is completed, the camera is ready to take pictures...
User Manual
Page 171
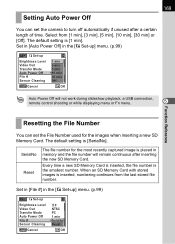
169 Setting Auto Power Off You can set the camera to turn off automatically if unused after inserting the new SD Memory Card. Set in [File #] in memory and the file number will not work during slideshow playback, a USB connection, remote control shooting or while displaying menu or Fn menu. 5 ... Power Off File # Sensor Cleaning Cancel 0 NTSC PC 1 min SerialNo Reset OK OK Select from the last stored file number. Every time a new SD Memory Card is inserted, the file number is [1 min]. The default setting is the smallest number. Set in [Auto Power Off] in the [H Set-up] menu...
169 Setting Auto Power Off You can set the camera to turn off automatically if unused after inserting the new SD Memory Card. Set in [File #] in memory and the file number will not work during slideshow playback, a USB connection, remote control shooting or while displaying menu or Fn menu. 5 ... Power Off File # Sensor Cleaning Cancel 0 NTSC PC 1 min SerialNo Reset OK OK Select from the last stored file number. Every time a new SD Memory Card is inserted, the file number is [1 min]. The default setting is the smallest number. Set in [Auto Power Off] in the [H Set-up] menu...
User Manual
Page 188
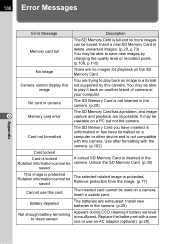
... sensor Appears during CCD cleaning if battery set with the camera. (p.162) Card locked Card is locked A locked SD Memory Card is inserted in the camera. (p.29) The SD Memory Card has a problem, and image 6 Memory card error capture and playback are trying to play back an image in camera The SD Memory Card is insufficient. It may be saved The selected rotated...
... sensor Appears during CCD cleaning if battery set with the camera. (p.162) Card locked Card is locked A locked SD Memory Card is inserted in the camera. (p.29) The SD Memory Card has a problem, and image 6 Memory card error capture and playback are trying to play back an image in camera The SD Memory Card is insufficient. It may be saved The selected rotated...

