Operation Manual
Page 2
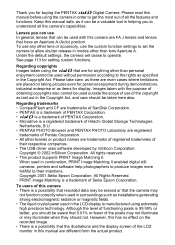
... the PENTAX w Digital Camera. Regarding copyrights Images taken using the camera in modes other lens or accessory, use In general, lenses that can be erased or that 0.01% or fewer of all the camera's capabilities. Please take care, as specified in helping you should be aware that the camera may not function correctly when used in the LCD display is a trademark of their intentions. To users of this manual safe...
... the PENTAX w Digital Camera. Regarding copyrights Images taken using the camera in modes other lens or accessory, use In general, lenses that can be erased or that 0.01% or fewer of all the camera's capabilities. Please take care, as specified in helping you should be aware that the camera may not function correctly when used in the LCD display is a trademark of their intentions. To users of this manual safe...

Operation Manual
Page 7
... Setting Menu List 112 How to Operate the Settings Menu 113 Camera Settings 114 Formatting a CF card 114 Setting the Custom Functions 115 Setting the Color Saturation 117 Setting the Image Sharpness 117 Setting the Contrast 118 Setting the Instant Review 118 Auto Power Off 119 Turning the Beep On and Off 119 Changing the Date Style and Date / Time 120 Setting the World Time 120 Setting the Display Language 122 Selecting the Video Output Format 123 Setting the LCD Monitor Brightness 123 Resetting the File Number...
... Setting Menu List 112 How to Operate the Settings Menu 113 Camera Settings 114 Formatting a CF card 114 Setting the Custom Functions 115 Setting the Color Saturation 117 Setting the Image Sharpness 117 Setting the Contrast 118 Setting the Instant Review 118 Auto Power Off 119 Turning the Beep On and Off 119 Changing the Date Style and Date / Time 120 Setting the World Time 120 Setting the Display Language 122 Selecting the Video Output Format 123 Setting the LCD Monitor Brightness 123 Resetting the File Number...

Operation Manual
Page 8
... and FA J Lenses Compatibility with the Built-in Flash 140 Setting the White Balance Manually 142 FUNCTIONS AVAILABLE WITH VARIOUS LENS COMBINATIONS 144 Optional Accessories 146 Battery grip D-BG1 146 AC adaptor D-AC10 146 Cable Switch 146 Flash Accessories 147 For Viewfinder 148 Camera Case 148 Others 148 Cleaning the CCD 149 Precautions Regarding Memory Cards 151 Error Messages 152 Troubleshooting 153 Main Specifications 154 Specification for Remote Control (Optional 157 Program...
... and FA J Lenses Compatibility with the Built-in Flash 140 Setting the White Balance Manually 142 FUNCTIONS AVAILABLE WITH VARIOUS LENS COMBINATIONS 144 Optional Accessories 146 Battery grip D-BG1 146 AC adaptor D-AC10 146 Cable Switch 146 Flash Accessories 147 For Viewfinder 148 Camera Case 148 Others 148 Cleaning the CCD 149 Precautions Regarding Memory Cards 151 Error Messages 152 Troubleshooting 153 Main Specifications 154 Specification for Remote Control (Optional 157 Program...

Operation Manual
Page 11
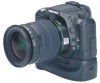
....5×15.7mm, the format size of the 35mm camera is attached to this camera. Also features a superimpose function, in which uses the same batteries as the camera, extends battery life and has a vertical shutter release button. As a result, the angle of view (the size and scale of the subject to be used to a conventional 35mm SLR camera, but with a variety of Pentax 35mm interchangeable lenses. As...
....5×15.7mm, the format size of the 35mm camera is attached to this camera. Also features a superimpose function, in which uses the same batteries as the camera, extends battery life and has a vertical shutter release button. As a result, the angle of view (the size and scale of the subject to be used to a conventional 35mm SLR camera, but with a variety of Pentax 35mm interchangeable lenses. As...

Operation Manual
Page 13
... of Working Parts Before using your camera Camera 1 Main switch Shutter release button Flash mode button Drive mode button Green button Mode dial Self-timer lamp X-synch terminal Mirror Manual white balance button Tv dial Focus mode AF coupler lever Lens mount index Lens unlock button Lens information contacts AE lock button / Protect button MENU button Delete button Strap lug Exposure compensation button AF button Four-way controller / OK button Focus point select dial Access lamp INFO button Battery cover Playback button Backup battery chamber cover Tripod socket Battery cover...
... of Working Parts Before using your camera Camera 1 Main switch Shutter release button Flash mode button Drive mode button Green button Mode dial Self-timer lamp X-synch terminal Mirror Manual white balance button Tv dial Focus mode AF coupler lever Lens mount index Lens unlock button Lens information contacts AE lock button / Protect button MENU button Delete button Strap lug Exposure compensation button AF button Four-way controller / OK button Focus point select dial Access lamp INFO button Battery cover Playback button Backup battery chamber cover Tripod socket Battery cover...

Operation Manual
Page 27
... will be set the language displayed on . Initial setting City DST Video Out English NYC NTSC OK : Ok 2 Use the four-way controller (45) to be displayed. are displayed from the following: English, French, German, Spanish, Italian and Japanese. 1 Turn the camera on the LCD monitor and the current date and time. The default setting is turned on after purchasing, the "Initial Setting" screen appears on . 2 Setting the Display Language You can change the setting after...
... will be set the language displayed on . Initial setting City DST Video Out English NYC NTSC OK : Ok 2 Use the four-way controller (45) to be displayed. are displayed from the following: English, French, German, Spanish, Italian and Japanese. 1 Turn the camera on the LCD monitor and the current date and time. The default setting is turned on after purchasing, the "Initial Setting" screen appears on . 2 Setting the Display Language You can change the setting after...

Operation Manual
Page 41
... Image" message is shown first when you switch to capture mode. Basic Operation (Playback) 41 Playing Back Images You can be displayed for easy viewing. (Only the display is rotated. Basic Operation • Pressing the four-way controller(3) will rotate the image 90°, 180° and 270°. The image captured in vertical position can play back the still pictures. 1 Press the playback button (Q) after taking a picture. 3 The most recently captured image...
... Image" message is shown first when you switch to capture mode. Basic Operation (Playback) 41 Playing Back Images You can be displayed for easy viewing. (Only the display is rotated. Basic Operation • Pressing the four-way controller(3) will rotate the image 90°, 180° and 270°. The image captured in vertical position can play back the still pictures. 1 Press the playback button (Q) after taking a picture. 3 The most recently captured image...

Operation Manual
Page 42
Deleting Images Press the Delete button (i) to display the Delete screen when the image is displayed on the LCD monitor. Basic Operation 2 Press the four-way controller (4 or 5). 4 Displays the previous image. 5 Displays the next image. Press the Playback button again or press the shutter release button halfway to return to select [Delete] and press OK. Press the four-way controller (2) to capture mode. Delete One All Delete 100-0120 Cancel OK : Ok The captured image is...
Deleting Images Press the Delete button (i) to display the Delete screen when the image is displayed on the LCD monitor. Basic Operation 2 Press the four-way controller (4 or 5). 4 Displays the previous image. 5 Displays the next image. Press the Playback button again or press the shutter release button halfway to return to select [Delete] and press OK. Press the four-way controller (2) to capture mode. Delete One All Delete 100-0120 Cancel OK : Ok The captured image is...

Operation Manual
Page 47
... seconds. The shutter will be released about 12 seconds after the shutter release button is in any capture mode other than a (metered manual exposure). Removing the Eyecup Attaching the viewfinder cap The focus indicator []] lights up when the subject is pressed fully. • The audible PCV signal can be affected if light enters the viewfinder during self-timer operation in focus. Shooting Functions 4 Press the shutter release 4 button completely.
... seconds. The shutter will be released about 12 seconds after the shutter release button is in any capture mode other than a (metered manual exposure). Removing the Eyecup Attaching the viewfinder cap The focus indicator []] lights up when the subject is pressed fully. • The audible PCV signal can be affected if light enters the viewfinder during self-timer operation in focus. Shooting Functions 4 Press the shutter release 4 button completely.

Operation Manual
Page 50
... remote control unit battery can use the AE lock function (see page 69). 50 • The operating distance of the camera. • Remote control shooting with the capture mode set to p (bulb) mode will involve a fee.) Shooting Functions See page 115 for attaching the viewfinder cap. • You can send a remote control signal about 30,000 times. See page 47 for setting Custom 4 Functions. • Press the drive button or turn the main switch...
... remote control unit battery can use the AE lock function (see page 69). 50 • The operating distance of the camera. • Remote control shooting with the capture mode set to p (bulb) mode will involve a fee.) Shooting Functions See page 115 for attaching the viewfinder cap. • You can send a remote control signal about 30,000 times. See page 47 for setting Custom 4 Functions. • Press the drive button or turn the main switch...

Operation Manual
Page 78
... is not all-powerful. d) Powerfully reflected light or strong backlight (subjects with the aid of these, set the focus mode switch to \ and use the manual focus mode to focus on the subject with extremely bright backgrounds). These also apply to manual focusing using the focus indicator []] in the viewfinder. 4 For any of the matte field in the viewfinder. Shooting Functions 78 Autofocus illuminator When the flash is up in...
... is not all-powerful. d) Powerfully reflected light or strong backlight (subjects with the aid of these, set the focus mode switch to \ and use the manual focus mode to focus on the subject with extremely bright backgrounds). These also apply to manual focusing using the focus indicator []] in the viewfinder. 4 For any of the matte field in the viewfinder. Shooting Functions 78 Autofocus illuminator When the flash is up in...

Operation Manual
Page 89
... the camera as far away from the aperture size, see p.139. The exposure will see vignetting in Bulb mode. Flash photography distance As a rule of thumb, the distance for using an external flash, it may also help to b (shutter priority) mode or a (manual exposure) mode. • b stops blinking when the flash is caused by shooting with a wider-angle lens at a closer distance. 89 About Red-eye Phenomenon Shooting portraits with a flash in...
... the camera as far away from the aperture size, see p.139. The exposure will see vignetting in Bulb mode. Flash photography distance As a rule of thumb, the distance for using an external flash, it may also help to b (shutter priority) mode or a (manual exposure) mode. • b stops blinking when the flash is caused by shooting with a wider-angle lens at a closer distance. 89 About Red-eye Phenomenon Shooting portraits with a flash in...

Operation Manual
Page 91
.... The flash can use the flash to change the depth of field or shoot any lens other than FA J, FA or F is possible to balance the exposure of the lens in use. • The shutter speed is fixed at any time before taking the picture in Hyper manual exposure mode. y Using M (Hyper manual exposure) Mode 1 Set the exposure mode to a(Hyper manual exposure) mode 2 Set the shutter speed (under 1/150 sec) and aperture value to obtain correct exposure. 3 Press the flash pop-up button to change the...
.... The flash can use the flash to change the depth of field or shoot any lens other than FA J, FA or F is possible to balance the exposure of the lens in use. • The shutter speed is fixed at any time before taking the picture in Hyper manual exposure mode. y Using M (Hyper manual exposure) Mode 1 Set the exposure mode to a(Hyper manual exposure) mode 2 Set the shutter speed (under 1/150 sec) and aperture value to obtain correct exposure. 3 Press the flash pop-up button to change the...

Operation Manual
Page 111
... Setting Menu List Press the Menu button to turn off. 1 min 119 Beep Sets beep settings. setting method. Serial # 124 Slideshow Plays recorded images successively. 3 sec 125 Sensor Cleaning Locks the mirror in the up position for displaying menus and messages English 122 on the LCD screen. NTSC 123 Brightness Level Sets brightness of your purpose. 1 115 Saturation Set the image saturation level. Use the settings menu to set the basic functions of LCD monitor. 0 123 File # Changes...
... Setting Menu List Press the Menu button to turn off. 1 min 119 Beep Sets beep settings. setting method. Serial # 124 Slideshow Plays recorded images successively. 3 sec 125 Sensor Cleaning Locks the mirror in the up position for displaying menus and messages English 122 on the LCD screen. NTSC 123 Brightness Level Sets brightness of your purpose. 1 115 Saturation Set the image saturation level. Use the settings menu to set the basic functions of LCD monitor. 0 123 File # Changes...

Operation Manual
Page 123
... set the File Number used for the images when inserting a new CF card. 1 Select [File #] on the Main menu. 2 Press the four-way controller (45) to switch between [Reset] and [Serial #]. 6 Main Menu Beep Date Adjust World Time Language/ Video Out Brightness Level File # English NTSC Serial # Reset: The File Number used for the most recently captured image is inserted, the consecutive No. The File Number will remain consecutive after inserting a new CF card. 3 Press the OK button...
... set the File Number used for the images when inserting a new CF card. 1 Select [File #] on the Main menu. 2 Press the four-way controller (45) to switch between [Reset] and [Serial #]. 6 Main Menu Beep Date Adjust World Time Language/ Video Out Brightness Level File # English NTSC Serial # Reset: The File Number used for the most recently captured image is inserted, the consecutive No. The File Number will remain consecutive after inserting a new CF card. 3 Press the OK button...
Operation Manual
Page 151
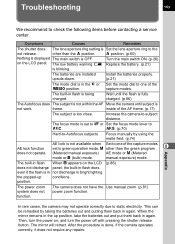
...) AE lock function AE lock is in not discharge in bright lighting the popped-up position, take the batteries out and put them back in the up position. Troubleshooting 153 We recommend to green operation mode, a other than the green program 8 does not operate. (Metered manual exposure) AE mode or a (Metered mode or p (bulb) mode. The low battery warning } Replace the battery. (p.21) is too close. The focus mode is Set the lens aperture ring...
...) AE lock function AE lock is in not discharge in bright lighting the popped-up position, take the batteries out and put them back in the up position. Troubleshooting 153 We recommend to green operation mode, a other than the green program 8 does not operate. (Metered manual exposure) AE mode or a (Metered mode or p (bulb) mode. The low battery warning } Replace the battery. (p.21) is too close. The focus mode is Set the lens aperture ring...

Operation Manual
Page 152
154 Main Specifications Type Effective Pixels Sensor Recorded Pixels Sensitivity File Format Quality Level Storage Medium Number of Shots 8 TTL autofocus, auto-exposure SLR digital-still camera with built-in retractable P-TTL flash 6.10 megapixels Total pixels 6.31 megapixels (3110 × 2030), interline / interlace scan CCD with a primary color filter L (3008 &#...Approx.6 Approx.10 Approx.26 64MB Approx.3 Approx.3 Approx.5 Approx.13 32MB Approx.1 Approx.1 Approx.2 Approx.6 Size / Quality level 3008 × 2008(L) 2400 × 1600(M) 1536 × 1024(S) Capacity Best Better ...
154 Main Specifications Type Effective Pixels Sensor Recorded Pixels Sensitivity File Format Quality Level Storage Medium Number of Shots 8 TTL autofocus, auto-exposure SLR digital-still camera with built-in retractable P-TTL flash 6.10 megapixels Total pixels 6.31 megapixels (3110 × 2030), interline / interlace scan CCD with a primary color filter L (3008 &#...Approx.6 Approx.10 Approx.26 64MB Approx.3 Approx.3 Approx.5 Approx.13 32MB Approx.1 Approx.1 Approx.2 Approx.6 Size / Quality level 3008 × 2008(L) 2400 × 1600(M) 1536 × 1024(S) Capacity Best Better ...

Operation Manual
Page 153
..., Number of view: 95%, Magnification 0.95 × (with 50mm f/1.4 lens at ISO 200 with f/1.4 lens), Focus lock available, Focus Mode: AF.S (single) / AF.C (predictive continuous) / MF (manual), focus points changeable. Penta-prism finder, Natural-Bright-Matte focusing screen, Field of multiple exposure shots, Bracket frames, and Exposure compensation. Electronically controlled and usable in OFF position. Focus Information: In-focus (Green lamp ] is lit), front or back focus Indication signals and unable-to-focus indicator (Green lamp ] blinks), Shutter speed indication, Aperture...
..., Number of view: 95%, Magnification 0.95 × (with 50mm f/1.4 lens at ISO 200 with f/1.4 lens), Focus lock available, Focus Mode: AF.S (single) / AF.C (predictive continuous) / MF (manual), focus points changeable. Penta-prism finder, Natural-Bright-Matte focusing screen, Field of multiple exposure shots, Bracket frames, and Exposure compensation. Electronically controlled and usable in OFF position. Focus Information: In-focus (Green lamp ] is lit), front or back focus Indication signals and unable-to-focus indicator (Green lamp ] blinks), Shutter speed indication, Aperture...

Operation Manual
Page 154
... flash, Red-eye reduction flash function, High-speed-sync, wireless-sync with shutter button halfway pressed GN 15.6 (ISO200/m), Angles of coverage: 18mm lens angle of 12 sec. The shutter is lit. World Time settings for Exposure setting step] Exposure Meter EV compensation AE lock Built-in used. with delay time of view (equivalent to set . is locked and no indication in 35mm format), Flash syncronization speed range at 1/150 sec. starts blinking. 156 Self-timer Electronically controlled with mirror lock...
... flash, Red-eye reduction flash function, High-speed-sync, wireless-sync with shutter button halfway pressed GN 15.6 (ISO200/m), Angles of coverage: 18mm lens angle of 12 sec. The shutter is lit. World Time settings for Exposure setting step] Exposure Meter EV compensation AE lock Built-in used. with delay time of view (equivalent to set . is locked and no indication in 35mm format), Flash syncronization speed range at 1/150 sec. starts blinking. 156 Self-timer Electronically controlled with mirror lock...

Operation Manual
Page 158
... RGB) International standard of copies to a DPOF photo printing store. 160 Glossary CCD (Charge Coupled Device) Photography element which converts the light entering through the lens into electric signals. Images recorded in JPEG format are suited for viewing on peripheral devices for writing information onto a card with different settings, such as digital cameras, printers, and monitors, differences in JPEG format when the quality level is mainly used in European...
... RGB) International standard of copies to a DPOF photo printing store. 160 Glossary CCD (Charge Coupled Device) Photography element which converts the light entering through the lens into electric signals. Images recorded in JPEG format are suited for viewing on peripheral devices for writing information onto a card with different settings, such as digital cameras, printers, and monitors, differences in JPEG format when the quality level is mainly used in European...

