Operation Manual
Page 8
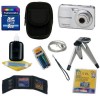
...Pet Mode 54 Taking Pictures of Dark Scenes (Night Scene Mode 55 Reducing Camera Shake and Blurring When Taking Pictures (Digital SR Mode 56 Framing Your Pictures (Frame Composite Mode 57 Taking Panoramic Pictures (Digital Panorama Mode 59 Taking Pictures with Customized Settings 62 Selecting the Recorded Pixels 62... 81 Selecting the Settings for Taking Movies 83 Playing Back and Deleting Images 85 Playing Back Images on the Camera 85 Playing Back Still Pictures 85 Reviewing Shooting Information 85 Nine-Image Display, Folder Display and Calendar Display 86 Zoom Playback 88 ...
...Pet Mode 54 Taking Pictures of Dark Scenes (Night Scene Mode 55 Reducing Camera Shake and Blurring When Taking Pictures (Digital SR Mode 56 Framing Your Pictures (Frame Composite Mode 57 Taking Panoramic Pictures (Digital Panorama Mode 59 Taking Pictures with Customized Settings 62 Selecting the Recorded Pixels 62... 81 Selecting the Settings for Taking Movies 83 Playing Back and Deleting Images 85 Playing Back Images on the Camera 85 Playing Back Still Pictures 85 Reviewing Shooting Information 85 Nine-Image Display, Folder Display and Calendar Display 86 Zoom Playback 88 ...
Operation Manual
Page 9
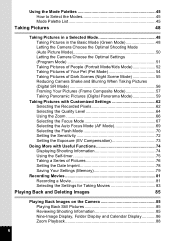
...Changing the Image Size and Quality (Resize 100 Cropping Images 102 Copying Images and Sound Files 103 Using the Digital Filter 105 Using the Brightness Filter 106 Adding a Frame (Frame Composite 107 Red-eye Compensation 109 Setting the Printing Service (DPOF 110 Printing Single Images 110 Printing All ... from the Printer 117 Recording and Playing Back Sound 118 Recording Sound (Voice Recording Mode 118 Playing Back Sound 120 Settings 121 Camera Settings 121 Formatting an SD Memory Card or the Built-in Memory 121 Changing the Sound Settings 122 Changing the Date and Time...
...Changing the Image Size and Quality (Resize 100 Cropping Images 102 Copying Images and Sound Files 103 Using the Digital Filter 105 Using the Brightness Filter 106 Adding a Frame (Frame Composite 107 Red-eye Compensation 109 Setting the Printing Service (DPOF 110 Printing Single Images 110 Printing All ... from the Printer 117 Recording and Playing Back Sound 118 Recording Sound (Voice Recording Mode 118 Playing Back Sound 120 Settings 121 Camera Settings 121 Formatting an SD Memory Card or the Built-in Memory 121 Changing the Sound Settings 122 Changing the Date and Time...

Operation Manual
Page 13
... Easily print out images without Using a Computer! Easy Printing without using the USB/AV cable, you display recorded images by date in Calendar Format! The Optio E50 lets you can enjoy printing out images directly from the camera with a frame. Have Fun with Adding a Frame to a printer that supports PictBridge using a computer. By connecting the...
... Easily print out images without Using a Computer! Easy Printing without using the USB/AV cable, you display recorded images by date in Calendar Format! The Optio E50 lets you can enjoy printing out images directly from the camera with a frame. Have Fun with Adding a Frame to a printer that supports PictBridge using a computer. By connecting the...

Operation Manual
Page 16
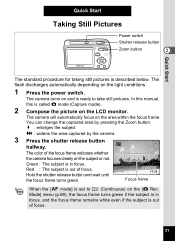
p.77) 4 Focus mode (p.67) 5 Camera shake icon (p.74) (appears only when the shutter release button is pressed halfway) 6 Digital zoom icon (p.66) 7 Memory status (p.26) + :Built-in memory (without card) a :SD Memory Card r :Card is pressed halfway) 14 6 3 Recorded pixels (p.62) 4 ...halfway) 2 Aperture (appears only when the shutter release button is write-protected 8 Remaining image storage capacity 9 Battery level indicator (p.19) 10 Focus frame (p.31) 11 EV compensation (p.73) 12 Date and time (p.29) Full Display in Still Picture Capture Mode The display shows information such as ...
p.77) 4 Focus mode (p.67) 5 Camera shake icon (p.74) (appears only when the shutter release button is pressed halfway) 6 Digital zoom icon (p.66) 7 Memory status (p.26) + :Built-in memory (without card) a :SD Memory Card r :Card is pressed halfway) 14 6 3 Recorded pixels (p.62) 4 ...halfway) 2 Aperture (appears only when the shutter release button is write-protected 8 Remaining image storage capacity 9 Battery level indicator (p.19) 10 Focus frame (p.31) 11 EV compensation (p.73) 12 Date and time (p.29) Full Display in Still Picture Capture Mode The display shows information such as ...

Operation Manual
Page 27
... 25 Mode] menu. Selecting the Recorded Pixels 1p.62 Selecting the Quality Level 1p.64 Storage capacity varies depending on the recorded pixels and the frame rate you select. For details, see the table on the page indicated below . For [Recorded Pixels], [8M], [5M], [4M], [3M], [2M...selection in [Movie] on the [A Rec. Approximate Image Storage Capacity and Recording Time (Still Picture) 1p.145 Movie Storage Capacity Select [Recorded Pixels] and [Frame Rate] for movies according to how the images will be used . For [Quality Level], you can select from [C (Best)], [D (Better)] and [E...
... 25 Mode] menu. Selecting the Recorded Pixels 1p.62 Selecting the Quality Level 1p.64 Storage capacity varies depending on the recorded pixels and the frame rate you select. For details, see the table on the page indicated below . For [Recorded Pixels], [8M], [5M], [4M], [3M], [2M...selection in [Movie] on the [A Rec. Approximate Image Storage Capacity and Recording Time (Still Picture) 1p.145 Movie Storage Capacity Select [Recorded Pixels] and [Frame Rate] for movies according to how the images will be used . For [Quality Level], you can select from [C (Best)], [D (Better)] and [E...
Operation Manual
Page 31
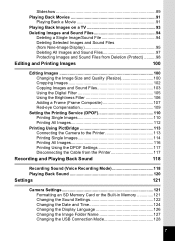
Date Adjust The frame moves to capture status. MENU Cancel OK OK If you selected [12h] in the same manner. The camera returns to [Date]. Date 01/01/2008 Time 0:00 Getting ... button. If you press the 3 button in the [Date Adjust] screen, you turn on the camera. 29 MENU Cancel OK OK The frame returns to select [24h] (24-hour display) or Date 01/01/2008 [12h] (12-hour ...screen will appear next time you can cancel your setting and start taking pictures right away. Date Adjust 1 The frame moves to [mm/dd/yy]. 2 Use the four-way controller (23) Date Style mm/dd/yy 24h...
Date Adjust The frame moves to capture status. MENU Cancel OK OK If you selected [12h] in the same manner. The camera returns to [Date]. Date 01/01/2008 Time 0:00 Getting ... button. If you press the 3 button in the [Date Adjust] screen, you turn on the camera. 29 MENU Cancel OK OK The frame returns to select [24h] (24-hour display) or Date 01/01/2008 [12h] (12-hour ...screen will appear next time you can cancel your setting and start taking pictures right away. Date Adjust 1 The frame moves to [mm/dd/yy]. 2 Use the four-way controller (23) Date Style mm/dd/yy 24h...
Operation Manual
Page 33
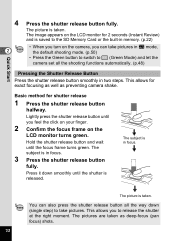
Green : The subject is in focus, and the focus frame remains white even if the subject is out of the focus frame indicates whether the camera focuses clearly on the subject or not. The camera will automatically focus on the light conditions. 1 Press the power switch. The flash discharges ...automatically depending on the area within the focus frame. The color of focus. 31 You can change the captured area by the camera 3 Press the shutter release button 38 halfway. Mode] menu (p.69), the focus frame turns green if the subject is set to take still ...
Green : The subject is in focus, and the focus frame remains white even if the subject is out of the focus frame indicates whether the camera focuses clearly on the subject or not. The camera will automatically focus on the light conditions. 1 Press the power switch. The flash discharges ...automatically depending on the area within the focus frame. The color of focus. 31 You can change the captured area by the camera 3 Press the shutter release button 38 halfway. Mode] menu (p.69), the focus frame turns green if the subject is set to take still ...
Operation Manual
Page 34
... The picture is in focus. Lightly press the shutter release button until you feel the click on your finger. 2 Confirm the focus frame on the camera, you can also press the shutter release button all the shooting functions automatically. (p.48) Pressing the Shutter Release Button Press the shutter ...the SD Memory Card or the built-in memory. (p.22) • When you to (Green Mode) and let the camera set all the way down smoothly until the focus frame turns green. This allows you turn on the LCD monitor turns green. Quick Start 4 2 Press the shutter release button...
... The picture is in focus. Lightly press the shutter release button until you feel the click on your finger. 2 Confirm the focus frame on the camera, you can also press the shutter release button all the shooting functions automatically. (p.48) Pressing the Shutter Release Button Press the shutter ...the SD Memory Card or the built-in memory. (p.22) • When you to (Green Mode) and let the camera set all the way down smoothly until the focus frame turns green. This allows you turn on the LCD monitor turns green. Quick Start 4 2 Press the shutter release button...

Operation Manual
Page 36
... the rotation direction and press the 4 button. Protected images can rotate the displayed image. The rotated image appears. Panoramic pictures, images taken with the 16-frame shooting function, and movies cannot be saved in the rotated state. 34 MENU Cancel OK OK The rotation selection screen (0°, Right 90°, Left...
... the rotation direction and press the 4 button. Protected images can rotate the displayed image. The rotated image appears. Panoramic pictures, images taken with the 16-frame shooting function, and movies cannot be saved in the rotated state. 34 MENU Cancel OK OK The rotation selection screen (0°, Right 90°, Left...

Operation Manual
Page 41
...movie or sound file during playback. (p.91, p.120) : Displays the previous or next image and sound file during single-image display. (p.33) Frame forwards, frame reverses and reverses a movie during playback. (p.91) Fast forwards, reverses, and moves to the next index in sound file playback. (p.120) (... nine-image display, a folder in folder 3 display, and a date in calendar display. (p.86, p.87) Moves the image when using the Frame Composite function. (p.107) 6 4/W button Changes the information displayed on the LCD monitor. (p.85) Returns zoom display or nine-image display to single...
...movie or sound file during playback. (p.91, p.120) : Displays the previous or next image and sound file during single-image display. (p.33) Frame forwards, frame reverses and reverses a movie during playback. (p.91) Fast forwards, reverses, and moves to the next index in sound file playback. (p.120) (... nine-image display, a folder in folder 3 display, and a date in calendar display. (p.86, p.87) Moves the image when using the Frame Composite function. (p.107) 6 4/W button Changes the information displayed on the LCD monitor. (p.85) Returns zoom display or nine-image display to single...

Operation Manual
Page 43
...Pixels 8M The [A Rec. Quality Level AF Mode 2 Press the four-way controller (3). Mode 1/2 The frame moves to change the setting. Movie MENU Exit 3 Press the four-way controller (3). Mode 1/2 mode. Sensitivity Auto EV Compensation ...±0 The frame moves to the following page for instructions on the [A Rec. Recorded Pixels 8M 3 Quality Level AF Mode...-down menu appears with the current EV Compensation Movie camera settings. Refer to [Recorded Pixels].
...Pixels 8M The [A Rec. Quality Level AF Mode 2 Press the four-way controller (3). Mode 1/2 The frame moves to change the setting. Movie MENU Exit 3 Press the four-way controller (3). Mode 1/2 mode. Sensitivity Auto EV Compensation ...±0 The frame moves to the following page for instructions on the [A Rec. Recorded Pixels 8M 3 Quality Level AF Mode...-down menu appears with the current EV Compensation Movie camera settings. Refer to [Recorded Pixels].
Operation Manual
Page 45
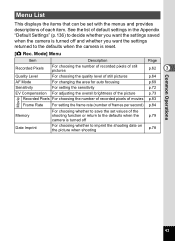
...the overall brightness of the picture p.73 Movie Recorded Pixels For choosing the number of recorded pixels of movies p.83 Frame Rate For setting the frame rate (number of frames per second) p.84 Memory For choosing whether to save the set with the menus and provides descriptions of default ...settings in the Appendix "Default Settings" (p.136) to decide whether you want the settings saved when the camera is turned off and ...
...the overall brightness of the picture p.73 Movie Recorded Pixels For choosing the number of recorded pixels of movies p.83 Frame Rate For setting the frame rate (number of frames per second) p.84 Memory For choosing whether to save the set with the menus and provides descriptions of default ...settings in the Appendix "Default Settings" (p.136) to decide whether you want the settings saved when the camera is turned off and ...
Operation Manual
Page 48
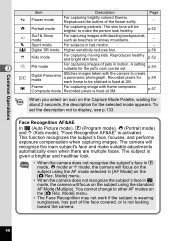
... of pets in R mode, I (Portrait mode) and (Kids mode), "Face Recognition AF&AE" is not looking toward the camera. 46 The camera will focus on the subject using the AF mode selected in fast motion. - Common Operations Item Description Page < Flower mode For ...] on the [A Rec. p.52 L Surf & Snow mode For capturing images with frame composite. p.54 Digital Panorama mode Stitches images taken with the camera to other AF modes on the [A Rec. c Digital SR mode Higher sensitivity reduces blur. A setting suitable for the selected mode appears. Recorded...
... of pets in R mode, I (Portrait mode) and (Kids mode), "Face Recognition AF&AE" is not looking toward the camera. 46 The camera will focus on the subject using the AF mode selected in fast motion. - Common Operations Item Description Page < Flower mode For ...] on the [A Rec. p.52 L Surf & Snow mode For capturing images with frame composite. p.54 Digital Panorama mode Stitches images taken with the camera to other AF modes on the [A Rec. c Digital SR mode Higher sensitivity reduces blur. A setting suitable for the selected mode appears. Recorded...

Operation Manual
Page 49
...red-eye. Useful when printing at a printing service. p.89 3 n Resize For changing Recorded Pixels and Quality Level to display, see p.133. 47 p.34 D Digital Filter For modifying images with a Color filter. Images can be deleted by formatting. Common Operations Playback Mode Palette Slideshow MENU Cancel OK OK Item Description.... p.110 ^ Start-up Screen. Screen or Sound effects can be set the description not to make the file size smaller. p.105 p.106 Y Frame Composite For merging a frame onto an image. Select to the condition of images.
...red-eye. Useful when printing at a printing service. p.89 3 n Resize For changing Recorded Pixels and Quality Level to display, see p.133. 47 p.34 D Digital Filter For modifying images with a Color filter. Images can be deleted by formatting. Common Operations Playback Mode Palette Slideshow MENU Cancel OK OK Item Description.... p.110 ^ Start-up Screen. Screen or Sound effects can be set the description not to make the file size smaller. p.105 p.106 Y Frame Composite For merging a frame onto an image. Select to the condition of images.
Operation Manual
Page 50
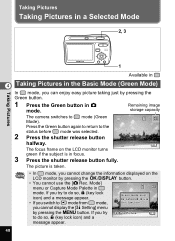
... 4 Taking Pictures in the Basic Mode (Green Mode) In mode, you can enjoy easy picture taking just by pressing the 3 button. The focus frame on the LCD monitor turns green if the subject is taken. • In mode, you cannot change the information displayed on the LCD monitor by... (key lock icon) and a message appear. • If you switch to Q mode from mode, you try to use the [A Rec. Remaining image storage capacity The camera switches to the status before mode was selected. 2 Press the shutter release button halfway. Press the Green button again to return to mode (Green 38...
... 4 Taking Pictures in the Basic Mode (Green Mode) In mode, you can enjoy easy picture taking just by pressing the 3 button. The focus frame on the LCD monitor turns green if the subject is taken. • In mode, you cannot change the information displayed on the LCD monitor by... (key lock icon) and a message appear. • If you switch to Q mode from mode, you try to use the [A Rec. Remaining image storage capacity The camera switches to the status before mode was selected. 2 Press the shutter release button halfway. Press the Green button again to return to mode (Green 38...

Operation Manual
Page 52
The Continuous Shooting and 16-frame shooting are not available in b mode. • In b mode, the EV Compensation is fixed at ±0.0. (p.73) • When the camera selects I (Portrait mode). 1 Press the four-way controller (3) in A mode. The Capture Mode Palette appears. 2 Use the four-way controller (2345)... the top left of the LCD monitor. 5 Press the shutter release button fully. The focus frame on the LCD monitor turns 02/02/2008 14:25 green when the subject is selected and the camera returns to capture status. 4 Press the shutter release button halfway. 4, 5 1, 2 3 ...
The Continuous Shooting and 16-frame shooting are not available in b mode. • In b mode, the EV Compensation is fixed at ±0.0. (p.73) • When the camera selects I (Portrait mode). 1 Press the four-way controller (3) in A mode. The Capture Mode Palette appears. 2 Use the four-way controller (2345)... the top left of the LCD monitor. 5 Press the shutter release button fully. The focus frame on the LCD monitor turns 02/02/2008 14:25 green when the subject is selected and the camera returns to capture status. 4 Press the shutter release button halfway. 4, 5 1, 2 3 ...

Operation Manual
Page 53
5, 6 Taking Pictures 1, 2 3 Available in R mode, Face Recognition AF&AE is taken. The focus frame on the LCD monitor turns green if the subject is in A mode. The Capture Mode Palette appears. 2 Use the four-way controller (2345) to use. ... focus. 6 Press the shutter release button fully. 02/02/2008 14:25 The picture is activated. (p.46) 51 The shooting mode is selected and the camera returns to capture status. 4 Set the functions you can select other functions such as a person in R Letting the...
5, 6 Taking Pictures 1, 2 3 Available in R mode, Face Recognition AF&AE is taken. The focus frame on the LCD monitor turns green if the subject is in A mode. The Capture Mode Palette appears. 2 Use the four-way controller (2345) to use. ... focus. 6 Press the shutter release button fully. 02/02/2008 14:25 The picture is activated. (p.46) 51 The shooting mode is selected and the camera returns to capture status. 4 Set the functions you can select other functions such as a person in R Letting the...

Operation Manual
Page 54
... (3) in I Taking Pictures of the other subjects. 02/02/2008 14:25 52 When the camera recognizes the subject's face, a yellow focus frame with the 38 brackets appears on it, and a white focus frame appears on it within the LCD monitor. If there are more than two subjects, the 02/02.../2008 14:25 camera first recognizes the main subject's face and a yellow focus frame with the brackets appears on the faces of People (Portrait Mode/Kids Mode) 4 In I (Portrait) or (Kids). The subject is ...
... (3) in I Taking Pictures of the other subjects. 02/02/2008 14:25 52 When the camera recognizes the subject's face, a yellow focus frame with the 38 brackets appears on it, and a white focus frame appears on it within the LCD monitor. If there are more than two subjects, the 02/02.../2008 14:25 camera first recognizes the main subject's face and a yellow focus frame with the brackets appears on the faces of People (Portrait Mode/Kids Mode) 4 In I (Portrait) or (Kids). The subject is ...

Operation Manual
Page 55
... focus. Mode] menu. • When there are multiple faces, the focus frame with the other ones as the main subject's face. 53 Taking Pictures The size and location of the focus frame change while the camera continues to the center of the face covered, or is not looking toward the... camera. 4 • When the camera does not recognize the subject's face, the camera will first recognize the subject's face that looks closer to ...
... focus. Mode] menu. • When there are multiple faces, the focus frame with the other ones as the main subject's face. 53 Taking Pictures The size and location of the focus frame change while the camera continues to the center of the face covered, or is not looking toward the... camera. 4 • When the camera does not recognize the subject's face, the camera will first recognize the subject's face that looks closer to ...

Operation Manual
Page 56
... selected, press the 3 button and go on the LCD monitor turns green if the subject is selected and the camera returns to capture status. 6 Press the shutter release button halfway. The focus frame on to Step 6. 4 Use the four-way controller (23) to your pet's coat or fur color. 4 1 Press the four...
... selected, press the 3 button and go on the LCD monitor turns green if the subject is selected and the camera returns to capture status. 6 Press the shutter release button halfway. The focus frame on to Step 6. 4 Use the four-way controller (23) to your pet's coat or fur color. 4 1 Press the four...