Operation Manual
Page 9
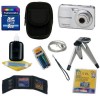
... All Images 112 Printing Using PictBridge 113 Connecting the Camera to the Printer 113 Printing Single Images 114 Printing All Images 116 Printing Using the DPOF Settings 117 Disconnecting the Cable from the Printer 117 Recording and Playing Back Sound 118 Recording Sound (Voice Recording Mode 118 Playing Back Sound 120 Settings 121 Camera Settings 121 Formatting an SD Memory Card or the Built-in Memory 121 Changing the Sound Settings 122 Changing the Date and Time 124 Changing the Display Language 126 Changing the Image Folder Name 127 Changing the USB Connection Mode...
... All Images 112 Printing Using PictBridge 113 Connecting the Camera to the Printer 113 Printing Single Images 114 Printing All Images 116 Printing Using the DPOF Settings 117 Disconnecting the Cable from the Printer 117 Recording and Playing Back Sound 118 Recording Sound (Voice Recording Mode 118 Playing Back Sound 120 Settings 121 Camera Settings 121 Formatting an SD Memory Card or the Built-in Memory 121 Changing the Sound Settings 122 Changing the Date and Time 124 Changing the Display Language 126 Changing the Image Folder Name 127 Changing the USB Connection Mode...

Operation Manual
Page 11
... PENTAX, 7 refer to take pictures and play back sound files. 8 Settings 9 This chapter explains how to set the relevant functions. 5 5 Playing Back and Deleting Images This chapter explains how to view still pictures and movies on the camera or on a TV and how to delete images from the camera. 6 6 Editing and Printing Images This chapter explains how to edit taken images using the camera and print still pictures. indicates information that is useful to be taken when operating the camera. 9 Use...
... PENTAX, 7 refer to take pictures and play back sound files. 8 Settings 9 This chapter explains how to set the relevant functions. 5 5 Playing Back and Deleting Images This chapter explains how to view still pictures and movies on the camera or on a TV and how to delete images from the camera. 6 6 Editing and Printing Images This chapter explains how to edit taken images using the camera and print still pictures. indicates information that is useful to be taken when operating the camera. 9 Use...
Operation Manual
Page 12
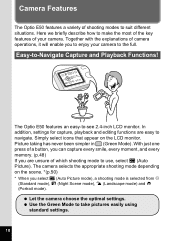
... Playback Functions! Simply select icons that appear on the scene. *(p.50) * When you select b (Auto Picture mode), a shooting mode is selected from (Standard mode), A (Night Scene mode), q (Landscape mode) and I (Portrait mode). Camera Features The Optio E50 features a variety of camera operations, it will enable you to enjoy your camera. Picture taking has never been simpler in (Green Mode). Let the camera choose the optimal settings. The camera selects the appropriate shooting mode depending on the LCD monitor. Easy...
... Playback Functions! Simply select icons that appear on the scene. *(p.50) * When you select b (Auto Picture mode), a shooting mode is selected from (Standard mode), A (Night Scene mode), q (Landscape mode) and I (Portrait mode). Camera Features The Optio E50 features a variety of camera operations, it will enable you to enjoy your camera. Picture taking has never been simpler in (Green Mode). Let the camera choose the optimal settings. The camera selects the appropriate shooting mode depending on the LCD monitor. Easy...

Operation Manual
Page 17
Button operation guide The button operation guide appears on the LCD monitor during operation. Four-way controller (2) Four-way controller (3) Four-way controller (4) Four-way controller (5) 2 Zoom button 3 4/W button 4 Shutter release button 5 Green/i button OK SHUTTER | or i 3 button MENU 15 Full Display in memory (without card) a :SD Memory Card r :Card is write-protected A8 Shooting date and time (p.29) A9 Four-way controller operation guide A10 Key lock icon (p.48) B1 Recorded pixels (p.62) B2 Quality level (p.64) B3 Sensitivity (p.72) B4 Shutter speed B5 Aperture In ...
Button operation guide The button operation guide appears on the LCD monitor during operation. Four-way controller (2) Four-way controller (3) Four-way controller (4) Four-way controller (5) 2 Zoom button 3 4/W button 4 Shutter release button 5 Green/i button OK SHUTTER | or i 3 button MENU 15 Full Display in memory (without card) a :SD Memory Card r :Card is write-protected A8 Shooting date and time (p.29) A9 Four-way controller operation guide A10 Key lock icon (p.48) B1 Recorded pixels (p.62) B2 Quality level (p.64) B3 Sensitivity (p.72) B4 Shutter speed B5 Aperture In ...

Operation Manual
Page 20
... Started Powering the Camera 1 Installing the Batteries Install the batteries into the camera. 18 If the batteries are reinserted and the camera is turned on, the message [Battery depleted] may leak. • If the batteries have been removed from it. 2 Insert the batteries, making sure the (+) and (-) terminals on again to use the camera for the first time; If the batteries are not rechargeable. • Do not open in the direction 1. Slide the battery/card...
... Started Powering the Camera 1 Installing the Batteries Install the batteries into the camera. 18 If the batteries are reinserted and the camera is turned on, the message [Battery depleted] may leak. • If the batteries have been removed from it. 2 Insert the batteries, making sure the (+) and (-) terminals on again to use the camera for the first time; If the batteries are not rechargeable. • Do not open in the direction 1. Slide the battery/card...

Operation Manual
Page 24
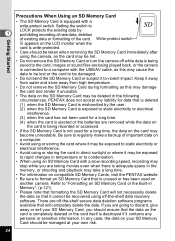
... a malfunction. Getting Started Installing the SD Memory Card 1 SD Memory Card SD Memory Card socket This camera uses either an SD Memory Card or an SDHC Memory Card. (Both cards are referred to as SD Memory Cards hereafter.) Captured images and sound files are saved in the built-in memory if a card is not inserted. • Be sure to use this camera to format an SD Memory Card that is unused or has been used on formatting. • Make sure that...
... a malfunction. Getting Started Installing the SD Memory Card 1 SD Memory Card SD Memory Card socket This camera uses either an SD Memory Card or an SDHC Memory Card. (Both cards are referred to as SD Memory Cards hereafter.) Captured images and sound files are saved in the built-in memory if a card is not inserted. • Be sure to use this camera to format an SD Memory Card that is unused or has been used on formatting. • Make sure that...
Operation Manual
Page 26
... remove the SD Memory Card during formatting as this may cause the data to be lost or the card to static electricity or electrical interference. (3) when the card has not been used on another camera. Write-protect switch r appears on the card is completely deleted or the card itself is adequate space in the memory, or shooting and playback may become unreadable. Setting the switch to LOCK protects the existing data by the user...
... remove the SD Memory Card during formatting as this may cause the data to be lost or the card to static electricity or electrical interference. (3) when the card has not been used on another camera. Write-protect switch r appears on the card is completely deleted or the card itself is adequate space in the memory, or shooting and playback may become unreadable. Setting the switch to LOCK protects the existing data by the user...

Operation Manual
Page 28
... Memory Card is in the locked position. If [Language/ ] screen or [Date Adjust] screen appears when you turn the camera on p.28 to reset the camera. r appears instead of a when the write-protect switch on the LCD monitor when there is turned on and the lens extends. Images and sound cannot be recorded when the write-protect switch is not a malfunction. Memory status 38 02/02/2008 14:25 If the batteries have been removed from the camera...
... Memory Card is in the locked position. If [Language/ ] screen or [Date Adjust] screen appears when you turn the camera on p.28 to reset the camera. r appears instead of a when the write-protect switch on the LCD monitor when there is turned on and the lens extends. Images and sound cannot be recorded when the write-protect switch is not a malfunction. Memory status 38 02/02/2008 14:25 If the batteries have been removed from the camera...
Operation Manual
Page 33
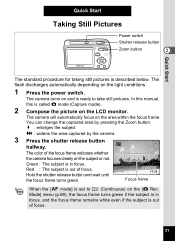
... focus frame indicates whether the camera focuses clearly on the LCD monitor. The flash discharges automatically depending on the area within the focus frame. x : enlarges the subject w : widens the area captured by pressing the Zoom button. Red : The subject is set to take still pictures. Mode] menu (p.69), the focus frame turns green if the subject is described below. Quick Start Taking Still Pictures Power switch Shutter release button Zoom button 2 Quick Start The standard procedure for taking still pictures is in focus...
... focus frame indicates whether the camera focuses clearly on the LCD monitor. The flash discharges automatically depending on the area within the focus frame. x : enlarges the subject w : widens the area captured by pressing the Zoom button. Red : The subject is set to take still pictures. Mode] menu (p.69), the focus frame turns green if the subject is described below. Quick Start Taking Still Pictures Power switch Shutter release button Zoom button 2 Quick Start The standard procedure for taking still pictures is in focus...

Operation Manual
Page 36
... direction and press the 4 button. MENU Cancel OK OK The rotation selection screen (0°, Right 90°, Left 90°, or 180°) appears. 4 Use the four-way controller (2345) to select s (Image Rotation) and press the 4 button. Protected images can rotate the displayed image. This is useful when you view images taken vertically. 1 Press the Q button after taking a picture. Panoramic pictures, images taken with the 16-frame shooting function, and movies cannot be saved...
... direction and press the 4 button. MENU Cancel OK OK The rotation selection screen (0°, Right 90°, Left 90°, or 180°) appears. 4 Use the four-way controller (2345) to select s (Image Rotation) and press the 4 button. Protected images can rotate the displayed image. This is useful when you view images taken vertically. 1 Press the Q button after taking a picture. Panoramic pictures, images taken with the 16-frame shooting function, and movies cannot be saved...

Operation Manual
Page 44
... Changes and Continue with Menu Operations 6 Press the 4 button or the four-way controller (4). MENU Exit : Exits the menu and returns to the button operation guide displayed at the bottom of Images 6 Press the Q button. The setting is taken. Refer to the original screen. Common Operations Saving the Setting and Start Taking Pictures 6 Press the shutter release button halfway. The setting is saved and the camera returns to Step 3 with the current setting. MENU : Returns to playback status. 3 Saving the Setting and Continue...
... Changes and Continue with Menu Operations 6 Press the 4 button or the four-way controller (4). MENU Exit : Exits the menu and returns to the button operation guide displayed at the bottom of Images 6 Press the Q button. The setting is taken. Refer to the original screen. Common Operations Saving the Setting and Start Taking Pictures 6 Press the shutter release button halfway. The setting is saved and the camera returns to Step 3 with the current setting. MENU : Returns to playback status. 3 Saving the Setting and Continue...

Operation Manual
Page 46
...] Menu Item Format Sound Date Adjust Language/ Folder Name 3 USB Connection Video Out Brightness Level Power Saving Auto Power Off Guide Display Reset Description For formatting the SD Memory Card or built-in memory For adjusting the playback volume and setting the start-up sound, shutter sound, key operation sound and self-timer sound For adjusting the date, time, and date and time styles For setting the language in which menus and messages appear For choosing how names are assigned to folders for storing images and sound files For setting the USB/AV cable connection (to PC or printer...
...] Menu Item Format Sound Date Adjust Language/ Folder Name 3 USB Connection Video Out Brightness Level Power Saving Auto Power Off Guide Display Reset Description For formatting the SD Memory Card or built-in memory For adjusting the playback volume and setting the start-up sound, shutter sound, key operation sound and self-timer sound For adjusting the date, time, and date and time styles For setting the language in which menus and messages appear For choosing how names are assigned to folders for storing images and sound files For setting the USB/AV cable connection (to PC or printer...
Operation Manual
Page 50
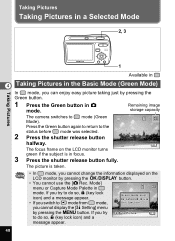
... cannot change the information displayed on the LCD monitor turns green if the subject is taken. • In mode, you try to do so, - (key lock icon) and a Auto Picture message appear. 48 The focus frame on the LCD monitor by pressing the 4/W button. • You cannot use this function. Remaining image storage capacity The camera switches to the status before mode was selected. 2 Press the shutter release button halfway. Press the Green button...
... cannot change the information displayed on the LCD monitor turns green if the subject is taken. • In mode, you try to do so, - (key lock icon) and a Auto Picture message appear. 48 The focus frame on the LCD monitor by pressing the 4/W button. • You cannot use this function. Remaining image storage capacity The camera switches to the status before mode was selected. 2 Press the shutter release button halfway. Press the Green button...

Operation Manual
Page 73
... the subject. - eye Compensation) function of the camera. (p.109) Taking Pictures 71 The camera returns to c (Auto + Red-eye) or d (Flash On + Red- 4 eye). Set the flash mode to capture status with the selected flash mode. The flash mode changes each time the button is reflected in A mode. You can also change the setting using the Z (Red- To prevent the phenomenon, try the followings. - You can also compensate the red-eye pictures using the four-way controller (23). 2 Press the 4 button. 1 Press the...
... the subject. - eye Compensation) function of the camera. (p.109) Taking Pictures 71 The camera returns to c (Auto + Red-eye) or d (Flash On + Red- 4 eye). Set the flash mode to capture status with the selected flash mode. The flash mode changes each time the button is reflected in A mode. You can also change the setting using the Z (Red- To prevent the phenomenon, try the followings. - You can also compensate the red-eye pictures using the four-way controller (23). 2 Press the 4 button. 1 Press the...

Operation Manual
Page 111
... and Printing Images • The red-eye compensation function cannot be used on movies or on images where red eyes cannot be detected on the camera. The edited image is automatically saved with a new file name. 6 Press the 4 button. Slideshow 1, 2, 3, 5 4, 6 MENU Cancel OK OK Red-eye Compensation You can compensate the "red-eye" in Step 4. • The red-eye compensation can be used for panoramic pictures or images taken with the 16-frame shooting function. 109 Overwrite Save as...
... and Printing Images • The red-eye compensation function cannot be used on movies or on images where red eyes cannot be detected on the camera. The edited image is automatically saved with a new file name. 6 Press the 4 button. Slideshow 1, 2, 3, 5 4, 6 MENU Cancel OK OK Red-eye Compensation You can compensate the "red-eye" in Step 4. • The red-eye compensation can be used for panoramic pictures or images taken with the 16-frame shooting function. 109 Overwrite Save as...

Operation Manual
Page 133
... Power Saving setting is saved. 8 The default power saving function is activated after the time set to "2min", "1min" or "30sec", the power saving function is activated 15 seconds after you can save battery power by pressing any of the buttons. 1 Use the four-way controller (23) to select [Power Saving] on the camera. Settings 131 How to display the [H Setting] menu MENU Four-way controller 4 button 3 button Setting 1/2 Format Sound Date Adjust 02/02/2008 Language/ English Folder Name Date USB Connection PC MENU Exit Using the Power Saving Function You can turn the LCD...
... Power Saving setting is saved. 8 The default power saving function is activated after the time set to "2min", "1min" or "30sec", the power saving function is activated 15 seconds after you can save battery power by pressing any of the buttons. 1 Use the four-way controller (23) to select [Power Saving] on the camera. Settings 131 How to display the [H Setting] menu MENU Four-way controller 4 button 3 button Setting 1/2 Format Sound Date Adjust 02/02/2008 Language/ English Folder Name Date USB Connection PC MENU Exit Using the Power Saving Function You can turn the LCD...
Operation Manual
Page 143
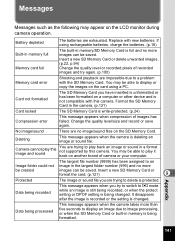
... memory/SD Memory Card is write-protected. (p.24) Compression error This message appears when compression of camera or your computer. Change the quality level/size and record or save again. Deleting This message appears when the camera is protected. Appendix 141 If using a PC. You may be saved. The largest file number (9999) has been assigned to play back an image or sound in a format not supported by this camera. Data being processed This message appears when the camera takes...
... memory/SD Memory Card is write-protected. (p.24) Compression error This message appears when compression of camera or your computer. Change the quality level/size and record or save again. Deleting This message appears when the camera is protected. Appendix 141 If using a PC. You may be saved. The largest file number (9999) has been assigned to play back an image or sound in a format not supported by this camera. Data being processed This message appears when the camera takes...

Operation Manual
Page 149
... of SD memory card capacity.) B&W, Sepia, Red, Pink, Purple, Blue, Green, Yellow Type Electronic/mechanical shutter Shutter Speed Approx. 1/2000 sec. - 4 sec. (all shooting modes included) Type Auto flash with red-eye reduction function Flash Modes Auto (at low illumination), Flash Off, Flash On, Auto + Red-eye, Flash On + Red-eye (Slow synchronization is available only in 1/3 EV steps) Compensation Green, Auto Picture, Program, Night Scene, Movie, Voice Recording, Landscape, Flower, Portrait, Surf & Snow, Sport, Digital SR, Kids, Pet, Digital Panorama, Frame Composite Continuous...
... of SD memory card capacity.) B&W, Sepia, Red, Pink, Purple, Blue, Green, Yellow Type Electronic/mechanical shutter Shutter Speed Approx. 1/2000 sec. - 4 sec. (all shooting modes included) Type Auto flash with red-eye reduction function Flash Modes Auto (at low illumination), Flash Off, Flash On, Auto + Red-eye, Flash On + Red-eye (Slow synchronization is available only in 1/3 EV steps) Compensation Green, Auto Picture, Program, Night Scene, Movie, Voice Recording, Landscape, Flower, Portrait, Surf & Snow, Sport, Digital SR, Kids, Pet, Digital Panorama, Frame Composite Continuous...

Operation Manual
Page 150
... C, D, E, printer setting Border Status With/without, printer setting XX (W) × XX (H) × XX (D) mm (excluding operating or protruding parts) XX g (excluding the batteries and SD Memory Card) XX g (including the batteries and SD Memory Card) Two AA alkaline batteries, USB/AV cable, Software (CD-ROM), Strap, Operating Manual/PC Connection Manual (CD-ROM), Quick Guide 9 Appendix 148 Actual time may vary according to operating conditions. * The playback time/recording time are measured based on , flash used for 50% of Recordable Images XX pictures Playback Time...
... C, D, E, printer setting Border Status With/without, printer setting XX (W) × XX (H) × XX (D) mm (excluding operating or protruding parts) XX g (excluding the batteries and SD Memory Card) XX g (including the batteries and SD Memory Card) Two AA alkaline batteries, USB/AV cable, Software (CD-ROM), Strap, Operating Manual/PC Connection Manual (CD-ROM), Quick Guide 9 Appendix 148 Actual time may vary according to operating conditions. * The playback time/recording time are measured based on , flash used for 50% of Recordable Images XX pictures Playback Time...
Operation Manual
Page 157
..., 120 Playback Mode Palette ....... 47 Playing back movies 91 Playing back sounds ......... 120 Power Saving 131 Power supply 18, 26 Power switch 26, 36, 38 Press fully (Shutter release button) ...... 32 Press halfway (Shutter release button) ...... 32 Printing 113 Protect Z 98 Q Quality Level 25, 64 R Recorded Pixels of movies 83 Recorded Pixels of still pictures 62 Recording movies 81 Recording sounds 118 Red-eye Compensation .... 109 Red-eye reduction cd ...... 70 9 Reset 134 Resize 100 Rotating 34 S Saving settings 79 SD Memory Card 22 Self-timer...
..., 120 Playback Mode Palette ....... 47 Playing back movies 91 Playing back sounds ......... 120 Power Saving 131 Power supply 18, 26 Power switch 26, 36, 38 Press fully (Shutter release button) ...... 32 Press halfway (Shutter release button) ...... 32 Printing 113 Protect Z 98 Q Quality Level 25, 64 R Recorded Pixels of movies 83 Recorded Pixels of still pictures 62 Recording movies 81 Recording sounds 118 Red-eye Compensation .... 109 Red-eye reduction cd ...... 70 9 Reset 134 Resize 100 Rotating 34 S Saving settings 79 SD Memory Card 22 Self-timer...


