Operation Manual
Page 3
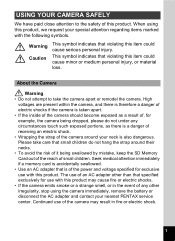
... of this product, we request your nearest PENTAX service center. High voltages are present within the camera, and there is therefore a danger of electric shocks if the camera is taken apart. • If the inside of the camera should become exposed as there is a danger... product. This symbol indicates that violating this item could cause serious personal injury. Please take the camera apart or remodel the camera. When using the camera immediately, remove the battery or disconnect the AC adapter and contact your special attention regarding items marked with this product.
... of this product, we request your nearest PENTAX service center. High voltages are present within the camera, and there is therefore a danger of electric shocks if the camera is taken apart. • If the inside of the camera should become exposed as there is a danger... product. This symbol indicates that violating this item could cause serious personal injury. Please take the camera apart or remodel the camera. When using the camera immediately, remove the battery or disconnect the AC adapter and contact your special attention regarding items marked with this product.

Operation Manual
Page 4
... cause a fire or electrical shock. • If the generation of smoke or strange odor from the camera immediately if it may explode. • Do not charge any batteries other abnormality occurs, immediately discontinue using and consult a PENTAX Service Center. LI8. This can cause a fire or electrical shock. Also, be careful of glass fragments...
... cause a fire or electrical shock. • If the generation of smoke or strange odor from the camera immediately if it may explode. • Do not charge any batteries other abnormality occurs, immediately discontinue using and consult a PENTAX Service Center. LI8. This can cause a fire or electrical shock. Also, be careful of glass fragments...
Operation Manual
Page 5
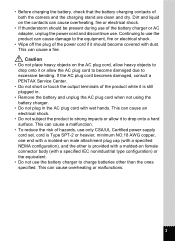
...AC plug cord becomes damaged, consult a PENTAX Service Center. • Do not short or touch the output terminals of the battery charger or AC adapter, unplug the power cord and discontinue use. Continuing to use the battery charger to charge batteries other than the ones specified. Caution &#...8226; Do not place heavy objects on the AC plug cord, allow heavy objects to drop onto it is provided with a molded-on the contacts can cause damage to the equipment, fire or electrical shock. • Wipe off the plug of both the camera...
...AC plug cord becomes damaged, consult a PENTAX Service Center. • Do not short or touch the output terminals of the battery charger or AC adapter, unplug the power cord and discontinue use. Continuing to use the battery charger to charge batteries other than the ones specified. Caution &#...8226; Do not place heavy objects on the AC plug cord, allow heavy objects to drop onto it is provided with a molded-on the contacts can cause damage to the equipment, fire or electrical shock. • Wipe off the plug of both the camera...
Operation Manual
Page 7
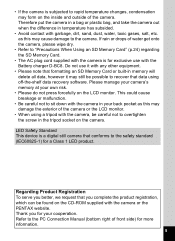
...not use with the camera is a digital still camera that data using a tripod with the camera or the PENTAX website. Please manage your camera's memory at your back pocket as this may form on the camera. Therefore put the camera in a bag or plastic bag, and take the camera out when the difference... the SD Memory Card. • The AC plug cord supplied with the Battery charger D-BC8. • If the camera is subjected to rapid temperature changes, condensation may damage the exterior of the camera or the LCD monitor. • When using off-the-shelf data recovery software...
...not use with the camera is a digital still camera that data using a tripod with the camera or the PENTAX website. Please manage your camera's memory at your back pocket as this may form on the camera. Therefore put the camera in a bag or plastic bag, and take the camera out when the difference... the SD Memory Card. • The AC plug cord supplied with the Battery charger D-BC8. • If the camera is subjected to rapid temperature changes, condensation may damage the exterior of the camera or the LCD monitor. • When using off-the-shelf data recovery software...
Operation Manual
Page 8
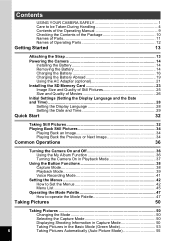
... 10 Names of Parts 11 Names of Operating Parts 12 Getting Started 13 Attaching the Strap 13 Powering the Camera 14 Installing the Battery 14 Removing the Battery 14 Charging the Battery 16 Charging the Battery Abroad 19 Using the AC Adapter (optional 21 Installing the SD Memory Card 23 Image Size and Quality of...
... 10 Names of Parts 11 Names of Operating Parts 12 Getting Started 13 Attaching the Strap 13 Powering the Camera 14 Installing the Battery 14 Removing the Battery 14 Charging the Battery 16 Charging the Battery Abroad 19 Using the AC Adapter (optional 21 Installing the SD Memory Card 23 Image Size and Quality of...
Operation Manual
Page 12
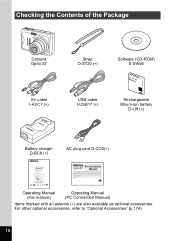
Checking the Contents of the Package Camera Optio S7 Strap O-ST20 (∗) Software (CD-ROM) S-SW56 AV cable I-AVC7 (∗) USB cable I-USB17 (∗) Rechargeable lithium-ion battery D-LI8 (∗) Battery charger D-BC8 (∗) AC plug cord D-CO2(∗) Operating Manual (this manual) Operating Manual (PC Connection Manual) Items marked with an asterisk (∗) are also available as optional accessories. For other optional accessories, refer to "Optional Accessories" (p.174). 10
Checking the Contents of the Package Camera Optio S7 Strap O-ST20 (∗) Software (CD-ROM) S-SW56 AV cable I-AVC7 (∗) USB cable I-USB17 (∗) Rechargeable lithium-ion battery D-LI8 (∗) Battery charger D-BC8 (∗) AC plug cord D-CO2(∗) Operating Manual (this manual) Operating Manual (PC Connection Manual) Items marked with an asterisk (∗) are also available as optional accessories. For other optional accessories, refer to "Optional Accessories" (p.174). 10

Operation Manual
Page 13
Names of Parts Front Back Power indicator Shutter release button Power switch Speaker Flash Remote control receiver Self-timer lamp/ Auxiliary AF light Strap lug Lens DC input terminal USB/AV terminal Microphone Battery/card cover Access lamp LCD monitor Tripod socket 11
Names of Parts Front Back Power indicator Shutter release button Power switch Speaker Flash Remote control receiver Self-timer lamp/ Auxiliary AF light Strap lug Lens DC input terminal USB/AV terminal Microphone Battery/card cover Access lamp LCD monitor Tripod socket 11
Operation Manual
Page 16
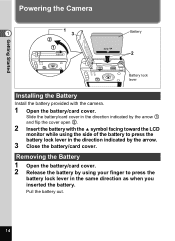
... cover in the same direction as when you inserted the battery. Removing the Battery 1 Open the battery/card cover. 2 Release the battery by the arrow. 3 Close the battery/card cover. Pull the battery out. 14 Getting Started Powering the Camera 1 1 3 2 1 Battery 2 Battery lock lever Installing the Battery Install the battery provided with the 2 symbol facing toward the LCD monitor while using...
... cover in the same direction as when you inserted the battery. Removing the Battery 1 Open the battery/card cover. 2 Release the battery by the arrow. 3 Close the battery/card cover. Pull the battery out. 14 Getting Started Powering the Camera 1 1 3 2 1 Battery 2 Battery lock lever Installing the Battery Install the battery provided with the 2 symbol facing toward the LCD monitor while using...
Operation Manual
Page 17
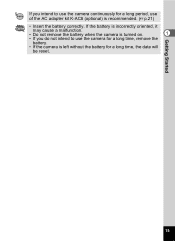
If you do not intend to use the camera continuously for a long period, use the camera for a long time, the date will be reset. Getting Started 15 If the battery is incorrectly oriented, it may cause a malfunction. • Do not remove the battery when the camera is turned on. 1 • If you intend to use of the AC adapter kit K-AC8 (optional) is left without the battery for a long time, remove the battery. • If the camera is recommended. (1p.21) • Insert the battery correctly.
If you do not intend to use the camera continuously for a long period, use the camera for a long time, the date will be reset. Getting Started 15 If the battery is incorrectly oriented, it may cause a malfunction. • Do not remove the battery when the camera is turned on. 1 • If you intend to use of the AC adapter kit K-AC8 (optional) is left without the battery for a long time, remove the battery. • If the camera is recommended. (1p.21) • Insert the battery correctly.

Operation Manual
Page 18
...Charging the Battery Use the battery charger D-BC8 supplied with the camera to charge the battery before using the camera for the first time or when the [Battery depleted] message appears. 1 Connect the AC plug cord to green when charging is completed. 4 Remove the battery from the battery charger when ...charging is visible. The charging indicator on the charger lights red while the battery is being charged and changes to the battery charger. 2 Plug the AC plug cord into the power outlet. 3 Place the battery in the battery charger so that the PENTAX name...
...Charging the Battery Use the battery charger D-BC8 supplied with the camera to charge the battery before using the camera for the first time or when the [Battery depleted] message appears. 1 Connect the AC plug cord to green when charging is completed. 4 Remove the battery from the battery charger when ...charging is visible. The charging indicator on the charger lights red while the battery is being charged and changes to the battery charger. 2 Plug the AC plug cord into the power outlet. 3 Place the battery in the battery charger so that the PENTAX name...
Operation Manual
Page 19
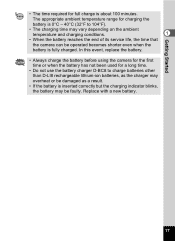
... event, replace the battery. • Always charge the battery before using the camera for the first time or when the battery has not been used for full charge is about 100 minutes. Replace with a new battery. 17 Getting Started • The time required for a long time. • Do not use the battery charger D-BC8 to 104...
... event, replace the battery. • Always charge the battery before using the camera for the first time or when the battery has not been used for full charge is about 100 minutes. Replace with a new battery. 17 Getting Started • The time required for a long time. • Do not use the battery charger D-BC8 to 104...
Operation Manual
Page 20
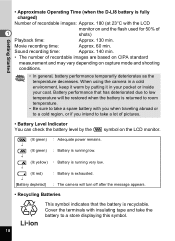
... depending on the LCD monitor. (lit green) ↓ (lit green) ↓ (lit yellow) ↓ (lit red) ↓ [Battery depleted] : Adequate power remains. : Battery is running low. : Battery is running very low. : Battery is exhausted. : The camera will be restored when the battery is returned to room temperature. • Be sure to take a lot of pictures. •...
... depending on the LCD monitor. (lit green) ↓ (lit green) ↓ (lit yellow) ↓ (lit red) ↓ [Battery depleted] : Adequate power remains. : Battery is running low. : Battery is running very low. : Battery is exhausted. : The camera will be restored when the battery is returned to room temperature. • Be sure to take a lot of pictures. •...
Operation Manual
Page 21
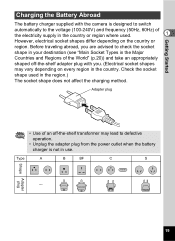
... C S Shape - Adapter plug 19 Adapter plug • Use of an off -the-shelf adapter plug with the camera is not in use. Getting Started Charging the Battery Abroad The battery charger supplied with you are advised to the voltage (100-240V) and frequency (50Hz, 60Hz) of the electricity supply..., you . (Electrical socket shapes may lead to defective operation. • Unplug the adapter plug from the power outlet when the battery charger is designed to switch automatically to check the socket shape in your destination (see "Main Socket Types in the Major Countries and...
... C S Shape - Adapter plug 19 Adapter plug • Use of an off -the-shelf adapter plug with the camera is not in use. Getting Started Charging the Battery Abroad The battery charger supplied with you are advised to the voltage (100-240V) and frequency (50Hz, 60Hz) of the electricity supply..., you . (Electrical socket shapes may lead to defective operation. • Unplug the adapter plug from the power outlet when the battery charger is designed to switch automatically to check the socket shape in your destination (see "Main Socket Types in the Major Countries and...
Operation Manual
Page 23
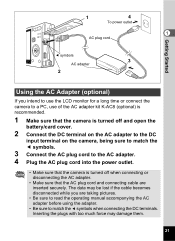
... cable becomes disconnected while you intend to use the LCD monitor for a long time or connect the camera to a PC, use of the AC adapter kit K-AC8 (optional) is turned off and open the battery/card cover. 2 Connect the DC terminal on the AC adapter to the DC input terminal on the... camera, being sure to match the 4 symbols. 3 Connect the AC plug cord to match the 4 symbols when connecting the...
... cable becomes disconnected while you intend to use the LCD monitor for a long time or connect the camera to a PC, use of the AC adapter kit K-AC8 (optional) is turned off and open the battery/card cover. 2 Connect the DC terminal on the AC adapter to the DC input terminal on the... camera, being sure to match the 4 symbols. 3 Connect the AC plug cord to match the 4 symbols when connecting the...

Operation Manual
Page 24
Getting Started Precautions When Using the Battery Charger or AC Adapter To avoid the risk of the battery charger and AC adapter. 22 Refer to page 181 for the specifications of fire or electric shock when using the battery charger or AC adapter, be sure to read the section on "USING YOUR CAMERA 1 SAFELY" on page 1.
Getting Started Precautions When Using the Battery Charger or AC Adapter To avoid the risk of the battery charger and AC adapter. 22 Refer to page 181 for the specifications of fire or electric shock when using the battery charger or AC adapter, be sure to read the section on "USING YOUR CAMERA 1 SAFELY" on page 1.

Operation Manual
Page 25
... and the selected image size and quality. (1p.25) 23 Refer to format unused cards or cards that the camera is facing toward the LCD monitor and push the card in until it out. Slide the battery/card cover in the direction indicated by the arrow and pull it clicks. 3 Close the... battery/card cover. Installing the SD Memory Card SD Memory Card 1 2 2 1 1 3 To remove the card, push in and pull out Getting Started An SD Memory Card can be used on another camera. Captured images are recorded on the SD Memory Card if...
... and the selected image size and quality. (1p.25) 23 Refer to format unused cards or cards that the camera is facing toward the LCD monitor and push the card in until it out. Slide the battery/card cover in the direction indicated by the arrow and pull it clicks. 3 Close the... battery/card cover. Installing the SD Memory Card SD Memory Card 1 2 2 1 1 3 To remove the card, push in and pull out Getting Started An SD Memory Card can be used on another camera. Captured images are recorded on the SD Memory Card if...

Operation Manual
Page 26
...programs available that it to be damaged. • Do not bend the SD Memory Card or subject it cannot be managed at your own risk. PENTAX does not accept any liability for data that have compatibility with a slow recording speed, recording may stop while you are being recorded on a PC. ...for a long time. (4) when the card is ejected, the AC adapter is disconnected or the battery is removed while the data on the SD Memory Card may be taken if you should ensure that the camera is exposed to regularly make a backup of the card. • Care should be recovered using...
...programs available that it to be damaged. • Do not bend the SD Memory Card or subject it cannot be managed at your own risk. PENTAX does not accept any liability for data that have compatibility with a slow recording speed, recording may stop while you are being recorded on a PC. ...for a long time. (4) when the card is ejected, the AC adapter is disconnected or the battery is removed while the data on the SD Memory Card may be taken if you should ensure that the camera is exposed to regularly make a backup of the card. • Care should be recovered using...
Operation Manual
Page 52
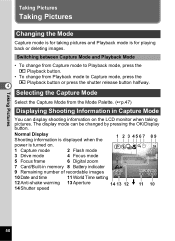
... pictures. The display mode can display shooting information on . 36 1 Capture mode 2 Flash mode 3 Drive mode 4 Focus mode 5 Focus frame 6 Digital zoom 7 Card/Built-in Capture Mode You can be changed by pressing the OK/Display button. Switching between Capture Mode and Playback Mode • To... button halfway. 4 Selecting the Capture Mode Select the Capture Mode from the Mode Palette. (1p.47) Displaying Shooting Information in memory 8 Battery indicator 9 Remaining number of recordable images 1/160 F2.7 10 Date and time 11 World Time setting 08/24/2006 12:00 12 Anti-...
... pictures. The display mode can display shooting information on . 36 1 Capture mode 2 Flash mode 3 Drive mode 4 Focus mode 5 Focus frame 6 Digital zoom 7 Card/Built-in Capture Mode You can be changed by pressing the OK/Display button. Switching between Capture Mode and Playback Mode • To... button halfway. 4 Selecting the Capture Mode Select the Capture Mode from the Mode Palette. (1p.47) Displaying Shooting Information in memory 8 Battery indicator 9 Remaining number of recordable images 1/160 F2.7 10 Date and time 11 World Time setting 08/24/2006 12:00 12 Anti-...
Operation Manual
Page 74
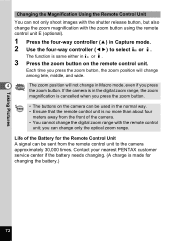
...i or h. 3 Press the zoom button on the camera can be sent from the front of the Battery for changing the battery.) Taking Pictures 72 Each time you press the zoom button. Contact your nearest PENTAX customer service center if the battery needs changing. (A charge is made for the Remote ...Control Unit A signal can be used in Capture mode. 2 Use the four-way controller (45) to the camera approximately 30,000 times. If the camera is in the digital zoom range, ...
...i or h. 3 Press the zoom button on the camera can be sent from the front of the Battery for changing the battery.) Taking Pictures 72 Each time you press the zoom button. Contact your nearest PENTAX customer service center if the battery needs changing. (A charge is made for the Remote ...Control Unit A signal can be used in Capture mode. 2 Use the four-way controller (45) to the camera approximately 30,000 times. If the camera is in the digital zoom range, ...

Operation Manual
Page 114
... mode. Displaying Shooting Information in Playback Mode Shooting information can be displayed on the LCD monitor in memory icon 3 Folder name 4 File name 5 Protect icon 6 Battery indicator 7 Shooting date and time 8 Four-way controller operation guide 12 3 4 5 100-0010 08/24/2006 12:00 8 76 Histogram Display The brightness distribution of...
... mode. Displaying Shooting Information in Playback Mode Shooting information can be displayed on the LCD monitor in memory icon 3 Folder name 4 File name 5 Protect icon 6 Battery indicator 7 Shooting date and time 8 Four-way controller operation guide 12 3 4 5 100-0010 08/24/2006 12:00 8 76 Histogram Display The brightness distribution of...
