
Operating Instructions
Page 8
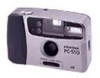
... THE BATTERY 8 SETTING THE FILM SPEED 9 LOADING THE FILM 9 HOLDING YOUR CAMERA 9 AUTO FLASH PHOTOGRAPHY 10 RED-EYE REDUCTION 10 TAKING PICTURES 10 REWINDING THE FILM 11 AUTO-FOCUS SHOOTING 11 Printing the Date and Time 12 TAKING CARE OF YOUR CAMERA 13 WARRANTY POLICY 14 SPECIFICATIONS 16 Before using your camera, please be sure to read these instructions carefully 7 NAME OF PARTS 1 Film Counter Window 2 Shutter Release Button 3 , Strap Eyelet 4 Photo Sensor , 5 Big Viewfinder Window 6 Lens Cover/Lens 7 Power (Lens Cover) Switch...
... THE BATTERY 8 SETTING THE FILM SPEED 9 LOADING THE FILM 9 HOLDING YOUR CAMERA 9 AUTO FLASH PHOTOGRAPHY 10 RED-EYE REDUCTION 10 TAKING PICTURES 10 REWINDING THE FILM 11 AUTO-FOCUS SHOOTING 11 Printing the Date and Time 12 TAKING CARE OF YOUR CAMERA 13 WARRANTY POLICY 14 SPECIFICATIONS 16 Before using your camera, please be sure to read these instructions carefully 7 NAME OF PARTS 1 Film Counter Window 2 Shutter Release Button 3 , Strap Eyelet 4 Photo Sensor , 5 Big Viewfinder Window 6 Lens Cover/Lens 7 Power (Lens Cover) Switch...
Operating Instructions
Page 9
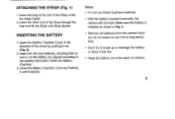
... Insert two AA-size batteries, checking that (+) and (-) on the battery are aligned according to break up or recharge the battery or throw it out. (Fig. 2) 2. Open the Battery Chamber Cover in...use it for a long period time. • Don't try to the polarity information inside the Battery Chamber. 3. Make sure the battery is installed as shown in the direction of the arrow by Pushing it until it latches. Remove AA batteries from the camera when you do not expect to use Nickel Cadmium batteries. With the battery inserted incorrectly, the camera will not work. Close the Battery...
... Insert two AA-size batteries, checking that (+) and (-) on the battery are aligned according to break up or recharge the battery or throw it out. (Fig. 2) 2. Open the Battery Chamber Cover in...use it for a long period time. • Don't try to the polarity information inside the Battery Chamber. 3. Make sure the battery is installed as shown in the direction of the arrow by Pushing it until it latches. Remove AA batteries from the camera when you do not expect to use Nickel Cadmium batteries. With the battery inserted incorrectly, the camera will not work. Close the Battery...
Operating Instructions
Page 10
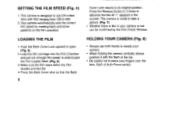
... out enough film leader to open. (Fig. 5) 2. Press the Release Button 2-3 times to its original position. Press the Back Cover shut so that the Back 9 Cover Lock returns to advance the film till "1" appears in your fingers over the lens, flash or Auto-Focus sensor. SETTING THE FILM SPEED (Fig. 4) 1. This camera is film in the counter. Make sure the film stays...
... out enough film leader to open. (Fig. 5) 2. Press the Release Button 2-3 times to its original position. Press the Back Cover shut so that the Back 9 Cover Lock returns to advance the film till "1" appears in your fingers over the lens, flash or Auto-Focus sensor. SETTING THE FILM SPEED (Fig. 4) 1. This camera is film in the counter. Make sure the film stays...
Operating Instructions
Page 11
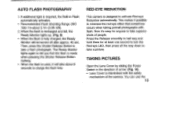
... lights up. (Fig. 9) • When the flash is interlocked with flash. This makes it 's easy for at least one second to turn the Red-eye LED, then press all the way down to minimize the red-eye effect that the flash is ready when pressing the Shutter Release Button halfway. • When the flash is designed to take a picture. Now it possible to take superior shots of the camera. AUTO FLASH...
... lights up. (Fig. 9) • When the flash is interlocked with flash. This makes it 's easy for at least one second to turn the Red-eye LED, then press all the way down to minimize the red-eye effect that the flash is ready when pressing the Shutter Release Button halfway. • When the flash is designed to take a picture. Now it possible to take superior shots of the camera. AUTO FLASH...

Operating Instructions
Page 12
...Sensor Windows on the front of film. 11 AUTO-FOCUS SHOOTING 1. Press the Shutter Release Button halfway. 3. After the film is fully rewound, it will stops automatically and "S" is seen in the Film Counter Window. (Fig. 13) • Be careful not to touch the inner lens surface...Switch in the center of the arrow. Set the subject you wish to take a picture. camera only when the lens Cover is at least 1m (3.3ft) away from the camera. • Be careful not to ensure accurate focusing. Gently press the Shutter Release Button down to take within the Auto-Focus Frame in the direction...
...Sensor Windows on the front of film. 11 AUTO-FOCUS SHOOTING 1. Press the Shutter Release Button halfway. 3. After the film is fully rewound, it will stops automatically and "S" is seen in the Film Counter Window. (Fig. 13) • Be careful not to touch the inner lens surface...Switch in the center of the arrow. Set the subject you wish to take a picture. camera only when the lens Cover is at least 1m (3.3ft) away from the camera. • Be careful not to ensure accurate focusing. Gently press the Shutter Release Button down to take within the Auto-Focus Frame in the direction...
Operating Instructions
Page 13
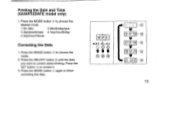
... '99) 1,_ (99 02 24) -CI -- 4 -124 22:25I •••Ei 12 Press the SET button C) to choose the desired mode. 1 No data 2 Month/day/year 3 Day/month/year 4 Year/month/day 5 Day/hour/minute Correcting the Data 1. Printing the Date and Time (QUARTZDATE model only) 1. Press the MODE button ® to correct it. 3. Press the MODE button ® to choose the...
... '99) 1,_ (99 02 24) -CI -- 4 -124 22:25I •••Ei 12 Press the SET button C) to choose the desired mode. 1 No data 2 Month/day/year 3 Day/month/year 4 Year/month/day 5 Day/hour/minute Correcting the Data 1. Printing the Date and Time (QUARTZDATE model only) 1. Press the MODE button ® to correct it. 3. Press the MODE button ® to choose the...
Operating Instructions
Page 14
... camera has a high working voltage. (Fig. 18) Dropping into water or water damage. Your camera is not water-proof, particularly when it is submerged in extreme temperature conditions. You have it on a tripod. Please never try to disassemble the camera, since the battery 13 will not function ...1. TAKING CARE OF YOUR CAMERA If you care for and handle this camera properly, you are going to be satisfied by dirt as well as sand, so your camera has to cleaned periodically to keep it many ways. (Fig. 14) 2. The shutter mechanism and moving parts of rusting to your camera. ...
... camera has a high working voltage. (Fig. 18) Dropping into water or water damage. Your camera is not water-proof, particularly when it is submerged in extreme temperature conditions. You have it on a tripod. Please never try to disassemble the camera, since the battery 13 will not function ...1. TAKING CARE OF YOUR CAMERA If you care for and handle this camera properly, you are going to be satisfied by dirt as well as sand, so your camera has to cleaned periodically to keep it many ways. (Fig. 14) 2. The shutter mechanism and moving parts of rusting to your camera. ...
Operating Instructions
Page 15
... repairs performed by non-authorized Pentax service facilities. The manufacturer or its authorized representatives shall not be replaced without cost to you purchased the equipment or to the replacement of parts as herein before 14 No refunds will take a considerable length of time before provided. In this case, it will be liable for a period of twelve months from date...
... repairs performed by non-authorized Pentax service facilities. The manufacturer or its authorized representatives shall not be replaced without cost to you purchased the equipment or to the replacement of parts as herein before 14 No refunds will take a considerable length of time before provided. In this case, it will be liable for a period of twelve months from date...
Operating Instructions
Page 16
...directly to proceed with your Pentax returned to the manufacturer will apply. Before sending your country for the service charge, and only after you review the warranty card supplied with the servicing. In any case, however, shipping charges and customs clearance fees are to be charged by the 15 sender. Always obtain a quotation for more information and to receive a copy... is covered by warranty, repairs will be made and parts replaced free of charge, and the equipment will be borne by warranty, regular charges of the manufacturer or of servicing. If the equipment is ...
...directly to proceed with your Pentax returned to the manufacturer will apply. Before sending your country for the service charge, and only after you review the warranty card supplied with the servicing. In any case, however, shipping charges and customs clearance fees are to be charged by the 15 sender. Always obtain a quotation for more information and to receive a copy... is covered by warranty, repairs will be made and parts replaced free of charge, and the equipment will be borne by warranty, regular charges of the manufacturer or of servicing. If the equipment is ...
Operating Instructions
Page 17
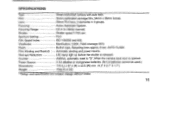
... light up before the shutter is opened. 2 AA alkaline or manganese batteries. (Ni-Cd batteries cannot be used.) 110 (L) x 67.4 (H) x 43.5 (W) mm (4.3" X 2.7" X 1.7") 152g (5.4 OZ) * Design and specification are subject change without notice. 16 SPECIFICATIONS Type: Film: Lens: Focusing: Focusing Range: Shutter: Aperture Setting: Film Speed Index: Viewfinder: Flash: Film Winding and Rewindi : Red-eye Reduction: Counter: Power Source: Dimensions: Weight: 35mm motorized camera with auto lash. 35mm perforated cartridge film, 24mm x 36mm format...
... light up before the shutter is opened. 2 AA alkaline or manganese batteries. (Ni-Cd batteries cannot be used.) 110 (L) x 67.4 (H) x 43.5 (W) mm (4.3" X 2.7" X 1.7") 152g (5.4 OZ) * Design and specification are subject change without notice. 16 SPECIFICATIONS Type: Film: Lens: Focusing: Focusing Range: Shutter: Aperture Setting: Film Speed Index: Viewfinder: Flash: Film Winding and Rewindi : Red-eye Reduction: Counter: Power Source: Dimensions: Weight: 35mm motorized camera with auto lash. 35mm perforated cartridge film, 24mm x 36mm format...
Operating Instructions
Page 123
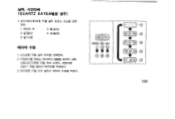
talAi c-1101EIZ- 3 c[AI t2-Pd Ei1014 -r MODE SEL ADJ O 00 * * * O0 0 02 2V4 '99) (24 02 '99) f('99 02 2J, I 24 22:25 122 Ail_tfAS (SET) Og- Ei101E) ;=1. 3 O/Wirt 5 UM /'7-1. 'LI sai tiq 2 ''/z'/k-A 4 01014 -1"-11 1.4E-2.E 2i E-5-§ 1,44,E1O. 2 E-1101E)7) (SELECT)WE CA Al44 *Sc). 4 24, AIV21441 (QUARTZ DATERin 1.3E(MODE)HIS fJE).
talAi c-1101EIZ- 3 c[AI t2-Pd Ei1014 -r MODE SEL ADJ O 00 * * * O0 0 02 2V4 '99) (24 02 '99) f('99 02 2J, I 24 22:25 122 Ail_tfAS (SET) Og- Ei101E) ;=1. 3 O/Wirt 5 UM /'7-1. 'LI sai tiq 2 ''/z'/k-A 4 01014 -1"-11 1.4E-2.E 2i E-5-§ 1,44,E1O. 2 E-1101E)7) (SELECT)WE CA Al44 *Sc). 4 24, AIV21441 (QUARTZ DATERin 1.3E(MODE)HIS fJE).
Operating Instructions
Page 128
...22527 Hamburg, GERMANY Pentax U.K. Slough SL3 8PN, U.K. Pentax Canada Inc. 3131 Universal Drive, Mississauga. hogy a termek rnegfelel az Europa K0zasseg biztonsagl el Iresanak es k0veteirnenyerek CE onsimatatitimmamemmmintvall CEnfa. -f`;'yU-a%-4(EC) 01-aoll 1-9901 57109 PRINTED IN CHINA 70839.450B...Pentax Europe n.r. II marchc CE garantisce la conformite del prodotto alla direttiva di scurezza CEE A marca CE garante que este produto este em conlormidade corn as condcbes impostas pela directive ea CE sobre seguance. Limited Pentax House, Heron Drive, Langley. SWITZERLAND Pentax...
...22527 Hamburg, GERMANY Pentax U.K. Slough SL3 8PN, U.K. Pentax Canada Inc. 3131 Universal Drive, Mississauga. hogy a termek rnegfelel az Europa K0zasseg biztonsagl el Iresanak es k0veteirnenyerek CE onsimatatitimmamemmmintvall CEnfa. -f`;'yU-a%-4(EC) 01-aoll 1-9901 57109 PRINTED IN CHINA 70839.450B...Pentax Europe n.r. II marchc CE garantisce la conformite del prodotto alla direttiva di scurezza CEE A marca CE garante que este produto este em conlormidade corn as condcbes impostas pela directive ea CE sobre seguance. Limited Pentax House, Heron Drive, Langley. SWITZERLAND Pentax...


