
Operation Manual
Page 1
Digital Camera Operating Manual To ensure the best performance from your camera, please read the Operating Manual before using the camera.
Digital Camera Operating Manual To ensure the best performance from your camera, please read the Operating Manual before using the camera.
Operation Manual
Page 2
... product supports PRINT Image Matching II. Keep this manual before using extremely high precision technology. Please read this manual safe, as items for purchasing the PENTAX Optio 30 Digital Camera. Although the level of Seiko Epson Corporation. • "PictBridge" allows the user to the rights as specified in combination, PRINT Image Matching II enabled...
... product supports PRINT Image Matching II. Keep this manual before using extremely high precision technology. Please read this manual safe, as items for purchasing the PENTAX Optio 30 Digital Camera. Although the level of Seiko Epson Corporation. • "PictBridge" allows the user to the rights as specified in combination, PRINT Image Matching II enabled...

Operation Manual
Page 3
...shocks. • If the inside of the camera should become exposed as a result of, for exclusive use of small children. These symbols indicate that it being dropped, please do not hang the strap around your nearest PENTAX service center. Seek medical attention immediately if accidentally ...swallowed. • Use an AC adapter of the power and voltage specified for example, the camera being swallowed by the following symbols during thunderstorms. This ...
...shocks. • If the inside of the camera should become exposed as a result of, for exclusive use of small children. These symbols indicate that it being dropped, please do not hang the strap around your nearest PENTAX service center. Seek medical attention immediately if accidentally ...swallowed. • Use an AC adapter of the power and voltage specified for example, the camera being swallowed by the following symbols during thunderstorms. This ...
Operation Manual
Page 4
...of discoloring. • Should the LCD be damaged, be obtained through taking pictures) arising from the camera immediately if it is still working properly, particularly prior to disassemble or short the battery. PENTAX is not responsible for consequential damages (costs incurred as a result of taking pictures, loss of benefits... mouth. Also, be careful not to allow the liquid crystal to be careful of time. • Do not place your finger on this camera, only the Ni-MH battery can be useful if you travel abroad. Also take care, as there is a risk of low temperature burns...
...of discoloring. • Should the LCD be damaged, be obtained through taking pictures) arising from the camera immediately if it is still working properly, particularly prior to disassemble or short the battery. PENTAX is not responsible for consequential damages (costs incurred as a result of taking pictures, loss of benefits... mouth. Also, be careful not to allow the liquid crystal to be careful of time. • Do not place your finger on this camera, only the Ni-MH battery can be useful if you travel abroad. Also take care, as there is a risk of low temperature burns...

Operation Manual
Page 5
...display becomes slow at temperatures of approximately 60°C (140°F) but will become very hot inside and outside of the camera. Place the camera on the inside . • Storing the camera where pesticides and chemicals are recommended every 1 to 2 years in order to the vibrations of a motorbike, car, or ...properties of the liquid crystal and is not a fault. • Periodic checks are handled should be used is not subjected to the camera. Particular care should be avoided. Remove from case and store in your back pocket as this may damage the exterior of water get ...
...display becomes slow at temperatures of approximately 60°C (140°F) but will become very hot inside and outside of the camera. Place the camera on the inside . • Storing the camera where pesticides and chemicals are recommended every 1 to 2 years in order to the vibrations of a motorbike, car, or ...properties of the liquid crystal and is not a fault. • Periodic checks are handled should be used is not subjected to the camera. Particular care should be avoided. Remove from case and store in your back pocket as this may damage the exterior of water get ...
Operation Manual
Page 6
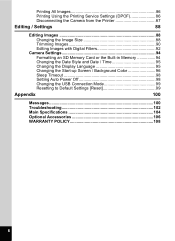
... 4 Contents of the Operating Manual 7 Checking Package Contents 8 Names of Parts 9 Names of Operating Parts 10 Getting Started 11 Attaching the Strap 11 Powering the Camera 12 Installing the Batteries 12 Using the AC Adapter (optional 14 Installing / Removing the SD Memory Card 15 Turning the... Camera On and Off 17 Playback Only Mode 17 Initial Settings 18 Setting the Display Language 18 Setting the Date and Time 19 Setting the Recorded ...
... 4 Contents of the Operating Manual 7 Checking Package Contents 8 Names of Parts 9 Names of Operating Parts 10 Getting Started 11 Attaching the Strap 11 Powering the Camera 12 Installing the Batteries 12 Using the AC Adapter (optional 14 Installing / Removing the SD Memory Card 15 Turning the... Camera On and Off 17 Playback Only Mode 17 Initial Settings 18 Setting the Display Language 18 Setting the Date and Time 19 Setting the Recorded ...

Operation Manual
Page 7
... 79 Protecting Images from Deletion (Protect 80 Setting the Printing Service (DPOF 81 Printing Single Image 81 Printing All Images 83 Printing Directly from the Camera Connected to a Printer (PictBridge 84 Connecting the Camera to the Printer 84 Printing Single Image 85 5
... 79 Protecting Images from Deletion (Protect 80 Setting the Printing Service (DPOF 81 Printing Single Image 81 Printing All Images 83 Printing Directly from the Camera Connected to a Printer (PictBridge 84 Connecting the Camera to the Printer 84 Printing Single Image 85 5
Operation Manual
Page 8
... the Printer 87 Editing / Settings 88 Editing Images 88 Changing the Image Size 88 Trimming Images 90 Editing Images with Digital Filters 92 Camera Settings 94 Formatting an SD Memory Card or the Built-in Memory 94 Changing the Date Style and Date / Time 95 Changing the Display Language ...
... the Printer 87 Editing / Settings 88 Editing Images 88 Changing the Image Size 88 Trimming Images 90 Editing Images with Digital Filters 92 Camera Settings 94 Formatting an SD Memory Card or the Built-in Memory 94 Changing the Date Style and Date / Time 95 Changing the Display Language ...
Operation Manual
Page 9
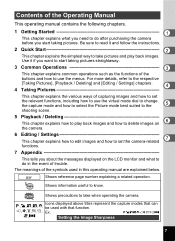
...play back images. Use it and follow the instructions. 2 Quick Start 2 This chapter explains the simplest way to take when operating the camera. For more details, refer to the respective [Taking Pictures], [Playback / Deleting] and [Editing / Settings] chapters. 4 4 Taking ...Pictures This chapter explains the various ways of capturing images and how to set the relevant functions, including how to set the camera-related functions. 7 Appendix This tells you start taking pictures straightaway. 3 Common Operations 3 This chapter explains common operations such as the...
...play back images. Use it and follow the instructions. 2 Quick Start 2 This chapter explains the simplest way to take when operating the camera. For more details, refer to the respective [Taking Pictures], [Playback / Deleting] and [Editing / Settings] chapters. 4 4 Taking ...Pictures This chapter explains the various ways of capturing images and how to set the relevant functions, including how to set the camera-related functions. 7 Appendix This tells you start taking pictures straightaway. 3 Common Operations 3 This chapter explains common operations such as the...

Operation Manual
Page 10
Checking Package Contents Camera Optio 30 Strap O-ST18 (∗) Software (CD-ROM) S-SW18 USB cable I-USB6 (*) AA Alkaline batteries (2) Operating Manual (this manual) Operating Manual (PC Connection Manual) About items marked with (∗) ∗ Items marked with (∗) are also available as optional accessories. For other optional accessories, refer to the list on page 106. ∗Type of AC plug cord D-CO2A Australia / D-CO2B United Kingdom / D-CO2E Europe / D-CO2H Hong Kong / D-CO2J Japan / D-CO2K Korea / D-CO2U North America, Canada 8
Checking Package Contents Camera Optio 30 Strap O-ST18 (∗) Software (CD-ROM) S-SW18 USB cable I-USB6 (*) AA Alkaline batteries (2) Operating Manual (this manual) Operating Manual (PC Connection Manual) About items marked with (∗) ∗ Items marked with (∗) are also available as optional accessories. For other optional accessories, refer to the list on page 106. ∗Type of AC plug cord D-CO2A Australia / D-CO2B United Kingdom / D-CO2E Europe / D-CO2H Hong Kong / D-CO2J Japan / D-CO2K Korea / D-CO2U North America, Canada 8
Operation Manual
Page 14
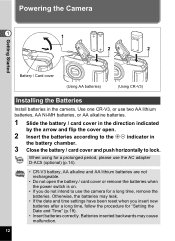
Powering the Camera 1 1 2 2 Getting Started Battery / Card cover (Using AA batteries) (Using CR-V3) Installing the Batteries Install batteries in the direction indicated by the arrow and flip ..., or use two AA lithium batteries, AA Ni-MH batteries, or AA alkaline batteries. 1 Slide the battery / card cover in the camera. When using for a prolonged period, please use the camera for "Setting the Date and Time" (p.19). • Insert batteries correctly. Batteries inserted backwards may leak. • If the date and...
Powering the Camera 1 1 2 2 Getting Started Battery / Card cover (Using AA batteries) (Using CR-V3) Installing the Batteries Install batteries in the direction indicated by the arrow and flip ..., or use two AA lithium batteries, AA Ni-MH batteries, or AA alkaline batteries. 1 Slide the battery / card cover in the camera. When using for a prolonged period, please use the camera for "Setting the Date and Time" (p.19). • Insert batteries correctly. Batteries inserted backwards may leak. • If the date and...

Operation Manual
Page 15
...is running low. : Battery is running very low. : Battery is exhausted. : After the message is displayed, the camera will be recovered when the batteries are based on PENTAX measuring conditions. Battery performance once deteriorated due to low temperature will turn off the LCD monitor, and using the... camera at low temperatures. Use of other batteries (such as the temperature decreases. Battery Level...
...is running low. : Battery is running very low. : Battery is exhausted. : After the message is displayed, the camera will be recovered when the batteries are based on PENTAX measuring conditions. Battery performance once deteriorated due to low temperature will turn off the LCD monitor, and using the... camera at low temperatures. Use of other batteries (such as the temperature decreases. Battery Level...
Operation Manual
Page 16
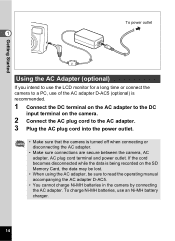
...data is turned off when connecting or disconnecting the AC adapter. • Make sure connections are secure between the camera, AC adapter, AC plug cord terminal and power outlet. To charge Ni-MH batteries, use of the AC adapter...) is recommended. 1 Connect the DC terminal on the AC adapter to the DC input terminal on the camera. 2 Connect the AC plug cord to the AC adapter. 3 Plug the AC plug cord into the power outlet.... • Make sure that the camera is being recorded on the SD Memory Card, the data may be lost. • When using the ...
...data is turned off when connecting or disconnecting the AC adapter. • Make sure connections are secure between the camera, AC adapter, AC plug cord terminal and power outlet. To charge Ni-MH batteries, use of the AC adapter...) is recommended. 1 Connect the DC terminal on the AC adapter to the DC input terminal on the camera. 2 Connect the AC plug cord to the AC adapter. 3 Plug the AC plug cord into the power outlet.... • Make sure that the camera is being recorded on the SD Memory Card, the data may be lost. • When using the ...
Operation Manual
Page 17
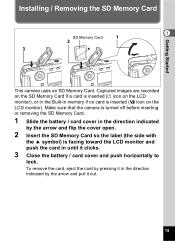
Getting Started Installing / Removing the SD Memory Card 1 SD Memory Card 1 2 3 2 This camera uses an SD Memory Card. icon on the LCD monitor), or in the Built-in memory if no card is facing toward the LCD monitor ... in the direction indicated by the arrow and pull it clicks. 3 Close the battery / card cover and push horizontally to lock. Make sure that the camera is turned off before inserting or removing the SD Memory Card. 1 Slide the battery / card cover in the direction indicated by the arrow and flip...
Getting Started Installing / Removing the SD Memory Card 1 SD Memory Card 1 2 3 2 This camera uses an SD Memory Card. icon on the LCD monitor), or in the Built-in memory if no card is facing toward the LCD monitor ... in the direction indicated by the arrow and pull it clicks. 3 Close the battery / card cover and push horizontally to lock. Make sure that the camera is turned off before inserting or removing the SD Memory Card. 1 Slide the battery / card cover in the direction indicated by the arrow and flip...

Operation Manual
Page 18
... be deleted under the following conditions. Be sure to the [Lock] position prevents the recording and deleting of data and the formatting of disuse. PENTAX does not accept any liability regarding deleted data. (1) When the user mishandles the SD Memory Card (2) When the SD Memory Card is placed in...a location with your PC. • Avoid using an SD Memory Card • Make sure the camera is removed while recording or reading data on an SD Memory Card may be answered by your nearest PENTAX service center. Be careful. • Do not remove the card or turn off before use . ...
... be deleted under the following conditions. Be sure to the [Lock] position prevents the recording and deleting of data and the formatting of disuse. PENTAX does not accept any liability regarding deleted data. (1) When the user mishandles the SD Memory Card (2) When the SD Memory Card is placed in...a location with your PC. • Avoid using an SD Memory Card • Make sure the camera is removed while recording or reading data on an SD Memory Card may be answered by your nearest PENTAX service center. Be careful. • Do not remove the card or turn off before use . ...

Operation Manual
Page 19
... Only mode, the lens does not extend. • To switch from Playback Only mode to Capture mode, press the power switch twice to turn the camera off . When the SD Memory Card write-protect switch is set to LOCK, Y appears and images cannot be recorded. 0 10/10/2004 11:20 ...power switch again to activate the Playback Only mode. • When the camera is being used , @ appears on again. Turning the Camera On and Off Power switch 1 Getting Started Q Playback button 1 Press the power switch. The camera will turn the camera off and then on the LCD monitor. When the SD Memory Card is...
... Only mode, the lens does not extend. • To switch from Playback Only mode to Capture mode, press the power switch twice to turn the camera off . When the SD Memory Card write-protect switch is set to LOCK, Y appears and images cannot be recorded. 0 10/10/2004 11:20 ...power switch again to activate the Playback Only mode. • When the camera is being used , @ appears on again. Turning the Camera On and Off Power switch 1 Getting Started Q Playback button 1 Press the power switch. The camera will turn the camera off and then on the LCD monitor. When the SD Memory Card is...
Operation Manual
Page 20
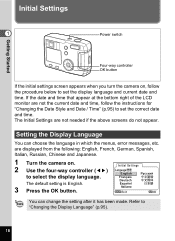
... screens do not appear. Initial Settings 1 Power switch Getting Started Four-way controller OK button If the initial settings screen appears when you turn the camera on . The Initial Settings are displayed from the following: English, French, German, Spanish, Italian, Russian, Chinese and Japanese. 1 Turn the...
... screens do not appear. Initial Settings 1 Power switch Getting Started Four-way controller OK button If the initial settings screen appears when you turn the camera on . The Initial Settings are displayed from the following: English, French, German, Spanish, Italian, Russian, Chinese and Japanese. 1 Turn the...
Operation Manual
Page 22
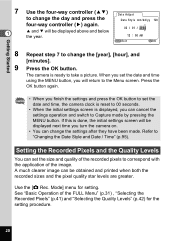
... When you finish the settings and press the OK button to set the date and time, the camera clock is reset to 00 seconds. • When the initial settings screen is displayed, you can... set the date and time using the MENU button, you turn the camera on. • You can be displayed above and below the year. If this is ready to take a ...controller (5) again. 2 and 3 will return to change the settings after they have been made. The camera is done, the initial settings screen will be displayed next time you will be obtained and printed when ...
... When you finish the settings and press the OK button to set the date and time, the camera clock is reset to 00 seconds. • When the initial settings screen is displayed, you can... set the date and time using the MENU button, you turn the camera on. • You can be displayed above and below the year. If this is ready to take a ...controller (5) again. 2 and 3 will return to change the settings after they have been made. The camera is done, the initial settings screen will be displayed next time you will be obtained and printed when ...

Operation Manual
Page 23
The default setting is based on standard shooting conditions specified by PENTAX and may vary depending on the subject, shooting conditions, capture mode, SD Memory Card, etc. . Approximate Number of Recordable Images, Recorded Pixels and Quality Levels ...) (160×120) 42 sec. 155 sec. • The above table indicates the number of images when using the Built-in the SIMPLE Menu This camera has two types of the SIMPLE Menu 1p.29 21 Suitable for photo prints. Basic Operation of menus: SIMPLE menu, which can set commonly used...
The default setting is based on standard shooting conditions specified by PENTAX and may vary depending on the subject, shooting conditions, capture mode, SD Memory Card, etc. . Approximate Number of Recordable Images, Recorded Pixels and Quality Levels ...) (160×120) 42 sec. 155 sec. • The above table indicates the number of images when using the Built-in the SIMPLE Menu This camera has two types of the SIMPLE Menu 1p.29 21 Suitable for photo prints. Basic Operation of menus: SIMPLE menu, which can set commonly used...

Operation Manual
Page 24
... light green when the camera is being recorded.) The focus frame on the SD Memory Card or in the Builtin memory. (The viewfinder lamp blinks slowly while the image is ...
... light green when the camera is being recorded.) The focus frame on the SD Memory Card or in the Builtin memory. (The viewfinder lamp blinks slowly while the image is ...


