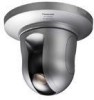

Network Camera
Page 3
...States and/or other countries. • Adobe and Reader are 2 sets of operating instructions for the WV-NS202 as follows. • Installation Guide • Network operating instructions These network operating instructions contain descriptions of how to read PDF. Follow the instructions on page 77 when the ...trademarks or trademarks of the ActiveX control required to display images from the camera will not be displayed. Adobe® Reader is not installed on the information bar of the browser. • When the "Live" page is a trademark. • Other names of companies and ...
...States and/or other countries. • Adobe and Reader are 2 sets of operating instructions for the WV-NS202 as follows. • Installation Guide • Network operating instructions These network operating instructions contain descriptions of how to read PDF. Follow the instructions on page 77 when the ...trademarks or trademarks of the ActiveX control required to display images from the camera will not be displayed. Adobe® Reader is not installed on the information bar of the browser. • When the "Live" page is a trademark. • Other names of companies and ...
Network Camera
Page 4
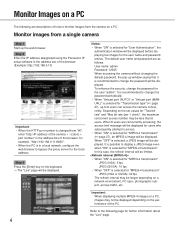
... the camera concurrently. Step 2 Enter the IP address designated using the Panasonic IP setup software in the address box of the PC. User name: admin Password: 12345 When accessing the camera without changing... "http://192.168.0.11:8080". • When the PC is selected for further information about the "Live" page. 4 Important: When displaying multiple MPEG-4 images on a PC, images may not be displayed ...a JPEG image even when "ON" is in a local network, configure the web browser to monitor images from "80", enter "http://IP address of the camera + : (colon) + port number" in the address...
... the camera concurrently. Step 2 Enter the IP address designated using the Panasonic IP setup software in the address box of the PC. User name: admin Password: 12345 When accessing the camera without changing... "http://192.168.0.11:8080". • When the PC is selected for further information about the "Live" page. 4 Important: When displaying multiple MPEG-4 images on a PC, images may not be displayed ...a JPEG image even when "ON" is in a local network, configure the web browser to monitor images from "80", enter "http://IP address of the camera + : (colon) + port number" in the address...

Network Camera
Page 5
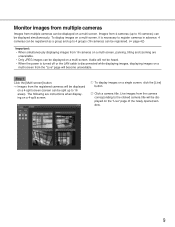
...on a multi-screen by registering cameras on the setup menu. ( page 9) r Image type buttons : The letters "MPEG-4" on the button will turn green and the status of the AUX connector will be closed. 5 About the "Live" page q [Setup] button w [Live] button e Multi-screen buttons r... Image type buttons t Image capture size buttons !5 Alarm occurrence indication button !4 Camera title !6 Full screen button !7 One shot button !8 Mic input button !9 ...
...on a multi-screen by registering cameras on the setup menu. ( page 9) r Image type buttons : The letters "MPEG-4" on the button will turn green and the status of the AUX connector will be closed. 5 About the "Live" page q [Setup] button w [Live] button e Multi-screen buttons r... Image type buttons t Image capture size buttons !5 Alarm occurrence indication button !4 Camera title !6 Full screen button !7 One shot button !8 Mic input button !9 ...

Network Camera
Page 6
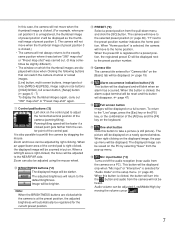
... will be displayed on the "Live" page. Preset map-shot: 8 thumbnail images of the main area and also the contrast ratio between the start from the pull-down menu and click the [START] button. When a thumbnail image is clicked, the camera moves to the FAR side. !0 AUTO MODE...(45° x 8 = 360°), and then displays 8 thumbnail images of how to the respective position and live images will be displayed on the "Live" page. When a thumbnail image is clicked, the camera moves to manually record images on the SD memo- u [SD] button (manual SD recording button) (*2) This button ...
... will be displayed on the "Live" page. Preset map-shot: 8 thumbnail images of the main area and also the contrast ratio between the start from the pull-down menu and click the [START] button. When a thumbnail image is clicked, the camera moves to the FAR side. !0 AUTO MODE...(45° x 8 = 360°), and then displays 8 thumbnail images of how to the respective position and live images will be displayed on the "Live" page. When a thumbnail image is clicked, the camera moves to manually record images on the SD memo- u [SD] button (manual SD recording button) (*2) This button ...
Network Camera
Page 7
...moving the volume cursor . 7 Note: When the BRIGHTNESS buttons are displayed will close when Clicking the following buttons that can switch the camera channel or reload images. [Live] button, multi-screen buttons, image type buttons ([MPEG-4]/[JPEG]), image capture size buttons ([VGA]/QVGA), full screen button, [Setup] ...or "Preset map-shot" again. !1 Control pad/buttons (*2) : Left-click on the control pad to the preset position number. !4 Camera title The camera title entered for "Audio mode" on the setup menu. ( page 40) When this button is clicked, the button will turn into the...
...moving the volume cursor . 7 Note: When the BRIGHTNESS buttons are displayed will close when Clicking the following buttons that can switch the camera channel or reload images. [Live] button, multi-screen buttons, image type buttons ([MPEG-4]/[JPEG]), image capture size buttons ([VGA]/QVGA), full screen button, [Setup] ...or "Preset map-shot" again. !1 Control pad/buttons (*2) : Left-click on the control pad to the preset position number. !4 Camera title The camera title entered for "Audio mode" on the setup menu. ( page 40) When this button is clicked, the button will turn into the...
Network Camera
Page 8
...button (*3) Turns on/off . When the SD recording starts, this indicator will go off the audio transmission (play audio from the PC on the camera speaker). Administrator" *2 Only operable by users whose access level is clicked, the button will not be checked with this indicator. Note: When operated by users... be inoperable for both the audio transmission and reception) will be displayed in order to page 55 for "Authentication" on the "Live" page that is up to the level that had been set the clicked point as the center. When the SD recording stops, this ...
...button (*3) Turns on/off . When the SD recording starts, this indicator will go off the audio transmission (play audio from the PC on the camera speaker). Administrator" *2 Only operable by users whose access level is clicked, the button will not be checked with this indicator. Note: When operated by users... be inoperable for both the audio transmission and reception) will be displayed in order to page 55 for "Authentication" on the "Live" page that is up to the level that had been set the clicked point as the center. When the SD recording stops, this ...
Network Camera
Page 9
... cable is necessary to register cameras in advance. 4 cameras can be registered as a group and up to 4 groups (16 cameras) can be registered. ( page 42) Important: • When simultaneously displaying images from the "Live" page will not be displayed on the "Live" page of the newly opened... window. 9 To display images on a multi-screen, it is disconnected while displaying images, displaying images on a multi-screen from 16 cameras on a multi-screen, panning, ...
... cable is necessary to register cameras in advance. 4 cameras can be registered as a group and up to 4 groups (16 cameras) can be registered. ( page 42) Important: • When simultaneously displaying images from the "Live" page will not be displayed on the "Live" page of the newly opened... window. 9 To display images on a multi-screen, it is disconnected while displaying images, displaying images on a multi-screen from 16 cameras on a multi-screen, panning, ...
Network Camera
Page 10
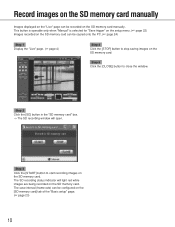
The save interval (frame rate) can be copied onto the PC. ( page 24) Step 1 Display the "Live" page. ( page 4) Step 4 Click the [STOP] button to stop saving images on the SD memory card. Step 5 Click the [CLOSE] button to start recording images ... the [SD memory card] tab of the "Basic setup" page. ( page 23) 10 Record images on the SD memory card manually Images displayed on the "Live" page can be recorded on the SD memory card.
The save interval (frame rate) can be copied onto the PC. ( page 24) Step 1 Display the "Live" page. ( page 4) Step 4 Click the [STOP] button to stop saving images on the SD memory card. Step 5 Click the [CLOSE] button to start recording images ... the [SD memory card] tab of the "Basic setup" page. ( page 23) 10 Record images on the SD memory card manually Images displayed on the "Live" page can be recorded on the SD memory card.

Network Camera
Page 11
...network disk recorder, is possible to the system. When "ON" is selected for Panasonic alarm protocol can be performed. The settings for "Panasonic alarm protocol", the connected Panasonic device will be configured in the alarm state. Alarm type Terminal alarm: When connecting an alarm device such as a sensor to the EXT I/O connector 1-3 on the "Live... alarm connector It is connected to output signals from the connected device via a network, the alarm action will be registered as recipients of the camera and sound the buzzer when an alarm occurs. The settings for "Save trigger"...
...network disk recorder, is possible to the system. When "ON" is selected for Panasonic alarm protocol can be performed. The settings for "Panasonic alarm protocol", the connected Panasonic device will be configured in the alarm state. Alarm type Terminal alarm: When connecting an alarm device such as a sensor to the EXT I/O connector 1-3 on the "Live... alarm connector It is connected to output signals from the connected device via a network, the alarm action will be registered as recipients of the camera and sound the buzzer when an alarm occurs. The settings for "Save trigger"...
Network Camera
Page 15
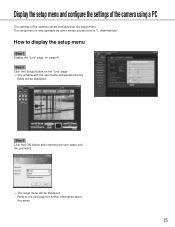
Display the setup menu and configure the settings of the camera using a PC The settings of the camera can be displayed. Refer to display the setup menu Step 1 Display the "Live" page. ( page 4) Step 2 Click the [Setup] button on the setup menu. Step 3 Click the [OK] button after entering the user name and the...
Display the setup menu and configure the settings of the camera using a PC The settings of the camera can be displayed. Refer to display the setup menu Step 1 Display the "Live" page. ( page 4) Step 2 Click the [Setup] button on the setup menu. Step 3 Click the [OK] button after entering the user name and the...

Network Camera
Page 17
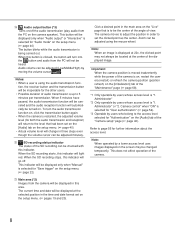
... time and date and cam- About the setup menu window q [Live] button w [Basic setup] button e [Camera setup] button r [Multi-screen setup] button t [Alarm setup] button y [Authentication setup] button u [Server setup] button i [Network setup] button o [Maintenance] button !0 [Help] button !1 Status display area !2 Setup page q [Live] button Click this button to the NTP server and the...
... time and date and cam- About the setup menu window q [Live] button w [Basic setup] button e [Camera setup] button r [Multi-screen setup] button t [Alarm setup] button y [Authentication setup] button u [Server setup] button i [Network setup] button o [Maintenance] button !0 [Help] button !1 Status display area !2 Setup page q [Live] button Click this button to the NTP server and the...
Network Camera
Page 20
.... Default: ON Important: • It is impossible to display images and to receive/ transmit audio between the camera and the PC when the viewer software "Network Camera View3" is to be sent. Note: Depending on the "Live" page. Default: Real time [Alarm status port] When selecting "real time" for "Alarm status update mode", designate...
.... Default: ON Important: • It is impossible to display images and to receive/ transmit audio between the camera and the PC when the viewer software "Network Camera View3" is to be sent. Note: Depending on the "Live" page. Default: Real time [Alarm status port] When selecting "real time" for "Alarm status update mode", designate...

Network Camera
Page 43
...: Does not receive alarms. Alarm input: Receives alarms. Default: OFF [Terminal alarm 2] Determine whether or not to the settings for descriptions of a Panasonic protocol alarm from the other cameras. Default: OFF [Command alarm] Select "ON" or "OFF" to determine whether or not to receive a terminal alarm 3 by selecting "OFF",... output: Alarm output will be carried out accord- Alarm input: Receives alarms. AUX output: The AUX buttons will be displayed on the "Live" page. Default: OFF [VMD alarm] Select "ON" or "OFF" to determine whether or not to receive the command alarm.
...: Does not receive alarms. Alarm input: Receives alarms. Default: OFF [Terminal alarm 2] Determine whether or not to the settings for descriptions of a Panasonic protocol alarm from the other cameras. Default: OFF [Command alarm] Select "ON" or "OFF" to determine whether or not to receive a terminal alarm 3 by selecting "OFF",... output: Alarm output will be carried out accord- Alarm input: Receives alarms. AUX output: The AUX buttons will be displayed on the "Live" page. Default: OFF [VMD alarm] Select "ON" or "OFF" to determine whether or not to receive the command alarm.

Network Camera
Page 44
... between "OPEN" and CLOSE" from the "Live" page. Default: OFF "AUX" is detected, the camera will move to the home position and start the auto tracking. For example, when it is necessary to control lighting at the camera location, connect a lighting control device to the...video motion (VMD function) while detecting a terminal alarm 1. Access permission: Permits access from users whose access level is detected, the camera will move to the camera action at an alarm occurrence can be configured in this section. Auto track: When a terminal alarm 1 is "1" while no ...
... between "OPEN" and CLOSE" from the "Live" page. Default: OFF "AUX" is detected, the camera will move to the home position and start the auto tracking. For example, when it is necessary to control lighting at the camera location, connect a lighting control device to the...video motion (VMD function) while detecting a terminal alarm 1. Access permission: Permits access from users whose access level is detected, the camera will move to the camera action at an alarm occurrence can be configured in this section. Auto track: When a terminal alarm 1 is "1" while no ...

Network Camera
Page 47
...alarm output ter- Default: OFF [External terminal output setup] Select "Latch" or "Pulse" for further information about the settings relating to the alarm, the camera action at an alarm occurrence. Latch: When an alarm is detected. Default: Latch AUX name The names of "AUX", "OPEN" and "CLOSE" on the... "Live" page can be output for around 20 seconds when the power of the camera is turned on the "Live" page. [Alarm output] Select "Open" or "Close" to determine whether to open or close the alarm...
...alarm output ter- Default: OFF [External terminal output setup] Select "Latch" or "Pulse" for further information about the settings relating to the alarm, the camera action at an alarm occurrence. Latch: When an alarm is detected. Default: Latch AUX name The names of "AUX", "OPEN" and "CLOSE" on the... "Live" page can be output for around 20 seconds when the power of the camera is turned on the "Live" page. [Alarm output] Select "Open" or "Close" to determine whether to open or close the alarm...
Network Camera
Page 54
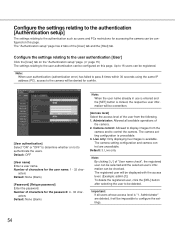
...of characters for the password: 4 - 32 char- Default: OFF [User name] Enter a user name. Camera control: Allowed to display images from the following. 1. Live only: Only displaying live images is unavailable. 3. Administrator" are unavailable. The "Authentication setup" page has 2 tabs of characters for ...denied for a while. acters Default: None (blank) [Access level] Select the access level of the camera. 2. The camera setting configuration and camera control are deleted, it will be checked. Configure the settings relating to the authentication [Authentication setup] The...
...of characters for the password: 4 - 32 char- Default: OFF [User name] Enter a user name. Camera control: Allowed to display images from the following. 1. Live only: Only displaying live images is unavailable. 3. Administrator" are unavailable. The "Authentication setup" page has 2 tabs of characters for ...denied for a while. acters Default: None (blank) [Access level] Select the access level of the camera. 2. The camera setting configuration and camera control are deleted, it will be checked. Configure the settings relating to the authentication [Authentication setup] The...
Network Camera
Page 55
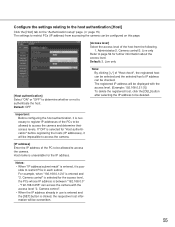
... of the PC to be allowed to restrict PCs (IP address) from accessing the camera can be configured on the "Authentication setup" page. ( page 15) The settings to access the camera. Camera control" is selected for the IP address. Live only Refer to authenticate the host. Default: OFF Note: By clicking [i] of "Host check...
... of the PC to be allowed to restrict PCs (IP address) from accessing the camera can be configured on the "Authentication setup" page. ( page 15) The settings to access the camera. Camera control" is selected for the IP address. Live only Refer to authenticate the host. Default: OFF Note: By clicking [i] of "Host check...

Network Camera
Page 59
... page 40) • When "64 kbps" is selected, it is impossible to carry out the live transmission of JPEG images and the FTP periodic transmission simultaneously. [DNS] Select "AUTO" or "MANUAL" ...995, 10669, 10670 [Line speed] Select the line speed for "DNS", enter the IP address of the camera. When "MANUAL" is selected, it is necessary to use the default setting "AUTO". Default: MANUAL [Primary... Default: AUTO [FTP access] Select "Allow" or "Forbid" to determine whether to the network administrator about the IP address of the DHCP server. [HTTP port] Assign the port numbers ...
... page 40) • When "64 kbps" is selected, it is impossible to carry out the live transmission of JPEG images and the FTP periodic transmission simultaneously. [DNS] Select "AUTO" or "MANUAL" ...995, 10669, 10670 [Line speed] Select the line speed for "DNS", enter the IP address of the camera. When "MANUAL" is selected, it is necessary to use the default setting "AUTO". Default: MANUAL [Primary... Default: AUTO [FTP access] Select "Allow" or "Forbid" to determine whether to the network administrator about the IP address of the DHCP server. [HTTP port] Assign the port numbers ...
Network Camera
Page 75
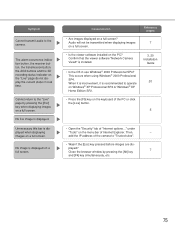
...live image is displayed when displaying images on a full screen. Confirm that the viewer software "Network Camera View3" is installed. • Is the OS in real time. under "Tools" on a full screen? add the IP address of Internet Explorer. Cause/solution • Are images displayed on the menu bar of the camera to the camera...Internet options..." Reference pages 7 3, 20 Installation Guide 20 5 • Open the "Security" tab of the PC or click the [Live] button. Cannot return to operate on Windows® XP Professional SP2 or Windows® XP Home Edition SP2. • Press the ...
...live image is displayed when displaying images on a full screen. Confirm that the viewer software "Network Camera View3" is installed. • Is the OS in real time. under "Tools" on a full screen? add the IP address of Internet Explorer. Cause/solution • Are images displayed on the menu bar of the camera to the camera...Internet options..." Reference pages 7 3, 20 Installation Guide 20 5 • Open the "Security" tab of the PC or click the [Live] button. Cannot return to operate on Windows® XP Professional SP2 or Windows® XP Home Edition SP2. • Press the ...
Network Camera
Page 3
...checked on the [Upgrade] tab of the viewer software from the camera will not be displayed when the viewer software "Network camera View3" is not installed on the information bar of the browser. • When the "Live" page is displayed for descriptions of operating instructions for the software ...site and install it. Refer to your dealer for the WV-NS202A as follows. • Installation Guide • Network operating instructions These network operating instructions contain descriptions of how to operate this product using a PC via a network and of how to connect to read PDF. When ...
...checked on the [Upgrade] tab of the viewer software from the camera will not be displayed when the viewer software "Network camera View3" is not installed on the information bar of the browser. • When the "Live" page is displayed for descriptions of operating instructions for the software ...site and install it. Refer to your dealer for the WV-NS202A as follows. • Installation Guide • Network operating instructions These network operating instructions contain descriptions of how to operate this product using a PC via a network and of how to connect to read PDF. When ...
