
Dvd Camcorder
Page 13
... transfer extracted data and title information etc. By combining DVD-MovieAlbumSE with VDR-M50PP/VDR-M70PP DVD Video Camera, it is also possible to connect this software when creating a DVD-Video disc from motion images edited using DVD-MovieAlbumSE. • Confirming the environment of connecting equipment: see page 130. Installation Guide (see page 141 for details) 1 Connect this driver when using DVD-MovieAlbumSE. • You can edit motion image files on a PC. To USB port 2 Edit motion image files using stills and images recorded...
... transfer extracted data and title information etc. By combining DVD-MovieAlbumSE with VDR-M50PP/VDR-M70PP DVD Video Camera, it is also possible to connect this software when creating a DVD-Video disc from motion images edited using DVD-MovieAlbumSE. • Confirming the environment of connecting equipment: see page 130. Installation Guide (see page 141 for details) 1 Connect this driver when using DVD-MovieAlbumSE. • You can edit motion image files on a PC. To USB port 2 Edit motion image files using stills and images recorded...
Dvd Camcorder
Page 14
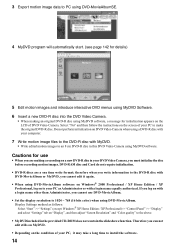
... slideshows function. 3 Export motion image data to PC using DVD-MovieAlbumSE. 4 MyDVD program will automatically start. (see page 142 for details) 5 Edit motion images and introduce interactive DVD menus using MyDVD Software. 6 Insert a new DVD-R disc into the DVD Video Camera. • When making a recording on "Display", and then adjust "Screen Resolution" and "Color quality" to the above. • MyDVD included in this DVD Video Camera using MyDVD software. Select "No" and then follow the instructions on...
... slideshows function. 3 Export motion image data to PC using DVD-MovieAlbumSE. 4 MyDVD program will automatically start. (see page 142 for details) 5 Edit motion images and introduce interactive DVD menus using MyDVD Software. 6 Insert a new DVD-R disc into the DVD Video Camera. • When making a recording on "Display", and then adjust "Screen Resolution" and "Color quality" to the above. • MyDVD included in this DVD Video Camera using MyDVD software. Select "No" and then follow the instructions on...
Dvd Camcorder
Page 15
... of Disc or Card 32 Recordable Time of Movie (Video 32 Recordable Stills (Photos) on Disc 33 Recordable Stills (Photos) on Card 33 Size and Quality of Photos 33 Setups Setting Up the DVD Video Camera 34 Holding DVD Video Camera 34 Attaching Shoulder Belt 35 Attaching Lens Cap 35 Inserting Battery into Remote Controller 36 Removing Battery from Remote Controller.......... 36 Viewing Subject Through Viewfinder 37 Viewing Image on LCD Monitor Screen 38 Closing LCD Monitor 39 Setting Date and Time 40 Changing Display Format of Date and Time 41 About the Battery Pack...
... of Disc or Card 32 Recordable Time of Movie (Video 32 Recordable Stills (Photos) on Disc 33 Recordable Stills (Photos) on Card 33 Size and Quality of Photos 33 Setups Setting Up the DVD Video Camera 34 Holding DVD Video Camera 34 Attaching Shoulder Belt 35 Attaching Lens Cap 35 Inserting Battery into Remote Controller 36 Removing Battery from Remote Controller.......... 36 Viewing Subject Through Viewfinder 37 Viewing Image on LCD Monitor Screen 38 Closing LCD Monitor 39 Setting Date and Time 40 Changing Display Format of Date and Time 41 About the Battery Pack...
Dvd Camcorder
Page 17
...-ROM 131 Installing USB Driver 133 Installing DVD-RAM Driver 135 Installing DVD-MovieAlbumSE 138 Installing MyDVD 140 Creating DVD Video on PC from DVD-RAM Disc Recorded on DVD Video Camera ....... 141 Uninstalling Software 143 Uninstalling USB Driver 143 Deleting Other Applications 144 Supplementary Information Introduction to Optional Accessories 145 Video Camera Accessories 145 Information on Round DVD Holder 146 Cleaning 147 Terminology 148 Before Requesting Service 150 Error Messages 152 Troubleshooting 158 System Reset 164 Major Specifications 165 Request for Service...
...-ROM 131 Installing USB Driver 133 Installing DVD-RAM Driver 135 Installing DVD-MovieAlbumSE 138 Installing MyDVD 140 Creating DVD Video on PC from DVD-RAM Disc Recorded on DVD Video Camera ....... 141 Uninstalling Software 143 Uninstalling USB Driver 143 Deleting Other Applications 144 Supplementary Information Introduction to Optional Accessories 145 Video Camera Accessories 145 Information on Round DVD Holder 146 Cleaning 147 Terminology 148 Before Requesting Service 150 Error Messages 152 Troubleshooting 158 System Reset 164 Major Specifications 165 Request for Service...
Dvd Camcorder
Page 50
... and take some time for the DVD Video Camera to display the Disc navigation screen after power is turned on. • When you can be possible. Power ON status During playback, set the power switch to " " or " " when using card. diagnosis function operates and a message may appear. In this time, no operation, such as recording, can immediately record or play back the same disc when the DVD Video Camera is turned on , the self- Basic Operation of DVD Video Camera Turning DVD Video Camera On or Off...
... and take some time for the DVD Video Camera to display the Disc navigation screen after power is turned on. • When you can be possible. Power ON status During playback, set the power switch to " " or " " when using card. diagnosis function operates and a message may appear. In this time, no operation, such as recording, can immediately record or play back the same disc when the DVD Video Camera is turned on , the self- Basic Operation of DVD Video Camera Turning DVD Video Camera On or Off...
Dvd Camcorder
Page 51
... blinking. • The minimum recordable time of movie is approximately 3 seconds. • See page 93 for setting of Record LED (recording indicator) On/Off. • For various functions available during recording will light. Using this DVD Video Camera, doing additional recording on DVD-R disc first recorded on the LCD screen will be made while "DISC ACCESS" is finished, turn the DVD Video Camera off while message "DISC ACCESS" is being displayed. pressing it once again will start . Power switch 1 Turn the DVD Video Camera on the screen...
... blinking. • The minimum recordable time of movie is approximately 3 seconds. • See page 93 for setting of Record LED (recording indicator) On/Off. • For various functions available during recording will light. Using this DVD Video Camera, doing additional recording on DVD-R disc first recorded on the LCD screen will be made while "DISC ACCESS" is finished, turn the DVD Video Camera off while message "DISC ACCESS" is being displayed. pressing it once again will start . Power switch 1 Turn the DVD Video Camera on the screen...

Dvd Camcorder
Page 75
... DVD video, LD, recorded video tapes, some parts of digital satellite broadcasts, etc. • If a video signal that cannot be recorded on DVD-RAM disc or card. Recording (Dubbing) Images 123 Before You Begin • Before connecting this DVD Video Camera to another device, always power the DVD Video Camera from household AC outlet using the AC adaptor. • With VDR-M70PP, using S-VIDEO will appear on the LCD screen or viewfinder of this DVD Video Camera. Recording (Dubbing) Images from Other Video Device You can connect...
... DVD video, LD, recorded video tapes, some parts of digital satellite broadcasts, etc. • If a video signal that cannot be recorded on DVD-RAM disc or card. Recording (Dubbing) Images 123 Before You Begin • Before connecting this DVD Video Camera to another device, always power the DVD Video Camera from household AC outlet using the AC adaptor. • With VDR-M70PP, using S-VIDEO will appear on the LCD screen or viewfinder of this DVD Video Camera. Recording (Dubbing) Images from Other Video Device You can connect...

Dvd Camcorder
Page 88
S IN * Displayed on VDR-M70PP only. 1 Press the MENU button, choose "Input Source" on either a DVDRAM disc or a card. Still external input mode L IN REM 9 9 9 8 : 00AM SEP 30 2 00 4 88 L IN S LINE* To input S-VIDEO signal from another device to this DVD Video Camera, you must first switch the setting on the "Record Functions Setup" menu screen, and then press the A button. 2 Select the desired option and then press the A button. V I DEO Mode Input Source OSD Ou t p u t CAMERA L I n p u t F r ame...
S IN * Displayed on VDR-M70PP only. 1 Press the MENU button, choose "Input Source" on either a DVDRAM disc or a card. Still external input mode L IN REM 9 9 9 8 : 00AM SEP 30 2 00 4 88 L IN S LINE* To input S-VIDEO signal from another device to this DVD Video Camera, you must first switch the setting on the "Record Functions Setup" menu screen, and then press the A button. 2 Select the desired option and then press the A button. V I DEO Mode Input Source OSD Ou t p u t CAMERA L I n p u t F r ame...
Dvd Camcorder
Page 131
...-RAM Driver (see page 138 for installation) You can use JPEG stills recorded on a DVD-RAM disc, on your PC, you will need to install it in order to edit the images recorded on a DVD-RAM disc and create a 3D title. To check and change the setting, open the on-line manuals (instruction manual files) for installation) Install this DVD Video Camera to PC. • Be sure you wish to create a DVD-Video disc from the Windows "Start" menu select...
...-RAM Driver (see page 138 for installation) You can use JPEG stills recorded on a DVD-RAM disc, on your PC, you will need to install it in order to edit the images recorded on a DVD-RAM disc and create a 3D title. To check and change the setting, open the on-line manuals (instruction manual files) for installation) Install this DVD Video Camera to PC. • Be sure you wish to create a DVD-Video disc from the Windows "Start" menu select...
Dvd Camcorder
Page 133
... 6 Set the power switch of PC. Click Check Click 133 If any message will appear: Click the "USB Driver Installation" button. When using Windows® XP Home Edition/XP Professional, proceed to install the USB Driver. When using OS other than Windows® XP Home Edition/XP Professional, skip this step. If the "Setup Menu" screen does not appear, doubleclick the CD-ROM drive icon. 2 The driver setup screen will appear, follow instructions on the "Setup Menu" screen...
... 6 Set the power switch of PC. Click Check Click 133 If any message will appear: Click the "USB Driver Installation" button. When using Windows® XP Home Edition/XP Professional, proceed to install the USB Driver. When using OS other than Windows® XP Home Edition/XP Professional, skip this step. If the "Setup Menu" screen does not appear, doubleclick the CD-ROM drive icon. 2 The driver setup screen will appear, follow instructions on the "Setup Menu" screen...
Dvd Camcorder
Page 135
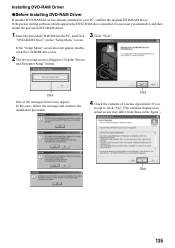
... CD-ROM drive icon. 2 The driver setup screen will appear: Click the "Driver and Formatter Setup" button. Click 4 Check the contents of the messages below may differ from those in your PC, confirm the original DVD-RAM driver. If the packet writing software which supports the DVD-RAM disc is installed, it is necessary to uninstall it , click "Yes" (The contents displayed on the "Setup Menu" screen. "DVD-RAM Driver" on actual screen may...
... CD-ROM drive icon. 2 The driver setup screen will appear: Click the "Driver and Formatter Setup" button. Click 4 Check the contents of the messages below may differ from those in your PC, confirm the original DVD-RAM driver. If the packet writing software which supports the DVD-RAM disc is installed, it is necessary to uninstall it , click "Yes" (The contents displayed on the "Setup Menu" screen. "DVD-RAM Driver" on actual screen may...
Dvd Camcorder
Page 141
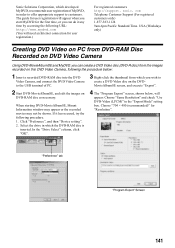
... "Same Resolution" and check "Use DVD-Video (LPCM)" in the "Export Mode" setting box. "Preference" tab "Program Export" Screen 141 USA (Weekdays only) Creating DVD Video on PC from DVD-RAM Disc Recorded on DVD Video Camera Using DVD-MovieAlbumSE and MyDVD, you can create a DVD Video disc (DVD-R disc) from the images recorded on this DVD Video Camera, following the procedure below , will need an Internet connection for user registration.) For registered customers http://support. The guide for user registration will appear...
... "Same Resolution" and check "Use DVD-Video (LPCM)" in the "Export Mode" setting box. "Preference" tab "Program Export" Screen 141 USA (Weekdays only) Creating DVD Video on PC from DVD-RAM Disc Recorded on DVD Video Camera Using DVD-MovieAlbumSE and MyDVD, you can create a DVD Video disc (DVD-R disc) from the images recorded on this DVD Video Camera, following the procedure below , will need an Internet connection for user registration.) For registered customers http://support. The guide for user registration will appear...
Dvd Camcorder
Page 143
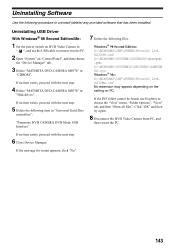
... depending on the setting on "Control Panel", and then choose the "Device Manager" tab. 3 Delete "MATSHITA DVD-CAMERA M5070" in "Universal Serial Bus controllers": "Panasonic DVD CAMERA DVD Mode USB Interface" 7 Delete the following procedure to uninstall (delete) any provided software that has been installed: Uninstalling USB Driver With Windows® 98 Second Edition/Me: 1 Set the power switch on DVD Video Camera to " ", and use Explorer to the PC. 2 Open "System" on PC. If the message for restart appears...
... depending on the setting on "Control Panel", and then choose the "Device Manager" tab. 3 Delete "MATSHITA DVD-CAMERA M5070" in "Universal Serial Bus controllers": "Panasonic DVD CAMERA DVD Mode USB Interface" 7 Delete the following procedure to uninstall (delete) any provided software that has been installed: Uninstalling USB Driver With Windows® 98 Second Edition/Me: 1 Set the power switch on DVD Video Camera to " ", and use Explorer to the PC. 2 Open "System" on PC. If the message for restart appears...

Dvd Camcorder
Page 144
... Professional: 1 Set the power switch on DVD Video Camera to " ", and use the USB cable to connect it to the PC. 2 Open "System" on "Control Panel", and then click "Device Manager" under the "Hardware" tab. 3 Delete "MATSHITA DVD-CAMERA M5070 USB Device" in "DVD/CD-ROM drive". 4 If your PC uses Windows® 2000 Professional, delete "MATSHITA DVD-CAMERA M5070 USB Device" in "Universal Serial Bus controllers". If no item exists, proceed with the next step. 5 Delete "Panasonic DVD CAMERA DVD Mode USB Interface" in "Disk drives". Deleting Other Applications...
... Professional: 1 Set the power switch on DVD Video Camera to " ", and use the USB cable to connect it to the PC. 2 Open "System" on "Control Panel", and then click "Device Manager" under the "Hardware" tab. 3 Delete "MATSHITA DVD-CAMERA M5070 USB Device" in "DVD/CD-ROM drive". 4 If your PC uses Windows® 2000 Professional, delete "MATSHITA DVD-CAMERA M5070 USB Device" in "Universal Serial Bus controllers". If no item exists, proceed with the next step. 5 Delete "Panasonic DVD CAMERA DVD Mode USB Interface" in "Disk drives". Deleting Other Applications...
Dvd Camcorder
Page 160
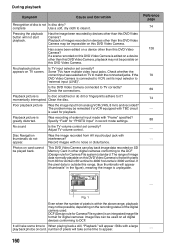
... DVD Video Camera. Is TV input selector set its input selector to "external input (LINE)". Check the connections. Poor playback picture Was the image input from AV input/output jack with TBC circuit is connected to appear. 160 Adjust TV volume control. Record images with a large play back image data recorded on this DVD Video Camera? The range of image data normally playable on SD Memory Card in record mode settings. DCF (Design rule for Camera File system) is an integrated image file format for playback. It will take some time to VCR, set...
... DVD Video Camera. Is TV input selector set its input selector to "external input (LINE)". Check the connections. Poor playback picture Was the image input from AV input/output jack with TBC circuit is connected to appear. 160 Adjust TV volume control. Record images with a large play back image data recorded on this DVD Video Camera? The range of image data normally playable on SD Memory Card in record mode settings. DCF (Design rule for Camera File system) is an integrated image file format for playback. It will take some time to VCR, set...

Operating Instructions
Page 13
... of Round DVD Holder Conies off 29 Disc Cleaning 29 Available Cards 30 Storage Capacity on Disc or Card 31 Recordable Time of Movie (Video) 31 Recordable Stills (Photos) 32 Features of DVD Video Camera/Recorder 30 Versatile Functions Available 30 Recording on Disc 32 Recording Movie and Still 32 Immediate Reviewing of Recorded Image 33 Editing in Various Ways on t.T1IT Monitor Screen tit Huing LCD Monitor 37 Setting Up the Battery 40 Charging Battery 40 Allaching Battery to read...
... of Round DVD Holder Conies off 29 Disc Cleaning 29 Available Cards 30 Storage Capacity on Disc or Card 31 Recordable Time of Movie (Video) 31 Recordable Stills (Photos) 32 Features of DVD Video Camera/Recorder 30 Versatile Functions Available 30 Recording on Disc 32 Recording Movie and Still 32 Immediate Reviewing of Recorded Image 33 Editing in Various Ways on t.T1IT Monitor Screen tit Huing LCD Monitor 37 Setting Up the Battery 40 Charging Battery 40 Allaching Battery to read...
Operating Instructions
Page 14
Will I IrIrli I lists . . . ( Advanced Techniques Understanding Flow of Menu 'Jelling lip Cancun I tuft:nor'; /4 Colechi If) Shooting Mode to Cinema Mode n INC)] O 1/1/8 ff v ;GNI FN MOIJI Ift9 MODE) 79 Setting Up Record Functions 8 I Switching Movie Quality (VIDEO Mode) N I 11wilching Quality of Still Image (Quality) 82 l Magnifying 2iihject Image (Dig. /omit) 81 Reducing Wind Noise during Recording (Wind Cut) //1 Switching to Match Hie subject (Switching Programme Al Mode) II Adjusting Colour (While Dal ) . /0 iny.-mo :mot-Hu:Jur /513) /-
Will I IrIrli I lists . . . ( Advanced Techniques Understanding Flow of Menu 'Jelling lip Cancun I tuft:nor'; /4 Colechi If) Shooting Mode to Cinema Mode n INC)] O 1/1/8 ff v ;GNI FN MOIJI Ift9 MODE) 79 Setting Up Record Functions 8 I Switching Movie Quality (VIDEO Mode) N I 11wilching Quality of Still Image (Quality) 82 l Magnifying 2iihject Image (Dig. /omit) 81 Reducing Wind Noise during Recording (Wind Cut) //1 Switching to Match Hie subject (Switching Programme Al Mode) II Adjusting Colour (While Dal ) . /0 iny.-mo :mot-Hu:Jur /513) /-

Operating Instructions
Page 49
... he possible. and operating the DVD video camera/recorder will lipid or blink to show that the DVD video camera/recorder iS recognising the disc or card: During this case, refer to "Trouble Messages" on page 142 and take seine time for the DVD video camera/recorder to start recording when turning the FWD video camera/recorder on next time (DVD-H disc). • If you turn the DVD video camel a/recorder on . set the power switch to "L'A PHOTO": To record still on SD memory card or MultiMediaCard Note...
... he possible. and operating the DVD video camera/recorder will lipid or blink to show that the DVD video camera/recorder iS recognising the disc or card: During this case, refer to "Trouble Messages" on page 142 and take seine time for the DVD video camera/recorder to start recording when turning the FWD video camera/recorder on next time (DVD-H disc). • If you turn the DVD video camel a/recorder on . set the power switch to "L'A PHOTO": To record still on SD memory card or MultiMediaCard Note...

Operating Instructions
Page 83
... device ' S LINE To input S-VIDEO signal from anon-for recording of less moving video. On-screen display No display L IN S IN 1 Pre.. on either a DVD-1ZAM disc or a card. menu screen. screen information. • The PHOTO Input setting will be confirmed using the on how to connect the DVD video camera/recorder to see hr./ In reGnnnrt Ihn nvn ,n)-1,-,), e,. Refer to the explanation starting from page 67 on - Input Source" tin Ihe "Record Functions screen. Frame suits recording...
... device ' S LINE To input S-VIDEO signal from anon-for recording of less moving video. On-screen display No display L IN S IN 1 Pre.. on either a DVD-1ZAM disc or a card. menu screen. screen information. • The PHOTO Input setting will be confirmed using the on how to connect the DVD video camera/recorder to see hr./ In reGnnnrt Ihn nvn ,n)-1,-,), e,. Refer to the explanation starting from page 67 on - Input Source" tin Ihe "Record Functions screen. Frame suits recording...
Operating Instructions
Page 129
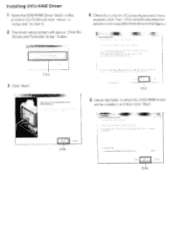
Ilerrjj Cenrel Click Click I Click UVII I 3 Click "Next". Installing DVD-HAM Driver 1 Open the DVD-RAM Driver folder on the provided CD-ROM and click "setup" or "setup.exe" to start it , click "Yes". (The contents displayed on actual screen may differ from those in the figure.) n e A ir I , I ter Ir 311. Click 5 Check the folder in which the DVD-RAM driver will appear: Click the "Driver and Formatter Setup" button. 4 Check the contents of License Agreement: If you accept it . 2 The driver setup screen will be installed, and then click "Next".
Ilerrjj Cenrel Click Click I Click UVII I 3 Click "Next". Installing DVD-HAM Driver 1 Open the DVD-RAM Driver folder on the provided CD-ROM and click "setup" or "setup.exe" to start it , click "Yes". (The contents displayed on actual screen may differ from those in the figure.) n e A ir I , I ter Ir 311. Click 5 Check the folder in which the DVD-RAM driver will appear: Click the "Driver and Formatter Setup" button. 4 Check the contents of License Agreement: If you accept it . 2 The driver setup screen will be installed, and then click "Next".


