Operating Instructions
Page 2
... to use safety-related components for installation, grounding, and other battery systems, especially a 24 V DC battery system. ❑ Keep batteries and insulation film out of reach of important operating instructions and installation instructions. Panasonic assumes the pictographs are located. Wiring and installation with the electrical safety system have specific procedures of vision. ❑ Never have it interferes with your car audio system carefully before installation. ❑ Make sure...
... to use safety-related components for installation, grounding, and other battery systems, especially a 24 V DC battery system. ❑ Keep batteries and insulation film out of reach of important operating instructions and installation instructions. Panasonic assumes the pictographs are located. Wiring and installation with the electrical safety system have specific procedures of vision. ❑ Never have it interferes with your car audio system carefully before installation. ❑ Make sure...
Operating Instructions
Page 3
... THE DEVICES TO BE CONNECTED. English Caution ❑ Use the designated parts and tools for an extended period of time. ❑ Follow the instructions to install and wire the prod- ● Insulate the battery (by placing them in a plastic bag or uct. Use the supplied or designated parts and appropriate tools Observe the following cautions when handling the battery for the remote control unit. ● Use...
... THE DEVICES TO BE CONNECTED. English Caution ❑ Use the designated parts and tools for an extended period of time. ❑ Follow the instructions to install and wire the prod- ● Insulate the battery (by placing them in a plastic bag or uct. Use the supplied or designated parts and appropriate tools Observe the following cautions when handling the battery for the remote control unit. ● Use...
Operating Instructions
Page 5
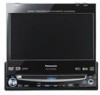
... liquid crystal panel to cloud over due to water vapor or it may cause condensation (droplets of synchronization or the image quality may decline in such environments. Main Unit (LCD monitor/DVD player) Qty.: 1 2. CQ-VD7005U 5 Installation Hardware (screws, cords, etc.) (a Installation Instructions) Note: ¡The number in evidence but leave the unit standing for maintenance and service. ¡Accessories and their parts numbers are in...
... liquid crystal panel to cloud over due to water vapor or it may cause condensation (droplets of synchronization or the image quality may decline in such environments. Main Unit (LCD monitor/DVD player) Qty.: 1 2. CQ-VD7005U 5 Installation Hardware (screws, cords, etc.) (a Installation Instructions) Note: ¡The number in evidence but leave the unit standing for maintenance and service. ¡Accessories and their parts numbers are in...

Operating Instructions
Page 7
... consumer control, improper maintenance, improper antenna, inadequate signal reception or pickup, power line surge, improper voltage supply, lightning, modification, commercial use (such as stated below ) Speakers One (1) Year Defective Car Audio Speakers under this product to remedy any product which vary from accident, misuse, abuse, neglect, bug infestation, mishandling, misapplication, alteration, faulty installation, set-up adjustment, maladjustment of the product, or service...
... consumer control, improper maintenance, improper antenna, inadequate signal reception or pickup, power line surge, improper voltage supply, lightning, modification, commercial use (such as stated below ) Speakers One (1) Year Defective Car Audio Speakers under this product to remedy any product which vary from accident, misuse, abuse, neglect, bug infestation, mishandling, misapplication, alteration, faulty installation, set-up adjustment, maladjustment of the product, or service...
Operating Instructions
Page 8
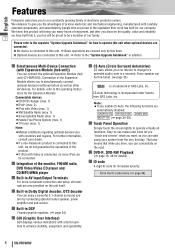
... Features Panasonic welcomes you to our constantly growing family of our family. 7 Please refer to the separate "System Upgrade Guidebook" for how to operate this unit when optional devices are connected. ■ No device is connected to this unit. Connectable devices ¡CD/DVD changer (max. 1) ¡iPod® (max. 2) ¡iPod with Video (max. 1) ¡XM Satellite Radio (max. 1) ¡Sirius Satellite Radio (max. 1) ¡Hands-Free Phone System (max. 1) ¡TV tuner...
... Features Panasonic welcomes you to our constantly growing family of our family. 7 Please refer to the separate "System Upgrade Guidebook" for how to operate this unit when optional devices are connected. ■ No device is connected to this unit. Connectable devices ¡CD/DVD changer (max. 1) ¡iPod® (max. 2) ¡iPod with Video (max. 1) ¡XM Satellite Radio (max. 1) ¡Sirius Satellite Radio (max. 1) ¡Hands-Free Phone System (max. 1) ¡TV tuner...
Operating Instructions
Page 9
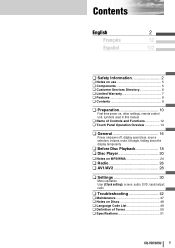
... First time power on, other settings, remote control unit, symbols used in this manual ¢ Name of Controls and Functions 12 ¢ Touch Panel Operation Oveview 14 ¢ General 16 Power on/power off, display open/close, source selection, volume, mute, tilt angle, folding down the display temporarily ¢ Before Disc Playback 18 ¢ Disc Player 20 ¢ Notes on MP3/WMA 24 ¢ Radio 26 ¢ AV1/AV2 28 ¢ Settings 30 Menu operation User (Clock setting), screen, audio, DVD, input/output, radio ¢ Troubleshooting 42...
... First time power on, other settings, remote control unit, symbols used in this manual ¢ Name of Controls and Functions 12 ¢ Touch Panel Operation Oveview 14 ¢ General 16 Power on/power off, display open/close, source selection, volume, mute, tilt angle, folding down the display temporarily ¢ Before Disc Playback 18 ¢ Disc Player 20 ¢ Notes on MP3/WMA 24 ¢ Radio 26 ¢ AV1/AV2 28 ¢ Settings 30 Menu operation User (Clock setting), screen, audio, DVD, input/output, radio ¢ Troubleshooting 42...
Operating Instructions
Page 10
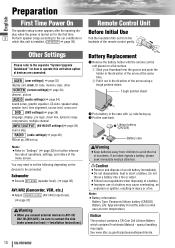
... a battery into the groove and push the holder in the direction of the arrow using a tough pointed object. Caution ¡Remove and dispose of the menu screen. USER (user settings)( a page 32) display unit, clock, ID code, memory clear, other SCREEN (screen settings)(a page 34) dimmer, picture AUDIO (audio settings)(a page 34) sound setup, graphic equalizer, CS Auto, speaker setup, speaker level, time alignment, source level, cross over DVD (DVD settings)(a page 38) language, display, pro logic, down mix, dynamic range compression, multiple channel INPUT/OUTPUT (AV-IN/OUT settings...
... a battery into the groove and push the holder in the direction of the arrow using a tough pointed object. Caution ¡Remove and dispose of the menu screen. USER (user settings)( a page 32) display unit, clock, ID code, memory clear, other SCREEN (screen settings)(a page 34) dimmer, picture AUDIO (audio settings)(a page 34) sound setup, graphic equalizer, CS Auto, speaker setup, speaker level, time alignment, source level, cross over DVD (DVD settings)(a page 38) language, display, pro logic, down mix, dynamic range compression, multiple channel INPUT/OUTPUT (AV-IN/OUT settings...

Operating Instructions
Page 13
.... ¡Slow playback ([d]). ¡Returns to the media.) DVD MENU) CQ-VD7005U 13 t [+] [-] (VOL) ¡Adjusts the sound volume. u[ ] ¡Displays the DVD/title menu. (Operations (TOP MENU/ vary according to the previous display. ¡Inputs the number again. ¡Displays the VCD's menu. ¡Mutes the sound temporarily. q [SRC] (PWR) w B] [s] [d] e [RET] (RETURN) r [MUTE] ¡Switches the power on the remote control unit. English Remote Control Aim the remote control at the remote control sensor of the main unit and operate it.
.... ¡Slow playback ([d]). ¡Returns to the media.) DVD MENU) CQ-VD7005U 13 t [+] [-] (VOL) ¡Adjusts the sound volume. u[ ] ¡Displays the DVD/title menu. (Operations (TOP MENU/ vary according to the previous display. ¡Inputs the number again. ¡Displays the VCD's menu. ¡Mutes the sound temporarily. q [SRC] (PWR) w B] [s] [d] e [RET] (RETURN) r [MUTE] ¡Switches the power on the remote control unit. English Remote Control Aim the remote control at the remote control sensor of the main unit and operate it.

Operating Instructions
Page 14
Source Button (Content varies with each source) Displays the Source Selection Screen. Touch to desired mode. Source Selection Screen Menu Button Displays the Menu Screen. Press [SRC] to change to quit. Menu Screen Source Selection Screen appears. Volume Current Disc indicator (a page 19) indicator mode (Lights when a disc is loaded) Display Button (a next page) Clock time (a page 32) Prohibition Input is not supported by the disc contents. Touch desired source button. Menu Setting, (a page 30) Press [MENU] to perform an operation which is not possible because the user...
Source Button (Content varies with each source) Displays the Source Selection Screen. Touch to desired mode. Source Selection Screen Menu Button Displays the Menu Screen. Press [SRC] to change to quit. Menu Screen Source Selection Screen appears. Volume Current Disc indicator (a page 19) indicator mode (Lights when a disc is loaded) Display Button (a next page) Clock time (a page 32) Prohibition Input is not supported by the disc contents. Touch desired source button. Menu Setting, (a page 30) Press [MENU] to perform an operation which is not possible because the user...

Operating Instructions
Page 22
.../title Selection 21 Operations Compatible Discs Operations Showing menu and selecting an item *1 Note on -screen direct operation of / [DVD MENU]. q Toggles "Chapter number input - Source Button (a page 14) Menu Button (a page 14) Moving operation buttons (Only for DVD) Some DVDs allow you to operate the DVD menu by pressing [DVD MENU], press and hold the same button for sure. ber of the title/chapter entered. *2 On-Screen Direct Operation (Only for DVD) When the operation buttons interfere with the buttons on the remote control or the unit...
.../title Selection 21 Operations Compatible Discs Operations Showing menu and selecting an item *1 Note on -screen direct operation of / [DVD MENU]. q Toggles "Chapter number input - Source Button (a page 14) Menu Button (a page 14) Moving operation buttons (Only for DVD) Some DVDs allow you to operate the DVD menu by pressing [DVD MENU], press and hold the same button for sure. ber of the title/chapter entered. *2 On-Screen Direct Operation (Only for DVD) When the operation buttons interfere with the buttons on the remote control or the unit...
Operating Instructions
Page 30
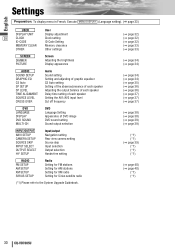
...Audio Sound setting Setting and adjusting of graphic equalizer CS Auto setting Setting of the absence/presence of each speaker Adjusting the output balance of each speaker Delay time setting of each speaker Setting the AV1/AV2 input level Cut off frequency DVD LANGUAGE DISPLAY DVD SOUND MULTI-CH DVD Language Setting Appearance of DVD image DVD sound setting Sound output selection INPUT/OUTPUT NAVI SETUP CAMERA SETUP SOURCE SKIP INPUT SELECT OUTPUT SELECT H-F SETUP Input/output Navigation setting Rear view camera setting Source skip Input selection Output selection Hands-free setting RADIO...
...Audio Sound setting Setting and adjusting of graphic equalizer CS Auto setting Setting of the absence/presence of each speaker Adjusting the output balance of each speaker Delay time setting of each speaker Setting the AV1/AV2 input level Cut off frequency DVD LANGUAGE DISPLAY DVD SOUND MULTI-CH DVD Language Setting Appearance of DVD image DVD sound setting Sound output selection INPUT/OUTPUT NAVI SETUP CAMERA SETUP SOURCE SKIP INPUT SELECT OUTPUT SELECT H-F SETUP Input/output Navigation setting Rear view camera setting Source skip Input selection Output selection Hands-free setting RADIO...

Operating Instructions
Page 31
e (Example: setting screen of "DISPLAY UNIT" a page 32) Determines the setting and goes back to the previous menu) Select/adjust) [ENTER] (Determine) CQ-VD7005U 31 Touch desired setting. ASPECT ASP P·MODE VOL MUTE CQ-VD7005U CQ-VD7001U PWR SRC MMENUU NAVI OPEN / CLOSE TILT O/C TEXT ENTER [SRC] (Exit from the menu) [MENU] (Shows the menu display/ Goes back to the previous menu out of the menu. Determines the setting and...
e (Example: setting screen of "DISPLAY UNIT" a page 32) Determines the setting and goes back to the previous menu) Select/adjust) [ENTER] (Determine) CQ-VD7005U 31 Touch desired setting. ASPECT ASP P·MODE VOL MUTE CQ-VD7005U CQ-VD7001U PWR SRC MMENUU NAVI OPEN / CLOSE TILT O/C TEXT ENTER [SRC] (Exit from the menu) [MENU] (Shows the menu display/ Goes back to the previous menu out of the menu. Determines the setting and...
Operating Instructions
Page 32
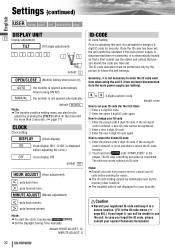
...!" Settings (continued) English USER SCREEN AUDIO DVD INPUT/OUTPUT RADIO DISPLAY UNIT 31 Display adjustment TILT (Tilt angle adjustment) 12345 1 5 default: 5 OPEN/CLOSE (Monitor setting when power on the main unit for more than 2 seconds. (a page 17) CLOCK Clock setting DISPLAY (Clock display) ON : clock display ON ("12:00" is displayed before sending for repair. ¡The ID code setting cannot be eliminated even by the memory clear function. ¡The inputted code is not displayed for the first time) q Enter a 4 digit ID code. How to change...
...!" Settings (continued) English USER SCREEN AUDIO DVD INPUT/OUTPUT RADIO DISPLAY UNIT 31 Display adjustment TILT (Tilt angle adjustment) 12345 1 5 default: 5 OPEN/CLOSE (Monitor setting when power on the main unit for more than 2 seconds. (a page 17) CLOCK Clock setting DISPLAY (Clock display) ON : clock display ON ("12:00" is displayed before sending for repair. ¡The ID code setting cannot be eliminated even by the memory clear function. ¡The inputted code is not displayed for the first time) q Enter a 4 digit ID code. How to change...
Operating Instructions
Page 34
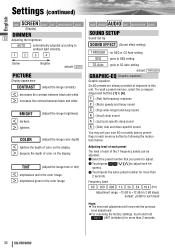
... the same preset number for more than 2 seconds. 34 CQ-VD7005U Frequency band 60 160 400 1 k 3 k 6 k 16 k (Hz) Adjustment range: -12 dB to ambient light intensity. 1 2 3 4 Darker Brighter default: AUTO PICTURE Display appearance CONTRAST (Adjust the image contrast) ] : decreases the contrast between black and white. [ : increases the contrast between black and white. Settings (continued) English SCREEN USER AUDIO DVD INPUT/OUTPUT RADIO (Display) DIMMER 33 Adjusting the brightness AUTO : automatically adjusted according...
... the same preset number for more than 2 seconds. 34 CQ-VD7005U Frequency band 60 160 400 1 k 3 k 6 k 16 k (Hz) Adjustment range: -12 dB to ambient light intensity. 1 2 3 4 Darker Brighter default: AUTO PICTURE Display appearance CONTRAST (Adjust the image contrast) ] : decreases the contrast between black and white. [ : increases the contrast between black and white. Settings (continued) English SCREEN USER AUDIO DVD INPUT/OUTPUT RADIO (Display) DIMMER 33 Adjusting the brightness AUTO : automatically adjusted according...
Operating Instructions
Page 35
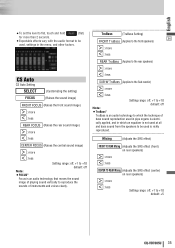
... playing sound vertically to reproduce the sounds of bass sound reproduction used is richly reproduced. TruBass (TruBass Setting) 34 FRONT TruBass (Applies to the front speakers) [ : more ] : less REAR TruBass (Applies to the rear speakers) [ : more ] : less SUB-W TruBass (Applies to +10 default: +5 CQ-VD7005U 35 Mixing (Adjusts the SRS effect) FRONT TO REAR Mixing (Adjusts the SRS effect (front) on rear speakers) [ : more ] : less CENTER TO REAR Mixing (Adjusts...
... playing sound vertically to reproduce the sounds of bass sound reproduction used is richly reproduced. TruBass (TruBass Setting) 34 FRONT TruBass (Applies to the front speakers) [ : more ] : less REAR TruBass (Applies to the rear speakers) [ : more ] : less SUB-W TruBass (Applies to +10 default: +5 CQ-VD7005U 35 Mixing (Adjusts the SRS effect) FRONT TO REAR Mixing (Adjusts the SRS effect (front) on rear speakers) [ : more ] : less CENTER TO REAR Mixing (Adjusts...
Operating Instructions
Page 37
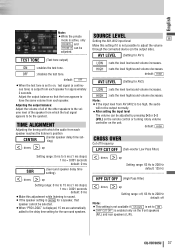
Adjust the output balance so that speaker cannot be adjusted by pressing [+] or [-] (VOL) on the remote control or turning rotary volume controller on the front speakers (R/L) and rear speakers (L/R). AV1 LEVEL (Setting for AV2) LOW : sets the level low/sound volume increases. default: OFF ¡When the test tone is set to adjust the volume through the connected device (on , test signal (a continuous tone) is output from each speaker. default: HIGH CROSS OVER Cut off Note...
Adjust the output balance so that speaker cannot be adjusted by pressing [+] or [-] (VOL) on the remote control or turning rotary volume controller on the front speakers (R/L) and rear speakers (L/R). AV1 LEVEL (Setting for AV2) LOW : sets the level low/sound volume increases. default: OFF ¡When the test tone is set to adjust the volume through the connected device (on , test signal (a continuous tone) is output from each speaker. default: HIGH CROSS OVER Cut off Note...

Operating Instructions
Page 38
... and right edges of the display unit is changed according to the symbol used on the screen. LETTER BOX : plays wide-screen video in letterbox mode (in accordance with the equipment connected to indicate the parts where multi-angle data is displayed to AV-OUT. default: ON 38 CQ-VD7005U WIDE : plays a video in 4:3 screen. default: NTSC ANGLE MARK (Angle mark setting) The angle mark is recorded...
... and right edges of the display unit is changed according to the symbol used on the screen. LETTER BOX : plays wide-screen video in letterbox mode (in accordance with the equipment connected to indicate the parts where multi-angle data is displayed to AV-OUT. default: ON 38 CQ-VD7005U WIDE : plays a video in 4:3 screen. default: NTSC ANGLE MARK (Angle mark setting) The angle mark is recorded...

Operating Instructions
Page 39
English DVD SOUND DVD sound setting PRO LOGIC (5.1 channel listening in some audio settings may disable audio output from the subwoofer. to a TV broadcast. default: OFF USER SCREEN AUDIO DVD INPUT/OUTPUT RADIO NAVI SETUP (Navigation set up) (a System Upgrade Guidebook) 38 CAMERA SETUP (a System Upgrade Guidebook) SOURCE SKIP Source skip AV1 SKIP (AV1 skip) If AV1 is not used , the AV2 mode is enabled only in the DVD/VCD/CD player mode. ¡ ON selection in Dolby surround sound) ON : activates Pro Logic...
English DVD SOUND DVD sound setting PRO LOGIC (5.1 channel listening in some audio settings may disable audio output from the subwoofer. to a TV broadcast. default: OFF USER SCREEN AUDIO DVD INPUT/OUTPUT RADIO NAVI SETUP (Navigation set up) (a System Upgrade Guidebook) 38 CAMERA SETUP (a System Upgrade Guidebook) SOURCE SKIP Source skip AV1 SKIP (AV1 skip) If AV1 is not used , the AV2 mode is enabled only in the DVD/VCD/CD player mode. ¡ ON selection in Dolby surround sound) ON : activates Pro Logic...
Operating Instructions
Page 42
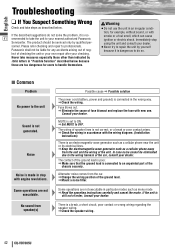
.... Fuse blows out. aSet MUTE to professionals. If the described suggestions do so. ■ Common Problem No power to the unit Sound is not generated. Warning ¡Do not use the unit in an irregular condition, for example, without sound, or with the wiring diagram. (Installation Instructions) There is made in step with new one. Some operations are not executable in particular modes such as menu mode...
.... Fuse blows out. aSet MUTE to professionals. If the described suggestions do so. ■ Common Problem No power to the unit Sound is not generated. Warning ¡Do not use the unit in an irregular condition, for example, without sound, or with the wiring diagram. (Installation Instructions) There is made in step with new one. Some operations are not executable in particular modes such as menu mode...
Operating Instructions
Page 47
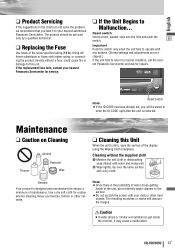
Reset switch Insert a hard, slender stick into the hole and push the switch. 46 Important Push the switch only when the unit fails to operate with your nearest authorized Panasonic Servicenter. Use a dry soft cloth for service. ❑ If the Unit Begins to the surface. ¡Do not scratch the screen with any buttons. (Stored settings and adjustments are not cleared.) If the unit fails to...
Reset switch Insert a hard, slender stick into the hole and push the switch. 46 Important Push the switch only when the unit fails to operate with your nearest authorized Panasonic Servicenter. Use a dry soft cloth for service. ❑ If the Unit Begins to the surface. ¡Do not scratch the screen with any buttons. (Stored settings and adjustments are not cleared.) If the unit fails to...


