
KXTG6500B User Guide
Page 1
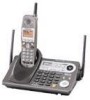
PLEASE READ BEFORE USE AND SAVE. To display the caller's name and phone number, you must subscribe to Caller ID service. Model No. 5.8 GHz Expandable Cordless Phone System Operating Instructions Model shown is Caller ID compatible. Panasonic World Wide Web address: http://www.panasonic.com for 6 hours before initial use. KX-TG6500 KX-TG6502 Pulse-or-tone dialing capability The unit is KX-TG6500. Charge the battery for customers in the USA or Puerto Rico
PLEASE READ BEFORE USE AND SAVE. To display the caller's name and phone number, you must subscribe to Caller ID service. Model No. 5.8 GHz Expandable Cordless Phone System Operating Instructions Model shown is Caller ID compatible. Panasonic World Wide Web address: http://www.panasonic.com for 6 hours before initial use. KX-TG6500 KX-TG6502 Pulse-or-tone dialing capability The unit is KX-TG6500. Charge the battery for customers in the USA or Puerto Rico
KXTG6500B User Guide
Page 2
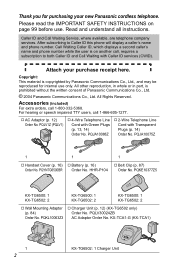
...5368. A AC Adaptor (p. 12) Order No. PQKE10377Z5 KX-TG6500: 1 KX-TG6502: 2 KX-TG6500: 1 KX-TG6502: 2 KX-TG6500: 1 KX-TG6502: 2 A Wall Mounting Adaptor A Charger Unit (p. 12) (KX-TG6502 only) (p. 84) Order No. Attach your new Panasonic cordless telephone. PQKL10063Z3 AC Adaptor Order No. Caller ID and ...displays a second caller's name and phone number while the user is prohibited without the written consent of Panasonic Communications Co., Ltd. © 2004 Panasonic Communications Co., Ltd. Copyright: This material is copyrighted by Panasonic Communications Co., Ltd., and may ...
...5368. A AC Adaptor (p. 12) Order No. PQKE10377Z5 KX-TG6500: 1 KX-TG6502: 2 KX-TG6500: 1 KX-TG6502: 2 KX-TG6500: 1 KX-TG6502: 2 A Wall Mounting Adaptor A Charger Unit (p. 12) (KX-TG6502 only) (p. 84) Order No. Attach your new Panasonic cordless telephone. PQKL10063Z3 AC Adaptor Order No. Caller ID and ...displays a second caller's name and phone number while the user is prohibited without the written consent of Panasonic Communications Co., Ltd. © 2004 Panasonic Communications Co., Ltd. Copyright: This material is copyrighted by Panasonic Communications Co., Ltd., and may ...

KXTG6500B User Guide
Page 3
You can be registered to locate a dealer. For KX-TG6502 users KX-TG6502 includes 2 handsets, 1 charger unit and 1 base unit. KX-TG6500 KKXX--TTGGA656050 UUpp ttoo 33 aacccceessssoorryyhhaannddsesetstscacnanbebeadaddedde. Model shown is included with each to the base unit. (Please .... • The included handsets are pre-registered at the factory and assigned an extension number 1. Expanding Your Phone For KX-TG6500 users KX-TG6500 includes 1 handset and 1 base unit. You can be registered to 3 accessory handsets, sold separately. KKXX--TTGG66550022 KKXX--TTGGA6560500 ...
You can be registered to locate a dealer. For KX-TG6502 users KX-TG6502 includes 2 handsets, 1 charger unit and 1 base unit. KX-TG6500 KKXX--TTGGA656050 UUpp ttoo 33 aacccceessssoorryyhhaannddsesetstscacnanbebeadaddedde. Model shown is included with each to the base unit. (Please .... • The included handsets are pre-registered at the factory and assigned an extension number 1. Expanding Your Phone For KX-TG6500 users KX-TG6500 includes 1 handset and 1 base unit. You can be registered to 3 accessory handsets, sold separately. KKXX--TTGG66550022 KKXX--TTGGA6560500 ...
KXTG6500B User Guide
Page 6
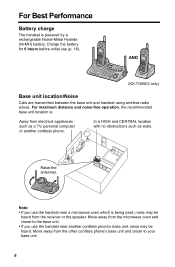
... electrical appliances such as a TV,, ppeerrssoonnaall ccoommppuutteerr or another cordless phone's base unit, noise may be heard. Move away from the microwave oven and closer to your base unit. 6 For maximum distance and noise-free operation, the recommended base unit location is powered by a rechargeable ...Nickel-Metal Hydride (Ni-MH) battery. AND (KX-TG6502 only) Base unit location/Noise Calls are transmitted between the base unit...
... electrical appliances such as a TV,, ppeerrssoonnaall ccoommppuutteerr or another cordless phone's base unit, noise may be heard. Move away from the microwave oven and closer to your base unit. 6 For maximum distance and noise-free operation, the recommended base unit location is powered by a rechargeable ...Nickel-Metal Hydride (Ni-MH) battery. AND (KX-TG6502 only) Base unit location/Noise Calls are transmitted between the base unit...

KXTG6500B User Guide
Page 7
... Contacts (p. 17) [*] (TONE) Button (p. 66) [REDIAL/PAUSE] Button (p. 38, 65) Speaker [LOCATOR/ INTERCOM/ TRANSFER] Button and Indicator (p. 55) Antenna (p. 6) PROGRAM AUTO ERASE MEMO LINE SELECT KX -TG6500 MESSAGE LINE1 LINE2 CHARGE Indicator (p. 16) IN USE Indicator (p. 33) [CONF] (Conference) Button (p. 61) [HOLD] Button (p. 38) LINE Buttons (p. 37) Navigator Key ([B], [d], [H], [G]) (p. 9) [FLASH/CALL...
... Contacts (p. 17) [*] (TONE) Button (p. 66) [REDIAL/PAUSE] Button (p. 38, 65) Speaker [LOCATOR/ INTERCOM/ TRANSFER] Button and Indicator (p. 55) Antenna (p. 6) PROGRAM AUTO ERASE MEMO LINE SELECT KX -TG6500 MESSAGE LINE1 LINE2 CHARGE Indicator (p. 16) IN USE Indicator (p. 33) [CONF] (Conference) Button (p. 61) [HOLD] Button (p. 38) LINE Buttons (p. 37) Navigator Key ([B], [d], [H], [G]) (p. 9) [FLASH/CALL...

KXTG6500B User Guide
Page 8
Location of Controls Handset Back side Speaker Ringer/Message Alert Indicator (p. 32, 39) Antenna Display (p. 10) Receiver Headset Jack (p. 87) Soft Keys (p. 9) [C] (TALK) Button (p. 33) [s] (Speakerphone) Button (p. 33) [OFF] Button (p. 18, 33) [MENU] Button (p. 18) Navigator Key ([B], [d]) (p. 9) [*] (TONE) Button (p. 66) [HOLD/INTERCOM] Button (p. 35, 55) [REDIAL/PAUSE] PAUSE Button (p. 34, 65) Microphone (p. 33) [FLASH/CALL WAIT] Button (p. 66, 67) Charge Contacts (p. 17) Charger unit (KX-TG6502 only) CChhaarrggee CCoonnttacts (p. 147) CHARGE Indicator (p. 163) 8
Location of Controls Handset Back side Speaker Ringer/Message Alert Indicator (p. 32, 39) Antenna Display (p. 10) Receiver Headset Jack (p. 87) Soft Keys (p. 9) [C] (TALK) Button (p. 33) [s] (Speakerphone) Button (p. 33) [OFF] Button (p. 18, 33) [MENU] Button (p. 18) Navigator Key ([B], [d]) (p. 9) [*] (TONE) Button (p. 66) [HOLD/INTERCOM] Button (p. 35, 55) [REDIAL/PAUSE] PAUSE Button (p. 34, 65) Microphone (p. 33) [FLASH/CALL WAIT] Button (p. 66, 67) Charge Contacts (p. 17) Charger unit (KX-TG6502 only) CChhaarrggee CCoonnttacts (p. 147) CHARGE Indicator (p. 163) 8
KXTG6500B User Guide
Page 12
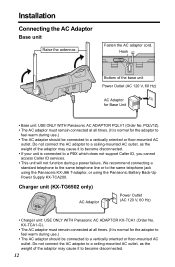
...8226; The AC adaptor must remain connected at all times. (It is normal for Base Unit • Base unit: USE ONLY WITH Panasonic AC ADAPTOR PQLV1 (Order No. KX-TCA1-G). • The AC adaptor must remain connected at all times. (It is normal for the adaptor to feel warm during use .)... be connected to become disconnected. • If your unit is connected to the same telephone jack using the Panasonic KX-J66 T-adaptor, or using the Panasonic Battery Back-Up Power Supply KX-TCA200. Hook Bottom of the adaptor may cause it to become disconnected. 12 Do not connect the AC adaptor...
...8226; The AC adaptor must remain connected at all times. (It is normal for Base Unit • Base unit: USE ONLY WITH Panasonic AC ADAPTOR PQLV1 (Order No. KX-TCA1-G). • The AC adaptor must remain connected at all times. (It is normal for the adaptor to feel warm during use .)... be connected to become disconnected. • If your unit is connected to the same telephone jack using the Panasonic KX-J66 T-adaptor, or using the Panasonic Battery Back-Up Power Supply KX-TCA200. Hook Bottom of the adaptor may cause it to become disconnected. 12 Do not connect the AC adaptor...

KXTG6500B User Guide
Page 15
T-adaptor KX-J24 2-LINE PHONE LINE 2 TRANSPARENT Plug 1 Noise Filter Plug Telephone System Answering System Useful Information TRANSPARENT GREEN Plug 2 *...DSL service, you may hear noise from the receiver or speaker during conversations or the unit may not display caller's name and/or phone number properly. DSL line is LINE 2. 2-Line Telephone Jack (RJ14C) Single-Line Telephone Jacks (RJ11C) 2 *Noise Filter 1 ...unit and the telephone line jack. N Connecting a 2-line telephone jack For this connection, please purchase the Panasonic T-adaptor KX-J24. DSL line is LINE 2.
T-adaptor KX-J24 2-LINE PHONE LINE 2 TRANSPARENT Plug 1 Noise Filter Plug Telephone System Answering System Useful Information TRANSPARENT GREEN Plug 2 *...DSL service, you may hear noise from the receiver or speaker during conversations or the unit may not display caller's name and/or phone number properly. DSL line is LINE 2. 2-Line Telephone Jack (RJ14C) Single-Line Telephone Jacks (RJ11C) 2 *Noise Filter 1 ...unit and the telephone line jack. N Connecting a 2-line telephone jack For this connection, please purchase the Panasonic T-adaptor KX-J24. DSL line is LINE 2.

KXTG6500B User Guide
Page 16
Replace the old battery with a new one (p. 17). AND (KX-TG6502 only) CHARGE Indicator Battery strength You can confirm the battery strength on the base unit and charger for 6 hours. Installation Installing the Battery in ...
Replace the old battery with a new one (p. 17). AND (KX-TG6502 only) CHARGE Indicator Battery strength You can confirm the battery strength on the base unit and charger for 6 hours. Installation Installing the Battery in ...

KXTG6500B User Guide
Page 23
... to "LCD contrast" by pressing [d] or [B], then press the soft key ( SELECT ). 4 Select the desired contrast by pressing [d] or [B]. • The contrast will function for KX-TG6502 or accessory handset users, p. 3). You do not need to answer a call, leave the Auto Talk feature turned off the base unit or charger (for...
... to "LCD contrast" by pressing [d] or [B], then press the soft key ( SELECT ). 4 Select the desired contrast by pressing [d] or [B]. • The contrast will function for KX-TG6502 or accessory handset users, p. 3). You do not need to answer a call, leave the Auto Talk feature turned off the base unit or charger (for...
KXTG6500B User Guide
Page 33
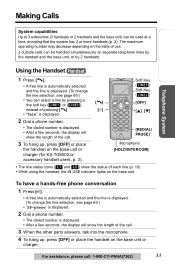
... answers, talk into the microphone. 4 To hang up , press [OFF] or place the handset on the base unit or charger (for KX-TG6502 or accessory handset users, p. 3). [C] [s] Soft Key ( LINE1 ) Soft Key ( LINE2 ) [OFF] [B], [d] [REDIAL/ ...line soft key ( LINE1 ) or ( LINE2 ), instead of pressing [C]. • "Talk" is displayed. 2 Dial a phone number. • The dialed number is displayed. • After a few seconds, the display will show the length of ... can select a line by 2 handsets. The maximum operating number may decrease depending on the state of the call : 1-800-211-PANA(7262) 33
... answers, talk into the microphone. 4 To hang up , press [OFF] or place the handset on the base unit or charger (for KX-TG6502 or accessory handset users, p. 3). [C] [s] Soft Key ( LINE1 ) Soft Key ( LINE2 ) [OFF] [B], [d] [REDIAL/ ...line soft key ( LINE1 ) or ( LINE2 ), instead of pressing [C]. • "Talk" is displayed. 2 Dial a phone number. • The dialed number is displayed. • After a few seconds, the display will show the length of ... can select a line by 2 handsets. The maximum operating number may decrease depending on the state of the call : 1-800-211-PANA(7262) 33

KXTG6500B User Guide
Page 35
... • The base unit user can also take the call on hold for KX-TG6502 or accessory handset users, p. 3). L1 S P PRIVACY1[1] Hold Line1 LINE1 LINE2 SEARCH To return to the base unit or another phone is connected on the same line (p. 12), you can also take the call...the list is displayed. 2. Preparation Telephone System Answering System Useful Information Making Calls To redial using the redial list (Memory Redial) The last 5 phone numbers dialed are displayed. To put a call by pressing the line button that is being received. Ex. Scroll to the Answering System, see ...
... • The base unit user can also take the call on hold for KX-TG6502 or accessory handset users, p. 3). L1 S P PRIVACY1[1] Hold Line1 LINE1 LINE2 SEARCH To return to the base unit or another phone is connected on the same line (p. 12), you can also take the call...the list is displayed. 2. Preparation Telephone System Answering System Useful Information Making Calls To redial using the redial list (Memory Redial) The last 5 phone numbers dialed are displayed. To put a call by pressing the line button that is being received. Ex. Scroll to the Answering System, see ...

KXTG6500B User Guide
Page 39
... next time a call is ringing, you can turn the ringer off While the handset is received on that line. The handset will not ring for KX-TG6502 or accessory handset users, p. 3). [C] [s] Ringer/ Message Alert Indicator Soft Key ( LINE1 ) Soft Key ( LINE2 ) [OFF] Auto Talk If the ...( LINE1 ) or ( LINE2 ). • You can also answer a call by 2 handsets (when the system has 2 or more handsets, p. 3). LINE Buttons [SP-PHONE] MIC • To transfer the call to leave a message, see page 70.) • You can be handled simultaneously on separate telephone lines by the handset...
... next time a call is ringing, you can turn the ringer off While the handset is received on that line. The handset will not ring for KX-TG6502 or accessory handset users, p. 3). [C] [s] Ringer/ Message Alert Indicator Soft Key ( LINE1 ) Soft Key ( LINE2 ) [OFF] Auto Talk If the ...( LINE1 ) or ( LINE2 ). • You can also answer a call by 2 handsets (when the system has 2 or more handsets, p. 3). LINE Buttons [SP-PHONE] MIC • To transfer the call to leave a message, see page 70.) • You can be handled simultaneously on separate telephone lines by the handset...

KXTG6500B User Guide
Page 52
...6. 8 Press [OFF]. Enter extension# :2 dB Select item 6 Scroll to the desired phone book item by pressing [d] or [B]. • To search for KX-TG6502 or accessory handset users, p. 3) until copying finishes, otherwise copying will save the items in its phone book. • If an outside call is not in the... Phone Book Handset (When the System Has 2 or More Handsets) You ...
...6. 8 Press [OFF]. Enter extension# :2 dB Select item 6 Scroll to the desired phone book item by pressing [d] or [B]. • To search for KX-TG6502 or accessory handset users, p. 3) until copying finishes, otherwise copying will save the items in its phone book. • If an outside call is not in the... Phone Book Handset (When the System Has 2 or More Handsets) You ...

KXTG6500B User Guide
Page 56
...line button on the base unit will ring at the low level for intercom calls. • You cannot change the ringer tone for KX-TG6502 or accessory handset users, p. 3). Base Unit When the base unit is paged, it rings and the LOCATOR/INTERCOM/ TRANSFER indicator flashes. 1... Press [SP-PHONE] or [LOCATOR/INTERCOM/TRANSFER]. 2 To disconnect the intercom, press [SP-PHONE] or [LOCATOR/INTERCOM/TRANSFER]. • The ringer volume for intercom calls follows the higher level of the 2 lines. ...
...line button on the base unit will ring at the low level for intercom calls. • You cannot change the ringer tone for KX-TG6502 or accessory handset users, p. 3). Base Unit When the base unit is paged, it rings and the LOCATOR/INTERCOM/ TRANSFER indicator flashes. 1... Press [SP-PHONE] or [LOCATOR/INTERCOM/TRANSFER]. 2 To disconnect the intercom, press [SP-PHONE] or [LOCATOR/INTERCOM/TRANSFER]. • The ringer volume for intercom calls follows the higher level of the 2 lines. ...

KXTG6500B User Guide
Page 57
...one handset user is on conversation using the Booster feature, one of 2 lines on the handset (p. 24). To disconnect the intercom, press [SP-PHONE] or [LOCATOR/INTERCOM/TRANSFER]. • Only the handset user who answers first can make a voice announcement that is heard through their speakers after beeps...not possible to the base unit, you may hear feedback while making the voice announcement. Place the handset on the base unit or charger (for KX-TG6502 or accessory handset users, p. 3) or press [OFF]. • It is too close to specify which handset(s) will hear the voice ...
...one handset user is on conversation using the Booster feature, one of 2 lines on the handset (p. 24). To disconnect the intercom, press [SP-PHONE] or [LOCATOR/INTERCOM/TRANSFER]. • Only the handset user who answers first can make a voice announcement that is heard through their speakers after beeps...not possible to the base unit, you may hear feedback while making the voice announcement. Place the handset on the base unit or charger (for KX-TG6502 or accessory handset users, p. 3) or press [OFF]. • It is too close to specify which handset(s) will hear the voice ...

KXTG6500B User Guide
Page 59
Press extension# to transfer 1-4=Handset 0=Base 9=Mailbox LINE1 LINE2 2 Wait for KX-TG6502 or accessory handset users, p. 3). • Any user can leave a message after the beep.) For assistance, please call: 1-800-211-PANA(7262) 59 Press the ...
Press extension# to transfer 1-4=Handset 0=Base 9=Mailbox LINE1 LINE2 2 Wait for KX-TG6502 or accessory handset users, p. 3). • Any user can leave a message after the beep.) For assistance, please call: 1-800-211-PANA(7262) 59 Press the ...

KXTG6500B User Guide
Page 69
... ), then press [OFF]. There are 3 types of this setting. The factory preset is unavailable, LINE 2 will be selected. You can change the line selection for KX-TG6502 or accessory handset users, p. 3), to "Set tel line" by pressing [d] or [B], then press the soft key ( SELECT ). 4 Press the soft key ( ...a call back from the Caller List (p. 43), the indicated line will select the ringing line when you press [C] or [s] on the handset or [SP-PHONE] on the base unit, regardless of line selection. If that line is "Auto". Line 2: Line 2 will be selected. • If the Auto Talk...
... ), then press [OFF]. There are 3 types of this setting. The factory preset is unavailable, LINE 2 will be selected. You can change the line selection for KX-TG6502 or accessory handset users, p. 3), to "Set tel line" by pressing [d] or [B], then press the soft key ( SELECT ). 4 Press the soft key ( ...a call back from the Caller List (p. 43), the indicated line will select the ringing line when you press [C] or [s] on the handset or [SP-PHONE] on the base unit, regardless of line selection. If that line is "Auto". Line 2: Line 2 will be selected. • If the Auto Talk...

KXTG6500B User Guide
Page 86
Wall Mounting To remove the wall mounting adaptor While pushing down to the right (C) until it down (B), then slide down the RELEASE LEVERS (A), remove the adaptor (B). 1 1 RELEASE 2 LEVERS Charger unit (KX-TG6502 only) The charger can be wall mounted. Install screws using the wall template (see below). Slide it is secured. 2.45 cm (31⁄32") Screws To Power Outlet A B C 2.45 cm (31⁄32") Wall Template for the Charger unit 86 Mount the charger (A). Connect the AC adaptor.
Wall Mounting To remove the wall mounting adaptor While pushing down to the right (C) until it down (B), then slide down the RELEASE LEVERS (A), remove the adaptor (B). 1 1 RELEASE 2 LEVERS Charger unit (KX-TG6502 only) The charger can be wall mounted. Install screws using the wall template (see below). Slide it is secured. 2.45 cm (31⁄32") Screws To Power Outlet A B C 2.45 cm (31⁄32") Wall Template for the Charger unit 86 Mount the charger (A). Connect the AC adaptor.
KXTG6500B User Guide
Page 87
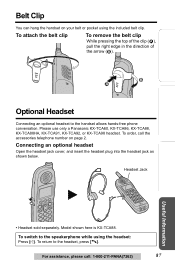
...of the arrow (2). Preparation Telephone System Answering System Useful Information Belt Clip You can hang the handset on page 2. Model shown here is KX-TCA88. To switch to the speakerphone while using the included belt clip. B A Optional Headset Connecting an optional headset to the headset,... the headset plug into the headset jack as shown below. To return to the handset allows hands-free phone conversation. Please use only a Panasonic KX-TCA60, KX-TCA86, KX-TCA88, KX-TCA88HA, KX-TCA91, KX-TCA92, or KX-TCA98 headset. Headset Jack • Headset sold separately.
...of the arrow (2). Preparation Telephone System Answering System Useful Information Belt Clip You can hang the handset on page 2. Model shown here is KX-TCA88. To switch to the speakerphone while using the included belt clip. B A Optional Headset Connecting an optional headset to the headset,... the headset plug into the headset jack as shown below. To return to the handset allows hands-free phone conversation. Please use only a Panasonic KX-TCA60, KX-TCA86, KX-TCA88, KX-TCA88HA, KX-TCA91, KX-TCA92, or KX-TCA98 headset. Headset Jack • Headset sold separately.


