

TCP55VT30 User Guide
Page 4
The lightning flash with arrowhead within a triangle is intended to tell the user that parts inside the product are provided for your dealer or licensed contractor to properly secure the wall-hanging bracket. ● Do not route the TV's power cord inside . Important Safety Instructions 1) Read these instructions. 2) Keep these warnings: ● Install the Plasma TV in -wall mounting. A grounding type plug has two blades and...
The lightning flash with arrowhead within a triangle is intended to tell the user that parts inside the product are provided for your dealer or licensed contractor to properly secure the wall-hanging bracket. ● Do not route the TV's power cord inside . Important Safety Instructions 1) Read these instructions. 2) Keep these warnings: ● Install the Plasma TV in -wall mounting. A grounding type plug has two blades and...

TCP55VT30 User Guide
Page 6
... TO WALL MOUNT YOUR FLAT PANEL DISPLAY, ALWAYS: • Use a mount that has been recommended by the display manufacturer and/or listed by using this product. ■About Use of 3D Eyewear ● Parents/guardians should monitor children's viewing habits to making home entertainment enjoyable and safe. CAUTION ■About 3D Eyewear ● Do not drop, exert pressure on, or step on the proper stands or installed...
... TO WALL MOUNT YOUR FLAT PANEL DISPLAY, ALWAYS: • Use a mount that has been recommended by the display manufacturer and/or listed by using this product. ■About Use of 3D Eyewear ● Parents/guardians should monitor children's viewing habits to making home entertainment enjoyable and safe. CAUTION ■About 3D Eyewear ● Do not drop, exert pressure on, or step on the proper stands or installed...

TCP55VT30 User Guide
Page 17
... the instructions on a network. -->Set "Network settings" first. Set clock Adjust the TV's date and time 2011/4/5 Mode Year Month Day Hour Minute Time zone DST Next 6:00 AM Auto EST Off Step 7 of 7 Set later: Go to You can use VIERA Connect. Ethernet cable Wireless(Wifi) Set later Step 6 of 7 Select Change RETURN Mode Manual: Adjust the clock manually (Year/Month/Day/Hour/Minute) Auto: The clock is adjusted automatically via Internet service. RETURN Connection test Connection error ■Manual setting Network settings Configure settings...
... the instructions on a network. -->Set "Network settings" first. Set clock Adjust the TV's date and time 2011/4/5 Mode Year Month Day Hour Minute Time zone DST Next 6:00 AM Auto EST Off Step 7 of 7 Set later: Go to You can use VIERA Connect. Ethernet cable Wireless(Wifi) Set later Step 6 of 7 Select Change RETURN Mode Manual: Adjust the clock manually (Year/Month/Day/Hour/Minute) Auto: The clock is adjusted automatically via Internet service. RETURN Connection test Connection error ■Manual setting Network settings Configure settings...
TCP55VT30 User Guide
Page 19
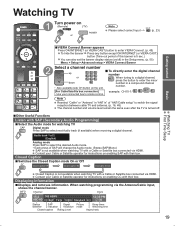
... 2 (English) Analog mode Press SAP to select the desired Audio mode. • Each press of SAP will change the Audio mode. (Stereo/SAP/Mono) SAP is not available when watching TV with a Cable or Satellite box connected via HDMI. Channel Clock 15-2 THE NEWS 12:30 PM ABC-HD CC SAP TV-G 1080i Standard 4:3 30 Station identifier SAP indication Signal Picture resolution mode Sleep timer remaining time Closed caption Rating Level Aspect ratio 19 To directly enter the digital channel number When tuning to a digital channel, press...
... 2 (English) Analog mode Press SAP to select the desired Audio mode. • Each press of SAP will change the Audio mode. (Stereo/SAP/Mono) SAP is not available when watching TV with a Cable or Satellite box connected via HDMI. Channel Clock 15-2 THE NEWS 12:30 PM ABC-HD CC SAP TV-G 1080i Standard 4:3 30 Station identifier SAP indication Signal Picture resolution mode Sleep timer remaining time Closed caption Rating Level Aspect ratio 19 To directly enter the digital channel number When tuning to a digital channel, press...
TCP55VT30 User Guide
Page 26
.... Viewing 3D images Using the television menu controls, set so that 3D images are automatically displayed according to correct your eyesight before use devices that have a different level of the screen is played on a 3D image supporting player/recorder connected using a HDMI cable to a 3D image supporting television. • 3D image supported broadcast (program) • 3D Photo, 3D Movie taken by "3D format select" or "3D settings". ● Change the view 3D⇔2D, 3D settings (p. 27) After Use Set the 3D Eyewear power switch...
.... Viewing 3D images Using the television menu controls, set so that 3D images are automatically displayed according to correct your eyesight before use devices that have a different level of the screen is played on a 3D image supporting player/recorder connected using a HDMI cable to a 3D image supporting television. • 3D image supported broadcast (program) • 3D Photo, 3D Movie taken by "3D format select" or "3D settings". ● Change the view 3D⇔2D, 3D settings (p. 27) After Use Set the 3D Eyewear power switch...

TCP55VT30 User Guide
Page 33
... play repeat function (Off/Repeat Folder/One song) Music options Repeat playback On select Other settings in Media player Display "Menu" Select the item Menu Picture Audio 3D settings VIERA Link Set select OK ■Adjust the Picture, Audio or 3D settings Picture 1/2 Reset to defaults Picture mode Vivid Contrast 0 Brightness 0 Color 0 Tint 0 Sharpness 0 select adjust example: Picture menu Picture menu/Audio menu (p. 51-53) 3D settings (p. 27) ■Use VIERA Link function VIERA Link control Recorder Speaker output TV Back to TV VIERA Link menu (p. 38) select change...
... play repeat function (Off/Repeat Folder/One song) Music options Repeat playback On select Other settings in Media player Display "Menu" Select the item Menu Picture Audio 3D settings VIERA Link Set select OK ■Adjust the Picture, Audio or 3D settings Picture 1/2 Reset to defaults Picture mode Vivid Contrast 0 Brightness 0 Color 0 Tint 0 Sharpness 0 select adjust example: Picture menu Picture menu/Audio menu (p. 51-53) 3D settings (p. 27) ■Use VIERA Link function VIERA Link control Recorder Speaker output TV Back to TV VIERA Link menu (p. 38) select change...

TCP55VT30 User Guide
Page 34
... Link controls. Enjoy additional HDMI Inter-Operability with Quick Start mode) • Audio Return Channel Audio Return Channel (ARC) is recommended that the image is based on the external equipment's connections, please refer to a connected audio device. ■When adding new equipment, reconnecting equipment or changing the setup after the connection, turn the equipment on and then switch the TV on. etc.) •• Automatic lip-sync function • Energy saving mode (with compatible Panasonic...
... Link controls. Enjoy additional HDMI Inter-Operability with Quick Start mode) • Audio Return Channel Audio Return Channel (ARC) is recommended that the image is based on the external equipment's connections, please refer to a connected audio device. ■When adding new equipment, reconnecting equipment or changing the setup after the connection, turn the equipment on and then switch the TV on. etc.) •• Automatic lip-sync function • Energy saving mode (with compatible Panasonic...

TCP55VT30 User Guide
Page 37
... might be set the Home theater system as Default speakers, change to the appropriate input, when playback begins on the operating conditions or the specification for each piece of timing for the equipment. Transmittable data Recorder Home theater Player On Screen Display Language setting (English/Español/Français) ○ ○ ○ Panel Aspect Ratio (16:9 fixed) ○ ○ ○ Closed caption information (Mode/CC type/Digital setting) ○ --- --- To set from the HDMI. Depending...
... might be set the Home theater system as Default speakers, change to the appropriate input, when playback begins on the operating conditions or the specification for each piece of timing for the equipment. Transmittable data Recorder Home theater Player On Screen Display Language setting (English/Español/Français) ○ ○ ○ Panel Aspect Ratio (16:9 fixed) ○ ○ ○ Closed caption information (Mode/CC type/Digital setting) ○ --- --- To set from the HDMI. Depending...
TCP55VT30 User Guide
Page 42
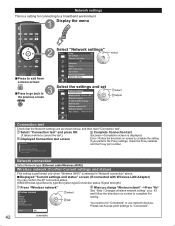
... the Proxy port number. Network connection Select Network type (Ethernet cable/Wireless (WiFi)) Wireless network (Confirm Current settings and status) This setting is performed only when "Wireless (WiFi)" is selected in progress... Complete Connection test Success-->Completion screen is displayed. You need to be "Connected" to the previous screen Select "Network settings" Menu Setup 1/2 3D settings Channel surf mode All Language Clock ANT/Cable setup Input labels Anti image retention Network settings select Select the settings and set Access point settings to complete...
... the Proxy port number. Network connection Select Network type (Ethernet cable/Wireless (WiFi)) Wireless network (Confirm Current settings and status) This setting is performed only when "Wireless (WiFi)" is selected in progress... Complete Connection test Success-->Completion screen is displayed. You need to be "Connected" to the previous screen Select "Network settings" Menu Setup 1/2 3D settings Channel surf mode All Language Clock ANT/Cable setup Input labels Anti image retention Network settings select Select the settings and set Access point settings to complete...

TCP55VT30 User Guide
Page 45
... are available depending on the signal. ■Using USB keyboard ● Keyboard type (p. 55) ● Operate USB keyboard/Entering characters (p. 21) (Also available Game pad) Advanced select OK ■Adjust the Picture, Audio or 3D settings Picture 1/2 Reset to defaults Picture mode Vivid Contrast 0 Brightness 0 Color 0 Tint 0 Sharpness 0 select adjust example: Picture menu Picture menu/Audio menu (p. 51-53) 3D settings (p. 27) ■Use VIERA Link function VIERA Link control Recorder Speaker output TV Back to use this service. Skype™) MORE requires...
... are available depending on the signal. ■Using USB keyboard ● Keyboard type (p. 55) ● Operate USB keyboard/Entering characters (p. 21) (Also available Game pad) Advanced select OK ■Adjust the Picture, Audio or 3D settings Picture 1/2 Reset to defaults Picture mode Vivid Contrast 0 Brightness 0 Color 0 Tint 0 Sharpness 0 select adjust example: Picture menu Picture menu/Audio menu (p. 51-53) 3D settings (p. 27) ■Use VIERA Link function VIERA Link control Recorder Speaker output TV Back to use this service. Skype™) MORE requires...

TCP55VT30 User Guide
Page 48
..."Not used". Select "ANT in Cable Auto program Manual program Signal meter next select Select a scanning mode (p. 16) Menu Auto program All channels Analog only Digital only OK select ● After the scanning is completed, select "Apply". (see p. 49 ). ● All previously saved channels are erased. 48 ANT/Cable setup and operation Display the menu Press to exit from a menu screen Select "Setup" Menu Setup 1/2 3D settings Channel surf mode All Language Clock ANT/Cable setup Input labels Anti image retention Network settings Select "ANT/Cable setup" Menu Setup...
..."Not used". Select "ANT in Cable Auto program Manual program Signal meter next select Select a scanning mode (p. 16) Menu Auto program All channels Analog only Digital only OK select ● After the scanning is completed, select "Apply". (see p. 49 ). ● All previously saved channels are erased. 48 ANT/Cable setup and operation Display the menu Press to exit from a menu screen Select "Setup" Menu Setup 1/2 3D settings Channel surf mode All Language Clock ANT/Cable setup Input labels Anti image retention Network settings Select "ANT/Cable setup" Menu Setup...
TCP55VT30 User Guide
Page 50
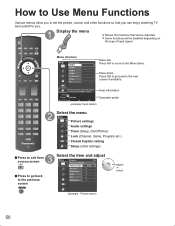
Select Change RETURN Customize label (example: Input labels) Help information Operation guide Select the menu Menu Picture settings Audio settings Timer (Sleep, On/Off timer) Lock (Channel, Game, Program etc.) Closed Caption setting Setup (other settings) Select the item and adjust Menu Picture 1/2 Reset to set the picture, sound, and other functions so that can enjoy watching TV best suited for you to defaults Picture mode Vivid Contrast 0 Brightness 0 Color 0 Tint 0 Sharpness 0 adjust or select (example: Picture menu) 50 Display the menu ● Shows the ...
Select Change RETURN Customize label (example: Input labels) Help information Operation guide Select the menu Menu Picture settings Audio settings Timer (Sleep, On/Off timer) Lock (Channel, Game, Program etc.) Closed Caption setting Setup (other settings) Select the item and adjust Menu Picture 1/2 Reset to set the picture, sound, and other functions so that can enjoy watching TV best suited for you to defaults Picture mode Vivid Contrast 0 Brightness 0 Color 0 Tint 0 Sharpness 0 adjust or select (example: Picture menu) 50 Display the menu ● Shows the ...

TCP55VT30 User Guide
Page 51
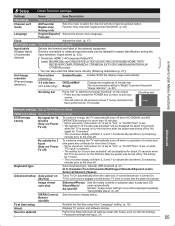
... each Input signal level. Custom (Photo) Customizes each Input signal level. Photo On/Off Provides appropriate picture when still images are made in the following menus: "Picture", "Pro settings", "PC adjustments", "Audio" and "Closed caption". Blue Saturation Color detail Yellow, Cyan, Adjusts the hue of each picture mode to suit your taste. Panel brightness High/Mid/Low Selects the display panel brightness. Save as default Save all picture adjustments to factory default settings except for viewing in...
... each Input signal level. Custom (Photo) Customizes each Input signal level. Photo On/Off Provides appropriate picture when still images are made in the following menus: "Picture", "Pro settings", "PC adjustments", "Audio" and "Closed caption". Blue Saturation Color detail Yellow, Cyan, Adjusts the hue of each picture mode to suit your taste. Panel brightness High/Mid/Low Selects the display panel brightness. Save as default Save all picture adjustments to factory default settings except for viewing in...

TCP55VT30 User Guide
Page 53
... TV turns off after switching to external inputs. SD: Standard Definition HD: High Definition Only used with 480p video signal. Block NR Off/On Reduces noise of specific digital signals of component-connected devices. If flicker is set to "No" (see p. 55) Settings Sleep (Off timer) Timer 1-5 (On/Off timer) Items Sleep (minutes) Timer set the clock (see p. 55) and make sure "Auto power on . Digital/ Component/ Video The default setting is "Digital" for the HDMI connection. (Digital input signal) Select audio input terminal when DVI cable is selected. sound...
... TV turns off after switching to external inputs. SD: Standard Definition HD: High Definition Only used with 480p video signal. Block NR Off/On Reduces noise of specific digital signals of component-connected devices. If flicker is set to "No" (see p. 55) Settings Sleep (Off timer) Timer 1-5 (On/Off timer) Items Sleep (minutes) Timer set the clock (see p. 55) and make sure "Auto power on . Digital/ Component/ Video The default setting is "Digital" for the HDMI connection. (Digital input signal) Select audio input terminal when DVI cable is selected. sound...
TCP55VT30 User Guide
Page 54
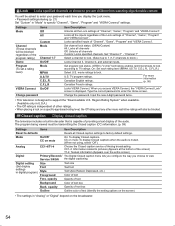
... Items Item Description Reset to specify "Channel", "Game", "Program" and "VIERA Connect" settings. Closed caption Display closed caption The television includes a built-in "Analog" or "Digital" depend on mute: To display Closed captions when the audio is designed to factory default settings. Digital setting Size (Set display Font settings in U.S.A.) • The Off rating is displayed. Lock Locks specified channels or shows to lock. C.F.L.R On/Off Change password Item Description Unlocks all Closed caption settings to support the "Downloadable U.S. Canadian French...
... Items Item Description Reset to specify "Channel", "Game", "Program" and "VIERA Connect" settings. Closed caption Display closed caption The television includes a built-in "Analog" or "Digital" depend on mute: To display Closed captions when the audio is designed to factory default settings. Digital setting Size (Set display Font settings in U.S.A.) • The Off rating is displayed. Lock Locks specified channels or shows to lock. C.F.L.R On/Off Change password Item Description Unlocks all Closed caption settings to support the "Downloadable U.S. Canadian French...
TCP55VT30 User Guide
Page 55
.... "Using Media player" (p. 28) VIERA Connect Banner (On/Off) Sets the banner display status. Devices connected to play back SD Videos/Music/ cards automatically. Setup Other function settings Settings Items Item Description 3D settings See p. 27 for easier identification during the input selection. (Input select (p. 23)) Terminals: HDMI 1-4/Component/Video/PC Label: [BLANK] Blu-ray/CABLE/SATELLITE/DVD/DVD REC/DVR/GAME/HOME THTR/ RECEIVER/COMPUTER/MEDIA CTR/MEDIA EXT/VCR/CAMERA/MONITOR/AUX/ OTHER/Not used...
.... "Using Media player" (p. 28) VIERA Connect Banner (On/Off) Sets the banner display status. Devices connected to play back SD Videos/Music/ cards automatically. Setup Other function settings Settings Items Item Description 3D settings See p. 27 for easier identification during the input selection. (Input select (p. 23)) Terminals: HDMI 1-4/Component/Video/PC Label: [BLANK] Blu-ray/CABLE/SATELLITE/DVD/DVD REC/DVR/GAME/HOME THTR/ RECEIVER/COMPUTER/MEDIA CTR/MEDIA EXT/VCR/CAMERA/MONITOR/AUX/ OTHER/Not used...

TCP55VT30 User Guide
Page 59
... displayed on the recorder or output monitor. 59 Technical Information Support Information Closed Caption (CC) ● For viewing the CC of digital broadcasting, set the aspect ratio to ON within the device itself. characters might be cut off). ● The CC can be connected to On on your local digital equipment retailer shop. HDMI-compatible equipment (*1) with an HDMI or DVI output terminal, such as a Cable or Satellite box or a DVD player...
... displayed on the recorder or output monitor. 59 Technical Information Support Information Closed Caption (CC) ● For viewing the CC of digital broadcasting, set the aspect ratio to ON within the device itself. characters might be cut off). ● The CC can be connected to On on your local digital equipment retailer shop. HDMI-compatible equipment (*1) with an HDMI or DVI output terminal, such as a Cable or Satellite box or a DVD player...

TCP55VT30 User Guide
Page 63
... connections are secure. not blinking) Press the INPUT button on the remote to select the correct input source. recheck above steps. Change the format (aspect ratio) of the picture by pressing the FORMAT button on the remote control. (p. 20) Check the aspect settings on (front red LED light should be OK. When using external video source, such as film-based movies, are nearby. Try unplugging it again. Check if the power cord is plugged in " is selected? When using a cable service (without a box...
... connections are secure. not blinking) Press the INPUT button on the remote to select the correct input source. recheck above steps. Change the format (aspect ratio) of the picture by pressing the FORMAT button on the remote control. (p. 20) Check the aspect settings on (front red LED light should be OK. When using external video source, such as film-based movies, are nearby. Try unplugging it again. Check if the power cord is plugged in " is selected? When using a cable service (without a box...
TCP55VT30 User Guide
Page 64
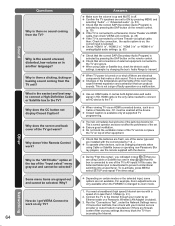
... sound coming from the TV? Why does the CC button not display Closed Caption? Why doesn't the Remote Control work on the remote control. Answers Make sure the volume is up and MUTE is off there are using Cable or Satellite boxes or operating non-Panasonic Bluray players, use the remote supplied with a Networking speed of other devices, such as a Cable or Satellite box, CC must be selected. Check "HDMI 1 in", "HDMI 2 in", "HDMI 3 in" or "HDMI 4 in" analog/digital audio settings...
... sound coming from the TV? Why does the CC button not display Closed Caption? Why doesn't the Remote Control work on the remote control. Answers Make sure the volume is up and MUTE is off there are using Cable or Satellite boxes or operating non-Panasonic Bluray players, use the remote supplied with a Networking speed of other devices, such as a Cable or Satellite box, CC must be selected. Check "HDMI 1 in", "HDMI 2 in", "HDMI 3 in" or "HDMI 4 in" analog/digital audio settings...

TCP55VT30 User Guide
Page 65
... charging cable connected properly? Turn the television power on the TV's remote control and select "3D" 2. Enter your TV. The battery of the image seem reversed? If software update is "grayed out", the TV is short when charged. Begin playing the 3D video source. 2. Check with Panasonic's Wireless LAN Adapter (included). Press "3D" button directly or press VIERA TOOLS button on , and charge the battery. In the "3D format select" menu...
... charging cable connected properly? Turn the television power on the TV's remote control and select "3D" 2. Enter your TV. The battery of the image seem reversed? If software update is "grayed out", the TV is short when charged. Begin playing the 3D video source. 2. Check with Panasonic's Wireless LAN Adapter (included). Press "3D" button directly or press VIERA TOOLS button on , and charge the battery. In the "3D format select" menu...


