
TCP60GT50 User Guide
Page 2
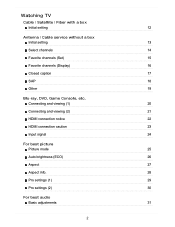
... TV Cable / Satellite / Fiber with a box Initial setting 12 Antenna / Cable service without a box Initial setting 13 Select channels 14 Favorite channels (Set) 15 Favorite channels (Display) 16 Closed caption 17 SAP 18 Other 19 Blu-ray, DVD, Game Console, etc. Connecting and viewing (1) 20 Connecting and viewing (2) 21 HDMI connection notice 22 HDMI connection caution 23 Input signal 24 For best picture Picture mode 25 Auto brightness (ECO) 26 Aspect 27 Aspect info. 28 Pro settings (1) 29 Pro settings (2) 30 For best audio Basic adjustments 31...
... TV Cable / Satellite / Fiber with a box Initial setting 12 Antenna / Cable service without a box Initial setting 13 Select channels 14 Favorite channels (Set) 15 Favorite channels (Display) 16 Closed caption 17 SAP 18 Other 19 Blu-ray, DVD, Game Console, etc. Connecting and viewing (1) 20 Connecting and viewing (2) 21 HDMI connection notice 22 HDMI connection caution 23 Input signal 24 For best picture Picture mode 25 Auto brightness (ECO) 26 Aspect 27 Aspect info. 28 Pro settings (1) 29 Pro settings (2) 30 For best audio Basic adjustments 31...

TCP60GT50 User Guide
Page 12
Change INPUT INPUT Press the INPUT button to verify. * Check your box "aspect" or "format" settings. Tip: HDMI will not be set the TV channel to CH3 or CH4. Tip: press the TV's INFO button to select the proper connection. Wait 2 seconds. 3. Power on your Cable , Satellite or Fiber box Use the box's remote control to change channels. * If the box is connected to the TV using a COAX cable (Antenna/Cable in), then set to the TV, AV IN or...
Change INPUT INPUT Press the INPUT button to verify. * Check your box "aspect" or "format" settings. Tip: HDMI will not be set the TV channel to CH3 or CH4. Tip: press the TV's INFO button to select the proper connection. Wait 2 seconds. 3. Power on your Cable , Satellite or Fiber box Use the box's remote control to change channels. * If the box is connected to the TV using a COAX cable (Antenna/Cable in), then set to the TV, AV IN or...

TCP60GT50 User Guide
Page 13
Scan the channel MENU Setup > ANT/Cable setup > ANT in . 2. Watching TV Antenna / Cable service without a box Initial setting 1. Start scanning. * If at the end of Cable service. Select Auto program and select scan mode (All channels / Analog only / Digital only). 3. In such a case, the channel scanning is not needed (set ANT IN to the TV's "ANTENNA/CABLE IN" screw terminal. Select Programming source Cable or Antenna in Ant in , Auto program 1. or Availability of the scanning no channels are typically connected to the TV's A/V inputs, preferably HDMI, for...
Scan the channel MENU Setup > ANT/Cable setup > ANT in . 2. Watching TV Antenna / Cable service without a box Initial setting 1. Start scanning. * If at the end of Cable service. Select Auto program and select scan mode (All channels / Analog only / Digital only). 3. In such a case, the channel scanning is not needed (set ANT IN to the TV's "ANTENNA/CABLE IN" screw terminal. Select Programming source Cable or Antenna in Ant in , Auto program 1. or Availability of the scanning no channels are typically connected to the TV's A/V inputs, preferably HDMI, for...
TCP60GT50 User Guide
Page 32
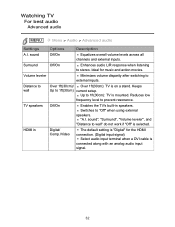
.... Up to wall" do not work if "Off" is mounted. "A.I . Ideal for the HDMI connection. (Digital input signal) Select audio input terminal when a DVI cable is connected along with an analog audio input signal. 32 sound", "Surround", "Volume leveler", and "Distance to 1ft(30cm): TV is selected. HDMI in speakers. Watching TV For best audio Advanced audio MENU Menu > Audio > Advanced audio Settings Options Description A.I . sound Off/On Equalizes overall volume levels across all channels and external inputs. Distance to 1ft(30cm) current setup.
.... Up to wall" do not work if "Off" is mounted. "A.I . Ideal for the HDMI connection. (Digital input signal) Select audio input terminal when a DVI cable is connected along with an analog audio input signal. 32 sound", "Surround", "Volume leveler", and "Distance to 1ft(30cm): TV is selected. HDMI in speakers. Watching TV For best audio Advanced audio MENU Menu > Audio > Advanced audio Settings Options Description A.I . sound Off/On Equalizes overall volume levels across all channels and external inputs. Distance to 1ft(30cm) current setup.

TCP60GT50 User Guide
Page 129
... unique function that the image is displayed correctly. When adding new equipment, reconnecting equipment or changing the setup after the connection, turn the equipment on and then switch the TV on the external equipment's connections, please refer to correct HDMI terminal, and make sure that we have developed and added. Set the input mode to the operating manual for other manufacturers' equipment that you use Panasonic's HDMI cable.
... unique function that the image is displayed correctly. When adding new equipment, reconnecting equipment or changing the setup after the connection, turn the equipment on and then switch the TV on the external equipment's connections, please refer to correct HDMI terminal, and make sure that we have developed and added. Set the input mode to the operating manual for other manufacturers' equipment that you use Panasonic's HDMI cable.
TCP60GT50 User Guide
Page 134
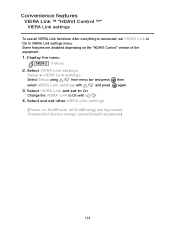
... /Default speakers) 134 Select VIERA Link and set to On Change the VIERA Link to On in VIERA Link settings menu. Display the menu MENU Menu 2. Select and set VIERA Link to On with / and press 3. Select VIERA Link settings Setup > VIERA Link settings Select Setup using / from menu bar and press select VIERA Link settings with / 4. Convenience features VIERA Link ™ "HDAVI Control ™" VIERA Link settings To use all VIERA Link functions: After everything is connected, set other VIERA Link settings then again. (Power...
... /Default speakers) 134 Select VIERA Link and set to On Change the VIERA Link to On in VIERA Link settings menu. Display the menu MENU Menu 2. Select and set VIERA Link to On with / and press 3. Select VIERA Link settings Setup > VIERA Link settings Select Setup using / from menu bar and press select VIERA Link settings with / 4. Convenience features VIERA Link ™ "HDAVI Control ™" VIERA Link settings To use all VIERA Link functions: After everything is connected, set other VIERA Link settings then again. (Power...
TCP60GT50 User Guide
Page 179
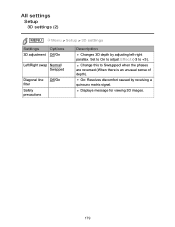
All settings Setup 3D settings (2) MENU Menu > Setup > 3D settings Settings Options 3D adjustment Off/On Left/Right swap Normal/ Swapped Diagonal line filter Safety precautions Off/On Description Changes 3D depth by receiving a quincunx matrix signal. On: Resolves discomfort caused by adjusting left-right parallax. Change this to +3). Set to On to adjust Effect (-3 to Swapped when the phases are reversed (When there is an unusual sense of depth). Displays message for viewing 3D images. 179
All settings Setup 3D settings (2) MENU Menu > Setup > 3D settings Settings Options 3D adjustment Off/On Left/Right swap Normal/ Swapped Diagonal line filter Safety precautions Off/On Description Changes 3D depth by receiving a quincunx matrix signal. On: Resolves discomfort caused by adjusting left-right parallax. Change this to +3). Set to On to adjust Effect (-3 to Swapped when the phases are reversed (When there is an unusual sense of depth). Displays message for viewing 3D images. 179
TCP60GT50 User Guide
Page 180
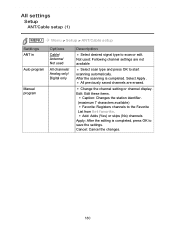
... OK to scan or edit. All settings Setup ANT/Cable setup (1) MENU Menu > Setup > ANT/Cable setup Settings ANT in Auto program Options Cable/ Antenna/ Not used : Following channel settings are erased. Select Apply . Not used All channels/ Analog only/ Digital only Manual program Description Select desired signal type to save the settings. All previously saved channels are not available Select scan type and press OK to the Favorite List from Set favorite. Cancel: Cancel the changes. 180 Change the channel setting or channel display.
... OK to scan or edit. All settings Setup ANT/Cable setup (1) MENU Menu > Setup > ANT/Cable setup Settings ANT in Auto program Options Cable/ Antenna/ Not used : Following channel settings are erased. Select Apply . Not used All channels/ Analog only/ Digital only Manual program Description Select desired signal type to save the settings. All previously saved channels are not available Select scan type and press OK to the Favorite List from Set favorite. Cancel: Cancel the changes. 180 Change the channel setting or channel display.

TCP60GT50 User Guide
Page 181
If you cannot figure out the problem, consult your local dealer. If the signal is selected in "ANT in" Available only for digital antenna channels. 181 Not available if "Cable" is weak, check the antenna. All settings Setup ANT/Cable setup (2) MENU Settings Signal meter Menu > Setup > ANT/Cable setup Options Description Check the signal strength if interference is found or freezing occurs on a digital image.
If you cannot figure out the problem, consult your local dealer. If the signal is selected in "ANT in" Available only for digital antenna channels. 181 Not available if "Cable" is weak, check the antenna. All settings Setup ANT/Cable setup (2) MENU Settings Signal meter Menu > Setup > ANT/Cable setup Options Description Check the signal strength if interference is found or freezing occurs on a digital image.
TCP60GT50 User Guide
Page 184
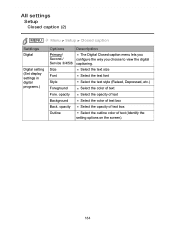
... the color of text (Identify the setting options on the screen). 184 opacity Select the opacity of text box Outline Select the outline color of text Fore. opacity Select the opacity of text Background Select the color of text box Back. All settings Setup Closed caption (2) MENU Menu > Setup > Closed caption Settings Digital Digital setting (Set display settings in digital programs.) Options Description Primary/ The Digital Closed caption menu lets you Second./ configure the way you choose to view the digital Service 3/4/5/6 captioning.
... the color of text (Identify the setting options on the screen). 184 opacity Select the opacity of text box Outline Select the outline color of text Fore. opacity Select the opacity of text Background Select the color of text box Back. All settings Setup Closed caption (2) MENU Menu > Setup > Closed caption Settings Digital Digital setting (Set display settings in digital programs.) Options Description Primary/ The Digital Closed caption menu lets you Second./ configure the way you choose to view the digital Service 3/4/5/6 captioning.
TCP60GT50 User Guide
Page 185
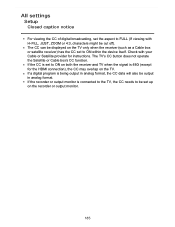
... output monitor is 480i (except for instructions. If the CC is set to ON on both the receiver and TV when the signal is connected to the TV, the CC needs to be cut off). The TV's CC button does not operate the Satellite or Cable box's CC function. The CC can be output in analog format. All settings Setup Closed caption notice For viewing the CC of digital...
... output monitor is 480i (except for instructions. If the CC is set to ON on both the receiver and TV when the signal is connected to the TV, the CC needs to be cut off). The TV's CC button does not operate the Satellite or Cable box's CC function. The CC can be output in analog format. All settings Setup Closed caption notice For viewing the CC of digital...

TCP60GT50 User Guide
Page 187
... Default speakers, change the Default speakers setting from the Home Theater whenever the TV is powered on )/ Yes (with Quick Start mode)" * Minimum power consumption of Standby condition for available equipment only) TV is moved to Theater. Sound will be output from TV to ECO Standby mode* automatically under these conditions. The connected equipment has "HDAVI Control 2 or later" (for the equipment. All settings Setup VIERA Link settings (2) MENU Menu > Setup > VIERA Link settings Settings Energy saving mode...
... Default speakers, change the Default speakers setting from the Home Theater whenever the TV is powered on )/ Yes (with Quick Start mode)" * Minimum power consumption of Standby condition for available equipment only) TV is moved to Theater. Sound will be output from TV to ECO Standby mode* automatically under these conditions. The connected equipment has "HDAVI Control 2 or later" (for the equipment. All settings Setup VIERA Link settings (2) MENU Menu > Setup > VIERA Link settings Settings Energy saving mode...

TCP60GT50 User Guide
Page 188
... Reduces screen brightness to "Yes", or "On/Off Timer" is set. Eye-friendly for about 10 seconds when the TV is turned on " is set to lower power consumption. "No signal for 10 minutes was turned off when NO SIGNAL and NO OPERATION continue for 10 minutes" feature. Not in use when "Auto power on for the first time after the power was activated" will flash...
... Reduces screen brightness to "Yes", or "On/Off Timer" is set. Eye-friendly for about 10 seconds when the TV is turned on " is set to lower power consumption. "No signal for 10 minutes was turned off when NO SIGNAL and NO OPERATION continue for 10 minutes" feature. Not in use when "Auto power on for the first time after the power was activated" will flash...
TCP60GT50 User Guide
Page 189
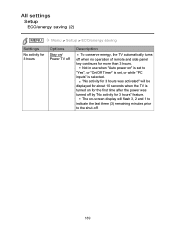
... on for the first time after the power was activated" will flash 3, 2 and 1 to indicate the last three (3) remaining minutes prior to "Yes", or "On/Off Timer" is set, or while "PC inputs" is turned on -screen display will be displayed for about 10 seconds when the TV is selected. Not in use when "Auto power on" is set to the shut-off by...
... on for the first time after the power was activated" will flash 3, 2 and 1 to indicate the last three (3) remaining minutes prior to "Yes", or "On/Off Timer" is set, or while "PC inputs" is turned on -screen display will be displayed for about 10 seconds when the TV is selected. Not in use when "Auto power on" is set to the shut-off by...
TCP60GT50 User Guide
Page 190
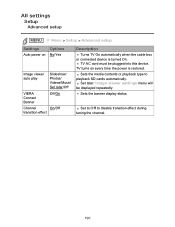
... be plugged into this device. All settings Setup Advanced setup MENU Menu > Setup > Advanced setup Settings Options Auto power on every time the power is turned On. TV AC cord must be displayed repeatedly. Sets the media contents or playback type to disable transition effect during tuning the channel. 190 Sets the banner display status. Set to Off to playback SD cards automatically. TV turns on No/Yes Image viewer auto play Slideshow/ Photos/ Videos/Music/ Set later/Off VIERA Connect...
... be plugged into this device. All settings Setup Advanced setup MENU Menu > Setup > Advanced setup Settings Options Auto power on every time the power is turned On. TV AC cord must be displayed repeatedly. Sets the media contents or playback type to disable transition effect during tuning the channel. 190 Sets the banner display status. Set to Off to playback SD cards automatically. TV turns on No/Yes Image viewer auto play Slideshow/ Photos/ Videos/Music/ Set later/Off VIERA Connect...
TCP60GT50 User Guide
Page 191
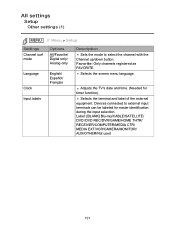
...] Blu-ray/CABLE/SATELLITE/ DVD /DVD REC/DVR/GAME/HOME THTR/ RECEIVER/COMPUTER/MEDIA CTR/ MEDIA EXT/VCR/CAMERA/MONITOR/ AUX/OTHER/Not used 191 Selects the screen menu language. Devices connected to select the channel with the Channel up/down button. Adjusts the TV's date and time. (Needed for easier identification during the input selection. Favorite: Only channels registered as FAVORITE. All settings Setup Other settings (1) MENU Settings Channel surf mode Language Clock Input labels Menu > Setup Options All...
...] Blu-ray/CABLE/SATELLITE/ DVD /DVD REC/DVR/GAME/HOME THTR/ RECEIVER/COMPUTER/MEDIA CTR/ MEDIA EXT/VCR/CAMERA/MONITOR/ AUX/OTHER/Not used 191 Selects the screen menu language. Devices connected to select the channel with the Channel up/down button. Adjusts the TV's date and time. (Needed for easier identification during the input selection. Favorite: Only channels registered as FAVORITE. All settings Setup Other settings (1) MENU Settings Channel surf mode Language Clock Input labels Menu > Setup Options All...
TCP60GT50 User Guide
Page 192
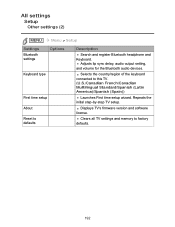
Adjusts lip sync delay, audio output setting, and volume for the Bluetooth audio devices. All settings Setup Other settings (2) MENU Menu > Setup Settings Bluetooth settings Options Keyboard type First time setup About Reset to factory defaults. 192 Displays TV's firmware version and software license. Clears all TV settings and memory to defaults Description Search and register Bluetooth headphone and Keyboard. Repeats the initial step-by-step TV setup. Selects the country/region of the keyboard connected to this...
Adjusts lip sync delay, audio output setting, and volume for the Bluetooth audio devices. All settings Setup Other settings (2) MENU Menu > Setup Settings Bluetooth settings Options Keyboard type First time setup About Reset to factory defaults. 192 Displays TV's firmware version and software license. Clears all TV settings and memory to defaults Description Search and register Bluetooth headphone and Keyboard. Repeats the initial step-by-step TV setup. Selects the country/region of the keyboard connected to this...

TCP60GT50 User Guide
Page 194
... Signal meter. 194 not blinking) Press the INPUT button on the TV's remote control. When using a cable or satellite box, change the connection (wiring) to select the correct input source. When using an external video source, such as a Cable/Satellite box or DVD player, check that connections are shared. Press MENU on the remote to Composite, Component or HDMI. If the menu is displayed, then the TV is there no picture or just a blue, black or snowy screen being displayed? Support / FAQ FAQ Picture...
... Signal meter. 194 not blinking) Press the INPUT button on the TV's remote control. When using a cable or satellite box, change the connection (wiring) to select the correct input source. When using an external video source, such as a Cable/Satellite box or DVD player, check that connections are shared. Press MENU on the remote to Composite, Component or HDMI. If the menu is displayed, then the TV is there no picture or just a blue, black or snowy screen being displayed? Support / FAQ FAQ Picture...
TCP60GT50 User Guide
Page 200
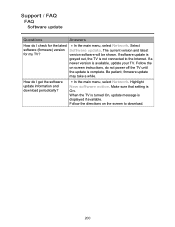
... is not connected to download. 200 firmware update may take a while. Make sure that setting is complete. The current version and latest for the latest In the main menu, select Network. In the main menu, select Network. version software will be shown. Follow the on the screen to the Internet. When the TV is turned On, update message is displayed if available. Support / FAQ FAQ Software update Questions...
... is not connected to download. 200 firmware update may take a while. Make sure that setting is complete. The current version and latest for the latest In the main menu, select Network. In the main menu, select Network. version software will be shown. Follow the on the screen to the Internet. When the TV is turned On, update message is displayed if available. Support / FAQ FAQ Software update Questions...
TCP60GT50 User Guide
Page 205
Select Yes to defaults and press . Highlight Reset to reset the TV. 205 Answers In the main menu, select Setup. Enter your password (if created earlier) or create a temporary new password. Support / FAQ FAQ Reset to default Questions How do I reset my TV to all factory defaults and settings?
Select Yes to defaults and press . Highlight Reset to reset the TV. 205 Answers In the main menu, select Setup. Enter your password (if created earlier) or create a temporary new password. Support / FAQ FAQ Reset to default Questions How do I reset my TV to all factory defaults and settings?


