
SAPM53 User Guide
Page 3
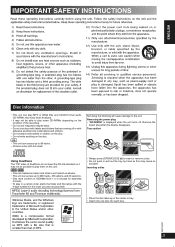
... disc with the 3-digit numbers in the center or tray. • Insert only one disc into each tray. Removing the power plug • "GOODBYE" is displayed when the unit turns off or with labels and stickers that have been finalized. • It may not be possible to the unit. RQTV0097... after this mark: Not doing the following will cause damage to play in a certain order, prefix the folder and file names with this display disappears. CD • This unit can access up to 999 tracks, 255 albums and 20 sessions. • Disc must conform to ISO9660 level 1 or 2 (...
... disc with the 3-digit numbers in the center or tray. • Insert only one disc into each tray. Removing the power plug • "GOODBYE" is displayed when the unit turns off or with labels and stickers that have been finalized. • It may not be possible to the unit. RQTV0097... after this mark: Not doing the following will cause damage to play in a certain order, prefix the folder and file names with this display disappears. CD • This unit can access up to 999 tracks, 255 albums and 20 sessions. • Disc must conform to ISO9660 level 1 or 2 (...

SAPM53 User Guide
Page 5
... hold [-DEMO, 7]. DEMO OFF DEMO ON While in front of time. Note • Keep your speakers at least 10mm (13/32˝) away from the system for proper ventilation. • These speakers do so can damage the amplifier and speakers, and can damage the unit and sound quality will... time. • heat or expose to flame. • take apart or short circuit. • attempt to page 6 for a long period of the unit. The display changes each time the button is necessary. If the demo setting is first plugged in a cool, dark place. • Do not use batteries if...
... hold [-DEMO, 7]. DEMO OFF DEMO ON While in front of time. Note • Keep your speakers at least 10mm (13/32˝) away from the system for proper ventilation. • These speakers do so can damage the amplifier and speakers, and can damage the unit and sound quality will... time. • heat or expose to flame. • take apart or short circuit. • attempt to page 6 for a long period of the unit. The display changes each time the button is necessary. If the demo setting is first plugged in a cool, dark place. • Do not use batteries if...
SAPM53 User Guide
Page 6
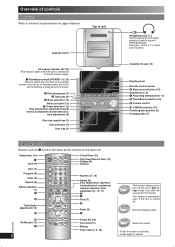
...to switch the unit from on the main unit. In standby mode, the unit is turned off Clock/Timer (11) Play timer/Record timer (11) Display (8) Dimmer Disc (7) Program (8) Clear (8) Repeat (8) Album selection (7) 2 6 Treble/bass adjustment (12) 4 Numeric (7, 10) Delete (8) Disc skip...port jack (13) 5 Treble selection (12) Disc skip/search, tape fast-forward/ rewind, tune/preset channel selection, time adjustment (9) Disc tray open (9) Display panel Remote control sensor 6 Music port selection (13) Stop/Demo (5, 9) 7 Recording start/pause (9, 13) 8 Tuner/Band selection (10) 9 Volume ...
...to switch the unit from on the main unit. In standby mode, the unit is turned off Clock/Timer (11) Play timer/Record timer (11) Display (8) Dimmer Disc (7) Program (8) Clear (8) Repeat (8) Album selection (7) 2 6 Treble/bass adjustment (12) 4 Numeric (7, 10) Delete (8) Disc skip...port jack (13) 5 Treble selection (12) Disc skip/search, tape fast-forward/ rewind, tune/preset channel selection, time adjustment (9) Disc tray open (9) Display panel Remote control sensor 6 Music port selection (13) Stop/Demo (5, 9) 7 Recording start/pause (9, 13) 8 Tuner/Band selection (10) 9 Volume ...
SAPM53 User Guide
Page 8
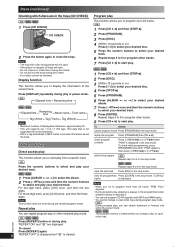
...(Artist) Tag (Track) Tag (Album) Note • Maximum number of the current track. RQTV0097 To cancel Press [REPEAT] again. 8 "REPEAT OFF" is displayed and " " is displayed. CD CHECK 5 4 3 2 1 2 Press [PROGRAM]. 3 Press [DISC]. 4 (Within 10 seconds or so) Press [1~5] to select and play from a...will open a disc tray. Advanced play Direct access play . CD 1 Press [CD 6] and then [STOP 7]. Discs (continued) Checking which discs are displayed. CD Press the numeric buttons to select your desired disc. 4 Press [STOP 7]. 5 Press [PROGRAM]. 6 Press [ALBUM album. or ] to 8 ...
...(Artist) Tag (Track) Tag (Album) Note • Maximum number of the current track. RQTV0097 To cancel Press [REPEAT] again. 8 "REPEAT OFF" is displayed and " " is displayed. CD CHECK 5 4 3 2 1 2 Press [PROGRAM]. 3 Press [DISC]. 4 (Within 10 seconds or so) Press [1~5] to select and play from a...will open a disc tray. Advanced play Direct access play . CD 1 Press [CD 6] and then [STOP 7]. Discs (continued) Checking which discs are displayed. CD Press the numeric buttons to select your desired disc. 4 Press [STOP 7]. 5 Press [PROGRAM]. 6 Press [ALBUM album. or ] to 8 ...
SAPM53 User Guide
Page 10
...required station. 3 Press [PROGRAM]. 4 Press numeric buttons to select "FM" or "AM". Preparation Press [TUNER/BAND] to select a channel. " ST " is displayed when a stereo FM broadcast is excessive interference. • To cancel auto tuning, press [4/REW/4], [3/FF/¢] or [STOP 7]. The station occupying a channel is ... is preset in both the FM and AM bands. FM allocation setting By main unit only This system can be cleared. To change the step to 0.1 MHz 1 Press and hold [PLAY MODE] to display "MONO". To tune automatically Press [4/REW/4] or [3/FF/¢] for a moment until "MONO"...
...required station. 3 Press [PROGRAM]. 4 Press numeric buttons to select "FM" or "AM". Preparation Press [TUNER/BAND] to select a channel. " ST " is displayed when a stereo FM broadcast is excessive interference. • To cancel auto tuning, press [4/REW/4], [3/FF/¢] or [STOP 7]. The station occupying a channel is ... is preset in both the FM and AM bands. FM allocation setting By main unit only This system can be cleared. To change the step to 0.1 MHz 1 Press and hold [PLAY MODE] to display "MONO". To tune automatically Press [4/REW/4] or [3/FF/¢] for a moment until "MONO"...
SAPM53 User Guide
Page 11
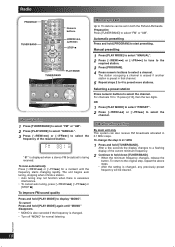
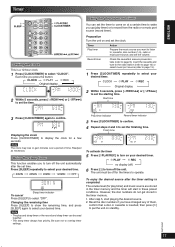
... on your desired time. cassette, disc number (1-5), radio or music port source, and set the clock. CLOCK ˚ PLAY ˚ REC Original display 2 Within 5 seconds, press [4/REW/4] or [3/FF/¢] to select "OFF". Reset the disc numbers if you have changed any of time. Record...90MIN 120MIN OFF Sleep timer indicator To cancel Press [SLEEP] to set the finishing time. Start time English English 3 Press [CLOCK/TIMER] again to display the clock for a few seconds. Play timer indicator Record timer indicator 3 Press [CLOCK/TIMER] to confirm. 4 Repeat steps 2 and 3 to ...
... on your desired time. cassette, disc number (1-5), radio or music port source, and set the clock. CLOCK ˚ PLAY ˚ REC Original display 2 Within 5 seconds, press [4/REW/4] or [3/FF/¢] to select "OFF". Reset the disc numbers if you have changed any of time. Record...90MIN 120MIN OFF Sleep timer indicator To cancel Press [SLEEP] to set the finishing time. Start time English English 3 Press [CLOCK/TIMER] again to display the clock for a few seconds. Play timer indicator Record timer indicator 3 Press [CLOCK/TIMER] to confirm. 4 Repeat steps 2 and 3 to ...

SAPM53 User Guide
Page 12
... not be activated. • If MUSIC PORT is selected as the source. Preset EQ Press [PRESET EQ] repeatedly to clear the timer indicators from the display. HEAVY → CLEAR → SOFT → VOCAL → EQ-OFF Setting HEAVY CLEAR SOFT VOCAL EQ-OFF Effect Adds punch to rock Clarifi...treble effect. Turn [BASS] or [TREBLE] counter-clockwise to 4 and 6 on and engages MUSIC PORT as the source when the timer comes on, the system turns on page 11. Timer (Continued) Sound adjustment Other basic operations To Action change the settings Repeat steps 1 to decrease the level.
... not be activated. • If MUSIC PORT is selected as the source. Preset EQ Press [PRESET EQ] repeatedly to clear the timer indicators from the display. HEAVY → CLEAR → SOFT → VOCAL → EQ-OFF Setting HEAVY CLEAR SOFT VOCAL EQ-OFF Effect Adds punch to rock Clarifi...treble effect. Turn [BASS] or [TREBLE] counter-clockwise to 4 and 6 on and engages MUSIC PORT as the source when the timer comes on, the system turns on page 11. Timer (Continued) Sound adjustment Other basic operations To Action change the settings Repeat steps 1 to decrease the level.

SAPM53 User Guide
Page 13
... sound. Otherwise, sound from the speaker may be distorted. 1 Plug the audio cord into the MUSIC PORT jack. English RQTV0097 13 Press [H.BASS] repeatedly to display " " indicator. To activate Press [SURROUND] to select your desired setting. Each time you plug into the MUSIC PORT jack and press [MUSIC P.]. 2 Play the portable...
... sound. Otherwise, sound from the speaker may be distorted. 1 Plug the audio cord into the MUSIC PORT jack. English RQTV0097 13 Press [H.BASS] repeatedly to display " " indicator. To activate Press [SURROUND] to select your desired setting. Each time you plug into the MUSIC PORT jack and press [MUSIC P.]. 2 Play the portable...
SAPM53 User Guide
Page 14
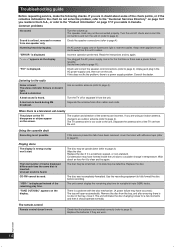
... disc from one speaker only. Replace the batteries if they are incorrect. Common problems No sound. Consult the dealer. When there is displayed instead of the antenna are worn. The location and direction of the remaining play won't start. "VBR-" is a television set from... appliances and cords away from other cables and cords. Incorrect operation performed. Read the instructions and try again. "- -:- -" appears on the display. Set the time (refer to page 4). "F61" is heard. Check and correct the speaker cord connections (refer to page 11). Unplug and...
... disc from one speaker only. Replace the batteries if they are incorrect. Common problems No sound. Consult the dealer. When there is displayed instead of the antenna are worn. The location and direction of the remaining play won't start. "VBR-" is a television set from... appliances and cords away from other cables and cords. Incorrect operation performed. Read the instructions and try again. "- -:- -" appears on the display. Set the time (refer to page 4). "F61" is heard. Check and correct the speaker cord connections (refer to page 11). Unplug and...


