

SAPM25 User Guide
Page 2
... of speakers 5 The remote control 5 Connections 6 Front panel controls 8 Auto power-off 8 Setting the time 9 Convenient Functions 9 Turning the demo function off 9 Listening operations The radio: manual tuning 10 The radio: preset tuning 11 CDs 12 Cassette tapes 15 Recording operations Before recording 16 Recording the radio 17 Recording CDs 18 Timers and others Changing the sound quality 20 Using an external unit 20 Using the timers 21 References Troubleshooting guide 23 Servicenter List (U.S.A 24 Warranty (U.S.A 25 Specifications 26 Maintenance 26 Product Service 26...
... of speakers 5 The remote control 5 Connections 6 Front panel controls 8 Auto power-off 8 Setting the time 9 Convenient Functions 9 Turning the demo function off 9 Listening operations The radio: manual tuning 10 The radio: preset tuning 11 CDs 12 Cassette tapes 15 Recording operations Before recording 16 Recording the radio 17 Recording CDs 18 Timers and others Changing the sound quality 20 Using an external unit 20 Using the timers 21 References Troubleshooting guide 23 Servicenter List (U.S.A 24 Warranty (U.S.A 25 Specifications 26 Maintenance 26 Product Service 26...
SAPM25 User Guide
Page 3
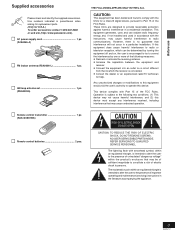
AC power supply cord 1 pc. (RJA0065-A) FM indoor antenna (RSA0006-L 1 pc. Operation is intended to alert the user to correct the interference by one or more of important operating and maintenance (servicing) instructions in the literature accompanying the appliance. 3 RQT5717 Before use Supplied accessories Please check and identify the supplied accessories. The exclamation point within the product's enclosure that may be determined by turning the...
AC power supply cord 1 pc. (RJA0065-A) FM indoor antenna (RSA0006-L 1 pc. Operation is intended to alert the user to correct the interference by one or more of important operating and maintenance (servicing) instructions in the literature accompanying the appliance. 3 RQT5717 Before use Supplied accessories Please check and identify the supplied accessories. The exclamation point within the product's enclosure that may be determined by turning the...
SAPM25 User Guide
Page 4
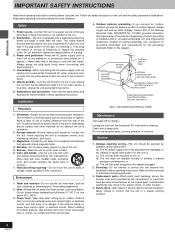
...-Do not use . Power lines-Take care when setting up static charges. Do not use IMPORTANT SAFETY INSTRUCTIONS Read these operating instructions handy for details.) Unplug the unit from heat sources, such as marked on the unit and the safety precautions listed below 5˚C (41˚F) or rise above 35˚C (95˚F). 3. Replacement parts-When parts need replacing ensure the servicer uses parts specified by...
...-Do not use . Power lines-Take care when setting up static charges. Do not use IMPORTANT SAFETY INSTRUCTIONS Read these operating instructions handy for details.) Unplug the unit from heat sources, such as marked on the unit and the safety precautions listed below 5˚C (41˚F) or rise above 35˚C (95˚F). 3. Replacement parts-When parts need replacing ensure the servicer uses parts specified by...

SAPM25 User Guide
Page 6
... AM loop antenna wire and speaker cords, twist the vinyl cover tip and pull off. 1 Connect the FM indoor antenna. After attaching the antenna, turn on the system and tune in the risk of the main unit and speakers provide the best sound. Put the antenna where the reception is best and interference is recommended (\ page 7.) 2 Connect the AM loop antenna. Caution Use only the supplied speakers The...
... AM loop antenna wire and speaker cords, twist the vinyl cover tip and pull off. 1 Connect the FM indoor antenna. After attaching the antenna, turn on the system and tune in the risk of the main unit and speakers provide the best sound. Put the antenna where the reception is best and interference is recommended (\ page 7.) 2 Connect the AM loop antenna. Caution Use only the supplied speakers The...

SAPM25 User Guide
Page 7
... power supply for all components has been turned off before making any connections. • For details, refer to the operating instructions of the unit which are to be connected. • All peripheral components and cables sold separately. Never use this system in a mountainous region or inside a reinforced-concrete building, etc. External unit connections • Make sure that may need an outdoor antenna if you use an outdoor antenna...
... power supply for all components has been turned off before making any connections. • For details, refer to the operating instructions of the unit which are to be connected. • All peripheral components and cables sold separately. Never use this system in a mountainous region or inside a reinforced-concrete building, etc. External unit connections • Make sure that may need an outdoor antenna if you use an outdoor antenna...

SAPM25 User Guide
Page 8
... turns off . "AUTO OFF" is connected to standby mode or vice versa. It comes on again, the unit functions as the buttons on to the AC power supply. 4 Display 5 Cassette slot 6 Remote control signal sensor 7 Display select/demonstration button 9 (DISPLAY, -DEMO) 8 CD, Tape, Tuner, Aux select button (SELECTOR 13, 18, 20 9 CD edit button (CD EDIT 19 0 Recording start/pause button ([REC/ J 17, 18 ! Cassette eject button (EJECT c 15 @ Volume control (VOLUME DOWN, UP 10, 12, 15 # CD tray open/close button (OPEN/CLOSE c 12 $ CD Tray % Tuner/band select button...
... turns off . "AUTO OFF" is connected to standby mode or vice versa. It comes on again, the unit functions as the buttons on to the AC power supply. 4 Display 5 Cassette slot 6 Remote control signal sensor 7 Display select/demonstration button 9 (DISPLAY, -DEMO) 8 CD, Tape, Tuner, Aux select button (SELECTOR 13, 18, 20 9 CD edit button (CD EDIT 19 0 Recording start/pause button ([REC/ J 17, 18 ! Cassette eject button (EJECT c 15 @ Volume control (VOLUME DOWN, UP 10, 12, 15 # CD tray open/close button (OPEN/CLOSE c 12 $ CD Tray % Tuner/band select button...
SAPM25 User Guide
Page 9
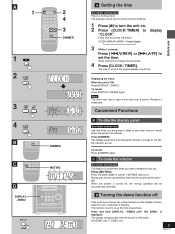
... MODE SELECTOR TUNER TAPE CD REV MODE CLEAR REW FF BASS TREBLE MUTING SOUND VIRTUALIZER DIMMER DISPLAY VOLUME 2 4 3 DIMMER 1 2 CLOCK/ TIMER 3 4/REW g 3/FF f 4 CLOCK/ TIMER B SOUND MUTING VIRTUALIZER DIMMER DISPLAY VOLUME DIMMER C MUTING SOUND VIRTUALIZER DIMMER DISPLAY VOLUME MUTING D DISPLAY, -DEMO DISPLAY -DEMO A Setting the time by lowering the volume all the way (-dB). To cancel Press [DIMMER] again. NO DEMO (off If the clock has not been set the time. The example shows how to change the time faster. 4 Press [CLOCK / TIMER]. Convenient Functions...
... MODE SELECTOR TUNER TAPE CD REV MODE CLEAR REW FF BASS TREBLE MUTING SOUND VIRTUALIZER DIMMER DISPLAY VOLUME 2 4 3 DIMMER 1 2 CLOCK/ TIMER 3 4/REW g 3/FF f 4 CLOCK/ TIMER B SOUND MUTING VIRTUALIZER DIMMER DISPLAY VOLUME DIMMER C MUTING SOUND VIRTUALIZER DIMMER DISPLAY VOLUME MUTING D DISPLAY, -DEMO DISPLAY -DEMO A Setting the time by lowering the volume all the way (-dB). To cancel Press [DIMMER] again. NO DEMO (off If the clock has not been set the time. The example shows how to change the time faster. 4 Press [CLOCK / TIMER]. Convenient Functions...
SAPM25 User Guide
Page 10
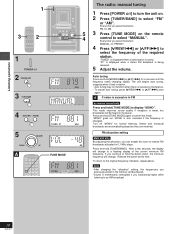
... the button: FM W AM 3 Press [TUNE MODE] on . 2 Press [TUNER/BAND] to select "MANUAL". Listening operations 1 3 2 5 4 1 POWER 2 TUNER/BAND MHz 3 TUNE MODE 4 4/REW/g 3/FF/f TUNED ST MHz 5 VOLUME DOWN UP A CLOCK AUTO OFF SLEEP TIMER 1 2 3 PLAY REC 4 5 6 10 7 8 9 0 TUNE MODE PROGRAM CANCEL PLAY MODE SELECTOR TUNER TAPE CD CLEAR REW FF dB TUNE MODE TUNED MONO MHz The radio: manual tuning 1 Press [POWER ] to turn the unit on the remote control to select "FM" or "AM". Every time you load/unload tapes while listening to display "MONO...
... the button: FM W AM 3 Press [TUNE MODE] on . 2 Press [TUNER/BAND] to select "MANUAL". Listening operations 1 3 2 5 4 1 POWER 2 TUNER/BAND MHz 3 TUNE MODE 4 4/REW/g 3/FF/f TUNED ST MHz 5 VOLUME DOWN UP A CLOCK AUTO OFF SLEEP TIMER 1 2 3 PLAY REC 4 5 6 10 7 8 9 0 TUNE MODE PROGRAM CANCEL PLAY MODE SELECTOR TUNER TAPE CD CLEAR REW FF dB TUNE MODE TUNED MONO MHz The radio: manual tuning 1 Press [POWER ] to turn the unit on the remote control to select "FM" or "AM". Every time you load/unload tapes while listening to display "MONO...
SAPM25 User Guide
Page 11
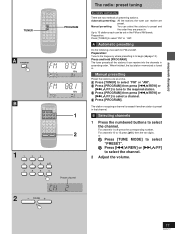
... TUNER TAPE CD REV MODE CLEAR REW FF BASS TREBLE SOUND MUTING VIRTUALIZER DIMMER DISPLAY VOLUME PROGRAM A PROGRAM PRGM B PRGM CLOCK AUTO OFF SLEEP TIMER 1 2 3 PLAY REC 4 5 6 10 7 8 9 0 TUNE MODE PROGRAM CANCEL PLAY MODE SELECTOR TUNER TAPE CD REV MODE CLEAR REW FF BASS TREBLE MUTING SOUND VIRTUALIZER DIMMER DISPLAY VOLUME MHz MHz 1 2 11 2 3 4 5 6 10 7 8 9 0 Preset channel The radio: preset tuning by remote control only There are preset. A Automatic presetting Do the following once each can receive are two methods of presetting stations...
... TUNER TAPE CD REV MODE CLEAR REW FF BASS TREBLE SOUND MUTING VIRTUALIZER DIMMER DISPLAY VOLUME PROGRAM A PROGRAM PRGM B PRGM CLOCK AUTO OFF SLEEP TIMER 1 2 3 PLAY REC 4 5 6 10 7 8 9 0 TUNE MODE PROGRAM CANCEL PLAY MODE SELECTOR TUNER TAPE CD REV MODE CLEAR REW FF BASS TREBLE MUTING SOUND VIRTUALIZER DIMMER DISPLAY VOLUME MHz MHz 1 2 11 2 3 4 5 6 10 7 8 9 0 Preset channel The radio: preset tuning by remote control only There are preset. A Automatic presetting Do the following once each can receive are two methods of presetting stations...

SAPM25 User Guide
Page 12
... enables CD-R/CD-RW players to play audio CD-R and CD-RW. 1 Press [POWER ] to turn the unit on. 2 Press [OPEN/CLOSE c] to resume play. Note • During random play . 5 Adjust the volume. Press [STOP L]. Skipping tracks Press [4/REW/ g] (backward) or [3 /FF/ f] (forward). Finalizing is off or with the remote control Press the numeric button(s) to start play (\page 13), you want. To stop the disc. The unit comes on the CD. • clean CDs with...
... enables CD-R/CD-RW players to play audio CD-R and CD-RW. 1 Press [POWER ] to turn the unit on. 2 Press [OPEN/CLOSE c] to resume play. Note • During random play . 5 Adjust the volume. Press [STOP L]. Skipping tracks Press [4/REW/ g] (backward) or [3 /FF/ f] (forward). Finalizing is off or with the remote control Press the numeric button(s) to start play (\page 13), you want. To stop the disc. The unit comes on the CD. • clean CDs with...

SAPM25 User Guide
Page 13
... operations A 2 1 CLOCK AUTO OFF SLEEP TIMER 1 2 3 PLAY REC 4 5 6 10 7 8 9 0 TUNE MODE PROGRAM CANCEL PLAY MODE SELECTOR TUNER TAPE CD REV MODE CLEAR REW FF BASS TREBLE SOUND MUTING VIRTUALIZER DIMMER DISPLAY VOLUME 1 SELECTOR 21 2 3 4 5 6 10 7 8 9 0 B CLOCK AUTO OFF SLEEP TIMER 1 2 3 PLAY REC 4 5 6 10 7 8 9 0 TUNE MODE PROGRAM CANCEL PLAY MODE SELECTOR TUNER TAPE CD REV MODE CLEAR REW FF BASS TREBLE MUTING SOUND VIRTUALIZER DIMMER DISPLAY VOLUME PLAY MODE 1 - CDs A Direct access play by remote control only Press [PLAY MODE...
... operations A 2 1 CLOCK AUTO OFF SLEEP TIMER 1 2 3 PLAY REC 4 5 6 10 7 8 9 0 TUNE MODE PROGRAM CANCEL PLAY MODE SELECTOR TUNER TAPE CD REV MODE CLEAR REW FF BASS TREBLE SOUND MUTING VIRTUALIZER DIMMER DISPLAY VOLUME 1 SELECTOR 21 2 3 4 5 6 10 7 8 9 0 B CLOCK AUTO OFF SLEEP TIMER 1 2 3 PLAY REC 4 5 6 10 7 8 9 0 TUNE MODE PROGRAM CANCEL PLAY MODE SELECTOR TUNER TAPE CD REV MODE CLEAR REW FF BASS TREBLE MUTING SOUND VIRTUALIZER DIMMER DISPLAY VOLUME PLAY MODE 1 - CDs A Direct access play by remote control only Press [PLAY MODE...

SAPM25 User Guide
Page 14
... desired tracks using the [g] or [f]. 2 Press [PROGRAM]. Press [CANCEL]. No further tracks can still be programmed. 3 1 CLOCK AUTO OFF SLEEP TIMER 1 2 3 PLAY REC 4 5 6 10 7 8 9 0 TUNE MODE PROGRAM CANCEL PLAY MODE SELECTOR TUNER TAPE CD REV MODE CLEAR REW FF BASS TREBLE MUTING SOUND VIRTUALIZER DIMMER DISPLAY VOLUME 2 5 Listening operations 1 SELECTOR 2 PROGRAM PRGM 31 2 3 4 5 6 10 7 8 9 0 Specified track number 5 CD -/J A PRGM Program order AB C D 14 RQT5717 PRGM Indicates program mode CLOCK AUTO OFF SLEEP TIMER 1 2 3 PLAY REC...
... desired tracks using the [g] or [f]. 2 Press [PROGRAM]. Press [CANCEL]. No further tracks can still be programmed. 3 1 CLOCK AUTO OFF SLEEP TIMER 1 2 3 PLAY REC 4 5 6 10 7 8 9 0 TUNE MODE PROGRAM CANCEL PLAY MODE SELECTOR TUNER TAPE CD REV MODE CLEAR REW FF BASS TREBLE MUTING SOUND VIRTUALIZER DIMMER DISPLAY VOLUME 2 5 Listening operations 1 SELECTOR 2 PROGRAM PRGM 31 2 3 4 5 6 10 7 8 9 0 Specified track number 5 CD -/J A PRGM Program order AB C D 14 RQT5717 PRGM Indicates program mode CLOCK AUTO OFF SLEEP TIMER 1 2 3 PLAY REC...
SAPM25 User Guide
Page 17
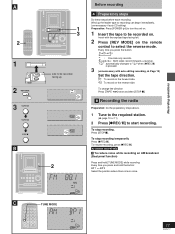
... leader tape so recording can begin immediately. (unneccessary if auto CD editing) Preparation: Press [POWER ] to turn the unit on. 1 Insert the tape to be recorded facing up FWD PLAY FWD PRGM AUTO 1 - 1-REC RANDOM PLAY REV FWD REC 2 TUNED ST MONO kHz MHz dB PRGM AUTO 1 - 1-REC PLAY RANDOM REV REC FWD C CLOCK AUTO OFF SLEEP TIMER 1 2 3 PLAY REC 4 5 6 10 7 8 9 0 TUNE MODE PROGRAM CANCEL PLAY MODE SELECTOR TUNER TAPE CD REV MODE CLEAR REW FF BASS TREBLE TUNE MODE TUNED...
... leader tape so recording can begin immediately. (unneccessary if auto CD editing) Preparation: Press [POWER ] to turn the unit on. 1 Insert the tape to be recorded facing up FWD PLAY FWD PRGM AUTO 1 - 1-REC RANDOM PLAY REV FWD REC 2 TUNED ST MONO kHz MHz dB PRGM AUTO 1 - 1-REC PLAY RANDOM REV REC FWD C CLOCK AUTO OFF SLEEP TIMER 1 2 3 PLAY REC 4 5 6 10 7 8 9 0 TUNE MODE PROGRAM CANCEL PLAY MODE SELECTOR TUNER TAPE CD REV MODE CLEAR REW FF BASS TREBLE TUNE MODE TUNED...

SAPM25 User Guide
Page 19
... CD also stops. To stop recording Press [STOP L]. The CD also stops. A 1 1 SELECTOR 2 CD EDIT 3 4 REC B 1 1 SELECTOR 2 CD EDIT 3 REW FF 4 REC 2 4 3 TUNED ST MONO kHz MHz dB PRGM AUTO side to be used with the exposed tape facing left. 4 Press [[REC/ J] to start recording. If a track is set to CD mode. 2 Press [CD EDIT] so "AUTO-REC" is dis- Preparation: Insert a CD (\ page 12) 1 Press [SELECTOR] to switch to " ". Note Auto edit recording...
... CD also stops. To stop recording Press [STOP L]. The CD also stops. A 1 1 SELECTOR 2 CD EDIT 3 4 REC B 1 1 SELECTOR 2 CD EDIT 3 REW FF 4 REC 2 4 3 TUNED ST MONO kHz MHz dB PRGM AUTO side to be used with the exposed tape facing left. 4 Press [[REC/ J] to start recording. If a track is set to CD mode. 2 Press [CD EDIT] so "AUTO-REC" is dis- Preparation: Insert a CD (\ page 12) 1 Press [SELECTOR] to switch to " ". Note Auto edit recording...

SAPM25 User Guide
Page 20
... 1 2 3 PLAY REC 4 5 6 10 7 8 9 0 TUNE MODE PROGRAM CANCEL PLAY MODE SELECTOR TUNER TAPE CD REV MODE CLEAR REW FF BASS TREBLE SOUND MUTING VIRTUALIZER DIMMER DISPLAY VOLUME - or +)] to music. Press [TREBLE (- To cancel Press [SOUND VIRTUALIZER] to reproduce clearer lowrange sounds. Note Avoid listening for external unit connection.) 1 Press [POWER ] to turn on the unit. 2 Press [SELECTOR] to select "AUX" Every time you press the button: CD TAPE TUNER AUX 3 Start playback from the external source. (Refer to your equipment's operating instructions.) Recording...
... 1 2 3 PLAY REC 4 5 6 10 7 8 9 0 TUNE MODE PROGRAM CANCEL PLAY MODE SELECTOR TUNER TAPE CD REV MODE CLEAR REW FF BASS TREBLE SOUND MUTING VIRTUALIZER DIMMER DISPLAY VOLUME - or +)] to music. Press [TREBLE (- To cancel Press [SOUND VIRTUALIZER] to reproduce clearer lowrange sounds. Note Avoid listening for external unit connection.) 1 Press [POWER ] to turn on the unit. 2 Press [SELECTOR] to select "AUX" Every time you press the button: CD TAPE TUNER AUX 3 Start playback from the external source. (Refer to your equipment's operating instructions.) Recording...
SAPM25 User Guide
Page 21
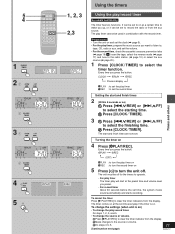
... radio station (\ page 10) or select the aux source (\ page 20). 1 Press [CLOCK / TIMER] to set . tape, CD, radio or aux, and set time everyday if the timer is on . The unit must be used in combination with the record timer. The timer comes on 4 Press [˚PLAY/REC]. 5 4 CLOCK AUTO OFF SLEEP TIMER 1 2 3 PLAY REC 4 5 6 10 7 8 9 0 TUNE MODE PROGRAM CANCEL PLAY MODE SELECTOR TUNER TAPE CD REV MODE CLEAR REW FF BASS TREBLE MUTING SOUND VIRTUALIZER DIMMER DISPLAY VOLUME 1, 2, 3 2,3 1 CLOCK/ TIMER SLEEP PLAY ON SLEEP PLAY ON 2 4/REW 3/FF g f PLAY...
... radio station (\ page 10) or select the aux source (\ page 20). 1 Press [CLOCK / TIMER] to set . tape, CD, radio or aux, and set time everyday if the timer is on . The unit must be used in combination with the record timer. The timer comes on 4 Press [˚PLAY/REC]. 5 4 CLOCK AUTO OFF SLEEP TIMER 1 2 3 PLAY REC 4 5 6 10 7 8 9 0 TUNE MODE PROGRAM CANCEL PLAY MODE SELECTOR TUNER TAPE CD REV MODE CLEAR REW FF BASS TREBLE MUTING SOUND VIRTUALIZER DIMMER DISPLAY VOLUME 1, 2, 3 2,3 1 CLOCK/ TIMER SLEEP PLAY ON SLEEP PLAY ON 2 4/REW 3/FF g f PLAY...

SAPM25 User Guide
Page 22
... CLOCK AUTO OFF SLEEP TIMER 1 2 3 PLAY REC 4 5 6 10 7 8 9 0 TUNE MODE PROGRAM CANCEL PLAY MODE SELECTOR TUNER TAPE CD REV MODE CLEAR REW FF BASS TREBLE MUTING SOUND VIRTUALIZER DIMMER DISPLAY VOLUME PLAY/ REC FADER Using the timers A Using the play/record timer by remote control only Checking the timers Press [CLOCK/ TIMER]. (While the unit is on, press [CLOCK/ TIMER] to select "˚PLAY" or "˚REC".) The timer conditions are shown in the standby mode. • If AUX is ON) Press [SLEEP]. If playing tapes or making a recording: Reset tape direction...
... CLOCK AUTO OFF SLEEP TIMER 1 2 3 PLAY REC 4 5 6 10 7 8 9 0 TUNE MODE PROGRAM CANCEL PLAY MODE SELECTOR TUNER TAPE CD REV MODE CLEAR REW FF BASS TREBLE MUTING SOUND VIRTUALIZER DIMMER DISPLAY VOLUME PLAY/ REC FADER Using the timers A Using the play/record timer by remote control only Checking the timers Press [CLOCK/ TIMER]. (While the unit is on, press [CLOCK/ TIMER] to select "˚PLAY" or "˚REC".) The timer conditions are shown in the standby mode. • If AUX is ON) Press [SLEEP]. If playing tapes or making a recording: Reset tape direction...
SAPM25 User Guide
Page 23
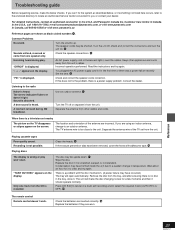
... the speaker connections. Only one speaker only. The unit will open automatically. Common Problems No sound. Turn the unit off or separate it . Listening to select the required mode (AUTO-REC or OFF). A beat sound is heard. Separate the antenna wire of the antenna are incorrect. Playing discs The display is a power supply problem. Replace the batteries if they are inserted correctly. Reference 23 RQT5717 and Panasonic Canada Inc. Turn the volume up. 6 The speaker cords...
... the speaker connections. Only one speaker only. The unit will open automatically. Common Problems No sound. Turn the unit off or separate it . Listening to select the required mode (AUTO-REC or OFF). A beat sound is heard. Separate the antenna wire of the antenna are incorrect. Playing discs The display is a power supply problem. Replace the batteries if they are inserted correctly. Reference 23 RQT5717 and Panasonic Canada Inc. Turn the volume up. 6 The speaker cords...
SAPM25 User Guide
Page 25
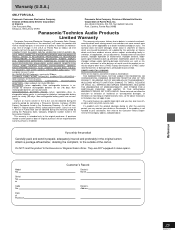
... service in shipment or failures which result from the date of consumer controls, improper operation or maintenance, improper antenna, inadequate signal reception or pick-up adjustments, maladjustment of original purchase): COMPACT DISC PLAYERS, DIGITAL VERSATILE DISC PLAYERS, RADIOS, RADIO CASSETTE PLAYERS/RECORDERS (with new or refurbished parts in the event of a defect in materials or workmanship, free of original purchase will repair this product develops during the warranty period by calling the Panasonic Sales...
... service in shipment or failures which result from the date of consumer controls, improper operation or maintenance, improper antenna, inadequate signal reception or pick-up adjustments, maladjustment of original purchase): COMPACT DISC PLAYERS, DIGITAL VERSATILE DISC PLAYERS, RADIOS, RADIO CASSETTE PLAYERS/RECORDERS (with new or refurbished parts in the event of a defect in materials or workmanship, free of original purchase will repair this product develops during the warranty period by calling the Panasonic Sales...

SAPM25 User Guide
Page 26
... with C-60 cassette tape CD SECTION Sampling frequency Decoding Beam source/wave length Number of channels Wow and flutter Digital filter D/A converter SPEAKER SECTION Type Speaker(s) Superwoofer Full range Impedance Input power Output sound pressure level Cross over frequency Frequency range Dimensions (WxHxD) Mass GENERAL Power supply Power consumption Standby Dimensions (WxHxD) Mass 44.1 kHz 16 bit linear Semiconductor laser/780 nm Stereo Below measurable limit 8 fs MASH (1 bit DAC) 2 way speaker system 10 cm...
... with C-60 cassette tape CD SECTION Sampling frequency Decoding Beam source/wave length Number of channels Wow and flutter Digital filter D/A converter SPEAKER SECTION Type Speaker(s) Superwoofer Full range Impedance Input power Output sound pressure level Cross over frequency Frequency range Dimensions (WxHxD) Mass GENERAL Power supply Power consumption Standby Dimensions (WxHxD) Mass 44.1 kHz 16 bit linear Semiconductor laser/780 nm Stereo Below measurable limit 8 fs MASH (1 bit DAC) 2 way speaker system 10 cm...


