
Blu-ray Disc Home Theater Sound System
Page 1
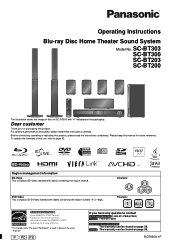
... "ALL". For optimum performance and safety, please read the instructions completely. Example: 1 ALL 124 [For[the[U.S.A.[and[Canada[ As an ENERGY STAR® Partner, Panasonic has determined that this manual for energy efficiency. Please keep this product meets the ENERGY STAR® guidelines for future reference. Before connecting, operating or... [U.S.A.]and]Puerto]Rico]:1-800-211-PANA(7262) [Canada]: 1-800-561-5505 [Only]for purchasing this product, please read these instructions carefully. Operating Instructions Blu-ray Disc Home Theater Sound System Model No.
... "ALL". For optimum performance and safety, please read the instructions completely. Example: 1 ALL 124 [For[the[U.S.A.[and[Canada[ As an ENERGY STAR® Partner, Panasonic has determined that this manual for energy efficiency. Please keep this product meets the ENERGY STAR® guidelines for future reference. Before connecting, operating or... [U.S.A.]and]Puerto]Rico]:1-800-211-PANA(7262) [Canada]: 1-800-561-5505 [Only]for purchasing this product, please read these instructions carefully. Operating Instructions Blu-ray Disc Home Theater Sound System Model No.
Blu-ray Disc Home Theater Sound System
Page 2
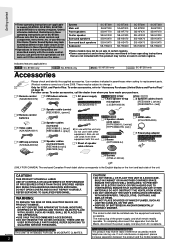
...to the English display on the main unit if the controls are described mainly with the remote control, but you have made your Blu-ray Disc Home Theater Sound System may look somewhat different from AC receptacle. [For[units[with[PX[printed[on [the[packaging[ THIS UNIT IS INTENDED FOR USE ... illustrations in these Operating Instructions. ≥Operations in these operating instructions that the actual controls and components, menu items, etc. System Main unit Front speakers Center speaker Surround speakers Surround back speakers Subwoofer SC-BT300 SA-BT300 SB-HF770 SB-HC300 SB-HS470 SB...
...to the English display on the main unit if the controls are described mainly with the remote control, but you have made your Blu-ray Disc Home Theater Sound System may look somewhat different from AC receptacle. [For[units[with[PX[printed[on [the[packaging[ THIS UNIT IS INTENDED FOR USE ... illustrations in these Operating Instructions. ≥Operations in these operating instructions that the actual controls and components, menu items, etc. System Main unit Front speakers Center speaker Surround speakers Surround back speakers Subwoofer SC-BT300 SA-BT300 SB-HF770 SB-HC300 SB-HS470 SB...
Blu-ray Disc Home Theater Sound System
Page 3
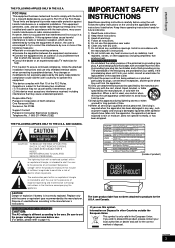
... two conditions: (1) This device may not cause harmful interference, and (2) this apparatus near any ventilation openings. Responsible Party: Panasonic Corporation of explosion if battery is encouraged to try to correct the interference by the party responsible for a Class B digital device...this symbolInformation on the unit and the applicable safety instructions listed below. CAUTION Danger of North America One Panasonic Way Secaucus, NJ 07094 Support Contact: Panasonic Consumer Electronics Company Telephone No.: 1-800-211-PANA (7262) THE FOLLOWING APPLIES ONLY TO THE U.S.A. ...
... two conditions: (1) This device may not cause harmful interference, and (2) this apparatus near any ventilation openings. Responsible Party: Panasonic Corporation of explosion if battery is encouraged to try to correct the interference by the party responsible for a Class B digital device...this symbolInformation on the unit and the applicable safety instructions listed below. CAUTION Danger of North America One Panasonic Way Secaucus, NJ 07094 Support Contact: Panasonic Consumer Electronics Company Telephone No.: 1-800-211-PANA (7262) THE FOLLOWING APPLIES ONLY TO THE U.S.A. ...

Blu-ray Disc Home Theater Sound System
Page 4
...Regarding 24p output 43 Discs that cannot be played 43 Disc and card handling 43 Maintenance 43 To dispose or transfer this unit 43 About MP3/JPEG files 44 Optional speaker settings Wireless connections (optional 45 Connecting the speakers with the optional wireless system (SH-FX70: ...from the START menu ........ 17 Selecting the source with the remote control........ 17 Enjoying sound from all speakers and various sound effects 18 Enjoying surround sound effects 18 Changing the sound modes 18 Adjusting speaker level during play 18 Playback Basic operations 19 Other operations during...
...Regarding 24p output 43 Discs that cannot be played 43 Disc and card handling 43 Maintenance 43 To dispose or transfer this unit 43 About MP3/JPEG files 44 Optional speaker settings Wireless connections (optional 45 Connecting the speakers with the optional wireless system (SH-FX70: ...from the START menu ........ 17 Selecting the source with the remote control........ 17 Enjoying sound from all speakers and various sound effects 18 Enjoying surround sound effects 18 Changing the sound modes 18 Adjusting speaker level during play 18 Playback Basic operations 19 Other operations during...
Blu-ray Disc Home Theater Sound System
Page 5
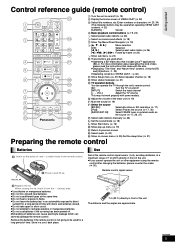
...the unit on and off (> 19) 2 Display the Home screen of VIERA CAST (> 32) 3 Select title numbers, etc./Enter numbers or characters (> 20, 34) (The character buttons may not work properly with the disc. ≥Displaying "Title View" and "Album View" ... VIERA CAST. (> 32) ; RQT9508 5 B 32) [CANCEL] : Cancel 4 Basic playback control buttons (> 19, 20) 5 Select preset radio stations (> 26) 6 Select surround sound effects (> 18) 7 Show Top Menu/Direct Navigator (> 19) 8 [3, 4, 2, 1]: Menu selection [OK]: Selection [2, 1]: Select preset radio station (> 26) [2] (2;), [1] (;1):...
...the unit on and off (> 19) 2 Display the Home screen of VIERA CAST (> 32) 3 Select title numbers, etc./Enter numbers or characters (> 20, 34) (The character buttons may not work properly with the disc. ≥Displaying "Title View" and "Album View" ... VIERA CAST. (> 32) ; RQT9508 5 B 32) [CANCEL] : Cancel 4 Basic playback control buttons (> 19, 20) 5 Select preset radio stations (> 26) 6 Select surround sound effects (> 18) 7 Show Top Menu/Direct Navigator (> 19) 8 [3, 4, 2, 1]: Menu selection [OK]: Selection [2, 1]: Select preset radio station (> 26) [2] (2;), [1] (;1):...
Blu-ray Disc Home Theater Sound System
Page 6
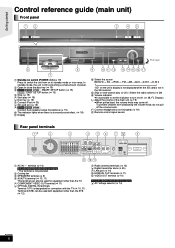
... Dock for iPod SMART SETUP Dock for equipment other than the TV. 5 COMPONENT VIDEO OUT terminal (> 11) 6 OPTICAL DIGITAL IN terminals Terminal 1(TV) is surround sound effect. (> 18) ; Display 9 10 11 12 13 14 15 16 17 < Select the source BD/DVD ) SD )IPOD ) FM )AM )AUX )D-IN 1 ... Í/I) (> 19) Press to switch the unit from swallowing the volume knob, do not pull off . Adjust the volume of power. 2 Open or close the disc tray (> 19) 3 [BT300] \BT303\ [BT200] : SMART SETUP button (> 15) [BT203] : EASY SETUP button (> 15) 4 Stop (> 19) 5 Start play (> 20) / Select the radio ...
... Dock for iPod SMART SETUP Dock for equipment other than the TV. 5 COMPONENT VIDEO OUT terminal (> 11) 6 OPTICAL DIGITAL IN terminals Terminal 1(TV) is surround sound effect. (> 18) ; Display 9 10 11 12 13 14 15 16 17 < Select the source BD/DVD ) SD )IPOD ) FM )AM )AUX )D-IN 1 ... Í/I) (> 19) Press to switch the unit from swallowing the volume knob, do not pull off . Adjust the volume of power. 2 Open or close the disc tray (> 19) 3 [BT300] \BT303\ [BT200] : SMART SETUP button (> 15) [BT203] : EASY SETUP button (> 15) 4 Stop (> 19) 5 Start play (> 20) / Select the radio ...
Blu-ray Disc Home Theater Sound System
Page 7
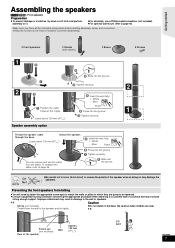
Make sure you have strong enough support. Leave about 120 mm (423/32) Tighten securely. Preventing the front speakers from the stand. Caution String (not included) Thread from the wall to page 46. e.g. Push! Speaker assembly option Thread the speaker cable through the base. Press into the groove. 1 Leave about 120 mm (423/32) You can remove and use a Phillips-head screwdriver (not included). ≥For optional wall mount, refer to the speaker and tie tightly. ≥Do not stand on the base. Be cautious when children are going to be fastened. ...
Make sure you have strong enough support. Leave about 120 mm (423/32) Tighten securely. Preventing the front speakers from the stand. Caution String (not included) Thread from the wall to page 46. e.g. Push! Speaker assembly option Thread the speaker cable through the base. Press into the groove. 1 Leave about 120 mm (423/32) You can remove and use a Phillips-head screwdriver (not included). ≥For optional wall mount, refer to the speaker and tie tightly. ≥Do not stand on the base. Be cautious when children are going to be fastened. ...
Blu-ray Disc Home Theater Sound System
Page 8
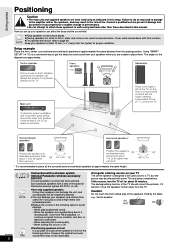
...and Surround back speakers with at approximately the same height. 160º to 170º RQT9508 8 NOTE TIPS Connection with a wireless system Optional Panasonic wireless accessory SH-FX70 It is placed directly on or off for about 1 m (3 ft) higher than those described in this manual.... the picture if it with 2 sets of the optional Panasonic wireless system SH-FX70. (> 45) ≥Use only supplied speakers Using other than ear level. * It is a convenient way to get the ideal surround sound from an oscillator, test disc, or electronic instrument. - Using "SMART SETUP" (> 15...
...and Surround back speakers with at approximately the same height. 160º to 170º RQT9508 8 NOTE TIPS Connection with a wireless system Optional Panasonic wireless accessory SH-FX70 It is placed directly on or off for about 1 m (3 ft) higher than those described in this manual.... the picture if it with 2 sets of the optional Panasonic wireless system SH-FX70. (> 45) ≥Use only supplied speakers Using other than ear level. * It is a convenient way to get the ideal surround sound from an oscillator, test disc, or electronic instrument. - Using "SMART SETUP" (> 15...
Blu-ray Disc Home Theater Sound System
Page 9
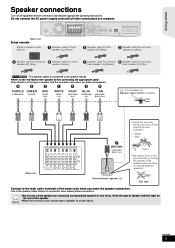
Be careful not to cross (short-circuit) or reverse the polarity of the speaker wires as a surround, surround back speaker or vice versa. Do not Connect to the main unit's terminals of the same color when you place the speakers. 6 5 2 1 4 3 8 PURPLE GREEN SUBWOOFER CENTER RED FRONT (Rch) WHITE FRONT (Lch) GRAY SURROUND (Rch) BLUE SURROUND (Lch) TAN SURROUND BACK (Rch) e.g., Front speaker (L) Speaker cable sticker (included) FRONT Lch 1 SPEAKERS Main unit 6 5 21 4387 3Ω SUB- 3Ω R 3Ω L R 3Ω L R 3Ω L WOOFER CENTER FRONT SURROUND SURROUND BACK 7 ...
Be careful not to cross (short-circuit) or reverse the polarity of the speaker wires as a surround, surround back speaker or vice versa. Do not Connect to the main unit's terminals of the same color when you place the speakers. 6 5 2 1 4 3 8 PURPLE GREEN SUBWOOFER CENTER RED FRONT (Rch) WHITE FRONT (Lch) GRAY SURROUND (Rch) BLUE SURROUND (Lch) TAN SURROUND BACK (Rch) e.g., Front speaker (L) Speaker cable sticker (included) FRONT Lch 1 SPEAKERS Main unit 6 5 21 4387 3Ω SUB- 3Ω R 3Ω L R 3Ω L R 3Ω L WOOFER CENTER FRONT SURROUND SURROUND BACK 7 ...
Blu-ray Disc Home Theater Sound System
Page 10
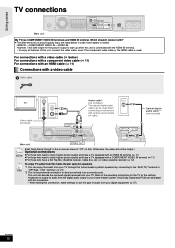
...video cable, even if the component video cable or the HDMI cable is used when connecting to lowest. This unit can be played with this home theater system's speakers *1 You can be output.) Optional connections ≥For those who want to enjoy higher picture quality and have a TV equipped with ...OUT VIDEO OUT DIGITAL IN 75Ω FM ANT LOOP EXT AM ANT LOOP ANT GND NOTE ≥Set "High Clarity Sound" in order from your TV through this home theater system's speakers by connecting to start up when this connection, make settings to your TV. For connections with ? ≥The ...
...video cable, even if the component video cable or the HDMI cable is used when connecting to lowest. This unit can be played with this home theater system's speakers *1 You can be output.) Optional connections ≥For those who want to enjoy higher picture quality and have a TV equipped with ...OUT VIDEO OUT DIGITAL IN 75Ω FM ANT LOOP EXT AM ANT LOOP ANT GND NOTE ≥Set "High Clarity Sound" in order from your TV through this home theater system's speakers by connecting to start up when this connection, make settings to your TV. For connections with ? ≥The ...
Blu-ray Disc Home Theater Sound System
Page 11
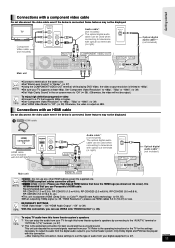
...to a TV that have the HDMI logo (as 480i. Refer to the operating instructions for the TV for best sound and true surround sound. TIPS To enjoy TV audio from this home theater system's speakers *1 You can be displayed. OPTICAL OUT OPTICAL 1(TV) Optical digital audio cable*1,2 (not included) AC IN... (Deep Color, x.v.ColorTM, High Bit rate Audio) technology. (> 54, 55) ≥When outputting 1080p signal (> 39, "HDMI Resolution"), please use Panasonic's HDMI cable. RQT9508 11 Set "Component Video Resolution" to "480p", "720p" or "1080i". (> 39) ≥Set "High Clarity...
...to a TV that have the HDMI logo (as 480i. Refer to the operating instructions for the TV for best sound and true surround sound. TIPS To enjoy TV audio from this home theater system's speakers *1 You can be displayed. OPTICAL OUT OPTICAL 1(TV) Optical digital audio cable*1,2 (not included) AC IN... (Deep Color, x.v.ColorTM, High Bit rate Audio) technology. (> 54, 55) ≥When outputting 1080p signal (> 39, "HDMI Resolution"), please use Panasonic's HDMI cable. RQT9508 11 Set "Component Video Resolution" to "480p", "720p" or "1080i". (> 39) ≥Set "High Clarity...

Blu-ray Disc Home Theater Sound System
Page 12
.... Due to output the original surround audio from the Set Top Box (Satellite receiver, Cable box, etc.). Use the following connections when you have various sound sources and this unit's speakers. ≥Do not connect through the video cassette recorder. Getting started Connections to a Set Top Box, etc.
.... Due to output the original surround audio from the Set Top Box (Satellite receiver, Cable box, etc.). Use the following connections when you have various sound sources and this unit's speakers. ≥Do not connect through the video cassette recorder. Getting started Connections to a Set Top Box, etc.

Blu-ray Disc Home Theater Sound System
Page 13
AM loop antenna (included) Stand the antenna up on so that it on its base. e.g. Remove a piece of the outer vinyl insulator. Carefully pull the tabs apart to 39 ft) AM outdoor antenna [Using a vinyl wire (not included)] Run a piece of the antenna where reception is not in use. ≥Do not use the outdoor antenna during an electrical storm. FM outdoor antenna [Using a TV antenna (not included)] The antenna should be installed by a competent technician. Clamp the cable conductor, and wind it does not contact anything else. Attach the cover....
AM loop antenna (included) Stand the antenna up on so that it on its base. e.g. Remove a piece of the outer vinyl insulator. Carefully pull the tabs apart to 39 ft) AM outdoor antenna [Using a vinyl wire (not included)] Run a piece of the antenna where reception is not in use. ≥Do not use the outdoor antenna during an electrical storm. FM outdoor antenna [Using a TV antenna (not included)] The antenna should be installed by a competent technician. Clamp the cable conductor, and wind it does not contact anything else. Attach the cover....
Blu-ray Disc Home Theater Sound System
Page 14
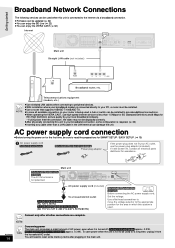
... main unit consumes a small amount of AC power, even when it still doesn't fit, contact an electrical parts distributor for the area in which this system is used. You will need to the appropriate position for assistance. Getting started Broadband Network Connections The following services can be used when this unit...
... main unit consumes a small amount of AC power, even when it still doesn't fit, contact an electrical parts distributor for the area in which this system is used. You will need to the appropriate position for assistance. Getting started Broadband Network Connections The following services can be used when this unit...
Blu-ray Disc Home Theater Sound System
Page 15
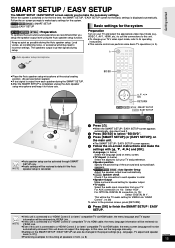
... ≥Audio settings will not be the TV audio setting for future use. In this unit does not support the language. When the system is displayed automatically. Getting started SMART SETUP / EASY SETUP The SMART SETUP / EASY SETUP screen assists you setup the speaker output level ...Follow the on for the first time, the SMART SETUP / EASY SETUP screen for the system [BT300] \BT303\ [BT200]: Preparation To optimize the surround sound experience we recommend that you to make basic settings for the system. [BT300] \BT303\ [BT200]: SMART SETUP \BT203\: EASY SETUP Basic settings for the...
... ≥Audio settings will not be the TV audio setting for future use. In this unit does not support the language. When the system is displayed automatically. Getting started SMART SETUP / EASY SETUP The SMART SETUP / EASY SETUP screen assists you setup the speaker output level ...Follow the on for the first time, the SMART SETUP / EASY SETUP screen for the system [BT300] \BT303\ [BT200]: Preparation To optimize the surround sound experience we recommend that you to make basic settings for the system. [BT300] \BT303\ [BT200]: SMART SETUP \BT203\: EASY SETUP Basic settings for the...
Blu-ray Disc Home Theater Sound System
Page 16
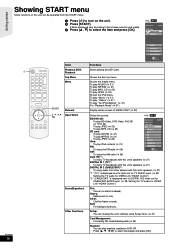
...using Setup menu (> 37). e.g., [BD-V] Home theater START BD-Video Playback DISC Top Menu Menu RQT9508 16 Network Input Select Sound(Equalizer) Other Functions OK RETURN Items Functions Playback DISC Playback Starts playing disc/SD Card. e.g., [BD-V] BD/DVD/CD: Home theater START To play BD-Video, DVD-Video, ... Press [3, 4] to DIGITAL IN 2 when set for TV AUDIO input. (> 28, Setting the TV audio for VIERA Link "HDAVI Control") Sound(Equalizer) Flat: Cancel (no effect is displayed next to select the item and press [OK]. To play AVCHD (> 21) To play MPEG2 ...
...using Setup menu (> 37). e.g., [BD-V] Home theater START BD-Video Playback DISC Top Menu Menu RQT9508 16 Network Input Select Sound(Equalizer) Other Functions OK RETURN Items Functions Playback DISC Playback Starts playing disc/SD Card. e.g., [BD-V] BD/DVD/CD: Home theater START To play BD-Video, DVD-Video, ... Press [3, 4] to DIGITAL IN 2 when set for TV AUDIO input. (> 28, Setting the TV audio for VIERA Link "HDAVI Control") Sound(Equalizer) Flat: Cancel (no effect is displayed next to select the item and press [OK]. To play AVCHD (> 21) To play MPEG2 ...
Blu-ray Disc Home Theater Sound System
Page 17
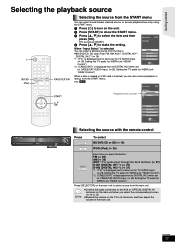
...;To exit press [START]. 4 Press [3, 4] to make the setting. e.g., [BD-V] Playback/menu access Home theater START BD-Video Playback DISC Top Menu Menu OK OK Network Input Select Sound(Equalizer) Other Functions OK RETURN SSDD CCAARRDD SETUP MIC SSEELLEECCTTOORR TTUUNNEE SELECTOR Selecting the source with the remote control...connection to the AUX or OPTICAL DIGITAL IN terminals on the main unit when you can select a desired source from the menu. Home theater No Disc START When "Input Select" is displayed next to DIGITAL IN 2 when set for CABLE/SAT AUDIO input. (> 28, Setting the...
...;To exit press [START]. 4 Press [3, 4] to make the setting. e.g., [BD-V] Playback/menu access Home theater START BD-Video Playback DISC Top Menu Menu OK OK Network Input Select Sound(Equalizer) Other Functions OK RETURN SSDD CCAARRDD SETUP MIC SSEELLEECCTTOORR TTUUNNEE SELECTOR Selecting the source with the remote control...connection to the AUX or OPTICAL DIGITAL IN terminals on the main unit when you can select a desired source from the menu. Home theater No Disc START When "Input Select" is displayed next to DIGITAL IN 2 when set for CABLE/SAT AUDIO input. (> 28, Setting the...
Blu-ray Disc Home Theater Sound System
Page 18
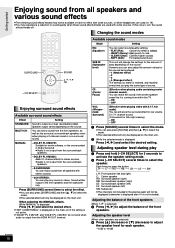
...displayed (subwoofer is displayed even if it was recorded/encoded. Adjusting the speaker level (When other speakers are used with some sources. Sound will not be output to select the speaker. HEAVY (Heavy): Adds punch to r6 dB RQT9508 18 FLAT (Flat): Cancel (no... effect with some sources, or when headphones are used (> 19). ≥You may experience a reduction in sound quality when these sound effects/modes are selected) 4 Press [3] (increase) or [4] (decrease) to adjust the balance of source. OFF W.S.: (Whispermode Surround) (Effective when...
...displayed (subwoofer is displayed even if it was recorded/encoded. Adjusting the speaker level (When other speakers are used with some sources. Sound will not be output to select the speaker. HEAVY (Heavy): Adds punch to r6 dB RQT9508 18 FLAT (Flat): Cancel (no... effect with some sources, or when headphones are used (> 19). ≥You may experience a reduction in sound quality when these sound effects/modes are selected) 4 Press [3] (increase) or [4] (decrease) to adjust the balance of source. OFF W.S.: (Whispermode Surround) (Effective when...
Blu-ray Disc Home Theater Sound System
Page 19
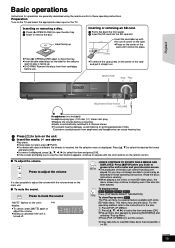
...8805;To remove the card, press on the main unit. ∫ To mute the sound. NOTE ≥DISCS CONTINUE TO ROTATE WHILE MENUS ARE DISPLAYED. Read the disc's instructions carefully. ≥When playing a set of the disc can cause hearing loss. 1 Press [Í] to control play as described in these operating.... ≥Press on the unit. 2 Insert the media. (B see above) Play starts. ≥If play is displayed. Inserting or removing a disc. 1 Press [< OPEN/CLOSE] to mute the sound "MUTE" flashes on the TV. Press [∫STOP] when you want to display even if the...
...8805;To remove the card, press on the main unit. ∫ To mute the sound. NOTE ≥DISCS CONTINUE TO ROTATE WHILE MENUS ARE DISPLAYED. Read the disc's instructions carefully. ≥When playing a set of the disc can cause hearing loss. 1 Press [Í] to control play as described in these operating.... ≥Press on the unit. 2 Insert the media. (B see above) Play starts. ≥If play is displayed. Inserting or removing a disc. 1 Press [< OPEN/CLOSE] to mute the sound "MUTE" flashes on the TV. Press [∫STOP] when you want to display even if the...

Blu-ray Disc Home Theater Sound System
Page 20
... to select "View Chapters" and press [OK]. 4 Press [2, 1] to display "STOP" on unit's display. ≥[BD-V] : On BD-Video discs including BD-J (> 54), the resume play . ≥Each press increases the number of the numbered buttons. Each press shows the next frame. ≥...starts from this setting. [DVD-VR] [MPEG2] AudioLR>AudioL>Audio R DVD-RAM(VR) Play "AudioLR" is selected AudioLR Chapter playback [DVD-VR] 1 Insert a disc (> 19). 2 While "Title View" screen is opened or you press the button. Search While playing, press [SEARCH6] or [SEARCH5]. ≥[BD-V] [AVCHD]...
... to select "View Chapters" and press [OK]. 4 Press [2, 1] to display "STOP" on unit's display. ≥[BD-V] : On BD-Video discs including BD-J (> 54), the resume play . ≥Each press increases the number of the numbered buttons. Each press shows the next frame. ≥...starts from this setting. [DVD-VR] [MPEG2] AudioLR>AudioL>Audio R DVD-RAM(VR) Play "AudioLR" is selected AudioLR Chapter playback [DVD-VR] 1 Insert a disc (> 19). 2 While "Title View" screen is opened or you press the button. Search While playing, press [SEARCH6] or [SEARCH5]. ≥[BD-V] [AVCHD]...