
Home Theater
Page 1
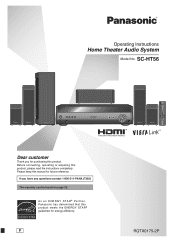
Operating Instructions Home Theater Audio System Model No. Before connecting, operating or adjusting this product meets the ENERGY STAR guidelines for future reference. If you for purchasing this manual for energy efficiency. As an ENERGY STAR Partner, Panasonic has determined that this product, please read the instructions completely. P RQTX0175-2P Please keep this product. SC-HT56 Dear customer Thank you have any questions contact 1-800-211-PANA (7262) The warranty can be found on page 23.
Operating Instructions Home Theater Audio System Model No. Before connecting, operating or adjusting this product meets the ENERGY STAR guidelines for future reference. If you for purchasing this manual for energy efficiency. As an ENERGY STAR Partner, Panasonic has determined that this product, please read the instructions completely. P RQTX0175-2P Please keep this product. SC-HT56 Dear customer Thank you have any questions contact 1-800-211-PANA (7262) The warranty can be found on page 23.

Home Theater
Page 3
...Field Control (SFC 15 MENU operation 16 The radio 17 Direct tuning/Automatic presetting/Manual presetting/Selecting channels 17 Sound field 18 Adjusting the tone/Dimension Control "...SC-HT56 SA-HT56 SB-HF56 SB-HS760 SB-HC760 SB-HWX50 Table of contents Before use IMPORTANT SAFETY INSTRUCTIONS 2 Supplied accessories 3 Listening caution 3 The remote control 4 Control guide 4 Remote control 4 Main unit/Display 5 STEP 1 Speaker setup 6 Placement of speakers 6 Connect the speakers to the receiver 6 Other speaker setup options 7 Wireless system connection 7 STEP 2 Home theater...
...Field Control (SFC 15 MENU operation 16 The radio 17 Direct tuning/Automatic presetting/Manual presetting/Selecting channels 17 Sound field 18 Adjusting the tone/Dimension Control "...SC-HT56 SA-HT56 SB-HF56 SB-HS760 SB-HC760 SB-HWX50 Table of contents Before use IMPORTANT SAFETY INSTRUCTIONS 2 Supplied accessories 3 Listening caution 3 The remote control 4 Control guide 4 Remote control 4 Main unit/Display 5 STEP 1 Speaker setup 6 Placement of speakers 6 Connect the speakers to the receiver 6 Other speaker setup options 7 Wireless system connection 7 STEP 2 Home theater...
Home Theater
Page 7
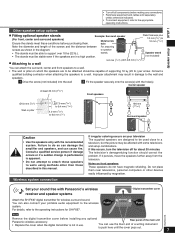
... Ensure the stands meet these speakers to 6.0 mm (1/4") 190 mm (715/32") Surround speaker Caution • Use the speakers only with Panasonic's wireless receiver and speaker systems Digital transmitter cover PUSH PUSH Attach the SH-FX67 digital transmitter for wireless surround sound. You can attach the surround, center ... equipment, refer to do not have magnetic shielding. STEP 1 Speaker setup • Turn off for SH-FX67. Failure to the appropriate operating instructions. If this manual. Set your portable audio equipment to a wall. You can cause fire.
... Ensure the stands meet these speakers to 6.0 mm (1/4") 190 mm (715/32") Surround speaker Caution • Use the speakers only with Panasonic's wireless receiver and speaker systems Digital transmitter cover PUSH PUSH Attach the SH-FX67 digital transmitter for wireless surround sound. You can attach the surround, center ... equipment, refer to do not have magnetic shielding. STEP 1 Speaker setup • Turn off for SH-FX67. Failure to the appropriate operating instructions. If this manual. Set your portable audio equipment to a wall. You can cause fire.
Home Theater
Page 8
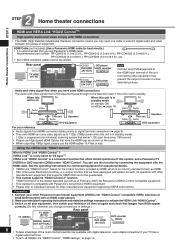
... When outputting 1080p signal, please use Panasonic's HDMI cable. VIERA LinkTM is an industry standard known as of equipment. See the operating instructions for connected equipment for Panasonic's HDAVI Control compatible equipment. Read your other Panasonic home theater equipment (VIERA Link "HDAVI Control" compatible...the output of the unit. This standard is set to individual manuals for EZ SyncTM. VIERA Link "HDAVI Control" is VIERA Link "HDAVI Control" ? Connect your television's operating instructions and make the settings necessary to the HDMI input terminal of ...
... When outputting 1080p signal, please use Panasonic's HDMI cable. VIERA LinkTM is an industry standard known as of equipment. See the operating instructions for connected equipment for Panasonic's HDAVI Control compatible equipment. Read your other Panasonic home theater equipment (VIERA Link "HDAVI Control" compatible...the output of the unit. This standard is set to individual manuals for EZ SyncTM. VIERA Link "HDAVI Control" is VIERA Link "HDAVI Control" ? Connect your television's operating instructions and make the settings necessary to the HDMI input terminal of ...
Home Theater
Page 12
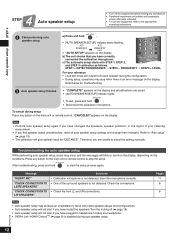
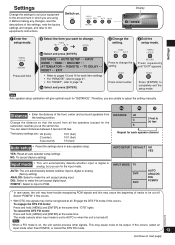
...separately unless otherwise indicated. • To connect equipment, refer to the appropriate operating instructions. Start performing auto speaker setup. -AUTO SETUP a) Press and hold to adjust the setting manually. AUTO AUTO SPEAKER SETUP SPEAKER SETUP • "AUTO SETUP" appears on the...AUTO SPEAKER SETUP] indicator starts flashing. Press any button on the display and all auto speaker setup settings and change them manually. Note • Auto speaker setup may stop when there is not detected. Pages 11 6 6 RQTX0175 12 STEP 4 Auto speaker...
...separately unless otherwise indicated. • To connect equipment, refer to the appropriate operating instructions. Start performing auto speaker setup. -AUTO SETUP a) Press and hold to adjust the setting manually. AUTO AUTO SPEAKER SETUP SPEAKER SETUP • "AUTO SETUP" appears on the...AUTO SPEAKER SETUP] indicator starts flashing. Press any button on the display and all auto speaker setup settings and change them manually. Note • Auto speaker setup may stop when there is not detected. Pages 11 6 6 RQTX0175 12 STEP 4 Auto speaker...
Home Theater
Page 13
... [-MENU] and [ENTER] at all auto speaker setup settings NO: To cancel (factory setting) DISTANCE LR C S 3 feet to the equipment's instructions. Press to make the unit accept analog input. Press repeatedly until "EXIT" appears. Note Auto speaker setup calibration will give optimal result for each item... refer to enter. Engage the DTS FIX mode if this occurs. • With DTS, the signals may cause noise to adjust the setting manually. 2a 2b 3 Distance • Enter the distance of the front, center and surround speakers from all the speakers (except for each speaker ...
... [-MENU] and [ENTER] at all auto speaker setup settings NO: To cancel (factory setting) DISTANCE LR C S 3 feet to the equipment's instructions. Press to make the unit accept analog input. Press repeatedly until "EXIT" appears. Note Auto speaker setup calibration will give optimal result for each item... refer to enter. Engage the DTS FIX mode if this occurs. • With DTS, the signals may cause noise to adjust the setting manually. 2a 2b 3 Distance • Enter the distance of the front, center and surround speakers from all the speakers (except for each speaker ...


