

SAPM16 User Guide
Page 2
... BE PLACED ON THE APPARATUS. Before use Supplied accessories 3 IMPORTANT SAFETY INSTRUCTIONS 4 Listening caution 5 Placement of speakers 5 The remote control 5 Connections 6 Front panel controls 8 Listening operations The radio: manual tuning 10 The radio: preset tuning 11 CDs 12 Cassette tapes 17 Recording operations Before recording 18 Recording from the radio 19 Recording CDs 19 Timers and others Using the built-in the space provided below and keep for purchasing this product can be found on either the back...
... BE PLACED ON THE APPARATUS. Before use Supplied accessories 3 IMPORTANT SAFETY INSTRUCTIONS 4 Listening caution 5 Placement of speakers 5 The remote control 5 Connections 6 Front panel controls 8 Listening operations The radio: manual tuning 10 The radio: preset tuning 11 CDs 12 Cassette tapes 17 Recording operations Before recording 18 Recording from the radio 19 Recording CDs 19 Timers and others Using the built-in the space provided below and keep for purchasing this product can be found on either the back...

SAPM16 User Guide
Page 3
... interference by turning the equipment off and on, the user is subject to the presence of important operating and maintenance (servicing) instructions in a residential installation. This equipment generates, uses and can be determined by one or more of electric shock to radio communications. NO USER-SERVICEABLE PARTS INSIDE. Remote control batteries 2 pcs. The exclamation point within the product s enclosure that may cause undesired operation. Use numbers indicated in...
... interference by turning the equipment off and on, the user is subject to the presence of important operating and maintenance (servicing) instructions in a residential installation. This equipment generates, uses and can be determined by one or more of electric shock to radio communications. NO USER-SERVICEABLE PARTS INSIDE. Remote control batteries 2 pcs. The exclamation point within the product s enclosure that may cause undesired operation. Use numbers indicated in...

SAPM16 User Guide
Page 6
... where radio signals are for low frequency. Consult a qualified service person if damage has occurred or if you experience a sudden change in performance. • Do not attach these speakers to a wall or column, in the risk of fire. Note The included AC power supply cord is recommended. (\ page 7) 2 Connect the AM loop antenna. The combination of the cords. Connections Before use 1 2 (L) (R) 3 4 1 Adhesive tape FM indoor antenna...
... where radio signals are for low frequency. Consult a qualified service person if damage has occurred or if you experience a sudden change in performance. • Do not attach these speakers to a wall or column, in the risk of fire. Note The included AC power supply cord is recommended. (\ page 7) 2 Connect the AM loop antenna. The combination of the cords. Connections Before use 1 2 (L) (R) 3 4 1 Adhesive tape FM indoor antenna...

SAPM16 User Guide
Page 7
... making any connections. • For details, refer to be connected, please consult your audio dealer. When units other convenient location. A FM outdoor antenna Disconnect the FM indoor antenna if an FM outdoor antenna is to the operating instructions of the unit which is installed. Never use this unit Connections Optional antenna connections You may be connected. • Set the switch to connect an analog player with a built-in phono equalizer...
... making any connections. • For details, refer to be connected, please consult your audio dealer. When units other convenient location. A FM outdoor antenna Disconnect the FM indoor antenna if an FM outdoor antenna is to the operating instructions of the unit which is installed. Never use this unit Connections Optional antenna connections You may be connected. • Set the switch to connect an analog player with a built-in phono equalizer...

SAPM16 User Guide
Page 8
... jack (PHONES 20 áStop/program clear and demonstration button (STOP L, -DEMO 12, 16, 17, 19, 21 àTuner/band select button (TUNER/BAND 10 âCassette play button (TAPE 2 17 äCD play/pause button (CD 2/ J 12 ãDisc direct play buttons (CD 1~CD 5 12 STOP DEMO CD 1 TUNER BAND TAPE CD CD 2 CD 3 CD 4 CD 5 - 8 RQT6683 Standby/on switch ( POWER) Press to switch the unit from on to the AC 4mains supply. Before use 1 OPEN 2 3 4 AC IN POWER 9 ! 5 AUX 6 7 8 FF REW CD CHECK REC S.SOUND EQ STOP DEMO CD 1 TUNER BAND TAPE VOLUME CD CD 2 CD 3 CD 4 CD...
... jack (PHONES 20 áStop/program clear and demonstration button (STOP L, -DEMO 12, 16, 17, 19, 21 àTuner/band select button (TUNER/BAND 10 âCassette play button (TAPE 2 17 äCD play/pause button (CD 2/ J 12 ãDisc direct play buttons (CD 1~CD 5 12 STOP DEMO CD 1 TUNER BAND TAPE CD CD 2 CD 3 CD 4 CD 5 - 8 RQT6683 Standby/on switch ( POWER) Press to switch the unit from on to the AC 4mains supply. Before use 1 OPEN 2 3 4 AC IN POWER 9 ! 5 AUX 6 7 8 FF REW CD CHECK REC S.SOUND EQ STOP DEMO CD 1 TUNER BAND TAPE VOLUME CD CD 2 CD 3 CD 4 CD...

SAPM16 User Guide
Page 10
... operations Before use 2 SLEEP CLOCK PLAY AUTO OFF TIMER REC DISC 1 2 3 456 789 PLAY MODE PGM 0 10 CD CLEAR TUNER/ TAPE BAND AUX VOL MUTING VOL REW FF S.SOUND EQ PRESET EQ DISPLAY DIMMER 3 1 TUNER BAND 2 PLAY MODE 3 FF REW 4 VOLUME DOWN UP A SLEEP CLOCK PLAY AUTO OFF TIMER REC DISC 1 2 3 456 789 PLAY MODE PGM 0 10 CD CLEAR TUNER/ TAPE BAND AUX VOL MUTING VOL REW FF S.SOUND EQ PRESET EQ DISPLAY DIMMER PLAY MODE The radio: manual tuning 1 Press [TUNER/BAND] to the original frequency indication, repeat above. Every time you...
... operations Before use 2 SLEEP CLOCK PLAY AUTO OFF TIMER REC DISC 1 2 3 456 789 PLAY MODE PGM 0 10 CD CLEAR TUNER/ TAPE BAND AUX VOL MUTING VOL REW FF S.SOUND EQ PRESET EQ DISPLAY DIMMER 3 1 TUNER BAND 2 PLAY MODE 3 FF REW 4 VOLUME DOWN UP A SLEEP CLOCK PLAY AUTO OFF TIMER REC DISC 1 2 3 456 789 PLAY MODE PGM 0 10 CD CLEAR TUNER/ TAPE BAND AUX VOL MUTING VOL REW FF S.SOUND EQ PRESET EQ DISPLAY DIMMER PLAY MODE The radio: manual tuning 1 Press [TUNER/BAND] to the original frequency indication, repeat above. Every time you...

SAPM16 User Guide
Page 11
... operations PGM TUNER/BAND SLEEP CLOCK PLAY AUTO OFF TIMER REC DISC 123 456 789 PLAY MODE PGM 0 10 CD CLEAR TUNER/ TAPE BAND AUX VOL MUTING VOL REW FF S.SOUND EQ PRESET EQ DISPLAY DIMMER / REW, / FF A PGM B PLAY MODE 2 SLEEP CLOCK PLAY AUTO OFF TIMER REC DISC 123 456 789 PLAY MODE PGM 0 10 CD CLEAR TUNER/ TAPE BAND AUX VOL MUTING VOL REW FF S.SOUND EQ PRESET EQ DISPLAY DIMMER 1 / REW, / FF 1 123 456 789 0 10 Preset channel The radio: preset tuning By remote control only...
... operations PGM TUNER/BAND SLEEP CLOCK PLAY AUTO OFF TIMER REC DISC 123 456 789 PLAY MODE PGM 0 10 CD CLEAR TUNER/ TAPE BAND AUX VOL MUTING VOL REW FF S.SOUND EQ PRESET EQ DISPLAY DIMMER / REW, / FF A PGM B PLAY MODE 2 SLEEP CLOCK PLAY AUTO OFF TIMER REC DISC 123 456 789 PLAY MODE PGM 0 10 CD CLEAR TUNER/ TAPE BAND AUX VOL MUTING VOL REW FF S.SOUND EQ PRESET EQ DISPLAY DIMMER 1 / REW, / FF 1 123 456 789 0 10 Preset channel The radio: preset tuning By remote control only...

SAPM16 User Guide
Page 12
... and stickers. Disc tray 2 CD CD indicator 3 VOLUME Track number Elapsed play time DOWN UP Aa b c CDs This unit can only play . The selected CD is loaded, press [CD 2/J] or [CD 1] ~ [CD 5]. Press [CD 2/ J] again to the last track in standby mode and a CD is played from the household AC outlet during CD changing operation. 12 RQT6683 The unit contains five CD trays. The unit comes on a flat, level surface. c • use cleaning CDs or CDs which are coming off or...
... and stickers. Disc tray 2 CD CD indicator 3 VOLUME Track number Elapsed play time DOWN UP Aa b c CDs This unit can only play . The selected CD is loaded, press [CD 2/J] or [CD 1] ~ [CD 5]. Press [CD 2/ J] again to the last track in standby mode and a CD is played from the household AC outlet during CD changing operation. 12 RQT6683 The unit contains five CD trays. The unit comes on a flat, level surface. c • use cleaning CDs or CDs which are coming off or...

SAPM16 User Guide
Page 14
... CLOCK PLAY AUTO OFF TIMER REC DISC 123 4 5 6 789 PLAY MODE PGM 0 10 CD CLEAR TUNER/ TAPE BAND AUX VOL MUTING VOL REW FF S.SOUND EQ PRESET EQ DISPLAY DIMMER 4 15 1 CD CLEAR 2 PLAY MODE Listening operations 3 DISC 4 1 2 3 45 Specified disc indicator 5 CD 14 RQT6683 CDs Listening to specific CDs and tracks (CD Play Mode function) By remote control only This function makes it easier for you to select specific CDs and tracks from those loaded in step 2. The CD starts. When playback ends The current play starts from disc 4, disc...
... CLOCK PLAY AUTO OFF TIMER REC DISC 123 4 5 6 789 PLAY MODE PGM 0 10 CD CLEAR TUNER/ TAPE BAND AUX VOL MUTING VOL REW FF S.SOUND EQ PRESET EQ DISPLAY DIMMER 4 15 1 CD CLEAR 2 PLAY MODE Listening operations 3 DISC 4 1 2 3 45 Specified disc indicator 5 CD 14 RQT6683 CDs Listening to specific CDs and tracks (CD Play Mode function) By remote control only This function makes it easier for you to select specific CDs and tracks from those loaded in step 2. The CD starts. When playback ends The current play starts from disc 4, disc...

SAPM16 User Guide
Page 15
... repeat play Press and hold [PLAY MODE] and make sure "REPEAT ON" and " " are displayed. Program the tracks you want (perform steps 1 ~ 6 on page 16.) 2. Listening operations 1 PLAY MODE SLEEP CLOCK PLAY AUTO OFF TIMER REC DISC 123 456 789 PLAY MODE PGM 0 10 CD CLEAR TUNER/ TAPE BAND AUX VOL MUTING VOL REW FF S.SOUND EQ PRESET EQ DISPLAY DIMMER 2 3 CD / DISPLAY 1 DISC 2 123 4 5 3 123 4 5 6 789 0 10 A PLAY MODE B DISPLAY Remaining play time CDs Direct access play By remote control only Direct access allows you to start normal play from a specific track...
... repeat play Press and hold [PLAY MODE] and make sure "REPEAT ON" and " " are displayed. Program the tracks you want (perform steps 1 ~ 6 on page 16.) 2. Listening operations 1 PLAY MODE SLEEP CLOCK PLAY AUTO OFF TIMER REC DISC 123 456 789 PLAY MODE PGM 0 10 CD CLEAR TUNER/ TAPE BAND AUX VOL MUTING VOL REW FF S.SOUND EQ PRESET EQ DISPLAY DIMMER 2 3 CD / DISPLAY 1 DISC 2 123 4 5 3 123 4 5 6 789 0 10 A PLAY MODE B DISPLAY Remaining play time CDs Direct access play By remote control only Direct access allows you to start normal play from a specific track...

SAPM16 User Guide
Page 16
... CLOCK PLAY AUTO OFF TIMER REC DISC 123 4 5 6 789 PLAY MODE PGM 0 10 CD CLEAR TUNER/ TAPE BAND AUX VOL MUTING VOL REW FF S.SOUND EQ PRESET EQ DISPLAY DIMMER 4 5 1 7 / REW, /FF 1 CD CLEAR 2 PGM 3 DISC 4 1 2 3 45 Listening operations 5 1 2 3 4 5 6 789 0 10 Specified track number 7 CD A Program order B 16 RQT6683 Indicates program mode CDs Program play By remote control only This function allows you to program up to 24 tracks. 1 Press [CD 2/ J] and then [L CLEAR]. 2 Press [PGM]. 3 Press [DISC]. 4 (within the current track. • During program play...
... CLOCK PLAY AUTO OFF TIMER REC DISC 123 4 5 6 789 PLAY MODE PGM 0 10 CD CLEAR TUNER/ TAPE BAND AUX VOL MUTING VOL REW FF S.SOUND EQ PRESET EQ DISPLAY DIMMER 4 5 1 7 / REW, /FF 1 CD CLEAR 2 PGM 3 DISC 4 1 2 3 45 Listening operations 5 1 2 3 4 5 6 789 0 10 Specified track number 7 CD A Program order B 16 RQT6683 Indicates program mode CDs Program play By remote control only This function allows you to program up to 24 tracks. 1 Press [CD 2/ J] and then [L CLEAR]. 2 Press [PGM]. 3 Press [DISC]. 4 (within the current track. • During program play...

SAPM16 User Guide
Page 19
... broadcast (Beat proof function) By remote control onlyly Press and hold [PLAY MODE] while recording. Ensure CD is stopped. 2 Press [[/ J REC] to make recordings. If the tape finishes before the CD The CD continues playing. Press [STOP L, -DEMO] to stop recording Press [STOP L, -DEMO]. A STOP , DEMO 2 REC B SLEEP CLOCK PLAY AUTO OFF TIMER REC DISC 123 4 5 6 789 PLAY MODE PGM 0 10 CD CLEAR TUNER/ TAPE BAND AUX VOL MUTING VOL REW FF S.SOUND EQ PRESET EQ DISPLAY DIMMER PLAY MODE C STOP , DEMO 2 REC A Recording from the radio Preparation: Do the preparatory...
... broadcast (Beat proof function) By remote control onlyly Press and hold [PLAY MODE] while recording. Ensure CD is stopped. 2 Press [[/ J REC] to make recordings. If the tape finishes before the CD The CD continues playing. Press [STOP L, -DEMO] to stop recording Press [STOP L, -DEMO]. A STOP , DEMO 2 REC B SLEEP CLOCK PLAY AUTO OFF TIMER REC DISC 123 4 5 6 789 PLAY MODE PGM 0 10 CD CLEAR TUNER/ TAPE BAND AUX VOL MUTING VOL REW FF S.SOUND EQ PRESET EQ DISPLAY DIMMER PLAY MODE C STOP , DEMO 2 REC A Recording from the radio Preparation: Do the preparatory...
SAPM16 User Guide
Page 20
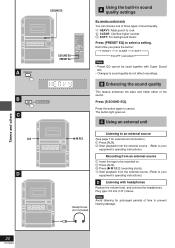
.... Plug type: 3.5 mm (1/8˝) stereo. Timers and others 20 RQT6683 Listening operations S.SOUND EQ A PRESET EQ S.SOUND EQ PRESET EQ SLEEP CLOCK PLAY AUTO OFF TIMER REC DISC 123 456 789 PLAY MODE PGM 0 10 CD CLEAR TUNER/ TAPE BAND AUX VOL MUTING VOL REW FF S.SOUND EQ PRESET EQ DISPLAY DIMMER B S.SOUND EQ C A Using the built-in sound quality settings By remote control only You can choose one of three types of the sound. Each time you press the button...
.... Plug type: 3.5 mm (1/8˝) stereo. Timers and others 20 RQT6683 Listening operations S.SOUND EQ A PRESET EQ S.SOUND EQ PRESET EQ SLEEP CLOCK PLAY AUTO OFF TIMER REC DISC 123 456 789 PLAY MODE PGM 0 10 CD CLEAR TUNER/ TAPE BAND AUX VOL MUTING VOL REW FF S.SOUND EQ PRESET EQ DISPLAY DIMMER B S.SOUND EQ C A Using the built-in sound quality settings By remote control only You can choose one of three types of the sound. Each time you press the button...
SAPM16 User Guide
Page 21
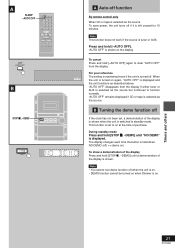
... and hold [STOP L, -DEMO] until "NO DEMO" is turned on the display. Listening operations A SLEEP AUTO OFF SLEEP CLOCK PLAY AUTO OFF TIMER REC DISC 1 2 3 456 789 PLAY MODE PGM 0 10 CD CLEAR TUNER/ TAPE BAND AUX VOL MUTING VOL REW FF S.SOUND EQ PRESET EQ DISPLAY DIMMER SLEEP AUTO OFF B STOP , DEMO STOP DEMO A Auto-off function By remote control only When CD or tape is selected as the source To save power, the unit turns off if it is tuner or AUX. NO DEMO (off) ↔ (demo...
... and hold [STOP L, -DEMO] until "NO DEMO" is turned on the display. Listening operations A SLEEP AUTO OFF SLEEP CLOCK PLAY AUTO OFF TIMER REC DISC 1 2 3 456 789 PLAY MODE PGM 0 10 CD CLEAR TUNER/ TAPE BAND AUX VOL MUTING VOL REW FF S.SOUND EQ PRESET EQ DISPLAY DIMMER SLEEP AUTO OFF B STOP , DEMO STOP DEMO A Auto-off function By remote control only When CD or tape is selected as the source To save power, the unit turns off if it is tuner or AUX. NO DEMO (off) ↔ (demo...

SAPM16 User Guide
Page 22
... AUX VOL MUTING VOL REW FF S.SOUND EQ PRESET EQ DISPLAY DIMMER 2 4 3 1 2 CLOCK/ TIMER Listening operations 3 REW FF Timers and others 4 CLOCK/ TIMER B MUTING SLEEP CLOCK PLAY AUTO OFF TIMER REC DISC 1 2 3 456 789 PLAY MODE PGM 0 10 CD CLEAR TUNER/ TAPE BAND AUX VOL MUTING VOL REW FF S.SOUND EQ PRESET EQ DISPLAY DIMMER DIMMER B DIMMER C MUTING 22 RQT6683 A Setting the time By remote control only This is convenient when you have a telephone call, etc. The time is turned...
... AUX VOL MUTING VOL REW FF S.SOUND EQ PRESET EQ DISPLAY DIMMER 2 4 3 1 2 CLOCK/ TIMER Listening operations 3 REW FF Timers and others 4 CLOCK/ TIMER B MUTING SLEEP CLOCK PLAY AUTO OFF TIMER REC DISC 1 2 3 456 789 PLAY MODE PGM 0 10 CD CLEAR TUNER/ TAPE BAND AUX VOL MUTING VOL REW FF S.SOUND EQ PRESET EQ DISPLAY DIMMER DIMMER B DIMMER C MUTING 22 RQT6683 A Setting the time By remote control only This is convenient when you have a telephone call, etc. The time is turned...
SAPM16 User Guide
Page 23
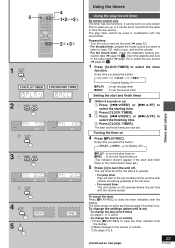
... [CLOCK / TIMER]. 5 SLEEP CLOCK PLAY AUTO OFF TIMER REC DISC 123 456 789 PLAY MODE PGM 0 10 CD CLEAR TUNER/ TAPE BAND AUX VOL MUTING VOL REW FF S.SOUND EQ PRESET EQ DISPLAY DIMMER 4 1 22 32 21 31 1 CLOCK/ TIMER FOR PLAY TIMER FOR RECORD TIMER 2 REW FF CLOCK/ TIMER 3 REW FF CLOCK/ TIMER 4 PLAY/ REC 5 Using the timers Listening operations Using the play /record times Do steps 1, 2, 3, and 5. 1• To change the play /record timer By remote control only The timer has two functions. The play timer, prepare the music source you press the button: CLOCK PLAY...
... [CLOCK / TIMER]. 5 SLEEP CLOCK PLAY AUTO OFF TIMER REC DISC 123 456 789 PLAY MODE PGM 0 10 CD CLEAR TUNER/ TAPE BAND AUX VOL MUTING VOL REW FF S.SOUND EQ PRESET EQ DISPLAY DIMMER 4 1 22 32 21 31 1 CLOCK/ TIMER FOR PLAY TIMER FOR RECORD TIMER 2 REW FF CLOCK/ TIMER 3 REW FF CLOCK/ TIMER 4 PLAY/ REC 5 Using the timers Listening operations Using the play /record times Do steps 1, 2, 3, and 5. 1• To change the play /record timer By remote control only The timer has two functions. The play timer, prepare the music source you press the button: CLOCK PLAY...

SAPM16 User Guide
Page 24
... [CLOCK/TIMER] twice. Listening operations A SLEEP CLOCK PLAY AUTO OFF TIMER REC DISC 123 456 789 PLAY MODE PGM 0 10 CD CLEAR TUNER/ TAPE BAND AUX VOL MUTING VOL REW FF S.SOUND EQ PRESET EQ DISPLAY DIMMER PLAY/ REC CLOCK/ TIMER B SLEEP AUTO OFF SLEEP CLOCK PLAY AUTO OFF TIMER REC DISC 123 456 789 PLAY MODE PGM 0 10 CD CLEAR TUNER/ TAPE BAND AUX VOL MUTING VOL REW FF S.SOUND EQ PRESET EQ DISPLAY DIMMER SLEEP AUTO OFF Timers and others 24 RQT6683 Using the timers A Using the play/record timer By remote control...
... [CLOCK/TIMER] twice. Listening operations A SLEEP CLOCK PLAY AUTO OFF TIMER REC DISC 123 456 789 PLAY MODE PGM 0 10 CD CLEAR TUNER/ TAPE BAND AUX VOL MUTING VOL REW FF S.SOUND EQ PRESET EQ DISPLAY DIMMER PLAY/ REC CLOCK/ TIMER B SLEEP AUTO OFF SLEEP CLOCK PLAY AUTO OFF TIMER REC DISC 123 456 789 PLAY MODE PGM 0 10 CD CLEAR TUNER/ TAPE BAND AUX VOL MUTING VOL REW FF S.SOUND EQ PRESET EQ DISPLAY DIMMER SLEEP AUTO OFF Timers and others 24 RQT6683 Using the timers A Using the play/record timer By remote control...

SAPM16 User Guide
Page 25
... (www.panasonic.ca), or an authorized Servicentre closest to you are incorrect. Turn the volume up. "ERROR" is a television set from one speaker only. You plugged the AC power supply cord in temperature. When there is displayed. Using the cassette deck Poor quality sound. CD-RW cannot be defective. Replace the disc. Check that the batteries are inserted correctly. 5 Replace the batteries if they are shown as black circled numbers 6. Reference...
... (www.panasonic.ca), or an authorized Servicentre closest to you are incorrect. Turn the volume up. "ERROR" is a television set from one speaker only. You plugged the AC power supply cord in temperature. When there is displayed. Using the cassette deck Poor quality sound. CD-RW cannot be defective. Replace the disc. Check that the batteries are inserted correctly. 5 Replace the batteries if they are shown as black circled numbers 6. Reference...

SAPM16 User Guide
Page 26
..., alteration, faulty installation, set-up adjustments, misadjustment of the product, service by the warrantor. Listening operations Warranty (ONLY FOR U.S.A.) Panasonic Consumer Electronics Company, Division of Matsushita Electric Corporation of America One Panasonic Way Secaucus, New Jersey 07094 Panasonic Sales Company, Division of Matsushita Electric of the original purchase date is not handled to your product with new or refurbished parts, or (b) replace it with a new or a refurbished...
..., alteration, faulty installation, set-up adjustments, misadjustment of the product, service by the warrantor. Listening operations Warranty (ONLY FOR U.S.A.) Panasonic Consumer Electronics Company, Division of Matsushita Electric Corporation of America One Panasonic Way Secaucus, New Jersey 07094 Panasonic Sales Company, Division of Matsushita Electric of the original purchase date is not handled to your product with new or refurbished parts, or (b) replace it with a new or a refurbished...

SAPM16 User Guide
Page 28
... these operating instructions. Replacement parts-When parts need replacing ensure the servicer uses parts specified by qualified service personnel if: (a) The AC power supply cord or AC adaptor has been damaged; Customer Care Centre at 1-800-211-7262, or e-mail consumerproducts@panasonic.com, or web site (http://www.panasonic.com). Servicing-Do not attempt to service the unit beyond that described in fire, electric shock, or other servicing to turn the...
... these operating instructions. Replacement parts-When parts need replacing ensure the servicer uses parts specified by qualified service personnel if: (a) The AC power supply cord or AC adaptor has been damaged; Customer Care Centre at 1-800-211-7262, or e-mail consumerproducts@panasonic.com, or web site (http://www.panasonic.com). Servicing-Do not attempt to service the unit beyond that described in fire, electric shock, or other servicing to turn the...


