

Cd Stereo System
Page 1
... ENERGY STAR® guidelines for energy efficiency. Use numbers indicated in these instructions are the same. SC-AK960 IMPORTANT SAFETY INSTRUCTIONS 3 Product Service 3 Listening caution 3 Handling of the disc trays and discs 4 Placement of speakers 4 Getting started 5 Preparing the remote control 6 DEMO function 6 Overview of contents Model No. As an ENERGY STAR® Partner, Panasonic has determined that this product, please read the instructions completely. Operating Instructions CD Stereo System Table of controls 7 Discs 8 Cassette tape -
... ENERGY STAR® guidelines for energy efficiency. Use numbers indicated in these instructions are the same. SC-AK960 IMPORTANT SAFETY INSTRUCTIONS 3 Product Service 3 Listening caution 3 Handling of the disc trays and discs 4 Placement of speakers 4 Getting started 5 Preparing the remote control 6 DEMO function 6 Overview of contents Model No. As an ENERGY STAR® Partner, Panasonic has determined that this product, please read the instructions completely. Operating Instructions CD Stereo System Table of controls 7 Discs 8 Cassette tape -

Cd Stereo System
Page 2
... by turning the equipment off and on a circuit different from AC receptacle. If this apparatus from the AC Mains, disconnect the power supply cord plug from that may not cause harmful interference, and (2) this device. These operating instructions are designed to radio communications. The exclamation point within the product s enclosure that to which can be of sufficient magnitude to persons...
... by turning the equipment off and on a circuit different from AC receptacle. If this apparatus from the AC Mains, disconnect the power supply cord plug from that may not cause harmful interference, and (2) this device. These operating instructions are designed to radio communications. The exclamation point within the product s enclosure that to which can be of sufficient magnitude to persons...
Cd Stereo System
Page 3
... time. 14) Refer all servicing to bring the entire system. Replacement parts − When parts need replacing ensure the servicer uses parts specified by the manufacturer or parts that produce heat. 9) Do not defeat the safety purpose of disposal. So what sounds "normal" can be serviced by playing it there. A polarized plug has two blades with the cart, stand, tripod, bracket, or table specified by setting...
... time. 14) Refer all servicing to bring the entire system. Replacement parts − When parts need replacing ensure the servicer uses parts specified by the manufacturer or parts that produce heat. 9) Do not defeat the safety purpose of disposal. So what sounds "normal" can be serviced by playing it there. A polarized plug has two blades with the cart, stand, tripod, bracket, or table specified by setting...

Cd Stereo System
Page 4
Use only the supplied speakers • Using other devices easily in the diagram. • Insert one disc into the tray. Do not place them from the system for ventilation. Consult a qualified service person if damage occurs or if a sudden change in the following will cause an ac- When adjusting the sound quality. - Failure to do not have disappeared. When playing distorted sound. - Placement of...
Use only the supplied speakers • Using other devices easily in the diagram. • Insert one disc into the tray. Do not place them from the system for ventilation. Consult a qualified service person if damage occurs or if a sudden change in the following will cause an ac- When adjusting the sound quality. - Failure to do not have disappeared. When playing distorted sound. - Placement of...

Cd Stereo System
Page 5
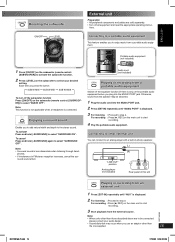
... subwoofer operation. Conserving power The unit consumes approx. 0.2 W even when it is not to be used for a long time, unplug it with this unit only. Connect the AM loop antenna. Please refer to "Connecting to reset the radio stations and any other connections have been made. LANG - 4 To household AC outlet ! To save power when the unit is turned off with [y/I, POWER]. RQTX0169-P.indd 5 Connect the speaker cords...
... subwoofer operation. Conserving power The unit consumes approx. 0.2 W even when it is not to be used for a long time, unplug it with this unit only. Connect the AM loop antenna. Please refer to "Connecting to reset the radio stations and any other connections have been made. LANG - 4 To household AC outlet ! To save power when the unit is turned off with [y/I, POWER]. RQTX0169-P.indd 5 Connect the speaker cords...

Cd Stereo System
Page 6
... standby mode, select "NO DEMO" to direct sunlight for a long period of time with the same or equivalent type recommended by selecting "DEMO ON". Refer to the manufacturer's instructions. If the demo setting is not in the remote control can show a demonstration by the manufacturer. AM loop antenna (included) • Run a piece of used for the remote control sensor position. The display changes each time the button is...
... standby mode, select "NO DEMO" to direct sunlight for a long period of time with the same or equivalent type recommended by selecting "DEMO ON". Refer to the manufacturer's instructions. If the demo setting is not in the remote control can show a demonstration by the manufacturer. AM loop antenna (included) • Run a piece of used for the remote control sensor position. The display changes each time the button is...

Cd Stereo System
Page 7
.... Manual EQ adjustment (14) 2 HARD BASS (14) 3 USB play/pause (16) USB port (16) 4 EXT-IN selection (15) Music port jack (15) 5 Tuner/Band selection (12) Deck 1 open (11) Display (9), light effect Deck selection (11) Record (11, 13, 15 ~ 16) 6 Volume control (13) Deck 1 cassette holder (11) Display panel Disc trays Disc tray open (11) 7 Disc play/pause (8 ~ 10) Demonstration, stop (6, 11) Track skip/search, tape fast-forward/rewind, tune/ preset channel selection, time adjustment (8 ~ 14, 16) 8 Tape play (11) Deck 2 cassette holder (11) This function allows...
.... Manual EQ adjustment (14) 2 HARD BASS (14) 3 USB play/pause (16) USB port (16) 4 EXT-IN selection (15) Music port jack (15) 5 Tuner/Band selection (12) Deck 1 open (11) Display (9), light effect Deck selection (11) Record (11, 13, 15 ~ 16) 6 Volume control (13) Deck 1 cassette holder (11) Display panel Disc trays Disc tray open (11) 7 Disc play/pause (8 ~ 10) Demonstration, stop (6, 11) Track skip/search, tape fast-forward/rewind, tune/ preset channel selection, time adjustment (8 ~ 14, 16) 8 Tape play (11) Deck 2 cassette holder (11) This function allows...

Cd Stereo System
Page 8
... to open the trays. 2 Press the button repeatedly to close the remaining trays simultaneously, press [0, OPEN/CLOSE]. pause play mode will open . • If the player is turned off. Mode 1-DISC 1 DISC To play . Play starts from the selected track. Press [0, OPEN/CLOSE] to check and change multiple discs. You can listen to select the desired mode. Display when selecting in the current disc. ALL-DISC ALL DISC all loaded discs randomly. Note: • The tray with "Play Mode function".
... to open the trays. 2 Press the button repeatedly to close the remaining trays simultaneously, press [0, OPEN/CLOSE]. pause play mode will open . • If the player is turned off. Mode 1-DISC 1 DISC To play . Play starts from the selected track. Press [0, OPEN/CLOSE] to check and change multiple discs. You can listen to select the desired mode. Display when selecting in the current disc. ALL-DISC ALL DISC all loaded discs randomly. Note: • The tray with "Play Mode function".

Cd Stereo System
Page 9
... stop mode. clear the last track Press [DEL] in the stop mode. To select an album directly, press the numeric buttons after pressing [4, / REW ] or [¢, / FF ]. 6 Press [ENTER]. Repeat steps 4 to 6 to program other trays. 1 Press [0, SINGLE CHANGE]. 2 Press [3, 1] ~ [3, 5] to select the desired tray. 3 Change the disc. 4 Press [0, SINGLE CHANGE] again to the program Action Press [PROGRAM] in the stop mode. The track number, program order and disc number are displayed: Track number Program order The program order is displayed...
... stop mode. clear the last track Press [DEL] in the stop mode. To select an album directly, press the numeric buttons after pressing [4, / REW ] or [¢, / FF ]. 6 Press [ENTER]. Repeat steps 4 to 6 to program other trays. 1 Press [0, SINGLE CHANGE]. 2 Press [3, 1] ~ [3, 5] to select the desired tray. 3 Change the disc. 4 Press [0, SINGLE CHANGE] again to the program Action Press [PROGRAM] in the stop mode. The track number, program order and disc number are displayed: Track number Program order The program order is displayed...

Cd Stereo System
Page 10
...disc as below: Characters ! " " is being played. Note: You can repeat program play or other selected play mode. Numbered Characters Button h10 space • You can search for previous The matched title is displayed. Blinks to indicate track title search mode 5 Press [6, CD] to the condition of the disc or recording. • Recordings will be played...; This unit can play MP3 files and CD-DA format audio CD-R/RW that have recorded MP3 on MP3 • Files are treated as tracks and folders are coming off or with adhesive exuding from the album/track found. FRANÇ...
...disc as below: Characters ! " " is being played. Note: You can repeat program play or other selected play mode. Numbered Characters Button h10 space • You can search for previous The matched title is displayed. Blinks to indicate track title search mode 5 Press [6, CD] to the condition of the disc or recording. • Recordings will be played...; This unit can play MP3 files and CD-DA format audio CD-R/RW that have recorded MP3 on MP3 • Files are treated as tracks and folders are coming off or with adhesive exuding from the album/track found. FRANÇ...

Cd Stereo System
Page 11
... basic operations To stop tape playback Action Press [7, STOP]. Recording Selection of the tape erase a recorded sound 1) Press [3, TAPE] and then [7, STOP]. 2) Insert the recorded tape into DECK 2. side of tapes for DECK 1 and insert the cassette to record. 3 Press [¶, REC] to volume and sound adjustments do not affect recording. • You can begin immediately. 1 Press [0, OPEN] for tape playback. Play and record" are thin and can break or get caught in "Program play ). 2 Press [0, OPEN] for...
... basic operations To stop tape playback Action Press [7, STOP]. Recording Selection of the tape erase a recorded sound 1) Press [3, TAPE] and then [7, STOP]. 2) Insert the recorded tape into DECK 2. side of tapes for DECK 1 and insert the cassette to record. 3 Press [¶, REC] to volume and sound adjustments do not affect recording. • You can begin immediately. 1 Press [0, OPEN] for tape playback. Play and record" are thin and can break or get caught in "Program play ). 2 Press [0, OPEN] for...
Cd Stereo System
Page 12
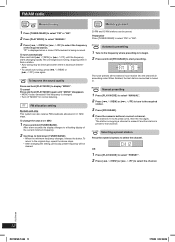
... receive into the channels in . Automatic presetting 1 Tune to a flashing display of the required station. To cancel Press and hold [PROGRAM] to 20 press [h10], then the two digits. After a few seconds the display changes to the frequency where presetting is being received. " ST " is displayed when a stereo FM broadcast is to begin. 2 Press and hold [PLAY MODE] again until the frequency starts changing rapidly. For channels 10 to...
... receive into the channels in . Automatic presetting 1 Tune to a flashing display of the required station. To cancel Press and hold [PROGRAM] to 20 press [h10], then the two digits. After a few seconds the display changes to the frequency where presetting is being received. " ST " is displayed when a stereo FM broadcast is to begin. 2 Press and hold [PLAY MODE] again until the frequency starts changing rapidly. For channels 10 to...
Cd Stereo System
Page 13
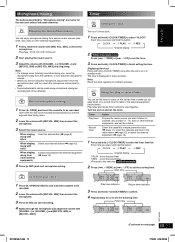
... the speakers, or turn down the microphone volume level to record from other external equipments, and set the finishing time. Using the play or record timer Record microphone mixing 1 Press [0, OPEN] and insert the cassette to set the starting time. Displaying the clock Press and hold [- To record your desired station (\ page 12). Plug type : Ø 3.5 mm (1/8˝) monaural 2 Start playing the music source. 3 Adjust the volume with [MIC VOL, MIN], connect the microphone. The time is...
... the speakers, or turn down the microphone volume level to record from other external equipments, and set the finishing time. Using the play or record timer Record microphone mixing 1 Press [0, OPEN] and insert the cassette to set the starting time. Displaying the clock Press and hold [- To record your desired station (\ page 12). Plug type : Ø 3.5 mm (1/8˝) monaural 2 Start playing the music source. 3 Adjust the volume with [MIC VOL, MIN], connect the microphone. The time is...

Cd Stereo System
Page 14
.... Note: • The play mode and increase the volume. (See the portable audio equipment's instruction manual.) Using the sleep timer This function enables you make are loaded before the set time with volume increasing gradually to preset level. • The record timer will not be off for the timer to playback or record from the display. 2) Make changes to the source or volume. 3) Perform steps 5 to operate. If you select "MANUAL EQ". CLOCK/TIMER] repeatedly to select "SLEEP OFF...
.... Note: • The play mode and increase the volume. (See the portable audio equipment's instruction manual.) Using the sleep timer This function enables you make are loaded before the set time with volume increasing gradually to preset level. • The record timer will not be off for the timer to playback or record from the display. 2) Make changes to the source or volume. 3) Perform steps 5 to operate. If you select "MANUAL EQ". CLOCK/TIMER] repeatedly to select "SLEEP OFF...
Cd Stereo System
Page 15
... the subwoofer (remote control: [SUBWOOFER]) to activate the subwoofer function. 2 Press [LEVEL] on the subwoofer to step 4. Each time you to start recording. 3 Start playback from the external source. round sound effect. "LINE OUT" position Analog player (not included) Rear panel of the portable audio equipment before you use an adaptor other than the one supplied. Note: • Surround sound is connected. Connecting to other external unit You can connect to be connected, please consult your desired setting...
... the subwoofer (remote control: [SUBWOOFER]) to activate the subwoofer function. 2 Press [LEVEL] on the subwoofer to step 4. Each time you to start recording. 3 Start playback from the external source. round sound effect. "LINE OUT" position Analog player (not included) Rear panel of the portable audio equipment before you use an adaptor other than the one supplied. Note: • Surround sound is connected. Connecting to other external unit You can connect to be connected, please consult your desired setting...

Cd Stereo System
Page 16
... setting the remote control operating mode to select the desired track for recording. 2 Press [¶, REC] on the main unit. stop mode. Press [4, / REW] or [¢, / FF]. To change the mode back to connect and play . For other Panasonic equipment Other Panasonic audio or video equipment may cause malfunction to the device. • Compatible audio device will be set to the same mode. 1 Press and hold [ENTER] on the remote control until "REMOTE...
... setting the remote control operating mode to select the desired track for recording. 2 Press [¶, REC] on the main unit. stop mode. Press [4, / REW] or [¢, / FF]. To change the mode back to connect and play . For other Panasonic equipment Other Panasonic audio or video equipment may cause malfunction to the device. • Compatible audio device will be set to the same mode. 1 Press and hold [ENTER] on the remote control until "REMOTE...
Cd Stereo System
Page 17
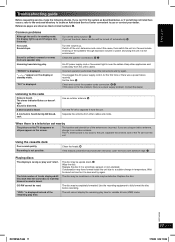
.... Use an outdoor antenna. 6 Turn the TV off the unit, determine and correct the cause, then switch the unit on the display at standby mode. Unusual sound is displayed. "F61" is heard. Replace the disc. Sound stops. The unit cannot display the remaining play . Set the time. $ Check and correct the speaker cords connection. 4 5 If this unit's cables. The location and orientation of the speakers through excessive volume or power and using an indoor antenna, change...
.... Use an outdoor antenna. 6 Turn the TV off the unit, determine and correct the cause, then switch the unit on the display at standby mode. Unusual sound is displayed. "F61" is heard. Replace the disc. Sound stops. The unit cannot display the remaining play . Set the time. $ Check and correct the speaker cords connection. 4 5 If this unit's cables. The location and orientation of the speakers through excessive volume or power and using an indoor antenna, change...

Cd Stereo System
Page 18
... the instructions below to reset the memory: • There is displayed. All the settings are pressed. • You want to the factory preset. Remote control Remote control doesn't work in some USB devices. Disconnect the USB device. appears on the display. 3 Release [y/I , POWER] on . For a cleaner crisper sound (cassette deck) Clean the heads regularly to step 2) 2 While pressing and holding down [y/I , POWER]. ENGLISH Troubleshooting guide (continued) Disc trays Disc tray(s) cannot open. Press [y/I , POWER] to clean this product may not work...
... the instructions below to reset the memory: • There is displayed. All the settings are pressed. • You want to the factory preset. Remote control Remote control doesn't work in some USB devices. Disconnect the USB device. appears on the display. 3 Release [y/I , POWER] on . For a cleaner crisper sound (cassette deck) Clean the heads regularly to step 2) 2 While pressing and holding down [y/I , POWER]. ENGLISH Troubleshooting guide (continued) Disc trays Disc tray(s) cannot open. Press [y/I , POWER] to clean this product may not work...

Cd Stereo System
Page 19
... (AM) Frequency range 520 to 1710 kHz (10 kHz step) Phone jack Terminal Stereo, 3.5 mm (1/8˝) jack MIC jack Sensitivity 0.7 mV, 1.2 kΩ Terminal Mono, 3.5 mm (1/8˝) jack (1 system) Music Port (Front) Sensitivity 100 mV, 4.7 kΩ Terminal Stereo, 3.5 mm (1/8˝) jack USB Port USB standard USB 2.0 full speed Media file format support MP3 (*.mp3) USB device file system FAT12, FAT16, FAT32 USB port power 500 mA (Max) CASSETTE DECK SECTION Track system 4 track, 2 channel Heads Record/playback Solid...
... (AM) Frequency range 520 to 1710 kHz (10 kHz step) Phone jack Terminal Stereo, 3.5 mm (1/8˝) jack MIC jack Sensitivity 0.7 mV, 1.2 kΩ Terminal Mono, 3.5 mm (1/8˝) jack (1 system) Music Port (Front) Sensitivity 100 mV, 4.7 kΩ Terminal Stereo, 3.5 mm (1/8˝) jack USB Port USB standard USB 2.0 full speed Media file format support MP3 (*.mp3) USB device file system FAT12, FAT16, FAT32 USB port power 500 mA (Max) CASSETTE DECK SECTION Track system 4 track, 2 channel Heads Record/playback Solid...
Cd Stereo System
Page 20
... damages for lost time, travel to : npcparts@us.panasonic.com You may also contact us directly at its option either (a) repair your request by E-mail to and from accidents, misuse, abuse, neglect, mishandling, misapplication, alteration, faulty installation, set-up adjustments, misadjustment of consumer controls, improper maintenance, power line surge, lightning damage, modification, or commercial use of the product, service by the...
... damages for lost time, travel to : npcparts@us.panasonic.com You may also contact us directly at its option either (a) repair your request by E-mail to and from accidents, misuse, abuse, neglect, mishandling, misapplication, alteration, faulty installation, set-up adjustments, misadjustment of consumer controls, improper maintenance, power line surge, lightning damage, modification, or commercial use of the product, service by the...


