
SAAK200 User Guide
Page 2
... of use 5 Connections 6 Basic connections (for supplied accessories 6 Optional antenna connections 7 External unit connection 7 Front panel controls 8 Turning the demo function off 10 Convenient functions 10 Auto-off function 11 Setting the time 11 Radio operations Listening to radio broadcasts 12 Presetting radio broadcasts 13 Compact disc operations About compact discs 14 Listening to compact discs 15 Playing MP3 (SC-AK500 and SC-AK490 only 15 Program play 17 To listen to specific CDs and tracks (CD Play Mode function 18 Direct access play 19 Repeat play 19 CD display 19...
... of use 5 Connections 6 Basic connections (for supplied accessories 6 Optional antenna connections 7 External unit connection 7 Front panel controls 8 Turning the demo function off 10 Convenient functions 10 Auto-off function 11 Setting the time 11 Radio operations Listening to radio broadcasts 12 Presetting radio broadcasts 13 Compact disc operations About compact discs 14 Listening to compact discs 15 Playing MP3 (SC-AK500 and SC-AK490 only 15 Program play 17 To listen to specific CDs and tracks (CD Play Mode function 18 Direct access play 19 Repeat play 19 CD display 19...
SAAK200 User Guide
Page 3
... settings 24 Enhancing the sound quality 24 Timer operations Using the timer 25 Using the play/record timer 25 Using the sleep timer 27 Reference Using an external unit 27 Troubleshooting guide 28 Servicenter List (ONLY FOR U.S.A 29 Warranty (ONLY FOR U.S.A 30 Specifications 31 Maintenance Back Cover Product Service Back Cover THE FOLLOWING APPLIES ONLY IN THE U.S.A.: CAUTION: This equipment has been tested and found to radio communications. ceiver. ¡Connect...
... settings 24 Enhancing the sound quality 24 Timer operations Using the timer 25 Using the play/record timer 25 Using the sleep timer 27 Reference Using an external unit 27 Troubleshooting guide 28 Servicenter List (ONLY FOR U.S.A 29 Warranty (ONLY FOR U.S.A 30 Specifications 31 Maintenance Back Cover Product Service Back Cover THE FOLLOWING APPLIES ONLY IN THE U.S.A.: CAUTION: This equipment has been tested and found to radio communications. ceiver. ¡Connect...
SAAK200 User Guide
Page 4
... operating instructions handy for the grounding electrode. Move carts with carts and stands recommended by items placed on or against voltage surges and built-up an outdoor antenna that it is in wire to grounding electrodes, and requirements for future reference. Environment 1. Replacement parts -When parts need replacing ensure the servicer uses parts specified by qualified service personnel if: (a) The AC power supply cord or the plug...
... operating instructions handy for the grounding electrode. Move carts with carts and stands recommended by items placed on or against voltage surges and built-up an outdoor antenna that it is in wire to grounding electrodes, and requirements for future reference. Environment 1. Replacement parts -When parts need replacing ensure the servicer uses parts specified by qualified service personnel if: (a) The AC power supply cord or the plug...
SAAK200 User Guide
Page 6
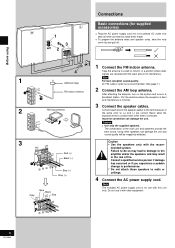
... 1 Connect the FM indoor antenna. Connect each other equipment. 6 RQT6085 Consult a qualified service person if damage has occurred or if you experience a sudden change in a broadcast station. Tape the antenna to the terminal lever of the same color so (+) and (-) are received with the least amount of interference. Caution • Use only the supplied speakers. After attaching the antenna, turn on the system and tune...
... 1 Connect the FM indoor antenna. Connect each other equipment. 6 RQT6085 Consult a qualified service person if damage has occurred or if you experience a sudden change in a broadcast station. Tape the antenna to the terminal lever of the same color so (+) and (-) are received with the least amount of interference. Caution • Use only the supplied speakers. After attaching the antenna, turn on the system and tune...
SAAK200 User Guide
Page 8
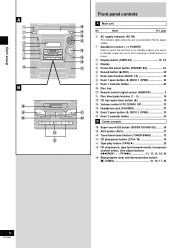
... standby mode or vice versa. Tape play /pause button (CD :/ J 16 . Before using A B 18 19 20 SUPER SOUND EQ AUX TUNER/BAND TAPE CD 21 22 REW DEMO FF 24 23 Front panel controls A Main unit No. Disc tray 11 Remote control signal sensor (SENSOR 5 # Disc direct play buttons (1 ~ 5 16 $ CD tray open/close button (c 16 % Volume control (VOL DOWN, UP 12 & Headphone jack (PHONES 27 ( Deck 2 open button (c DECK 1 OPEN 20 9 Deck 1 cassette holder 20 ! CD play button (TAPE 20 / CD skip/search, tape fast-forward/rewind, tune/preset channel select, time adjust buttons (g/REW...
... standby mode or vice versa. Tape play /pause button (CD :/ J 16 . Before using A B 18 19 20 SUPER SOUND EQ AUX TUNER/BAND TAPE CD 21 22 REW DEMO FF 24 23 Front panel controls A Main unit No. Disc tray 11 Remote control signal sensor (SENSOR 5 # Disc direct play buttons (1 ~ 5 16 $ CD tray open/close button (c 16 % Volume control (VOL DOWN, UP 12 & Headphone jack (PHONES 27 ( Deck 2 open button (c DECK 1 OPEN 20 9 Deck 1 cassette holder 20 ! CD play button (TAPE 20 / CD skip/search, tape fast-forward/rewind, tune/preset channel select, time adjust buttons (g/REW...
SAAK200 User Guide
Page 9
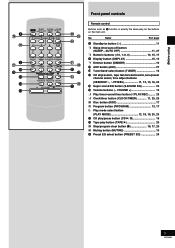
... @ Disc button (DISC 17 [ Program button (PROGRAM 13, 17 \ Play mode select button (PLAY MODE 12, 18, 19, 20, 23 - page 2 Standby/on the main unit. No. VOLUME 12 > Play timer/record timer button (rPLAY/REC) ......... 25 ? Before using 2 25 26 3 27 19 20 23 18 14 SLEEP CLOCK PLAY AUTO OFF TIMER REC 1 2 3 DISC 4 5 6 10 7 8 9 0 DISPLAY DIMMER PLAY MODE PROGRAM AUX TUNER TAPE CD REW FF S.SOUND EQ PRESET EQ MUTING VOLUME 28 29 30 31 32 21 22 33 34 5 Front panel controls Remote control Buttons...
... @ Disc button (DISC 17 [ Program button (PROGRAM 13, 17 \ Play mode select button (PLAY MODE 12, 18, 19, 20, 23 - page 2 Standby/on the main unit. No. VOLUME 12 > Play timer/record timer button (rPLAY/REC) ......... 25 ? Before using 2 25 26 3 27 19 20 23 18 14 SLEEP CLOCK PLAY AUTO OFF TIMER REC 1 2 3 DISC 4 5 6 10 7 8 9 0 DISPLAY DIMMER PLAY MODE PROGRAM AUX TUNER TAPE CD REW FF S.SOUND EQ PRESET EQ MUTING VOLUME 28 29 30 31 32 21 22 33 34 5 Front panel controls Remote control Buttons...
SAAK200 User Guide
Page 10
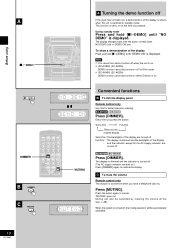
... button again to standby mode. NO DEMO (off . (The AC supply indicator remains on . Convenient functions B To dim the display panel Remote control only Use this for the AC supply indicator, are turned off. Muting can also be cancelled by lowering the volume all the way (--dB). This function is set , a demonstration of purchase. SC-AK490 SC-AK200 Press [DIMMER]. The display changes each time the button is turned...
... button again to standby mode. NO DEMO (off . (The AC supply indicator remains on . Convenient functions B To dim the display panel Remote control only Use this for the AC supply indicator, are turned off. Muting can also be cancelled by lowering the volume all the way (--dB). This function is set , a demonstration of purchase. SC-AK490 SC-AK200 Press [DIMMER]. The display changes each time the button is turned...
SAAK200 User Guide
Page 12
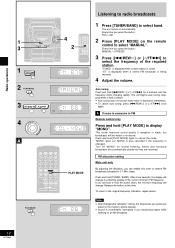
... tuner to select "MANUAL". "ST" is displayed when a stereo FM broadcast is changed. Auto tuning Press and hold [PLAY MODE] again to select the frequency of the current minimum FM frequency. Stereo and monaural broadcasts are automatically played as they are received. Every time you previously preset in FM Remote control only Press and hold [PLAY MODE] to an AM broadcast. MONO is also cancelled if the frequency is being received. 4 Adjust the volume...
... tuner to select "MANUAL". "ST" is displayed when a stereo FM broadcast is changed. Auto tuning Press and hold [PLAY MODE] again to select the frequency of the current minimum FM frequency. Stereo and monaural broadcasts are automatically played as they are received. Every time you previously preset in FM Remote control only Press and hold [PLAY MODE] to an AM broadcast. MONO is also cancelled if the frequency is being received. 4 Adjust the volume...
SAAK200 User Guide
Page 14
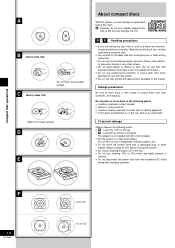
... directly exposed to clean CDs Do not touch the recorded surface. Do not set it on top of the sort can only play compact discs having this mark. The adapter is opening/closing, or when loaded. D E About compact discs With this system. • Do not use record cleaning sprays, benzine, thinner, static electric- Do not place or store discs in the tray. • Do not use irregular shaped CDs...
... directly exposed to clean CDs Do not touch the recorded surface. Do not set it on top of the sort can only play compact discs having this mark. The adapter is opening/closing, or when loaded. D E About compact discs With this system. • Do not use record cleaning sprays, benzine, thinner, static electric- Do not place or store discs in the tray. • Do not use irregular shaped CDs...
SAAK200 User Guide
Page 15
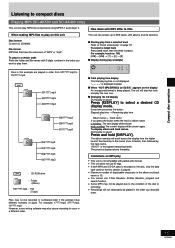
... folder and file names with 3-digits numbers in the order you press the button when the track or album name is scrolling: The next display will be recorded in numbered order if the prefixes have the extension of displayable characters in this unit This unit can play or pause Press and hold [DISPLAY]. → Compact disc operations Listening to compact discs Playing MP3 (SC-AK500 and SC...
... folder and file names with 3-digits numbers in the order you press the button when the track or album name is scrolling: The next display will be recorded in numbered order if the prefixes have the extension of displayable characters in this unit This unit can play or pause Press and hold [DISPLAY]. → Compact disc operations Listening to compact discs Playing MP3 (SC-AK500 and SC...
SAAK200 User Guide
Page 16
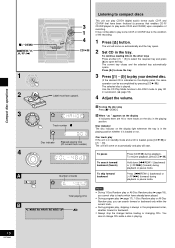
... tray opens. 2 Set CD in the playing position. To pause To search forward/ backward (Search) To skip forward/ backward Press [CD :/ J] during playback or pause mode. You cannot change CDs while a disc is played. Compact disc operations 3 1 4 DEMO 1 1 5 2 43 2 Label must face upward. 3 1 5 2 43 Track number Disc indicator Elapsed playing time (Of current track number) 4 DOWN VOL UP A Number of tracks Total playing time B Listening to compact discs This unit can play CD-DA (digital audio) format audio CD-R and CD-RW that have already been played...
... tray opens. 2 Set CD in the playing position. To pause To search forward/ backward (Search) To skip forward/ backward Press [CD :/ J] during playback or pause mode. You cannot change CDs while a disc is played. Compact disc operations 3 1 4 DEMO 1 1 5 2 43 2 Label must face upward. 3 1 5 2 43 Track number Disc indicator Elapsed playing time (Of current track number) 4 DOWN VOL UP A Number of tracks Total playing time B Listening to compact discs This unit can play CD-DA (digital audio) format audio CD-R and CD-RW that have already been played...
SAAK200 User Guide
Page 18
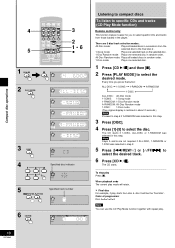
... playback ends The current play starts from those loaded in the player. Final disc For example, if play mode will be the "final disc". 4 5 1 2 Compact disc operations 3 DISC 4 5 6 18 RQT6085 3 2 1 • 6 Specified disc indicator Specified track number Listening to compact discs To listen to specific CDs and tracks (CD Play Mode function) Remote control only This function makes it easier for you press the button: ALL-DISC 1-SONG 1-RANDOM A-RANDOM 1-DISC ALL-DISC: All-Disc mode 1-SONG: 1-Song mode 1-RANDOM: 1-Disc Random mode A-RANDOM: All-Disc Random mode 1-DISC: 1-Disc mode...
... playback ends The current play starts from those loaded in the player. Final disc For example, if play mode will be the "final disc". 4 5 1 2 Compact disc operations 3 DISC 4 5 6 18 RQT6085 3 2 1 • 6 Specified disc indicator Specified track number Listening to compact discs To listen to specific CDs and tracks (CD Play Mode function) Remote control only This function makes it easier for you press the button: ALL-DISC 1-SONG 1-RANDOM A-RANDOM 1-DISC ALL-DISC: All-Disc mode 1-SONG: 1-Song mode 1-RANDOM: 1-Disc Random mode A-RANDOM: All-Disc Random mode 1-DISC: 1-Disc mode...

SAAK200 User Guide
Page 19
.... To cancel repeat play time of the disc. To repeat your favorite tracks 1. Playback will be played from the selected track to the last track of the current track. The CD will start. Press and hold [PLAY MODE] and make sure "REPEAT ON" and " " are displayed. Program the tracks you to display the remaining play Press and hold [PLAY MODE] before or during playback, and make sure "REPEAT ON" and " " are displayed. 2 3 1 2 3 A B DISPLAY DISPLAY Compact disc operations Listening to compact discs Direct access play Remote control only 1 1 Press [DISC]. 2 (within 10...
.... To cancel repeat play time of the disc. To repeat your favorite tracks 1. Playback will be played from the selected track to the last track of the current track. The CD will start. Press and hold [PLAY MODE] and make sure "REPEAT ON" and " " are displayed. Program the tracks you to display the remaining play Press and hold [PLAY MODE] before or during playback, and make sure "REPEAT ON" and " " are displayed. 2 3 1 2 3 A B DISPLAY DISPLAY Compact disc operations Listening to compact discs Direct access play Remote control only 1 1 Press [DISC]. 2 (within 10...
SAAK200 User Guide
Page 20
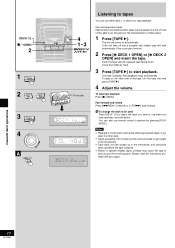
... characteristics of the tape, turn the tape over and press [TAPE :]. 4 Adjust the volume. Cassette deck operations 20 RQT6085 DECK 1/2 DEMO 2 1 TAPE 2 DECK 1 OPEN DECK 2 OPEN 3 TAPE 4 DOWN VOL UP A DECK 1/2 4 1 • 3 Front side Listening to tapes You can use remote control to perform by hand. 3 Press [TAPE :] to start automatically (One touch play on automatically. To play function). 2 Press [c DECK 1 OPEN] or [c DECK 2 OPEN] and insert the tape. Use normal position tapes. The unit will...
... characteristics of the tape, turn the tape over and press [TAPE :]. 4 Adjust the volume. Cassette deck operations 20 RQT6085 DECK 1/2 DEMO 2 1 TAPE 2 DECK 1 OPEN DECK 2 OPEN 3 TAPE 4 DOWN VOL UP A DECK 1/2 4 1 • 3 Front side Listening to tapes You can use remote control to perform by hand. 3 Press [TAPE :] to start automatically (One touch play on automatically. To play function). 2 Press [c DECK 1 OPEN] or [c DECK 2 OPEN] and insert the tape. Use normal position tapes. The unit will...
SAAK200 User Guide
Page 22
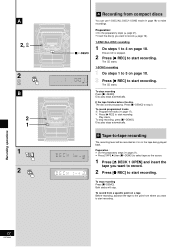
... [c DECK 1 OPEN] and insert the tape you want to -tape recording The recording level will stop recording, press [L/-DEMO]. B Tape-to start recording. Preparation : • Do the preparatory steps (z page 21). • Press [TAPE :] then [L/-DEMO] to make recordings. To record from a specific point on a tape Before recording, advance the tape to the point from compact discs You can use 1-DISC/ALL-DISC/1-SONG mode (z page 18) to select tape as it . Disc play stops automatically. Play starts. To stop . Preparation...
... [c DECK 1 OPEN] and insert the tape you want to -tape recording The recording level will stop recording, press [L/-DEMO]. B Tape-to start recording. Preparation : • Do the preparatory steps (z page 21). • Press [TAPE :] then [L/-DEMO] to make recordings. To record from a specific point on a tape Before recording, advance the tape to the point from compact discs You can use 1-DISC/ALL-DISC/1-SONG mode (z page 18) to select tape as it . Disc play stops automatically. Play starts. To stop . Preparation...
SAAK200 User Guide
Page 25
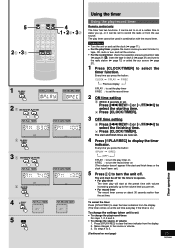
... turn the play timer on rREC : to turn the unit off for the timers to operate. • For play timer The timer play /record times Do steps 1, 2, 3 and 5. • To change the play will start and finish times are now set. 4 Press [rPLAY/REC] to clear the timer indicators from the display. 2. The unit must be used in deck 2 (A page 21) and tune to the radio station (A page 12) or select the aux...
... turn the play timer on rREC : to turn the unit off for the timers to operate. • For play timer The timer play /record times Do steps 1, 2, 3 and 5. • To change the play will start and finish times are now set. 4 Press [rPLAY/REC] to clear the timer indicators from the display. 2. The unit must be used in deck 2 (A page 21) and tune to the radio station (A page 12) or select the aux...
SAAK200 User Guide
Page 26
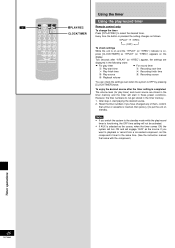
...; If AUX is on, press [CLOCK/TIMER] so "rPLAY" (or "rREC") appears on standby. If you switch the system to the standby mode while the play /record timer Remote control only To change the timer Press [rPLAY/REC] to the same time. (See the instruction manual that a Disc or cassette is OFF by pressing [CLOCK/TIMER] twice. Notes • If you want to playback or record from a connected component, set the component's timer to...
...; If AUX is on, press [CLOCK/TIMER] so "rPLAY" (or "rREC") appears on standby. If you switch the system to the standby mode while the play /record timer Remote control only To change the timer Press [rPLAY/REC] to the same time. (See the instruction manual that a Disc or cassette is OFF by pressing [CLOCK/TIMER] twice. Notes • If you want to playback or record from a connected component, set the component's timer to...
SAAK200 User Guide
Page 28
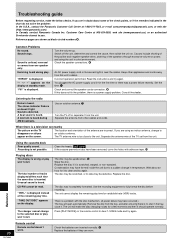
... the tray, close to you are incorrect. Switch off or separate it is a power supply problem. Read the instructions and try again. Check and correct the speaker cords connection. 6 If this unit's cables. CD-RW cannot be upside down. ( Wipe the disc. The changer cannot change to clear 1-SONG mode and try again. Press [PLAY MODE] on the remote control to an outdoor antenna. Check the batteries are inserted correctly. 5 Replace the batteries...
... the tray, close to you are incorrect. Switch off or separate it is a power supply problem. Read the instructions and try again. Check and correct the speaker cords connection. 6 If this unit's cables. CD-RW cannot be upside down. ( Wipe the disc. The changer cannot change to clear 1-SONG mode and try again. Press [PLAY MODE] on the remote control to an outdoor antenna. Check the batteries are inserted correctly. 5 Replace the batteries...
SAAK200 User Guide
Page 30
USB READER-WRITER, PERSONAL COMPUTER CARD ADAPTERS- (when applicable)-exchange defective unit with new or refurbished parts or equivalent product, free of consumer controls, improper operation or maintenance, improper antenna, inadequate signal reception or pick-up adjustments, maladjustment of charge in materials and workmanship which vary from the date of original purchase will repair or replace this product develops during or after the warranty period, you...
USB READER-WRITER, PERSONAL COMPUTER CARD ADAPTERS- (when applicable)-exchange defective unit with new or refurbished parts or equivalent product, free of consumer controls, improper operation or maintenance, improper antenna, inadequate signal reception or pick-up adjustments, maladjustment of charge in materials and workmanship which vary from the date of original purchase will repair or replace this product develops during or after the warranty period, you...
SAAK200 User Guide
Page 32
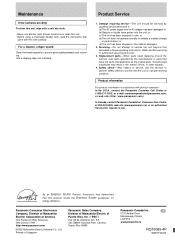
... this unit. • Before using a chemically treated cloth, read the instructions that came with product operation: In the U.S.A., contact the Panasonic Customer Call Center at 905-624-5505, web site (www.panasonic.ca), or an authorized Servicentre closest to you. Replacement parts -When parts need replacing ensure the servicer uses parts specified by qualified service personnel if: (a)The AC power supply cord or AC adaptor has been damaged; In...
... this unit. • Before using a chemically treated cloth, read the instructions that came with product operation: In the U.S.A., contact the Panasonic Customer Call Center at 905-624-5505, web site (www.panasonic.ca), or an authorized Servicentre closest to you. Replacement parts -When parts need replacing ensure the servicer uses parts specified by qualified service personnel if: (a)The AC power supply cord or AC adaptor has been damaged; In...


