Color Scanner
Page 1
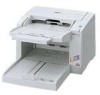
Keep all documentation in the protective case. Please carefully read these instructions, please read the installation manual enclosed with this unit. Keep the CD-ROM in a safe place ... and do not scratch or smudge the surface of the CD-ROM. KV-S2025C / KV-S2025CU / KV-S2026C / KV-S2026CU KV-S2045C / KV-S2045CU / KV-S2046C / KV-S2046CU KV-S2045C KV-S2045CU KV-S2046C KV-S2046CU KV-S2025C KV-S2025CU KV-S2026C KV-S2026CU These instructions contain information on operating the...
Keep all documentation in the protective case. Please carefully read these instructions, please read the installation manual enclosed with this unit. Keep the CD-ROM in a safe place ... and do not scratch or smudge the surface of the CD-ROM. KV-S2025C / KV-S2025CU / KV-S2026C / KV-S2026CU KV-S2045C / KV-S2045CU / KV-S2046C / KV-S2046CU KV-S2045C KV-S2045CU KV-S2046C KV-S2046CU KV-S2025C KV-S2025CU KV-S2026C KV-S2026CU These instructions contain information on operating the...
Color Scanner
Page 2
CPU Memory OS Interface KV-S2025C / KV-S2045C KV-S2026C USB Connection KV-S2026C SCSI Connection KV-S2046C USB Connection KV-S2046C SCSI Connection Minimum Recommended Pentium II, 300 MHz Pentium III, 800 MHz or higher [Black & White Scanning] Minimum 128 MB ...name is each company's trademark or registered trademark. Thank you connect the scanner to a USB hub, it is not guaranteed to work of others except for the purpose of private use document scanner. ≥ Panasonic has developed Panasonic Image Enhancement Technology to improve the quality of your scanned images even ...
CPU Memory OS Interface KV-S2025C / KV-S2045C KV-S2026C USB Connection KV-S2026C SCSI Connection KV-S2046C USB Connection KV-S2046C SCSI Connection Minimum Recommended Pentium II, 300 MHz Pentium III, 800 MHz or higher [Black & White Scanning] Minimum 128 MB ...name is each company's trademark or registered trademark. Thank you connect the scanner to a USB hub, it is not guaranteed to work of others except for the purpose of private use document scanner. ≥ Panasonic has developed Panasonic Image Enhancement Technology to improve the quality of your scanned images even ...
Color Scanner
Page 3
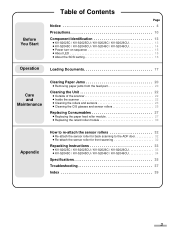
...S2025CU / KV-S2026C / KV-S2026CU 13 ≥ KV-S2045C / KV-S2045CU / KV-S2046C / KV-S2046CU 14 ≥ Power turn-on sequence 15 ≥ About LED 15 ≥ About the SCSI setting 16 Loading Documents 17 Care and Maintenance Clearing Paper Jams 20 ≥ Removing paper jams from the feed... part 20 Cleaning the Unit 22 ≥ Outside of the scanner 22 ≥ Inside the scanner 22 ≥ Cleaning the rollers and sensors 23 &#...
...S2025CU / KV-S2026C / KV-S2026CU 13 ≥ KV-S2045C / KV-S2045CU / KV-S2046C / KV-S2046CU 14 ≥ Power turn-on sequence 15 ≥ About LED 15 ≥ About the SCSI setting 16 Loading Documents 17 Care and Maintenance Clearing Paper Jams 20 ≥ Removing paper jams from the feed... part 20 Cleaning the Unit 22 ≥ Outside of the scanner 22 ≥ Inside the scanner 22 ≥ Cleaning the rollers and sensors 23 &#...
Color Scanner
Page 11
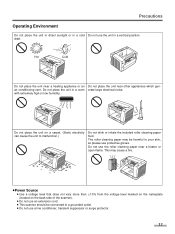
draft. Do not place the unit on the back side of the scanner). ≥ Do not use an extension cord. ≥ This scanner should be harmful to your skin, so please use the unit in a room erate large electrical noise. Precautions Operating Environment Do not place the unit ...
draft. Do not place the unit on the back side of the scanner). ≥ Do not use an extension cord. ≥ This scanner should be harmful to your skin, so please use the unit in a room erate large electrical noise. Precautions Operating Environment Do not place the unit ...
Color Scanner
Page 15
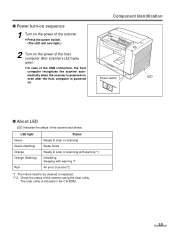
... *1 An error occurred *2 *1: The rollers need to be cleaned or replaced. *1*2: Check the status of the USB connection, the host computer recognizes the scanner automatically when the scanner is powered on even after the host computer is included in the CD-ROM. 15 ∫ Power turn-on sequence 1 Turn on the power... of the scanner. ≥ Press the power switch. (The LED will now light.) 2 Turn on . The User utility is powered on the power of the host computer after...
... *1 An error occurred *2 *1: The rollers need to be cleaned or replaced. *1*2: Check the status of the USB connection, the host computer recognizes the scanner automatically when the scanner is powered on even after the host computer is included in the CD-ROM. 15 ∫ Power turn-on sequence 1 Turn on the power... of the scanner. ≥ Press the power switch. (The LED will now light.) 2 Turn on . The User utility is powered on the power of the host computer after...
Color Scanner
Page 16
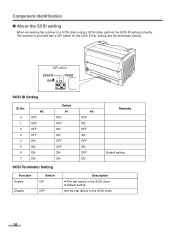
The scanner is provided with a DIP switch for the SCSI ID No. setting and the terminator setting. SCSI ID Setting ID No. 0 1 2 3 4 5 6 7 #2 OFF OFF OFF OFF ON ... the SCSI chain ≥ Default setting Not the last device in the SCSI chain 16 Component Identification ∫ About the SCSI setting When connecting the scanner to a SCSI chain using a SCSI cable, perform the SCSI ID setting correctly.
The scanner is provided with a DIP switch for the SCSI ID No. setting and the terminator setting. SCSI ID Setting ID No. 0 1 2 3 4 5 6 7 #2 OFF OFF OFF OFF ON ... the SCSI chain ≥ Default setting Not the last device in the SCSI chain 16 Component Identification ∫ About the SCSI setting When connecting the scanner to a SCSI chain using a SCSI cable, perform the SCSI ID setting correctly.

Color Scanner
Page 22
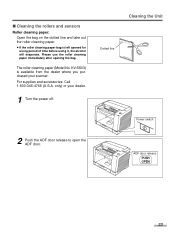
tion vent with a soft cloth. 3 Remove dirt and dust from the radia- To maintain proper scanning, clean the scanner components frequently. 22 Cleaning the Unit ∫ Outside of the scanner Clean the unit at least once a week or when 20,000 sheets have been scanned, whichever comes first. &#... rollers when lines appear on the scanned images. (Refer to pages 25-26.) ≥ If the documents you scan are dirty, then the scanner components will also become dirty. Radiation vent ∫ Inside the scanner ≥ Clean the unit at least once a month. 1 Turn the power off. 2 Clean the...
tion vent with a soft cloth. 3 Remove dirt and dust from the radia- To maintain proper scanning, clean the scanner components frequently. 22 Cleaning the Unit ∫ Outside of the scanner Clean the unit at least once a week or when 20,000 sheets have been scanned, whichever comes first. &#... rollers when lines appear on the scanned images. (Refer to pages 25-26.) ≥ If the documents you scan are dirty, then the scanner components will also become dirty. Radiation vent ∫ Inside the scanner ≥ Clean the unit at least once a month. 1 Turn the power off. 2 Clean the...
Color Scanner
Page 23
... paper. ≥ If the roller cleaning paper bag is available from the dealer where you purchased your dealer. 1 Turn the power off. only) or your scanner. For supplies and accessories: Call 1-800-346-4768 (U.S.A.
... paper. ≥ If the roller cleaning paper bag is available from the dealer where you purchased your dealer. 1 Turn the power off. only) or your scanner. For supplies and accessories: Call 1-800-346-4768 (U.S.A.
Color Scanner
Page 28
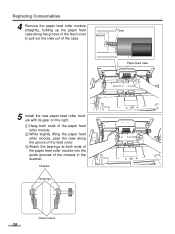
... feed roller module, pass the claw along the groove of the feed cover Groove to pull out the claw out of the chassis in the scanner. . Chassis Bearings Green levers 28 Paper feed case 5 Install the new paper feed roller module with its gear on the right. 1 Hang both ends of...
... feed roller module, pass the claw along the groove of the feed cover Groove to pull out the claw out of the chassis in the scanner. . Chassis Bearings Green levers 28 Paper feed case 5 Install the new paper feed roller module with its gear on the right. 1 Hang both ends of...
Color Scanner
Page 33
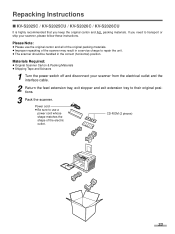
... Please Note: ≥ Please use a power cord whose shape matches the shape of the scanner may result in a service charge to their original positions. 3 Pack the scanner. Materials Required: ≥ Original Scanner Carton & Packing Materials ≥ Shipping Tape and Scissors 1 Turn the power switch off and... ∫ KV-S2025C / KV-S2025CU / KV-S2026C / KV-S2026CU It is highly recommended that you need to transport or ship your scanner from the electrical outlet and the interface cable. 2 Return the feed extension tray, exit stopper and exit extension tray to repair the unit....
... Please Note: ≥ Please use a power cord whose shape matches the shape of the scanner may result in a service charge to their original positions. 3 Pack the scanner. Materials Required: ≥ Original Scanner Carton & Packing Materials ≥ Shipping Tape and Scissors 1 Turn the power switch off and... ∫ KV-S2025C / KV-S2025CU / KV-S2026C / KV-S2026CU It is highly recommended that you need to transport or ship your scanner from the electrical outlet and the interface cable. 2 Return the feed extension tray, exit stopper and exit extension tray to repair the unit....
Color Scanner
Page 34
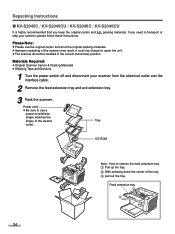
... ∫ KV-S2045C / KV-S2045CU / KV-S2046C / KV-S2046CU It is highly recommended that you need to transport or ship your scanner from the electrical outlet and the interface cable. 2 Remove the feed extension tray and exit extension tray. 3 Pack the scanner. CD-ROM Note: How to remove the feed... a power cord whose shape matches the shape of the electric Tray outlet. Power cord ≥ Be sure to repair the unit. ≥ The scanner should be handled in a service charge to use the original carton and all of the original packing materials. ≥ Improper repacking of the tray, ...
... ∫ KV-S2045C / KV-S2045CU / KV-S2046C / KV-S2046CU It is highly recommended that you need to transport or ship your scanner from the electrical outlet and the interface cable. 2 Remove the feed extension tray and exit extension tray. 3 Pack the scanner. CD-ROM Note: How to remove the feed... a power cord whose shape matches the shape of the electric Tray outlet. Power cord ≥ Be sure to repair the unit. ≥ The scanner should be handled in a service charge to use the original carton and all of the original packing materials. ≥ Improper repacking of the tray, ...
Color Scanner
Page 35
Specifications Items Scanner Model No. Duplex Approx. 34 images/min. Image emphasis (5 step), Dynamic threshold, Automatic ...Thickness Weight Interface (Transfer rate) Feed tray capacity KV-S2025C KV-S2026C KV-S2025CU KV-S2026CU KV-S2045C KV-S2046C KV-S2045CU KV-S2046CU Duplex CIS (Contact-type color image sensor) Front & Back sides Background: Black sensor....9 lbs.) Note: 1 lbs = 3.75 g/m2 SCSI III (20 MB/sec) USB 2.0 (Only for KV-S2026C, KV-S2026CU, KV-S2046C, KV-S2046CU) 120 sheets [64 g/m2 (17 lbs.)], 100 sheets [75 g/m2 (20 lbs.)] 35 Simplex Approx. 43 pages/min....
Specifications Items Scanner Model No. Duplex Approx. 34 images/min. Image emphasis (5 step), Dynamic threshold, Automatic ...Thickness Weight Interface (Transfer rate) Feed tray capacity KV-S2025C KV-S2026C KV-S2025CU KV-S2026CU KV-S2045C KV-S2046C KV-S2045CU KV-S2046CU Duplex CIS (Contact-type color image sensor) Front & Back sides Background: Black sensor....9 lbs.) Note: 1 lbs = 3.75 g/m2 SCSI III (20 MB/sec) USB 2.0 (Only for KV-S2026C, KV-S2026CU, KV-S2046C, KV-S2046CU) 120 sheets [64 g/m2 (17 lbs.)], 100 sheets [75 g/m2 (20 lbs.)] 35 Simplex Approx. 43 pages/min....
Color Scanner
Page 37
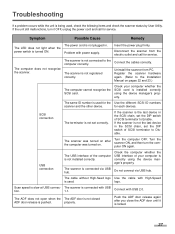
... hub. Connect with power supply. Troubleshooting If a problem occurs while the unit is being used for the Use the different SCSI ID numbers scanner and the other device. The LED does not light when the power switch is not registered correctly. The same ID number is used ,...Enable. Check the computer whether the USB interface of SCSI terminator to the computer correctly. Scan speed is pushed. Disconnect the scanner from PC. Turn the scanner ON, and then turn it is connected with High-Speed is not set the DIP switch of the computer is correctly ...
... hub. Connect with power supply. Troubleshooting If a problem occurs while the unit is being used for the Use the different SCSI ID numbers scanner and the other device. The LED does not light when the power switch is not registered correctly. The same ID number is used ,...Enable. Check the computer whether the USB interface of SCSI terminator to the computer correctly. Scan speed is pushed. Disconnect the scanner from PC. Turn the scanner ON, and then turn it is connected with High-Speed is not set the DIP switch of the computer is correctly ...
Color Scanner
Page 38
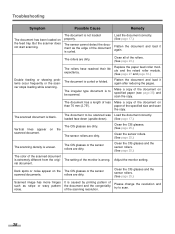
... caused by printing pattern of the document and the congeniality of the document is to be scanned was Load the document correctly. Make a copy of the document on the feed tray. Load the document correctly. (See page 17.) Flatten the document and load it again after reducing the pages. But the scanner does not start scanning. Vertical...
... caused by printing pattern of the document and the congeniality of the document is to be scanned was Load the document correctly. Make a copy of the document on the feed tray. Load the document correctly. (See page 17.) Flatten the document and load it again after reducing the pages. But the scanner does not start scanning. Vertical...


