
Vhs-c Camcorder
Page 1
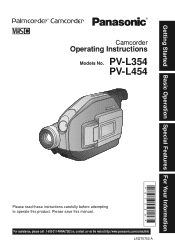
For assistance, please call : 1-800-211-PANA(7262) or, contact us via the web at:http://www.panasonic.com/contactinfo LSQT0753 A PV-L354 PV-L454 Please read these instructions carefully before attempting to operate this manual. Please save this product. Getting Started Basic Operation Special Features For Your Information Camcorder Operating Instructions Models No.
For assistance, please call : 1-800-211-PANA(7262) or, contact us via the web at:http://www.panasonic.com/contactinfo LSQT0753 A PV-L354 PV-L454 Please read these instructions carefully before attempting to operate this manual. Please save this product. Getting Started Basic Operation Special Features For Your Information Camcorder Operating Instructions Models No.
Vhs-c Camcorder
Page 2
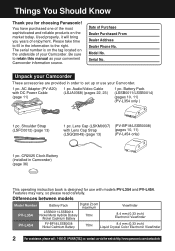
...and reliable products on the underside of your Camcorder. 1 pc. Please take time to fill in Camcorder) (page 36) This operating instruction book is on the tag located on the market today. The serial number is designed for choosing Panasonic! Lens Cap (LSKM0937) (PV-BP18/LSSB0008...) Liquid Crystal Color Electronic Viewfinder 2 For assistance, please call : 1-800-211-PANA(7262) or, contact us via the web at:http://www.panasonic.com/contactinfo Date of Purchase Dealer Purchased From Dealer Address Dealer Phone No. Battery Pack (LSSB0011/LSSB0014) (pages 10, 11) (PV-L354 only ...
...and reliable products on the underside of your Camcorder. 1 pc. Please take time to fill in Camcorder) (page 36) This operating instruction book is on the tag located on the market today. The serial number is designed for choosing Panasonic! Lens Cap (LSKM0937) (PV-BP18/LSSB0008...) Liquid Crystal Color Electronic Viewfinder 2 For assistance, please call : 1-800-211-PANA(7262) or, contact us via the web at:http://www.panasonic.com/contactinfo Date of Purchase Dealer Purchased From Dealer Address Dealer Phone No. Battery Pack (LSSB0011/LSSB0014) (pages 10, 11) (PV-L354 only ...
Vhs-c Camcorder
Page 3
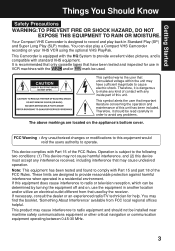
...FCC Rules. If this equipment does cause interference to operate. This product may cause undesired operation. This Camcorder is equipped with the HQ System to provide excellent video pictures, and is dangerous to this unit. ...' available from that have sufficient magnitude to avoid any inside part of the FCC Rules. Your Compact VHS Camcorder is recommended that only cassette tapes that used . Getting Started Things You Should Know Safety Precautions WARNING:TO... has been tested and found to record and play a Compact VHS Camcorder recording on , use in a residential environment.
...FCC Rules. If this equipment does cause interference to operate. This product may cause undesired operation. This Camcorder is equipped with the HQ System to provide excellent video pictures, and is dangerous to this unit. ...' available from that have sufficient magnitude to avoid any inside part of the FCC Rules. Your Compact VHS Camcorder is recommended that only cassette tapes that used . Getting Started Things You Should Know Safety Precautions WARNING:TO... has been tested and found to record and play a Compact VHS Camcorder recording on , use in a residential environment.
Vhs-c Camcorder
Page 5
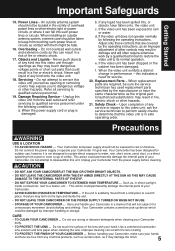
... storage. Do not overload wall outlets and extension cords as this indicates a need for outdoor use strong or abrasive detergents when cleaning your Camcorder from any kind onto the video unit. 18. If the video unit has been dropped or the cabinet has been damaged. Safety Check ... checks to unnecessary movement (avoid shaking and striking). If any kind into , or objects have the same characteristics as contact with your Camcorder if it is suddenly moved from touching such power lines or circuits as the original part. When the video unit exhibits a distinct change...
... storage. Do not overload wall outlets and extension cords as this indicates a need for outdoor use strong or abrasive detergents when cleaning your Camcorder from any kind onto the video unit. 18. If the video unit has been dropped or the cabinet has been damaged. Safety Check ... checks to unnecessary movement (avoid shaking and striking). If any kind into , or objects have the same characteristics as contact with your Camcorder if it is suddenly moved from touching such power lines or circuits as the original part. When the video unit exhibits a distinct change...
Vhs-c Camcorder
Page 7
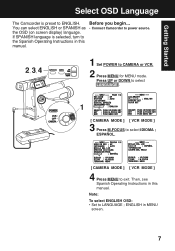
... 4 Press MENU to LANGUAGE ; Note: To select ENGLISH OSD: • Set to exit. ENGLISH in this manual. Before you begin... • Connect Camcorder to power source. 2, 3, 4 1 Set POWER to ENGLISH. You can select ENGLISH or SPANISH as the OSD (on screen display) language. Getting Started ...Select OSD Language The Camcorder is selected, turn to select IDIOMA ; Press UP or DOWN to select LANGUAGE . 1 [ CAMERA MODE ] [ VCR MODE ] 3 Press M.FOCUS to...
... 4 Press MENU to LANGUAGE ; Note: To select ENGLISH OSD: • Set to exit. ENGLISH in this manual. Before you begin... • Connect Camcorder to power source. 2, 3, 4 1 Set POWER to ENGLISH. You can select ENGLISH or SPANISH as the OSD (on screen display) language. Getting Started ...Select OSD Language The Camcorder is selected, turn to select IDIOMA ; Press UP or DOWN to select LANGUAGE . 1 [ CAMERA MODE ] [ VCR MODE ] 3 Press M.FOCUS to...
Vhs-c Camcorder
Page 8
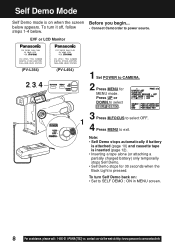
... EVF or LCD Monitor (PV-L354) 2, 3, 4 (PV-L454) 1 Set POWER to power source. below . To turn it off, follow • Connect Camcorder to CAMERA. 2 Press MENU for 30 seconds when the Back Light is pressed. Note: • Self Demo stops automatically if battery is attached (page 10... to exit. ON in MENU screen. 8 For assistance, please call : 1-800-211-PANA(7262) or, contact us via the web at:http://www.panasonic.com/contactinfo Self Demo Mode Self Demo mode is inserted (page 12). • Inserting a tape alone (or attaching a partially charged battery) only temporarily ...
... EVF or LCD Monitor (PV-L354) 2, 3, 4 (PV-L454) 1 Set POWER to power source. below . To turn it off, follow • Connect Camcorder to CAMERA. 2 Press MENU for 30 seconds when the Back Light is pressed. Note: • Self Demo stops automatically if battery is attached (page 10... to exit. ON in MENU screen. 8 For assistance, please call : 1-800-211-PANA(7262) or, contact us via the web at:http://www.panasonic.com/contactinfo Self Demo Mode Self Demo mode is inserted (page 12). • Inserting a tape alone (or attaching a partially charged battery) only temporarily ...

Vhs-c Camcorder
Page 10
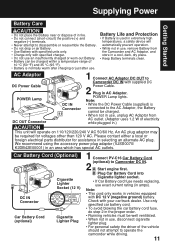
... 1 Plug in extremely high temperatures. 10 For assistance, please call : 1-800-211-PANA(7262) or, contact us via the web at:http://www.panasonic.com/contactinfo Note: • Charging takes about 40 minutes (PV-L354) or 1.5 hours (PV-L454) (LCD monitor on AC Adaptor (see steps ... to the left edge of AC Adaptor. If BATTERY REFRESH is used . Supplying Power • We recommend using Panasonic's Battery. • We cannot guarantee the quality of this Camcorder when batteries of other companies are used . • Battery will then start automatically. To use (LCD monitor off...
... 1 Plug in extremely high temperatures. 10 For assistance, please call : 1-800-211-PANA(7262) or, contact us via the web at:http://www.panasonic.com/contactinfo Note: • Charging takes about 40 minutes (PV-L354) or 1.5 hours (PV-L454) (LCD monitor on AC Adaptor (see steps ... to the left edge of AC Adaptor. If BATTERY REFRESH is used . Supplying Power • We recommend using Panasonic's Battery. • We cannot guarantee the quality of this Camcorder when batteries of other companies are used . • Battery will then start automatically. To use (LCD monitor off...
Vhs-c Camcorder
Page 11
... plug. B Plug Car Battery Cord into Cigarette lighter socket. • If Car Battery cord fuse needs replacing, use , unplug AC Adaptor from the Camcorder and AC Adaptor, and store in a cool, dark, dry place. • Keep Battery terminals clean. Battery Life and Protection • If Battery ... or just after use , disconnect cigarette lighter plug. • For personal safety the driver of the vehicle should not attempt to operate the camcorder while driving. 11 Note: • This cord only works in the proper order. • Running vehicles must be required for assistance in amps...
... plug. B Plug Car Battery Cord into Cigarette lighter socket. • If Car Battery cord fuse needs replacing, use , unplug AC Adaptor from the Camcorder and AC Adaptor, and store in a cool, dark, dry place. • Keep Battery terminals clean. Battery Life and Protection • If Battery ... or just after use , disconnect cigarette lighter plug. • For personal safety the driver of the vehicle should not attempt to operate the camcorder while driving. 11 Note: • This cord only works in the proper order. • Running vehicles must be required for assistance in amps...

Vhs-c Camcorder
Page 13
... Shoulder Strap Remove Battery Pack before completing the following steps: 1 Undo strap ends from the front clasp and thread the Strap through Strap Rings on Camcorder. 2 Remove the Sensor tag. Adjust the Length of the Shoulder Strap Pull a loop of strap from buckle, then pull strap tight to shorten or lengthen...
... Shoulder Strap Remove Battery Pack before completing the following steps: 1 Undo strap ends from the front clasp and thread the Strap through Strap Rings on Camcorder. 2 Remove the Sensor tag. Adjust the Length of the Shoulder Strap Pull a loop of strap from buckle, then pull strap tight to shorten or lengthen...
Vhs-c Camcorder
Page 14
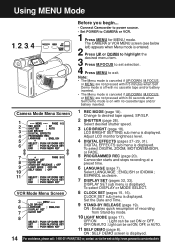
...Menu Screen 1 REC MODE (page 18). To select DIGITAL ZOOM, MOTIONSENSOR, or FADE. 7 8 5 PROGRAMMED REC (page 20). Camcorder starts and stops recording at :http://www.panasonic.com/contactinfo To select DISPLAY or MODE SELECT. Set the Date and Time. 9 STAND-BY RELEASE (page 19). ON : SELF ...FOCUS, or MENU are not pressed within 30 seconds when Self Demo mode is displayed. Using MENU Mode 1, 2, 3, 4 Before you begin... • Connect Camcorder to power source. • Set POWER to desired tape speed, SP/SLP. 1 2 SHUTTER (page 26). Change to CAMERA or VCR. 1 Press MENU...
...Menu Screen 1 REC MODE (page 18). To select DIGITAL ZOOM, MOTIONSENSOR, or FADE. 7 8 5 PROGRAMMED REC (page 20). Camcorder starts and stops recording at :http://www.panasonic.com/contactinfo To select DISPLAY or MODE SELECT. Set the Date and Time. 9 STAND-BY RELEASE (page 19). ON : SELF ...FOCUS, or MENU are not pressed within 30 seconds when Self Demo mode is displayed. Using MENU Mode 1, 2, 3, 4 Before you begin... • Connect Camcorder to power source. • Set POWER to desired tape speed, SP/SLP. 1 2 SHUTTER (page 26). Change to CAMERA or VCR. 1 Press MENU...
Vhs-c Camcorder
Page 15
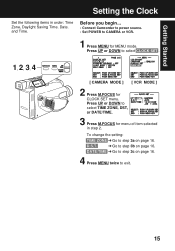
... SET menu. Getting Started Setting the Clock Set the following items in step 2. Press UP or DOWN to exit. 15 Before you begin... • Connect Camcorder to power source. • Set POWER to step 3a on page 16. To change the setting: TIME ZONE ➔ Go to CAMERA or VCR. 1 Press...
... SET menu. Getting Started Setting the Clock Set the following items in step 2. Press UP or DOWN to exit. 15 Before you begin... • Connect Camcorder to power source. • Set POWER to step 3a on page 16. To change the setting: TIME ZONE ➔ Go to CAMERA or VCR. 1 Press...

Vhs-c Camcorder
Page 16
The Camcorder is preset to local time. Note : • Clock may lose or gain up to DEC 31, 2099. ...FOCUS is pressed. 16 For assistance, please call : 1-800-211-PANA(7262) or, contact us via the web at:http://www.panasonic.com/contactinfo Note: • Auto DST does not function if time zone is set to select local time zone. Autumn (Last ...auto-adjust to confirm entry. Repeat for minute, month, day, and year. Setting the Clock 3a Setting the Time Zone The Camcorder is preset to Eastern time. [ Time Zone chart ] Press UP or DOWN to OFF by doing the following. Press M.FOCUS...
The Camcorder is preset to local time. Note : • Clock may lose or gain up to DEC 31, 2099. ...FOCUS is pressed. 16 For assistance, please call : 1-800-211-PANA(7262) or, contact us via the web at:http://www.panasonic.com/contactinfo Note: • Auto DST does not function if time zone is set to select local time zone. Autumn (Last ...auto-adjust to confirm entry. Repeat for minute, month, day, and year. Setting the Clock 3a Setting the Time Zone The Camcorder is preset to Eastern time. [ Time Zone chart ] Press UP or DOWN to OFF by doing the following. Press M.FOCUS...
Vhs-c Camcorder
Page 17
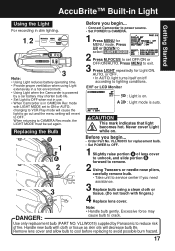
... force may shorten bulb life. • Set Light to OFF when not in use. • When Camcorder is in a hot environment. • Using Light when the Camcorder is powered by Panasonic to reduce risk of lens cover to unhook, and slide portion B forward to remove. 2 Using Tweezers or... needle-nose pliers, carefully remove bulb. • Take unit to service center if you begin ... • Connect Camcorder to power source. •...
... force may shorten bulb life. • Set Light to OFF when not in use. • When Camcorder is in a hot environment. • Using Light when the Camcorder is powered by Panasonic to reduce risk of lens cover to unhook, and slide portion B forward to remove. 2 Using Tweezers or... needle-nose pliers, carefully remove bulb. • Take unit to service center if you begin ... • Connect Camcorder to power source. •...
Vhs-c Camcorder
Page 18
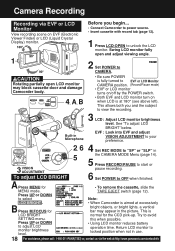
... the web at excessively B Press M.FOCUS for bright objects, or bright lights, a vertical bar may block cassette door and damage Camcorder body. 4, A, B • Be sure POWER is aimed at :http://www.panasonic.com/contactinfo EVF : Look into EVF and adjust VISION ADJUSTMENT to your preference. 2 6 4 , Set REC MODE to "SP" or "SLP...
... the web at excessively B Press M.FOCUS for bright objects, or bright lights, a vertical bar may block cassette door and damage Camcorder body. 4, A, B • Be sure POWER is aimed at :http://www.panasonic.com/contactinfo EVF : Look into EVF and adjust VISION ADJUSTMENT to your preference. 2 6 4 , Set REC MODE to "SP" or "SLP...

Vhs-c Camcorder
Page 19
... Press RECORD/PAUSE to exit. c To resume recording, set to OFF at the factory. 1 Set POWER to CAMERA. 2 Press MENU for 5 minutes, Camcorder switches to Stand-by Quick Release is set POWER to CAMERA. Stand-by mode to CAMERA. Press RECORD/ PAUSE to record. 4 Press MENU to resume... OFF, then to conserve battery. OFF : From Stand-by mode, set to resume recording. Basic Operation Camera Recording Before you begin... • Connect Camcorder to OFF and leave cassette in RECORD/PAUSE mode for MENU mode. b Press (PLAY/STILL) to CAMERA. C Set POWER to review recording. ON ...
... Press RECORD/PAUSE to exit. c To resume recording, set to OFF at the factory. 1 Set POWER to CAMERA. 2 Press MENU for 5 minutes, Camcorder switches to Stand-by Quick Release is set POWER to CAMERA. Stand-by mode to CAMERA. Press RECORD/ PAUSE to record. 4 Press MENU to resume... OFF, then to conserve battery. OFF : From Stand-by mode, set to resume recording. Basic Operation Camera Recording Before you begin... • Connect Camcorder to OFF and leave cassette in RECORD/PAUSE mode for MENU mode. b Press (PLAY/STILL) to CAMERA. C Set POWER to review recording. ON ...
Vhs-c Camcorder
Page 20
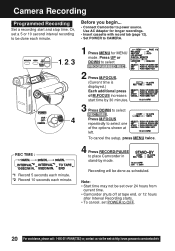
... . 2 Press M.FOCUS. (Current time is displayed.) Each additional press of the options shown at :http://www.panasonic.com/contactinfo To cancel the setup, press MENU twice. 4 Press RECORD/PAUSE to place Camcorder in stand-by 30 minutes. 3 Press DOWN to select one of M.FOCUS increases start and stop time. Before... CAMERA. Press M.FOCUS repeatedly to select REC TIME . Recording will be set over 24 hours from current time. • Camcorder shuts off at tape end, or 12 hours after Interval Recording starts. • To cancel, set a 5 or 10 second interval recording to OFF....
... . 2 Press M.FOCUS. (Current time is displayed.) Each additional press of the options shown at :http://www.panasonic.com/contactinfo To cancel the setup, press MENU twice. 4 Press RECORD/PAUSE to place Camcorder in stand-by 30 minutes. 3 Press DOWN to select one of M.FOCUS increases start and stop time. Before... CAMERA. Press M.FOCUS repeatedly to select REC TIME . Recording will be set over 24 hours from current time. • Camcorder shuts off at tape end, or 12 hours after Interval Recording starts. • To cancel, set a 5 or 10 second interval recording to OFF....
Vhs-c Camcorder
Page 21
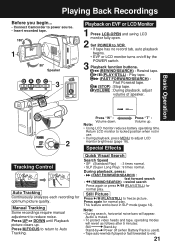
.../SEARCH) : Fast Forward tape. Note: • Using LCD monitor reduces battery operating time. A (REWIND/SEARCH) : Rewind tape. Playing Back Recordings Before you begin... • Connect Camcorder to power source. • Insert recorded tape. 1 Speaker 3 D A B C E Playback on EVF or LCD Monitor 1 Press LCD-OPEN and swing LCD monitor fully open. 2 Set POWER...
.../SEARCH) : Fast Forward tape. Note: • Using LCD monitor reduces battery operating time. A (REWIND/SEARCH) : Rewind tape. Playing Back Recordings Before you begin... • Connect Camcorder to power source. • Insert recorded tape. 1 Speaker 3 D A B C E Playback on EVF or LCD Monitor 1 Press LCD-OPEN and swing LCD monitor fully open. 2 Set POWER...
Vhs-c Camcorder
Page 22
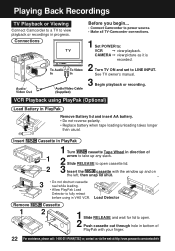
...(7262) or, contact us via the web at:http://www.panasonic.com/contactinfo See TV owner's manual. 3 Begin playback or recording. Connections Audio/ Video Out Before you begin... • Connect Camcorder to power source. • Make all TV-Camcorder connections. 1 Set POWER to LINE INPUT. CAMERA © ... it is recorded. 2 Turn TV ON and set to : VCR © view playback. VCR Playback using in VHS VCR. Playing Back Recordings TV Playback or Viewing Connect Camcorder to a TV to fully retract before using PlayPak (Optional) Load Battery in PlayPak Remove Battery lid and insert AA ...
...(7262) or, contact us via the web at:http://www.panasonic.com/contactinfo See TV owner's manual. 3 Begin playback or recording. Connections Audio/ Video Out Before you begin... • Connect Camcorder to power source. • Make all TV-Camcorder connections. 1 Set POWER to LINE INPUT. CAMERA © ... it is recorded. 2 Turn TV ON and set to : VCR © view playback. VCR Playback using in VHS VCR. Playing Back Recordings TV Playback or Viewing Connect Camcorder to a TV to fully retract before using PlayPak (Optional) Load Battery in PlayPak Remove Battery lid and insert AA ...
Vhs-c Camcorder
Page 23
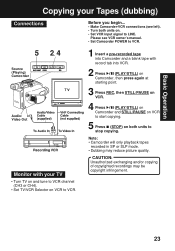
...reduce picture quality. Basic Operation Copying your Tapes (dubbing) Connections Before you begin... • Make Camcorder-VCR connections (see VCR owner's manual. • Set Camcorder POWER to VCR. 5 2, 4 Source (Playing) Camcorder Audio/ Video Out Monitor with your TV • Turn TV on and tune to VCR channel ...CH3 or CH4). • Set TV/VCR Selector on VCR to VCR. 1 Insert a pre-recorded tape into Camcorder and a blank tape with record tab into VCR. 2 Press (PLAY/STILL) on Camcorder, then press again at starting point. 3 Press REC, then STILL/PAUSE on VCR. 4 Press (PLAY/STILL...
...reduce picture quality. Basic Operation Copying your Tapes (dubbing) Connections Before you begin... • Make Camcorder-VCR connections (see VCR owner's manual. • Set Camcorder POWER to VCR. 5 2, 4 Source (Playing) Camcorder Audio/ Video Out Monitor with your TV • Turn TV on and tune to VCR channel ...CH3 or CH4). • Set TV/VCR Selector on VCR to VCR. 1 Insert a pre-recorded tape into Camcorder and a blank tape with record tab into VCR. 2 Press (PLAY/STILL) on Camcorder, then press again at starting point. 3 Press REC, then STILL/PAUSE on VCR. 4 Press (PLAY/STILL...
Vhs-c Camcorder
Page 24
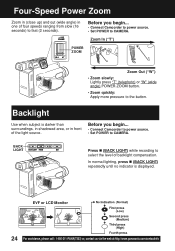
Before you begin ... • Connect Camcorder to power source. • Set POWER to CAMERA. Zoom In ("T") POWER ZOOM Zoom Out ("W") • Zoom slowly: Lightly press "T" (telephoto) or "W" (wide angle) POWER ZOOM ... seconds) to CAMERA. EVF or LCD Monitor 24 For assistance, please call : 1-800-211-PANA(7262) or, contact us via the web at:http://www.panasonic.com/contactinfo Four-Speed Power Zoom Zoom in (close up) and out (wide angle) in front of the light source. Backlight Use when subject is...
Before you begin ... • Connect Camcorder to power source. • Set POWER to CAMERA. Zoom In ("T") POWER ZOOM Zoom Out ("W") • Zoom slowly: Lightly press "T" (telephoto) or "W" (wide angle) POWER ZOOM ... seconds) to CAMERA. EVF or LCD Monitor 24 For assistance, please call : 1-800-211-PANA(7262) or, contact us via the web at:http://www.panasonic.com/contactinfo Four-Speed Power Zoom Zoom in (close up) and out (wide angle) in front of the light source. Backlight Use when subject is...

